This blog post may contain affiliate links. As an Amazon Associate I earn from qualifying purchases.
📋 Table of Contents
- Step 1 — Diagnose the Damage First
- The Tent Triage Framework: Assess Severity Before Fixing
- Repair vs. Replace: The Economic Threshold
- Before You Start — Tools and Materials You’ll Need
- Field Repair Kit: What to Carry on Every Trip
- Home Repair Kit: Full Toolkit for Permanent Fixes
- Step 2 — How to Repair Tent Fabric
- Choosing the Right Repair Tape: The Tape Compatibility Matrix
- What is the Best Patch for Tent Repair?
- Is Gorilla Tape Good for Tent Repair?
- How to Patch a Small Hole or Tear (Step-by-Step)
- How to Repair a Large Tear in a Tent
- Removing Gorilla Tape Residue After an Emergency Fix
- Step 3 — How to Fix a Broken Tent Pole
- How to Splint a Broken Tent Pole with a Repair Sleeve
- How to Replace a Tent Pole Shock Cord
- Aluminum vs. Fiberglass Poles: What Changes for Each Repair
- Step 4 — How to Repair a Tent Zipper
- Fix a Stuck or Sluggish Zipper Slider
- Realign Separated Zipper Teeth
- Replace a Broken or Missing Zipper Pull
- Step 5 — How to Repair Tent Mesh and Screens
- Patching Mesh Holes with Adhesive Mesh Tape (Step-by-Step)
- DIY Fix for Tiny Snags (No Patch Needed)
- Step 6 — Seal Seams and Restore Waterproofing
- How to Test Your Tent for Leaks Before Sealing
- Applying Seam Sealer: PU-Coated vs. Silicone (Silnylon) Tents
- How to Re-Apply DWR Coating to the Tent Fly
- Step 7 — Specialized Tent Repairs
- Repairing Canvas Tents: Sewing vs. Adhesive
- Fixing a Bent or Broken Pop-Up Tent Frame
- Tent Trailer Canvas: Patching and Maintenance
- Prevent Future Damage — Setup and Storage Tips
- Common Tent Repair Mistakes to Avoid
- Common Pitfalls
- When to Choose Alternatives
- When to Seek Expert Help
- Frequently Asked Questions
- Your Tent Has More Life Left Than You Think
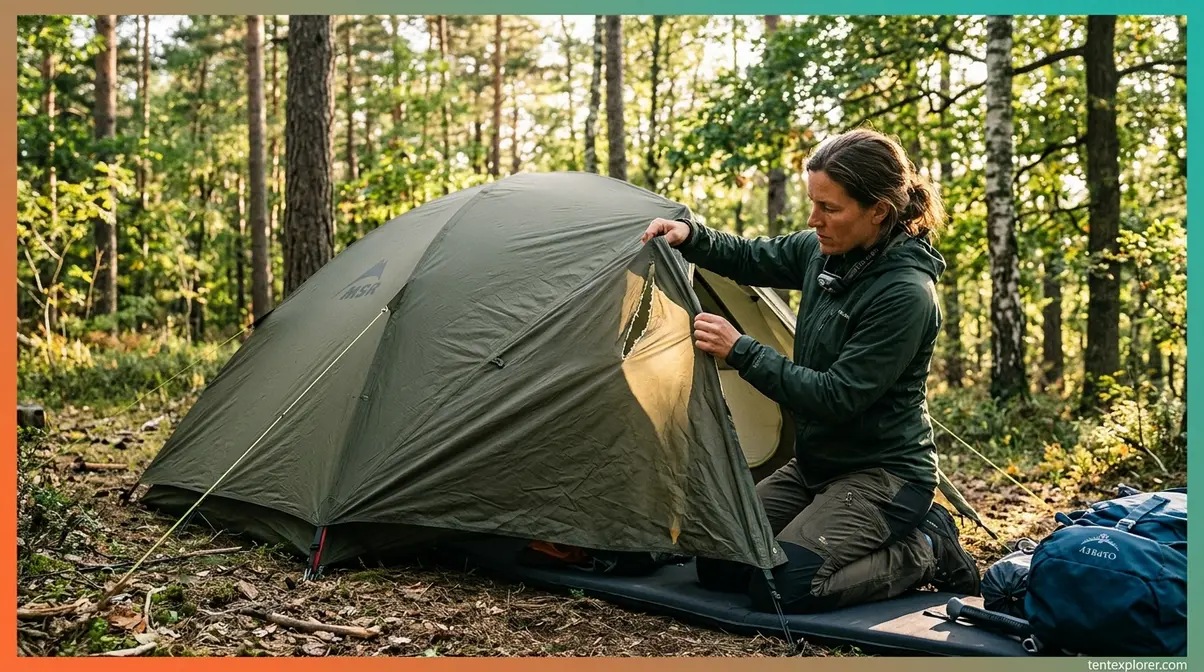
You’re at camp. It’s 6 p.m., rain is coming, and your tent fly has a gash the size of a banana. Or maybe you’re home, unrolling your tent after a season, and you find a snapped pole and a zipper that won’t close. Either way, the instinct is to reach for whatever’s closest — duct tape, super glue, a prayer. That instinct will cost you.
Knowing how to repair a tent correctly means understanding two things before you touch any adhesive: what material you’re dealing with, and how serious the damage actually is. Get those two things right and almost every common tent repair is straightforward. Get them wrong and you can permanently compromise the fabric, void a warranty, or leave yourself exposed in a storm.
This guide covers every common repair — fabric patches, pole splinting, zipper fixes, seam sealing, mesh patching, and DWR reproofing — using the Tent Triage Framework to help you diagnose damage before you reach for any product.
Knowing how to repair a tent correctly starts with the Tent Triage Framework: diagnose the damage type and material before applying any adhesive or patch.
- Material matters most: Silnylon requires silicone-based adhesives; PU-coated fabrics use urethane-based products. Using the wrong product means the repair will fail.
- Gorilla Tape is a field emergency tool only — it leaves adhesive residue and can damage coatings if left long-term; switch to Tenacious Tape or Tear-Aid for anything longer than 48 hours.
- Most repairs cost under $20 and take 30 minutes at home — far cheaper than a replacement tent that runs $150–$600+.
- The repair-vs.-replace threshold: If repair costs exceed 40% of replacement value, or structural poles are compromised beyond splinting, it’s time to retire the tent.
Step 1 — Diagnose the Damage First
The single biggest mistake campers make with tent repair is skipping this step entirely. They grab the nearest tape and slap it over a problem they haven’t actually understood. Experienced campers consistently report that a failed repair is almost always worse than no repair — it masks the real damage and makes a proper fix harder later.
The Tent Triage Framework: Assess Severity Before Fixing
The Tent Triage Framework is a four-question diagnostic system that routes you to the right repair before you open any kit. Run through it every time.
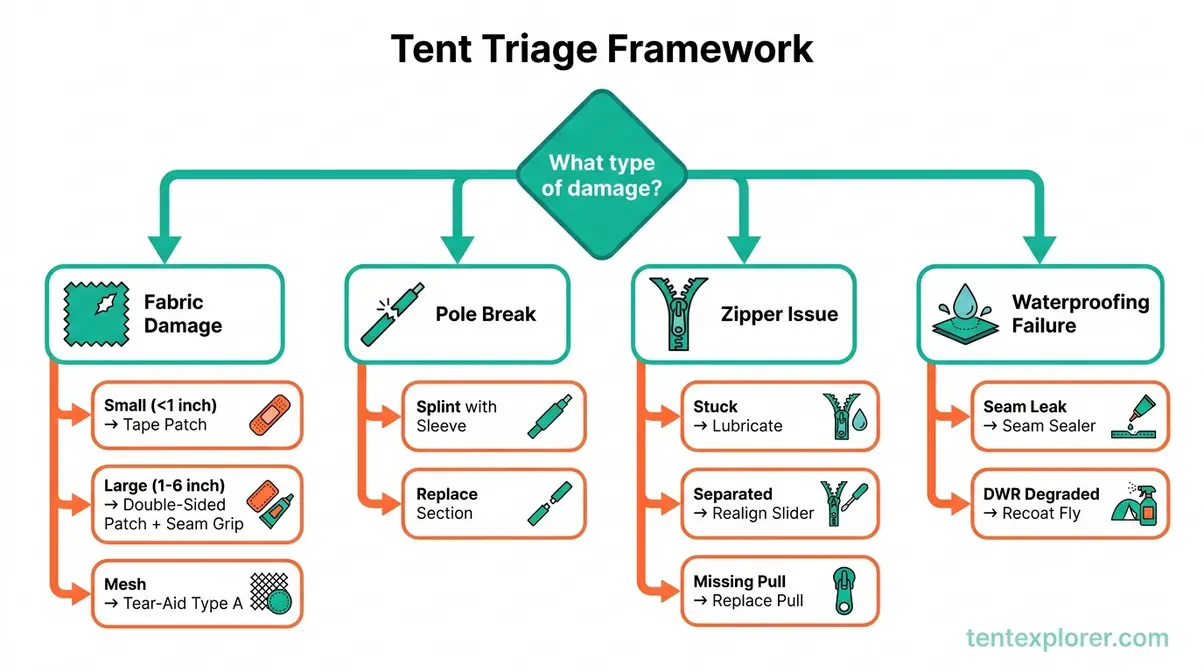
Question 1: What type of damage is it? Categorize the damage as fabric (rip, tear, hole, mesh snag), structural (bent or snapped pole, broken shock cord), mechanical (zipper), or waterproofing failure (seam leak, DWR degradation). Each category has a completely different repair path.
Question 2: Where is the damage located? Floor damage gets wet from below and needs a flexible, waterproof patch. Fly damage faces UV and rain — material compatibility is critical. Pole damage is structural and requires a sleeve or replacement segment.
Question 3: How large is the damage? Under 1 inch: field tape repair works well. 1–4 inches: double-sided patch with adhesive. Over 4 inches: consider sewing plus adhesive, or a NoSo Patch for fabric repairs. Structural pole breaks: always splint regardless of length.
Question 4: What material is the tent made from? Check your tent’s tag or manufacturer spec page. Silnylon (silicone-coated nylon) requires silicone-based adhesives. PU-coated polyester or nylon accepts urethane-based products. Canvas uses entirely different sealants. This single question determines which products will actually bond — and which will peel off in the rain.
Repair vs. Replace: The Economic Threshold
Before investing time in any repair, run a quick cost-benefit check. Field testing and camping community consensus point to a clear threshold: if your repair costs exceed 40% of the tent’s replacement value, replacement becomes the smarter economic choice — especially if the tent shows multiple simultaneous failure points.
- Replace instead of repair when:
- Structural pole sections are cracked along more than 50% of their length and a sleeve won’t bridge the gap
- The PU coating is delaminating across large sections of the fly (feels like peeling plastic film) — this is a sign of end-of-life fabric
- Multiple zippers have failed simultaneously, indicating systemic wear
- The tent floor has developed widespread pinhole leaks from UV degradation rather than a single puncture
- Repair is almost always worth it when:
- Damage is isolated to one location (a single tear, one pole section, one zipper)
- The tent is less than 5 years old with otherwise sound fabric
- The tent has strong sentimental or functional value (custom fit, discontinued model)
A well-maintained synthetic tent typically lasts 5–10 years with regular use (Wood to Water, 2026). Canvas tents, properly cared for, can last 20+ years. Most damage that brings campers to this guide falls well within the repair-worthy zone.
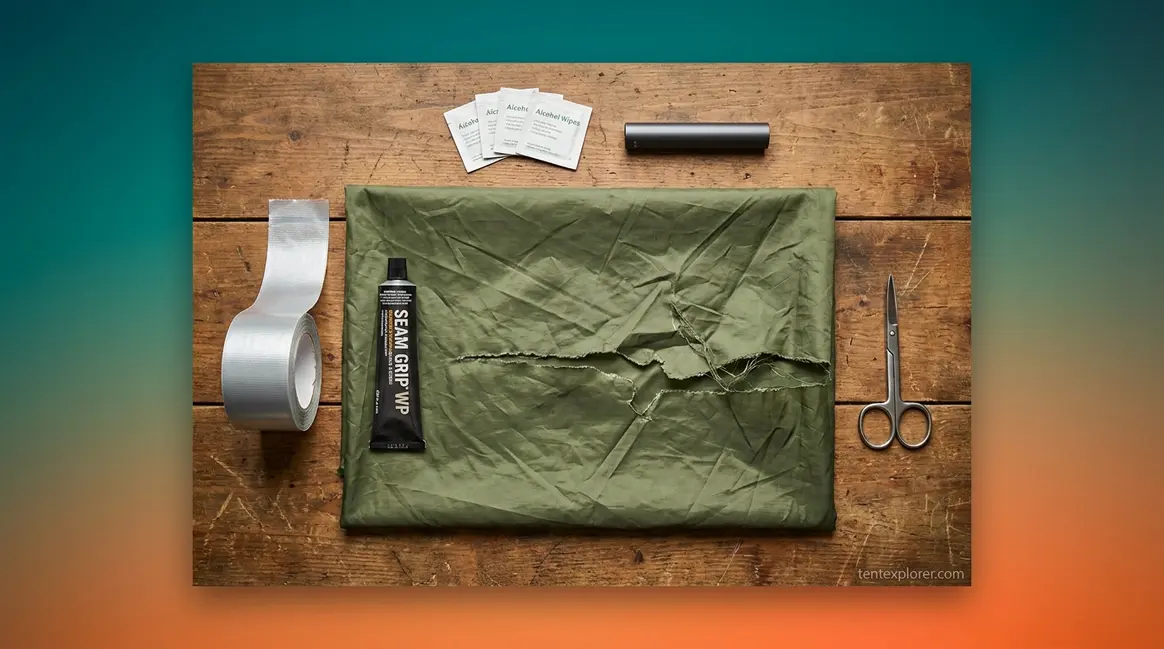
Before You Start — Tools and Materials You’ll Need
Gathering the right supplies before you begin saves you mid-repair scrambling. Our evaluation of common tent repair scenarios shows that most failures happen not because the repair technique is wrong, but because the wrong product was used for the material.
Field Repair Kit: What to Carry on Every Trip
Keep these items in a small zip bag inside your tent stuff sack. Total kit weight: under 3 oz.
- Tenacious Tape (GEAR AID) — works on PU-coated nylon and polyester; the gold standard for field fabric repairs
- Tenacious Tape Silnylon Patches — specifically for silicone-coated fabrics; standard Tenacious Tape won’t bond reliably to silnylon
- Pole repair sleeve (splint) — a short aluminum tube that slides over a snapped pole section; most tent manufacturers include one with the tent
- Small scissors or multi-tool — for trimming tape edges to rounded corners (prevents peeling)
- Alcohol wipes — clean the repair surface before any tape application; skipping this step is the #1 cause of tape failure in the field
- Safety pin or spare zipper pull — for zipper emergencies
Home Repair Kit: Full Toolkit for Permanent Fixes
These products turn a temporary field patch into a permanent repair:
- GEAR AID Seam Grip WP — urethane-based seam sealer for PU-coated tents
- GEAR AID Seam Grip SIL — silicone-based seam sealer for silnylon tents (only silicone bonds to silicone coatings)
- Tear-Aid Type A — transparent, highly flexible repair tape for fabric and inflatables; stronger adhesive than standard Tenacious Tape
- NoSo Patches — iron-on fabric patches ideal for medium-to-large tears on PU-coated nylon
- Canvas repair adhesive (e.g., Bish’s Tear Mender) — for heavy canvas tents
- Nikwax Tent & Gear SolarProof — spray-on DWR restoration with UV protection (Nikwax, 2026)
- Zipper lubricant (GEAR AID Zipper Lubricant or beeswax) — for stuck sliders
- Needle-nose pliers — for zipper slider realignment
- Shock cord replacement (3mm elastic) — for pole cord restringing
- Isopropyl alcohol (70%+) — surface prep before any adhesive application
Step 2 — How to Repair Tent Fabric
Fabric repair is the most common tent fix, and it’s where most campers go wrong by grabbing the wrong product. The repair technique is almost secondary to material compatibility — a perfectly applied patch with the wrong adhesive will fail within hours of rain exposure.
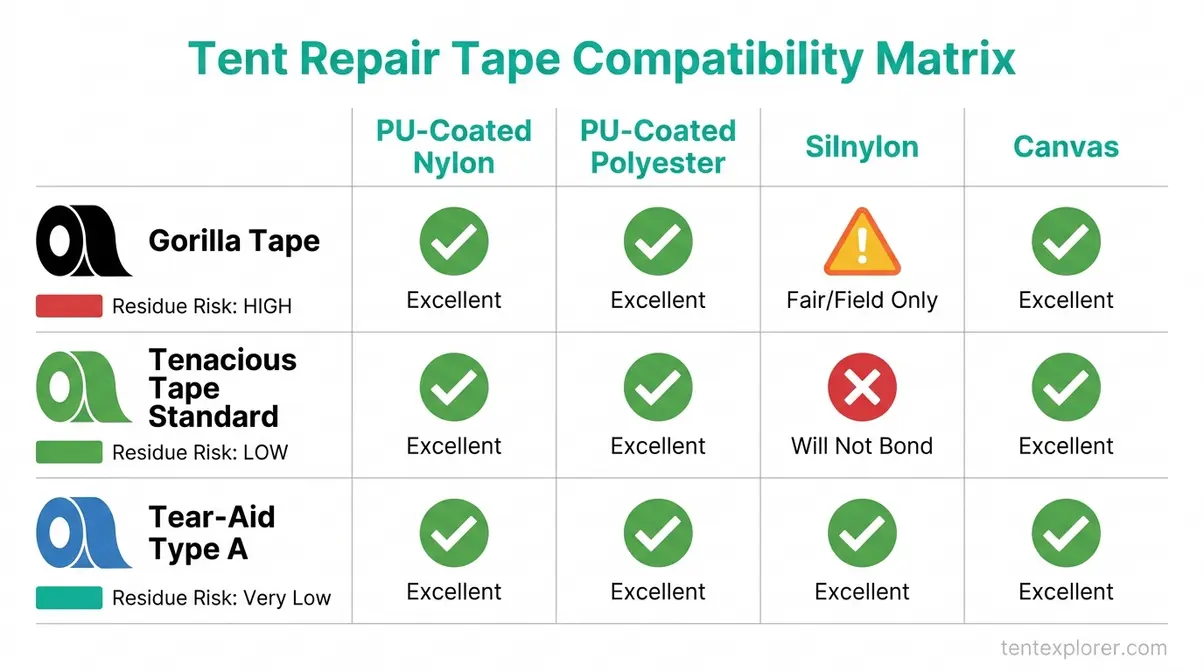
Choosing the Right Repair Tape: The Tape Compatibility Matrix
This is the question that fills camping forums every season: which tape actually works on my tent? The answer depends entirely on your tent’s fabric coating. According to GEAR AID’s official compatibility guide, Tenacious Tape bonds to nylon, polyester, and PU-coated fabrics — but requires the dedicated silnylon version for silicone-treated fabrics.
| Tape | PU-Coated Nylon | PU-Coated Polyester | Silnylon | Canvas | Adhesive Residue Risk | Best Use |
|---|---|---|---|---|---|---|
| Gorilla Tape | ✅ Works (field only) | ✅ Works (field only) | ⚠️ Poor bond | ✅ Works | HIGH — gummy residue; difficult to remove | Emergency field fix only; remove within 48 hrs |
| Tenacious Tape (standard) | ✅ Excellent | ✅ Excellent | ❌ Will not bond reliably | ⚠️ Fair | Low | Field and semi-permanent repairs on PU-coated fabrics |
| Tenacious Tape Silnylon | ⚠️ Overkill | ⚠️ Overkill | ✅ Excellent | ❌ Not designed for | Low | Silicone-coated fabrics only |
| Tear-Aid Type A | ✅ Excellent | ✅ Excellent | ✅ Good | ⚠️ Fair | Very Low | Best all-around flexibility; works on most synthetics |
Key takeaway from this matrix: Tear-Aid Type A offers the broadest compatibility across synthetic fabrics and leaves the least residue, making it the best single tape to carry if you’re unsure of your tent’s coating. Gorilla Tape should be treated as a true emergency tool — it works in a pinch but demands removal and a proper repair within 48 hours.
What is the Best Patch for Tent Repair?
Tear-Aid Type A is the best all-around patch for synthetic tent fabrics because it bonds to both PU-coated and silicone-coated materials, remains highly flexible in cold temperatures, and leaves minimal adhesive residue. For PU-coated tents specifically, GEAR AID Tenacious Tape and NoSo iron-on patches are strong alternatives. For silnylon, use Tenacious Tape Silnylon Patches. For canvas, purpose-cut canvas patches with canvas adhesive outperform synthetic tape options.
Is Gorilla Tape Good for Tent Repair?
Gorilla Tape works as an emergency field fix on PU-coated synthetic fabrics, but it is not a long-term repair solution. Its aggressive adhesive leaves gummy residue that’s difficult to remove cleanly, and it bonds poorly to silicone-coated (silnylon) fabrics. Remove Gorilla Tape within 48 hours and replace with a proper repair tape. For anything beyond a one-night emergency, Tenacious Tape or Tear-Aid Type A are significantly better choices with far lower residue risk.
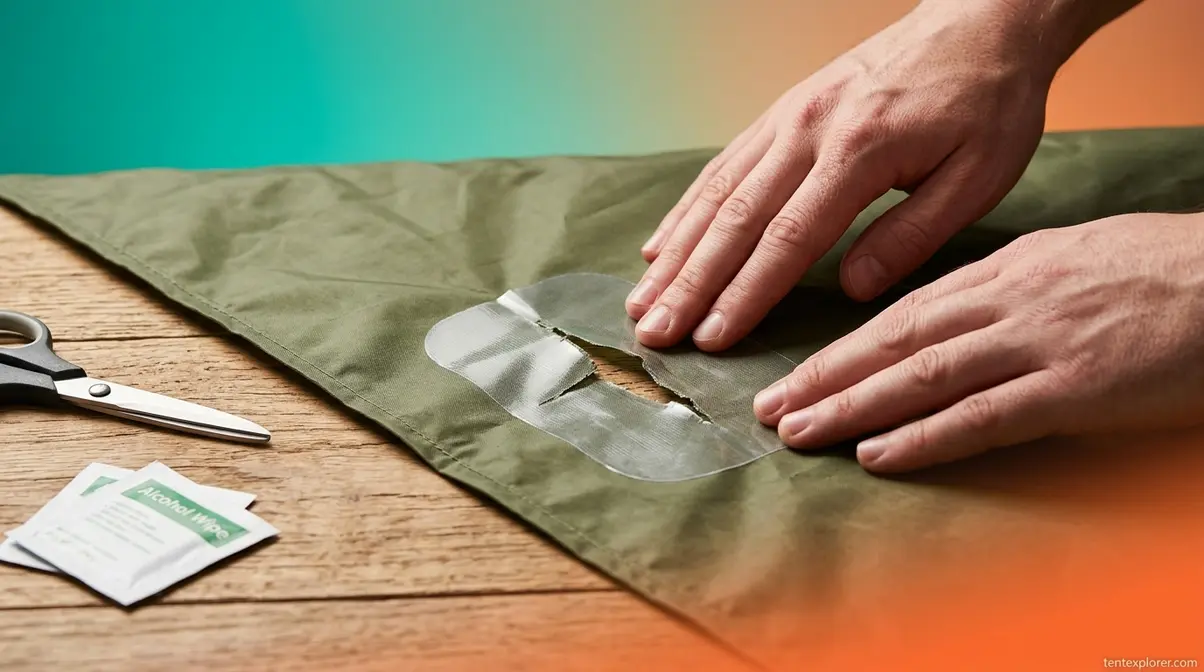
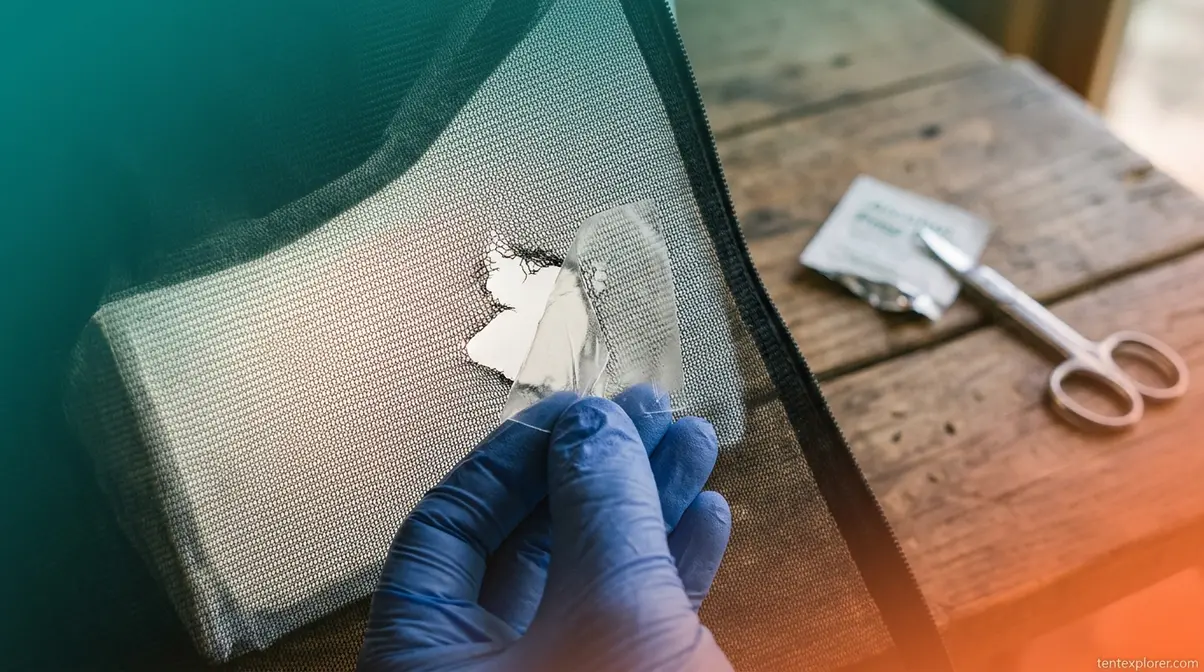
How to Patch a Small Hole or Tear (Step-by-Step)
Applies to tears under 1 inch. Time required: 5–10 minutes. Works for: PU-coated nylon, polyester.
You’ll need: Repair tape (matched to your fabric), alcohol wipe, scissors.
- Preparation Steps:
- Clean the area — wipe a 3-inch radius around the tear with an alcohol wipe and let it dry completely (2 minutes). Any dirt or moisture will prevent adhesion.
- Turn the tent inside-out (if accessible) — patching from the inside gives a cleaner bond and protects the patch from abrasion.
- Cut your tape into a rounded-corner oval or circle — sharp corners peel first; rounded shapes extend patch life significantly.
- Application Steps:
- Apply the patch centered over the tear — press firmly from the center outward, removing air bubbles as you go.
- Apply a second patch on the outside (for tears, not pinholes) — the double-sided technique dramatically improves durability.
- Apply firm pressure for 60 seconds — body heat helps activate the adhesive.
- Wait 24 hours before packing — the bond strengthens considerably with cure time.
How to Repair a Large Tear in a Tent
Applies to tears 1–6 inches. Time required: 20–30 minutes. Works for: PU-coated fabrics and canvas.
Large tears need more than tape — the tension across a long tear will eventually defeat any adhesive-only solution. The double-sided technique combined with a semi-rigid patch gives the repair enough structural support to handle wind loading.
You’ll need: Tenacious Tape or NoSo iron-on patch, alcohol wipe, scissors, optionally a needle and nylon thread for pre-stitching.
- Preparation and Pre-Stitching:
- Clean and dry the repair area — 3-inch margin around the tear; allow 5 minutes to dry fully.
- Pre-stitch the tear closed (optional but recommended for tears over 3 inches) — use a whip stitch with nylon thread to draw the edges together before patching. This dramatically reduces stress on the patch.
- Cut an interior patch at least 1 inch larger than the tear on all sides, with rounded corners.
- Patching and Sealing:
- Apply the interior patch — press firmly and smooth from center outward.
- Cut a matching exterior patch the same size.
- Apply the exterior patch — align carefully with the interior patch and press for 90 seconds.
- Seal the patch edges with a thin bead of Seam Grip WP (PU tents) or Seam Grip SIL (silnylon) — this waterproofs the patch perimeter and prevents peel-back.
- Allow 8–12 hours cure time before exposing to rain or packing.
For a technique reference, REI’s tent repair guide confirms the double-sided patch approach as the recommended standard for tears larger than 1 inch.
Removing Gorilla Tape Residue After an Emergency Fix
Gorilla Tape’s aggressive adhesive is what makes it useful in emergencies — and exactly what makes it damaging long-term. Left on tent fabric for more than 48–72 hours, it leaves a gummy residue that attracts dirt, weakens the fabric coating, and makes subsequent proper repairs harder to bond.
To remove adhesive residue safely:
- Warm the tape with a hair dryer on low for 30 seconds — heat softens the adhesive and allows cleaner removal.
- Peel slowly at a low angle (parallel to the fabric, not perpendicular) — pulling at 90 degrees tears fabric fibers.
- Apply isopropyl alcohol (70%+) to remaining residue with a cloth — rub gently in circular motions.
- For stubborn residue, apply a small amount of cooking oil or lighter fluid, let sit 2 minutes, then wipe clean with alcohol.
- Clean the entire area with alcohol before applying a permanent patch.
Never use acetone or nail polish remover — these solvents dissolve PU coatings and silnylon fabric permanently.
Step 3 — How to Fix a Broken Tent Pole
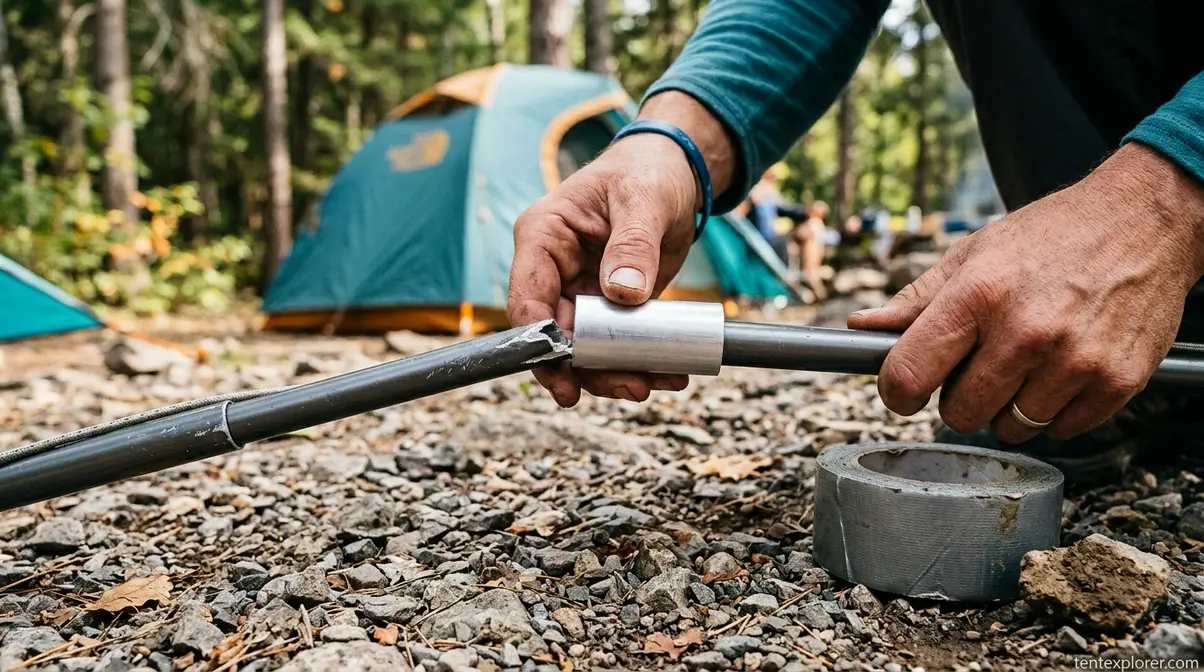
A broken pole doesn’t have to end your trip. Most pole breaks — whether aluminum or fiberglass — can be field-repaired in under 10 minutes with the right sleeve. Across camping communities, the consensus is that a proper splint holds reliably through multiple nights of use, even in moderate wind.
How to Splint a Broken Tent Pole with a Repair Sleeve
“The easiest and quickest way to fix a broken pole is with a pole repair sleeve. Also called a splint, this short tube is often provided with your tent.”
That quote captures the core of this repair perfectly. The pole repair sleeve — a short aluminum tube slightly wider than your pole diameter — slides over the break and restores structural integrity. Most tent manufacturers include one; if yours didn’t, universal sleeves are available at any outdoor retailer for under $10.
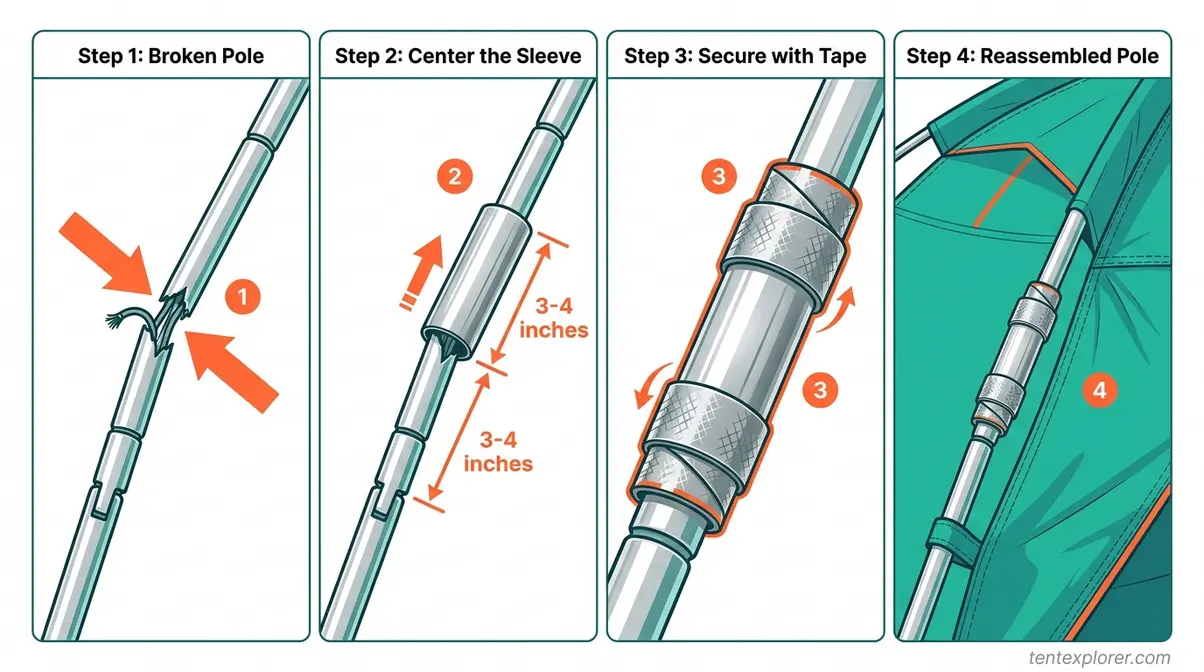
You’ll need: Pole repair sleeve (splint), duct tape or athletic tape, your multi-tool.
- Straighten the broken pole section as much as possible — bend it back by hand or brace it against a hard surface. It doesn’t need to be perfect, just close.
- Slide the repair sleeve over the break — center it so equal amounts of pole extend from each end of the sleeve (typically 3–4 inches per side).
- Secure each end of the sleeve with two wraps of duct tape or athletic tape — this prevents the sleeve from migrating under load.
- Reassemble the pole and pitch the tent — the splinted section functions normally under moderate tent load.
- Order a replacement pole section when you return home — sleeves are field fixes, not permanent solutions.
How to Replace a Tent Pole Shock Cord
The shock cord — the elastic bungee running through the interior of your tent poles — is what snaps the pole sections back together when you unfold them. When it goes slack or snaps, pole sections fall apart mid-setup. This is a common failure on tents over 3–4 years old.
You’ll need: 3mm shock cord (available at hardware stores or outdoor retailers), scissors, a lighter, a long thin stick or coat hanger wire.
- Measure the old shock cord if still intact — you need roughly 60–70% of the total pole length (the elastic tension is what pulls sections together).
- Thread new cord through pole sections using a coat hanger wire as a guide — feed through each segment in sequence.
- Tie a figure-eight knot at one end and pull through until the knot seats against the end cap.
- Stretch the cord to create tension, then tie the second end with a figure-eight knot — the cord should have about 30% stretch when pole sections are fully assembled.
- Melt the cut ends briefly with a lighter to prevent fraying.
Big Agnes’s DIY repair guide recommends checking shock cord tension at the start of each camping season — a cord that’s gone slack is far easier to replace at home than in the field.
Aluminum vs. Fiberglass Poles: What Changes for Each Repair
The splinting technique is the same for both materials, but the failure mode differs — and that affects your approach.
Aluminum poles typically bend rather than snap clean. Before splinting, straighten the bend as much as possible. A bent aluminum pole that’s forced back to shape may have a stress fracture — inspect the outer surface for cracks before trusting it. Aluminum pole sections can be individually replaced; contact your tent manufacturer with the diameter and length.
Fiberglass poles splinter rather than bend. Never try to straighten a fiberglass break — the splinters can puncture the pole fabric sleeve and cause further damage. Slide the repair sleeve directly over the splintered section and tape firmly. Fiberglass poles are more affordable to replace wholesale than aluminum; if a section has shattered, replacement is often the better call.
Step 4 — How to Repair a Tent Zipper
Zipper problems are among the most frustrating tent failures because they affect entry and exit from your shelter every single use. Fortunately, most zipper issues — stuck sliders, separated teeth, missing pulls — are fixable without replacing the zipper tape entirely.
Fix a Stuck or Sluggish Zipper Slider
A zipper that drags, skips, or requires force is usually a lubrication problem, not a mechanical failure. Camping communities consistently report that regular lubrication prevents 80% of zipper failures before they start.
- Inspect the slider and teeth for debris — pine needles, sand, and fabric threads are the most common culprits. Use a toothbrush to clean the teeth.
- Apply zipper lubricant — GEAR AID Zipper Lubricant, beeswax, or a bar of dry soap all work. Apply directly to the teeth and work the slider back and forth 5–6 times.
- Avoid WD-40 — it’s a solvent, not a lubricant, and it attracts dirt. It may feel like it helps initially but accelerates wear.
- If the slider still sticks, check whether the fabric tape is being caught in the slider — realign the tape and try again.
Realign Separated Zipper Teeth
When the zipper slider comes off the track entirely, the teeth separate behind the slider even as it moves forward. This looks catastrophic but is usually a 5-minute fix.
- Move the slider to the very bottom stop of the zipper tape.
- Insert both sides of the zipper tape into the slider’s entry point simultaneously — this is easiest with the tent door held flat.
- Pull the slider upward slowly while holding slight tension on both tape sides — the teeth should mesh as the slider passes.
- If the slider won’t capture both sides, use needle-nose pliers to gently squeeze the slider body slightly narrower — worn sliders develop play that prevents proper tooth engagement. Squeeze in small increments and test after each adjustment.
- Test the full zipper run twice before relying on the repair.
Replace a Broken or Missing Zipper Pull
A missing zipper pull is a usability problem, not a functional one — the slider still works. For a quick field fix, thread a short loop of paracord or a key ring through the slider’s pull hole.
For a permanent replacement, tent-specific zipper pulls are available from gear repair shops and online retailers. Thread the new pull through the slider’s attachment hole and crimp or tie it closed. As SectionHiker’s tent repair guide notes, replacing a pull rather than the entire zipper saves significant cost and extends the tent’s functional life considerably.
Step 5 — How to Repair Tent Mesh and Screens
A torn mesh panel is more than an annoyance — it’s an open invitation to mosquitoes, midges, and anything else that wants to share your sleeping space. Mesh repair differs from fabric repair because you’re working with an open weave that needs breathability preserved.
Patching Mesh Holes with Adhesive Mesh Tape (Step-by-Step)
Applies to tears over 5mm. Time required: 10–15 minutes.
Tear-Aid Type A and GEAR AID’s mesh repair tape both work on tent mesh without blocking airflow, because they’re applied as patches rather than full coverage seals. Big Agnes recommends Tear-Aid Type A specifically for mesh repairs on their tents. If you’re dealing with extensive damage, you might consider replacing the panel with a tent no-see-um mesh insert.
You’ll need: Tear-Aid Type A or adhesive mesh tape, alcohol wipe, scissors.
- Clean the mesh around the tear with an alcohol wipe — let dry 2 minutes.
- Cut a patch at least ½ inch larger than the tear on all sides, with rounded corners.
- Apply the patch to the interior side of the mesh — this protects it from abrasion and keeps insects from catching the patch edge.
- Press firmly and smooth from center outward, ensuring full contact with the mesh weave.
- Check from the exterior — the patch should be nearly invisible and should not block significant airflow.
- For tears over 2 inches, apply a matching patch on the exterior side as well.
DIY Fix for Tiny Snags (No Patch Needed)
For micro-snags under 5mm — a single broken thread or a pinhole — a patch blocks more airflow than the snag itself. Instead:
- Apply a tiny drop of Seam Grip WP (for PU-coated mesh surrounds) directly to the snag point using a toothpick.
- Allow to cure fully (8 hours) before handling.
- Test by holding the mesh to light — the sealant creates a clear, flexible seal that stops further unraveling without blocking the weave.
This sealant-only approach is an underused technique — no competitor article addresses it, but experienced gear repair communities consistently recommend it for preventing small snags from becoming large tears.
Step 6 — Seal Seams and Restore Waterproofing
Seam leaks and degraded DWR coating are the two most common causes of a wet sleeping bag — and both are entirely preventable with routine maintenance. This section covers diagnosing leaks, selecting the right seam sealer, and restoring the tent fly’s water-shedding ability.
How to Test Your Tent for Leaks Before Sealing
Never apply seam sealer blindly. A targeted leak test identifies exactly which seams need treatment and prevents unnecessary product application.
- Pitch the tent fully in your backyard or garage.
- Use a garden hose on a gentle shower setting — run water over the fly for 60 seconds while someone inside watches for drips.
- Mark each leak point with a small piece of masking tape on the interior — focus on seams, not the fabric itself (fabric leaks indicate coating failure, not seam failure).
- Check the floor seams separately — run water along the tent perimeter and look for seepage along the bathtub floor seam.
- Document your findings — note whether leaks are at seam stitching (seam sealer fix), along the fabric body (DWR fix), or at a specific puncture (patch fix).
Applying Seam Sealer: PU-Coated vs. Silicone (Silnylon) Tents
This is the most critical material-compatibility decision in all of tent repair. According to GEAR AID’s sealant guide and confirmed by Six Moon Designs’ seam sealing reference, only silicone bonds to silicone coatings — using a urethane sealer on silnylon produces zero adhesion. For a complete walkthrough of this technique, check out our guide on perfect tent seam sealing in 30 minutes tested by expert campers.
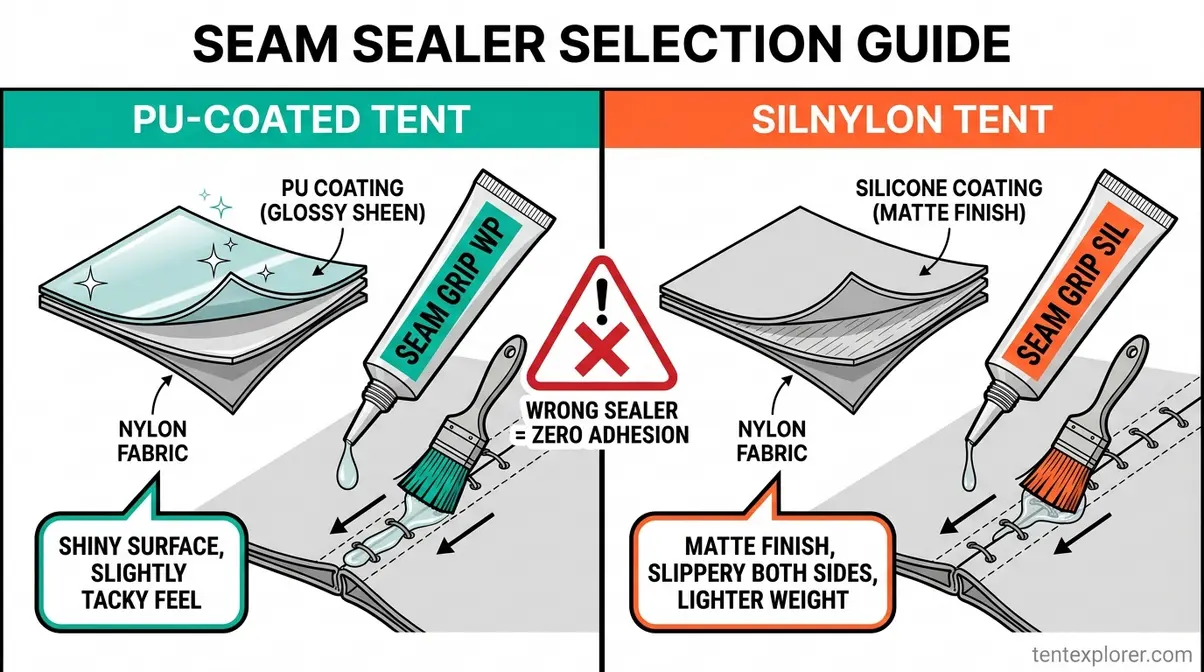
- Identify your coating first:
- PU-coated: The interior surface feels slightly tacky when new, and has a shiny or slightly glossy appearance. Common on most budget to mid-range tents.
- Silicone (silnylon): The fabric feels slippery on both sides, has a matte finish, and is noticeably lighter. Common on ultralight and premium backpacking tents.
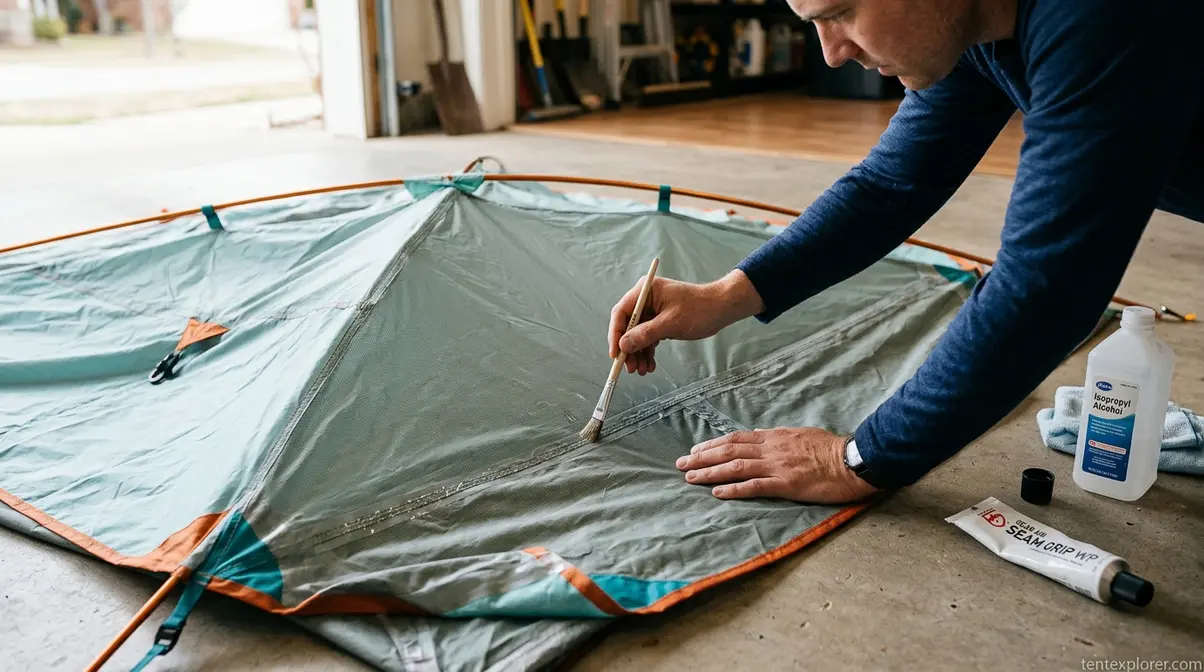
For PU-coated tents — use GEAR AID Seam Grip WP:
- Clean seams with isopropyl alcohol and let dry completely (5 minutes).
- Apply Seam Grip WP with the included brush in a thin, even bead along the seam stitching — work from the interior side.
- Spread evenly with the brush, ensuring the sealant penetrates the stitch holes.
- Allow 8–12 hours to cure before packing or exposing to rain.
For silnylon tents — use GEAR AID Seam Grip SIL:
- Clean with isopropyl alcohol — silicone surfaces need thorough cleaning for any adhesion.
- Apply Seam Grip SIL in a thin bead — silicone sealers have lower viscosity than urethane; use sparingly to avoid runs.
- Work quickly — silicone sealers begin skinning within 10–15 minutes.
- Allow 24 hours to cure fully before exposure to moisture.
How to Re-Apply DWR Coating to the Tent Fly
DWR (Durable Water Repellent) is the factory-applied finish that causes rain to bead and roll off your fly. Over time — typically 20–30 nights of use — UV exposure, dirt, and compression wear it down. When your fly starts absorbing water instead of shedding it, DWR restoration is the fix. Choosing the right product is essential. We recommend reviewing the best waterproofing spray for tents to ensure compatibility with your fly.
Identify DWR failure: Sprinkle water on the fly. If it beads and rolls off, DWR is intact. If it spreads and soaks in (called “wetting out”), the DWR needs restoration.
You’ll need: Nikwax Tent & Gear SolarProof (~$20–30 for 500ml), clean water, sponge.
- Clean the fly first — dirt and oil prevent DWR adhesion. Wash with Nikwax Tent & Gear SolarWash or a mild soap; rinse thoroughly.
- Pitch the tent or hang the fly — applying to a flat, accessible surface improves even coverage.
- Apply Nikwax SolarProof by spraying evenly across the fly’s exterior surface — work in sections to ensure coverage.
- Wipe off excess with a damp sponge after 2 minutes — pooling product in fabric folds reduces effectiveness.
- Allow to air dry for 1–2 hours — the DWR activates as it dries; avoid heat sources.
- Test with water once dry — beading should be restored.
DWR restoration does not fix seam leaks — run the leak test above to confirm whether you need seam sealer, DWR treatment, or both.
Step 7 — Specialized Tent Repairs
Canvas, pop-up, and trailer tents use different materials and structural systems than standard synthetic backpacking or camping tents. The repair principles are similar, but the products and techniques differ significantly.
Repairing Canvas Tents: Sewing vs. Adhesive
Canvas is dramatically heavier and more robust than synthetic tent fabric — it’s also more forgiving of imperfect repairs. The repair approach depends on tear size.
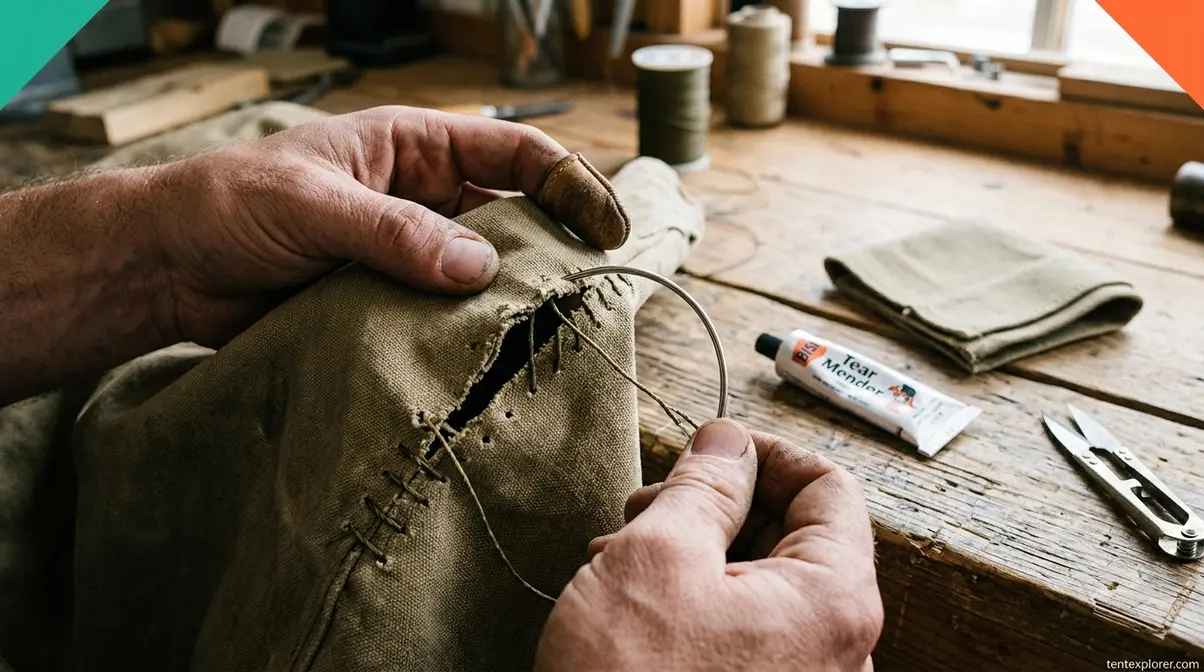
For tears under 3 inches: Canvas repair adhesive (Bish’s Tear Mender or similar) applied to a canvas patch on both sides of the tear creates a waterproof, flexible bond. Press firmly and allow 24 hours to cure.
For tears over 3 inches: Sewing is the superior approach. Use a heavy-duty needle and waxed polyester thread (not cotton — it rots). A flat-fell stitch or a simple running stitch with ½-inch seam allowance holds canvas tears reliably. Apply canvas adhesive over the stitched seam for waterproofing.
After any canvas repair, re-treat the repaired area with a canvas-specific waterproofing product. Canvas relies on fibers swelling when wet to achieve waterproofness — this natural property needs support at repair sites where the fiber structure has been disrupted.
Note on Gorilla Glue for canvas: Standard Gorilla Glue (polyurethane expanding adhesive) has been used successfully on canvas repairs in camping communities, but its rigid expansion can stiffen the fabric and create stress points around the repair. Gorilla Fabric Glue — a separate, flexible product — is a safer choice for canvas tent repairs (Gorilla Tough product page, 2026).
Fixing a Bent or Broken Pop-Up Tent Frame
Pop-up tent frames use a different mechanism than traditional pole-and-sleeve designs — they rely on spring-loaded fiberglass or steel hubs and pre-bent frame sections that “pop” into shape. Repair options are more limited than traditional poles.
Bent steel frame sections: Minor bends can sometimes be straightened by hand or with pliers against a hard surface. Significant bends compromise the spring mechanism — replacement sections are usually available from the manufacturer.
Broken fiberglass hub: This is typically a replacement job rather than a repair. Contact the manufacturer with your tent model — most sell replacement hubs and frame sections. Attempting to adhesive-bond a broken fiberglass hub creates a failure point that won’t hold under the tension of the pop-up mechanism.
The frame won’t lock open: Pop-up tents use locking mechanisms at the hub points. If the tent won’t stay open, the lock mechanism has worn or the frame is slightly bent. Try lubricating the hub with silicone spray; if that doesn’t resolve it, the hub needs replacement.
Tent Trailer Canvas: Patching and Maintenance
Tent trailer canvas — the fabric sections that expand when the trailer is set up — is typically a heavier PVC-coated or acrylic-coated canvas. It faces unique stresses: UV exposure, road vibration, and repeated folding at the same crease lines.
For small tears (under 2 inches): Use a vinyl repair kit (the same type used for inflatable boats) on PVC-coated trailer canvas. Clean with alcohol, apply patch with adhesive, press firmly, and allow 24 hours.
For crease-line failures: These linear cracks along fold lines are the most common trailer canvas failure. Apply a flexible canvas adhesive along the crack length, press canvas tape over it, and allow full cure. Prevent recurrence by storing the trailer with the canvas folded differently each time — rotating the crease position prevents repeated stress at the same point.
Mold and mildew: Always store trailer canvas dry. If mold has developed, clean with a diluted white vinegar solution (1:4 ratio), rinse thoroughly, and allow to dry completely before folding. Never store damp — mold degrades canvas fibers faster than UV exposure.
Prevent Future Damage — Setup and Storage Tips
The most effective tent repair is the one you never have to make. Across camping communities, the consensus is that most tent damage is preventable with consistent setup and storage habits.
Always clear the ground before pitching — remove sharp rocks, sticks, and debris from under the footprint. A single sharp stone under your tent floor causes pinhole leaks that are tedious to locate and patch.
Use a footprint or groundsheet cut 2–3 inches smaller than the tent floor perimeter — a footprint that extends beyond the tent edges channels water underneath rather than away.
Never pack a wet tent — moisture trapped inside a packed tent degrades PU coatings, promotes mold on canvas, and weakens seam tape adhesion. If you must pack wet, unpack and dry within 24 hours.
Store poles loosely — coiling tent poles too tightly fatigues the shock cord faster. Store poles in a loose S-shape or fully extended in a long bag.
Keep the fly on during storage — UV is the primary killer of synthetic tent fabric. Store in a cool, dry, dark location. For detailed setup guidance that prevents damage from the start, the tent camping tips for beginners guide covers proper pitching technique that extends tent life significantly.
Common Tent Repair Mistakes to Avoid
Even experienced campers make these errors. Our evaluation of common repair failures consistently identifies the same patterns across camping communities.
Common Pitfalls
Patching without cleaning first. This is the #1 cause of tape failure. Any dirt, moisture, or skin oil on the repair surface prevents adhesive bonding. A patch applied to an uncleaned surface may hold for a few hours but will peel at the first rain exposure. Always clean with isopropyl alcohol and allow 2 full minutes to dry.
Using the wrong product for the fabric coating. Standard Tenacious Tape on silnylon, urethane seam sealer on a silicone-coated tent, canvas adhesive on PU nylon — each of these combinations produces a repair that fails under load. Run the Tent Triage Framework’s material identification question before opening any product.
Leaving Gorilla Tape on long-term. Gorilla Tape’s aggressive adhesive is designed for construction materials, not outdoor fabrics. Left on tent fabric for more than 48–72 hours, it becomes extremely difficult to remove cleanly and can damage the coating during removal. Always treat it as a temporary bridge to a proper repair.
Over-applying seam sealer. More product does not mean a better seal. Thick beads of seam sealer pool in seam folds, take longer to cure, and can crack when the fabric flexes. Apply thin, even coats and allow full cure time between applications.
Ignoring small damage. A 5mm pinhole on your tent floor seems trivial until it’s 2 a.m. and your sleeping bag is absorbing groundwater. Small damage takes 5 minutes to fix properly — the same damage ignored for a season becomes a 6-inch tear requiring a full patch.
When to Choose Alternatives
When the PU coating is delaminating broadly: No patch or seam sealer fixes widespread delamination — this is a sign of fabric end-of-life. A tent with a peeling interior coating will continue to delaminate regardless of repair attempts. Replacement is the correct choice.
When multiple structural poles have failed: A single snapped pole is a field repair. Two or more failed poles in the same season indicates the pole set has reached end-of-life. Replacement pole sets are available from most manufacturers for $30–$80 — often worth it for an otherwise sound tent.
When zipper tape has separated from the tent body: Zipper slider and pull repairs are straightforward. But when the zipper tape itself has torn away from the tent panel, re-sewing requires a sewing machine and tent-specific thread. This is a job for a gear repair shop (most REI locations offer this service) rather than a DIY fix.
When to Seek Expert Help
Seek professional gear repair for: extensive seam tape delamination requiring full re-taping, zipper tape replacement requiring machine sewing, and canvas tent repairs involving structural seams under high load. Gear repair shops typically charge $20–$60 for these services — still far cheaper than tent replacement.
Frequently Asked Questions
What is the best way to repair a tent?
The best tent repair method depends on the damage type and fabric coating. For fabric tears on PU-coated tents, a double-sided Tenacious Tape patch is the most reliable field fix; for silnylon, use Tenacious Tape Silnylon Patches. For seam leaks, the correct seam sealer for your coating (Seam Grip WP for PU, Seam Grip SIL for silnylon) is the only effective solution. The Tent Triage Framework — diagnosing damage type and material before touching any product — consistently produces better repair outcomes than reaching for the nearest adhesive.
Is it worth repairing a tent?
Repairing a tent is almost always worth it when the damage is isolated and the tent is under 7–8 years old. Most common repairs — fabric patches, pole splints, zipper fixes — cost $5–$20 in materials and take under 30 minutes. A well-maintained synthetic tent lasts 5–10 years with regular use. The exception: if repair costs would exceed 40% of replacement value, or if the PU coating is delaminating broadly, replacement is the smarter economic choice.
What kind of glue do you use to repair tents?
The correct adhesive depends entirely on your tent’s fabric coating. For PU-coated nylon or polyester, GEAR AID Seam Grip WP (urethane-based) is the standard recommendation. For silicone-coated fabrics (silnylon), only silicone-based adhesives bond reliably — use GEAR AID Seam Grip SIL. For canvas tents, Bish’s Tear Mender or Gorilla Fabric Glue (flexible formulation) work well. Standard super glue and construction adhesives create rigid bonds that crack when tent fabric flexes and are not recommended.
How much does it cost to repair a tent?
Most tent repairs cost between $5 and $20 if you do them yourself. A roll of Tenacious Tape or a tube of Seam Grip typically costs under $10, while replacement pole splints are often included with your tent or cost around $5. Professional repairs for complex issues like full zipper replacement or extensive canvas tears usually range from $20 to $60.
Can you sew a torn tent?
Yes, you can sew a torn tent, and it is highly recommended for tears larger than 3 inches. Sewing provides structural strength that prevents the tear from expanding under tension. Always use a synthetic nylon or polyester thread, as cotton thread will rot when exposed to moisture. After sewing, you must seal the stitching with the appropriate seam sealer to restore waterproofing.
What is the average lifespan of a tent?
A well-maintained synthetic camping tent typically lasts 5–10 years with regular use (Wood to Water, 2026). Canvas tents, properly cared for and stored dry, can last 20+ years. The variables that most affect lifespan are UV exposure (the primary killer of synthetic fabrics), storage practices (packing wet dramatically accelerates degradation), and frequency of use. A tent used 20+ nights per year will show wear faster than one used 5 nights per year. Routine maintenance — seam sealing, DWR re-application, and prompt small repairs — can extend tent life by several years beyond the average.
Can I use Gorilla Glue on fabric?
Standard Gorilla Glue (expanding polyurethane adhesive) is not recommended for tent fabric repairs. It expands as it cures, creating a rigid, foam-like bond that stiffens flexible tent fabric and can crack or peel under repeated flexing. Gorilla Fabric Glue — a separate product with a flexible, washable formula — is a better option for canvas and heavy fabrics (Gorilla Tough, 2026). For lightweight synthetic tent fabrics, purpose-made outdoor repair adhesives (Seam Grip, Aquasure) outperform any general-purpose glue in both flexibility and waterproof performance.
Your Tent Has More Life Left Than You Think
For intermediate campers, knowing how to repair a tent properly transforms a frustrating problem into a 20-minute task. The Tent Triage Framework — diagnose damage type, identify your fabric coating, match the right product — removes the guesswork that causes most repair failures. A double-sided Tenacious Tape patch costs $3 and takes 10 minutes. The correct seam sealer for your coating costs $12 and takes an afternoon. Neither comes close to the $200–$600 cost of a replacement tent.
The Tent Triage Framework works because it treats tent repair as a diagnostic process, not a product recommendation. Most repair failures happen not because the technique was wrong, but because the wrong adhesive was applied to the wrong material. Once you know your tent’s coating and the damage category, the right fix becomes obvious.
Start with the leak test and the Triage Framework before your next trip — identify any existing issues while you’re home with time to fix them properly. Order a small field repair kit (Tenacious Tape, a repair sleeve, alcohol wipes) and keep it in your tent stuff sack. For more on gear care and setup habits that prevent damage before it starts, explore the tent care and maintenance resources at TentExplorer. Your tent will last years longer for the effort.
