No-See-Um Tent Mesh: Specs, Repair & Buying Guide
 Dave King
Updated June 28, 2026
22 min read
Dave King
Updated June 28, 2026
22 min read
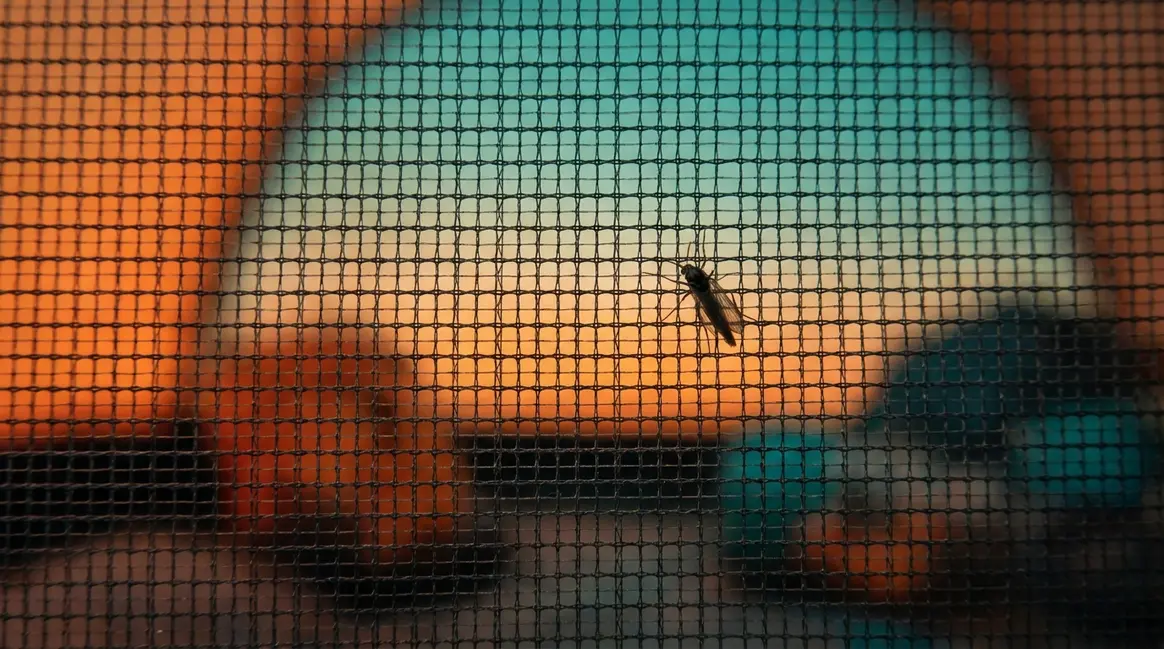
You set up camp, zip your tent closed — and within an hour, tiny insects are buzzing around your face inside. Standard tent mesh has holes wide enough for gnats, midges, and sand flies to crawl through the screen holes without effort. Most budget tents use a coarser weave that stops mosquitoes just fine, but completely fails against these smaller insects.
No-see-um tent mesh solves this with a finer, denser weave — but “no-see-um rated” on a hang tag doesn’t tell you much without the actual specifications. This guide explains exactly what no-see-um tent mesh is, how to read mesh specs so you can buy with confidence, and how to repair your mesh when it tears — because it will eventually tear.
No-see-um tent mesh uses a 20×20 weave — 400 openings per square inch — to block gnats and midges that slip through standard screens entirely.
- The Mesh Specs Ladder: Protection is a spectrum from coarse 16×16 to ultra-fine 30×30 mesh — matching density to your bug environment is the key decision.
- Pre-built or DIY: Ready-made no-see-um tents cost more upfront; DIY mesh fabric from suppliers like Ripstop by the Roll costs less but requires sewing skills.
- Permethrin adds a layer: Treating mesh with 0.5% permethrin reduces insect landings by 44% per PubMed research — a meaningful boost on top of physical exclusion.
- Repairs are doable: Tears, mesh runs, and burns can all be fixed with adhesive patches or a needle and thread — no specialist gear needed.
Recommended Products
| # | Image | Product | Best For | Buy |
|---|---|---|---|---|
| 1 |  |
OAZ Nylon Tent Repair Patches | Quick nylon tent repairs | Buy on Amazon |
| 2 |  |
Coghlan’s Mesh Repair Patches | Mesh screen tent repairs | Buy on Amazon |
| 3 | |
OAZ Nylon Tent Repair Patches | Multi-use fabric patching | Buy on Amazon |
What Is No-See-Um Tent Mesh
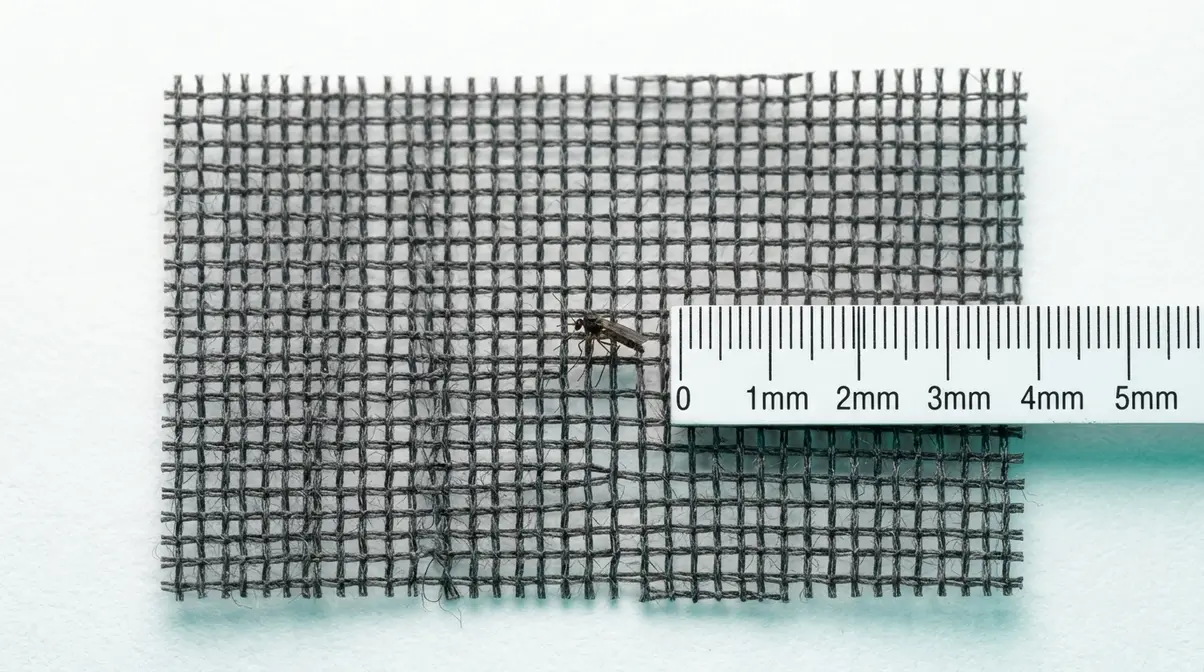
No-see-um mesh is an ultra-fine netting designed to block tiny biting insects — specifically gnats, midges, and sand flies — that pass through standard mosquito netting without resistance. According to EPA guidelines, a mesh with openings no larger than 0.0277 inches is required to effectively exclude no-see-ums. If your tent uses a coarser screen, those insects don’t have to force their way in — the gap is simply large enough for them to walk through freely.
Differences from Standard Mesh
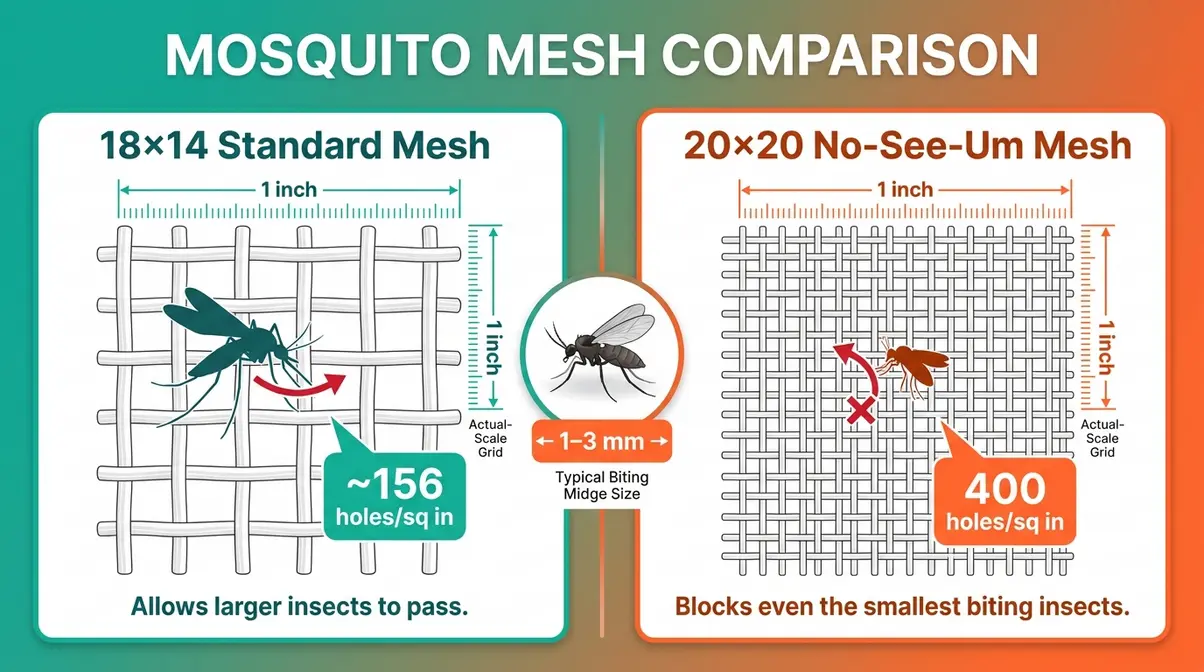
Most budget tents use standard mosquito netting — the coarser mesh found in most budget tents — with a mesh count around 18×14 (meaning 18 strands per inch running horizontally and 14 strands per inch running vertically). That creates roughly 156 openings per square inch. Mosquitoes, which measure around 3–6 mm in body width, can’t squeeze through. However, gnats and midges — two species of tiny biting flies that standard screens cannot stop — measure as little as 1–3 mm and pass through those same openings with ease.
No-see-um mesh uses a 20×20 weave (20 strands per inch in each direction). That tighter grid creates smaller, more uniform openings — physically too small for midges to penetrate. When you’re shopping, look for the number “20×20” in the product specs. If the description just says “bug-proof” or “insect-resistant” without a mesh count, you can’t verify what you’re actually getting.
As one camper in a tree-planting community put it:
“We sat there one evening and watched them crawl through the screen holes.”
That’s not a fluke — it’s physics. The holes in standard mesh are simply too large to stop these insects. Purdue University Extension advice notes that standard window screens are insufficient against biting midges, and that specific biting midge screening is required (Purdue University Extension, 2024). The insects affected include gnats, midges (also called biting midges or no-see-ums), and sand flies. If you camp near water, coastal marshes, or dense woodland, you’ve almost certainly encountered at least one of them.
How fine does the mesh actually need to be? That depends on which insects you’re fighting — and that’s where mesh specs become critical.
The Mesh Specs Ladder Explained
The Mesh Specs Ladder is a framework for understanding that insect protection is a spectrum, measured in holes per square inch, from coarse standard mesh to ultra-fine no-see-um netting. Think of it like SPF ratings for sunscreen — the number is a measurable indicator of protection, not just a marketing tier.
Here’s how the five main mesh types compare:
| Mesh Type | Weave | Holes/Sq In | Insects Blocked | Airflow Impact |
|---|---|---|---|---|
| Standard window screen | 18×14 | ~156 | Mosquitoes only | Minimal |
| Standard tent mesh | 16×16 | ~156 | Mosquitoes only | Minimal |
| No-see-um mesh (entry-level) | 20×20 | ~400 | Gnats, midges, sand flies | Moderate (~16–30% reduction) |
| No-see-um mesh (premium) | Tricot knit, 20D | 1,054 | Gnats, midges, sand flies | Moderate–High |
| Ultra-fine mesh | 30×30 | ~900+ | Near-complete insect exclusion | High (~30–77% reduction) |
The 1,054 holes-per-square-inch figure comes from Canvas ETC and Ripstop by the Roll product data for their premium 20-denier stabilized tricot-knit noseeum mesh (Canvas ETC, 2026; Ripstop by the Roll, 2026). This is a meaningfully different construction from a standard woven 20×20 screen — the tricot knit method packs more openings into the same surface area while keeping weight low at 0.85 oz per square yard.
The airflow tradeoff is real and worth understanding before you buy. Studies on insect screen airflow reduction found that fine insect-proof screens can reduce natural ventilation rates by 16% to 77% depending on mesh porosity (PubMed Central, NIH). That means on a hot summer night, ultra-fine 30×30 mesh could feel noticeably stuffy — which is why most camping gear uses 20×20 as the practical sweet spot between protection and breathability.
The University of Arizona’s 30×30 mesh recommendation applies specifically to high-infestation areas where maximum exclusion is required. For most campers, 20×20 is the right balance. For MYOG (make-your-own-gear) projects, suppliers like Ripstop by the Roll offer noseeum mesh in 0.5 oz (NS50), 0.67 oz, and 0.9 oz weights — lighter fabrics for hammock bugnets and sleeping bags, heavier weights for no-see-um mesh inserts for your existing tent and structural panels.
Now that you can see exactly how mesh specs translate to protection, the obvious next question is: does this actually work in real camping conditions?
Do No-See-Um Screens Really Work?
Yes — but only when the mesh meets the correct specification. A label that says “bug-proof” without a mesh count number may not be adequate. This is a binary failure, not a marginal one: standard mesh is simply the wrong tool for the job against biting midges.
Purdue University Extension confirms that standard window screens are insufficient against biting midges and that only specific biting midge screening provides reliable protection. Outdoor gear communities back this up with consistent field reports. Campers on Reddit’s r/treeplanting and HammockForums.net consistently report that switching to no-see-um rated mesh eliminates the problem entirely, while standard tent mesh offers zero measurable protection against gnats and midges.
The University of Arizona’s 30×30 mesh recommendation notes that no-see-ums pass through standard 16×16 mesh entirely, and recommends finer 30×30 mesh for effective prevention in high-pressure environments. Real-world scenarios where this matters most: coastal camping along the southeastern U.S. Gulf Coast, woodland camping in the Pacific Northwest during late summer, and any camping near standing water or marsh environments where biting midges breed.
No-see-um mesh with a verified 20×20 weave or finer physically cannot be penetrated by insects measuring under 0.85 mm — that’s the physical reality, not a marketing claim. The mesh works when you have the right spec. The challenge is knowing what spec you actually have.
So the mesh works — but is the cost and inconvenience of upgrading actually worth it for your style of camping?
Are No-See-Um Screens Worth It?
For campers in low-bug environments — alpine camping above treeline, desert camping in dry conditions, or winter trips — standard mesh is probably fine. No-see-ums and biting midges need moisture and warmth to thrive. However, if you camp near water, in coastal areas, or in forested regions during warm months, the upgrade pays for itself on the first miserable night you avoid.
Pre-built tents with built-in no-see-um mesh typically cost $50–$200 more than comparable tents with standard screens. DIY mesh fabric from specialty suppliers like Ripstop by the Roll runs approximately $3–$6 per yard — enough to retrofit a mesh insert for a fraction of the cost. The math favors action if you camp more than two or three times per year in bug-prone areas.
Outdoor gear communities consistently report that the difference is not subtle — a tent with proper micro-mesh netting versus one without is the difference between sleeping and not sleeping in a midge-heavy environment. That’s a meaningful quality-of-life improvement, not a marginal upgrade. If you want to explore options without replacing your whole tent, a no-see-um mesh insert for your existing tent is often the most cost-effective first step.
Pre-Built Tents vs. DIY Fabric
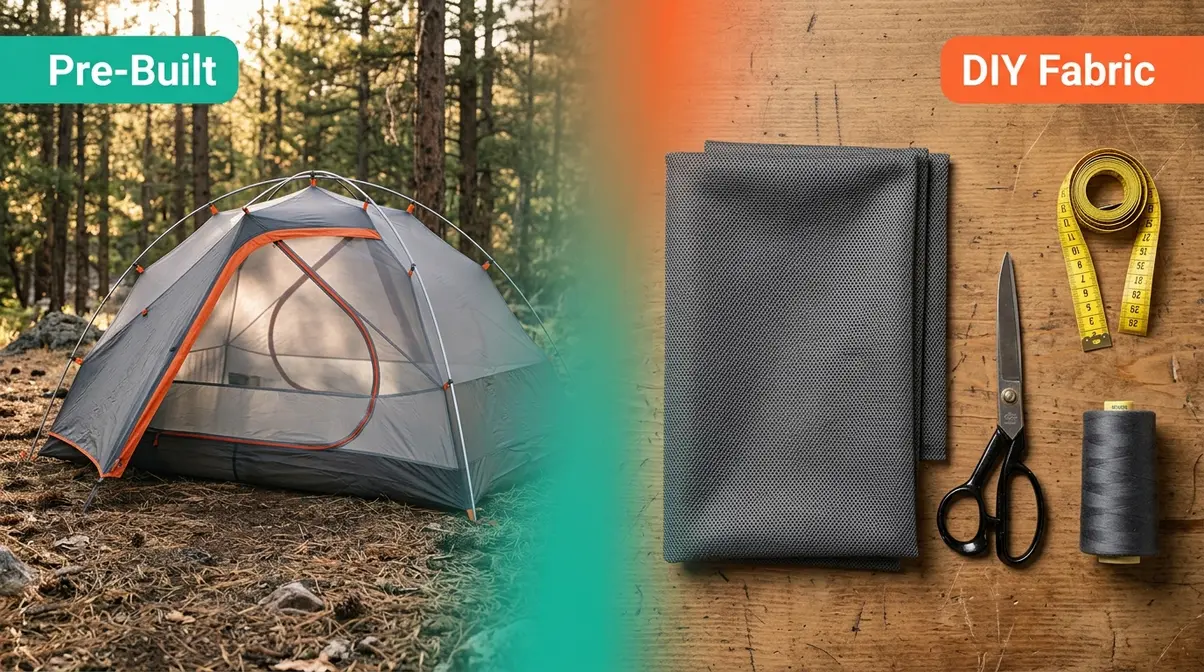
Understanding the Mesh Specs Ladder tells you what protection level you need. The next step is deciding how to get it — either by purchasing a tent or shelter with no-see-um mesh already built in, or by sourcing the fabric yourself for a DIY or retrofit project.
Pre-Built Tents and Shelters
Pre-built options fall into three categories: freestanding tents with no-see-um mesh panels, screen houses and shelters for base camping, and hammock bugnets designed for ultralight backpacking. Each solves the same core problem but targets a different use case.
Freestanding tents with integrated no-see-um mesh — such as those from NEMO Equipment, Big Agnes, and Sea to Summit — typically use 20×20 or finer mesh throughout the inner tent body. These are the most convenient option because the mesh is already tensioned correctly and attached to the tent structure. The tradeoff is cost: a quality no-see-um rated tent from a reputable brand starts around $250 and can exceed $600 for ultralight four-season options.
Screen houses and tarp shelters with no-see-um mesh walls serve base campers who want a bug-free communal space. If you are outfitting a family campsite, consider upgrading to one of the best screen tents for camping. These work well for car camping, canoe trips, or family camping where weight isn’t a primary concern. Look for mesh rated at 20×20 or the “no-see-um” designation with a verifiable spec — not all screen houses use fine enough mesh.
Hammock bugnets are a specialized category worth noting. Ultralight backpackers who sleep in hammocks rely on fine mesh netting — often called hammock bugnets — to protect the entire sleeping area. These are typically made from 0.5 oz or 0.67 oz noseeum mesh and are among the most weight-efficient bug protection options available. A hammock bugnet using NS50 fabric can weigh under 4 oz while providing full 360-degree no-see-um protection.
The main advantage of pre-built options is convenience: no sewing, no measuring, no guessing about whether you’ve tensioned the mesh correctly. The main disadvantage is that you’re paying for the entire tent, not just the mesh panel. If your existing tent is otherwise excellent, replacing it solely for mesh quality is an expensive solution.
DIY No-See-Um Fabric Guide
DIY mesh fabric is the right choice for MYOG (make-your-own-gear) builders, anyone retrofitting an existing tent, or campers who want a custom hammock bugnet. The fabric itself is widely available, and the specifications are transparent.
Ripstop by the Roll is the most commonly referenced specialty supplier for noseeum mesh in the outdoor gear community. Their mesh is available in three weights: the 0.5 oz NS50 (lightest, for hammock bugnets and sleeping bag liners), 0.67 oz (mid-weight, most popular for tent panels and inserts), and 0.9 oz (heaviest, for high-wear applications). Both the 0.67 oz and 0.9 oz variants carry the 1,054 holes-per-square-inch specification confirmed by Ripstop by the Roll’s own product documentation (Ripstop by the Roll, 2026).
Rockywoods and Canvas ETC are two additional suppliers that carry 54-inch-wide noseeum mesh by the yard. Canvas ETC’s tricot-knit polyester mesh is 0.85 oz/yd², 20-denier stabilized yarn, and rated at 1,054 holes per square inch — identical construction to the Ripstop by the Roll variants (Canvas ETC, 2026). At approximately $4–$6 per yard, a full hammock bugnet project typically requires 2–3 yards, making the material cost under $20.
Eco-mesh and NS50 represent the current frontier of ultralight noseeum fabric technology. NS50 in particular has gained significant traction in the MYOG community since 2024 for its combination of sub-gram-per-square-foot weight and verified 20×20 protection. These newer ultralight mesh technologies are worth considering for anyone building weight-sensitive shelter systems.
For a straightforward retrofit project — adding a no-see-um mesh panel to an existing tent door — you need the mesh fabric, a seam ripper to remove the original panel, and basic sewing skills. The sewing section later in this guide covers the exact technique.
Permethrin Treatment Benefits
Physical mesh exclusion blocks insects from entering. Permethrin treatment adds a second layer — a contact insecticide that kills or repels insects that land on the mesh surface before they can find a gap. Together, they’re significantly more effective than either approach alone.
Permethrin is a synthetic insecticide approved for use on clothing, gear, and tents. The CDC explicitly recommends 0.5% permethrin to treat boots, clothing, and camping gear including tents, noting that properly treated items help prevent mosquito bites (CDC, 2024). The EPA has reviewed permethrin factory-treated clothing and concluded that exposure from wearing such items is “unlikely to pose any significant immediate or long-term hazard” when used as directed (EPA, 2026).
The effectiveness data for tent-specific treatment is compelling. A field study published on PubMed Central found that volunteers sleeping inside a permethrin-treated tent experienced an 84–94% reduction in mosquito bites. Even those sleeping outside a treated tent had a 43% reduction in bites — a 44% relative risk reduction at the campsite level (PubMed Central, 2003). A separate study found that permethrin-treated tent fabric maintained greater than 96% protection from bites for nine months under constant weather exposure (PubMed, 1987).
Compatibility with synthetic mesh: Permethrin works by soaking into and bonding with fabric fibers. On standard polyester or nylon noseeum mesh — the type used in most tents and MYOG projects — it bonds effectively because these fabrics are absorbent at the fiber level. The key limitation is waterproof or DWR-treated fabrics (silnylon, cuben fiber/DCF): permethrin cannot penetrate these surfaces and will not bind correctly. If your tent’s outer fly is silnylon, treat only the mesh panels and inner tent body, not the waterproof shell (GoFastCampers Forum, 2020; Reddit r/Ultralight, 2020).
- How to apply permethrin to your mesh:
- Take the tent or mesh panel outdoors to a well-ventilated area.
- Lay the mesh flat or hang it so all surfaces are accessible.
- Spray 0.5% permethrin (products like Sawyer Permethrin Fabric Treatment) in a slow sweeping motion, holding the bottle 6–8 inches from the fabric.
- Apply enough to visibly dampen the mesh (slight color change).
- Allow to dry completely — at least 2–4 hours, longer in humid conditions — before packing or using.
- Keep cats away during application and until the fabric is fully dry; permethrin is highly toxic to cats when wet (Consumer Reports, 2023).
- Avoid runoff near streams, ponds, or other aquatic environments — permethrin is highly toxic to fish and aquatic invertebrates.
One treatment lasts approximately 6–12 washes or one season of regular use. Reapply at the start of each camping season for consistent protection. Never apply permethrin directly to skin.
Permethrin is not a substitute for proper mesh density — it supplements physical exclusion. If your mesh isn’t fine enough to block no-see-ums, permethrin alone won’t solve the problem. Use both together for maximum protection.
Pre-Built vs. DIY Decision Guide
Not sure which path makes more sense for your situation? This framework cuts through the decision in under a minute.
| Your Situation | Best Choice | Why |
|---|---|---|
| First tent, camping 3+ times/year in bug areas | Pre-built no-see-um tent | Convenience outweighs cost for regular campers |
| Existing tent you love, just bad mesh | DIY retrofit or mesh insert | Upgrade the mesh, keep the tent |
| Hammock camper, weight-conscious | DIY hammock bugnet (NS50 fabric) | Lightest option, full 360° protection |
| Base camper, want communal bug-free space | Pre-built screen house | No sewing required, sets up fast |
| MYOG enthusiast, comfortable with sewing | DIY from Ripstop by the Roll | Full control over specs and weight |
| Budget-constrained, occasional camper | Adhesive mesh patch kit + permethrin | Lowest cost entry point |
The fundamental split is time versus money. Pre-built options cost more but require zero skill. DIY options cost less but require at least basic sewing ability. For most frustrated campers who already own a tent, the most practical first step is either a retrofit insert or a targeted permethrin treatment — before committing to a full tent replacement.
Repairing No-See-Um Mesh
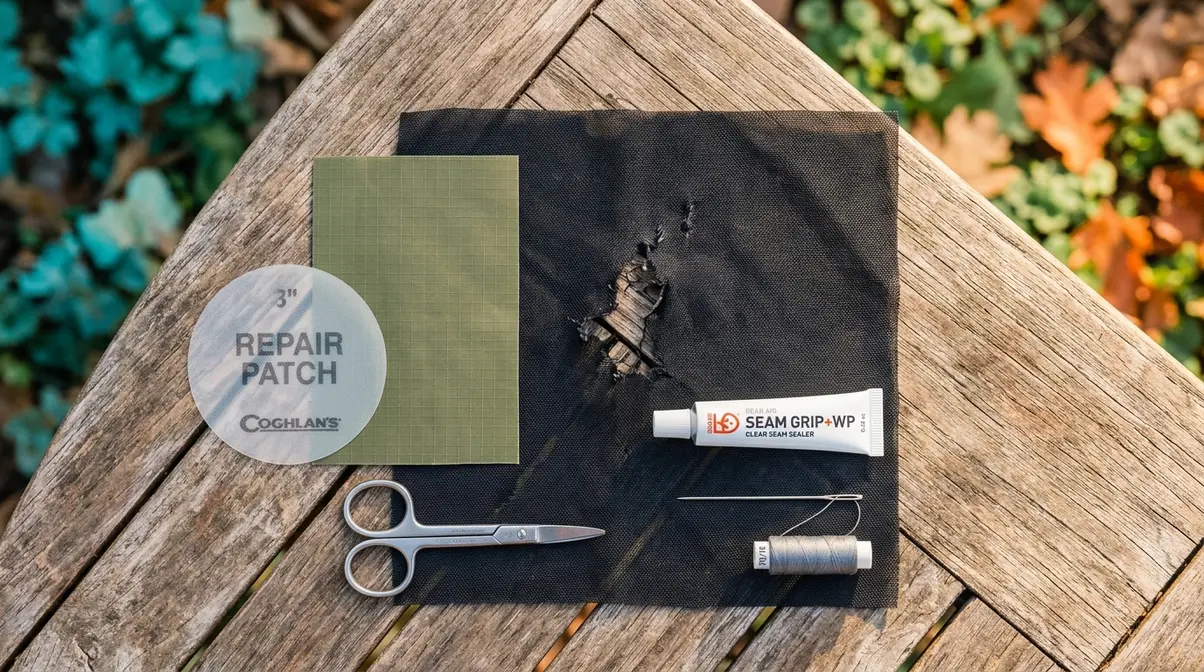
Fine mesh is more delicate than standard tent fabric. The tighter weave that makes no-see-um mesh effective also makes it more vulnerable to snags, burns from camp stoves, and the mesh runs that occur when a single strand pulls and unravels a section of weave. The good news: most damage is repairable with basic materials and patience.
Identifying Mesh Damage
Before you reach for a patch, identify what you’re actually dealing with — the repair method differs significantly by damage type.
A mesh run happens when a single strand catches on something sharp and pulls, creating a ladder-like unraveling along one axis. You’ll see a thin line of loosened or missing strands running in one direction, with the surrounding mesh still intact. Mesh runs are the most common damage type in fine noseeum mesh because the tricot-knit construction is more prone to run propagation than a simple woven fabric. According to NEMO Equipment’s care guidelines, catching a mesh run early — before it extends — is critical to preventing a small repair from becoming a large one.
A hole is a discrete opening where strands have broken or been cut. Holes can result from sharp tent stakes, abrasive rocks, or accidental contact with a zipper tooth. They’re usually circular or irregular in shape and don’t propagate the way runs do.
A burn is the most visually obvious damage — a darkened, melted area where synthetic fibers have fused or disintegrated from heat contact. Camp stove proximity, embers, and cigarettes are the most common causes. Burned areas cannot be repaired by re-weaving; they require a patch over the damaged zone.
Once you’ve identified the damage type, choose your repair method accordingly.
Quick Adhesive Patch Repairs
Adhesive patches are the fastest field fix for holes and burns. You don’t need a needle, thread, or any sewing skill — just a clean, dry surface and a few minutes.
Materials needed: Adhesive mesh repair patch (Coghlan’s Mesh Repair Patches work well for mesh-specific repairs; OAZ Nylon Repair Patches cover nylon tent fabric adjacent to mesh panels), scissors, and a clean dry cloth.
- Steps:
- Clean the damaged area with the dry cloth, removing any dirt, moisture, or debris. Adhesive won’t bond to a wet or dirty surface.
- Cut the patch to size — it should overlap the damaged area by at least ½ inch on all sides.
- Round the corners of the patch with scissors. Square corners peel from the edges; rounded corners stay bonded significantly longer.
- Peel the backing and press the patch firmly onto the mesh, starting from the center and pressing outward to avoid air bubbles.
- Apply firm pressure for 30–60 seconds, then leave undisturbed for at least 2 hours before stressing the repair.
For mesh runs specifically, the adhesive method works but requires a preparatory step: use a drop of clear seam sealer (see our guide to the best seam sealers for tents) or fabric glue at each end of the run to stop further propagation before applying the patch. Without this step, the run can continue beyond the patch edges.
Adhesive patches hold well in dry conditions but can delaminate in sustained wet weather. For a permanent fix — especially on a high-quality tent you plan to use for many seasons — the sewing method below is more durable.
Can You Sew Tent Mesh?
Yes, you can sew no-see-um tent mesh, but fine noseeum mesh requires a different approach than standard fabric repair. The right needle and stitch make the difference between a clean repair and a new run.
Materials needed: Fine ballpoint needle (size 70/10 or 75/11), polyester thread (match color to your mesh), scissors, fabric stabilizer or tear-away backing, and an iron-on hem tape or seam sealer for edge finishing.
- Preparation Steps:
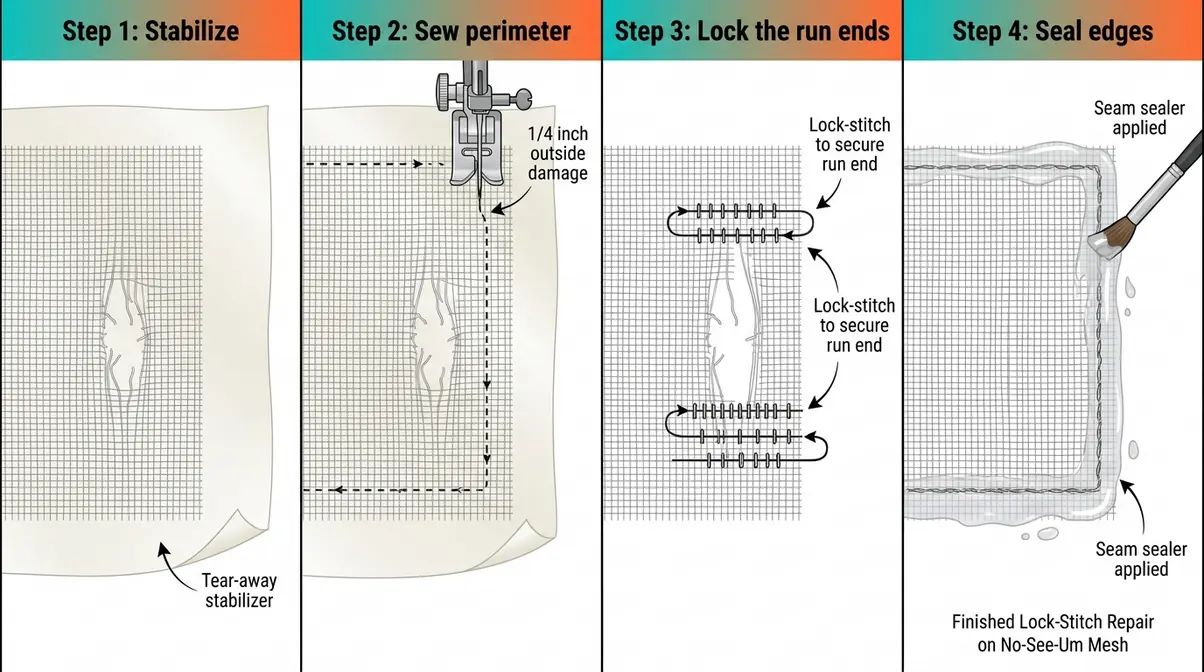
- Stabilize the damaged area by placing a piece of tear-away stabilizer or lightweight iron-on interfacing behind the mesh. This prevents the delicate weave from shifting under the presser foot.
- Thread your machine with polyester thread — nylon thread works but can cause tension issues on fine mesh. Set stitch length to 2.0–2.5 mm.
- Use a lock-stitch pattern rather than a straight stitch for mesh repairs. A lock-stitch anchors each stitch independently, so if one stitch breaks, it doesn’t unravel the entire seam.
- Execution Steps:
- Sew around the perimeter of the damaged area, staying at least ¼ inch outside the visible damage to catch any weakened strands.
- For a mesh run, sew two parallel lines across the run at each end — perpendicular to the direction of the run — to prevent further propagation.
- Remove the stabilizer, then apply a thin line of seam sealer along the stitched edges to prevent fraying.
Hand-sewing is also viable for small holes. Use a fine hand-sewing needle and a simple running stitch around the perimeter of the hole, then apply seam sealer. It won’t be as strong as a machine repair, but it’s a solid field-to-home fix for damage you discover mid-trip.
Preventative Care Tips
The best repair is the one you never need to make. Fine mesh netting is more delicate than the rest of your tent fabric, and a few habits dramatically extend its lifespan.
Storage: Never stuff your tent loosely with the mesh panels exposed to sharp objects. Roll or fold mesh panels inward before packing, and store the tent in its stuff sack away from tent stakes, trekking poles, or anything with a sharp edge.
Setup: Keep the mesh panels away from fire, stoves, and lanterns. A single ember or brief contact with a camp stove is enough to burn a hole in synthetic mesh. When setting up near a campfire, orient your tent door away from the fire.
Cleaning: Rinse mesh panels with cool water and mild soap after dusty or muddy trips. Avoid machine washing on hot cycles — heat can distort the fine weave geometry. According to NEMO Equipment’s care guidelines, air drying in the shade is preferable to direct sunlight, which can degrade synthetic mesh fibers over time.
Zipper care: Many mesh runs start at zipper teeth. Keep tent zippers lubricated with a zipper wax or Teflon-based lubricant, and operate them smoothly rather than forcing them when they catch. A zipper that catches and tears a mesh run is a common and entirely preventable failure mode.
No-See-Um Mesh Limitations
Common Pitfalls
Pitfall 1 — Buying mesh without verifying the spec: A tent labeled “no-see-um” without a mesh count number (like 20×20) may use a coarser weave that doesn’t actually stop biting midges. Always confirm the specification before purchasing. If the retailer can’t provide a mesh count, that’s a red flag.
Pitfall 2 — Applying permethrin to waterproof tent fabric: Permethrin needs to soak into fabric fibers to bond. Applying it to silnylon, DCF, or any DWR-coated waterproof surface wastes product and provides no protection. Treat only the mesh panels and inner tent body, not the waterproof fly.
Pitfall 3 — Ignoring mesh runs until they’re large: A mesh run that’s 2 cm long is a 5-minute repair. The same run ignored for three camping trips can become a 20 cm tear requiring a full panel replacement. Check your mesh panels after every trip.
Pitfall 4 — Over-tightening patches on mesh: Adhesive patches applied with excessive tension can distort the mesh weave geometry, creating stress points that cause new runs adjacent to the repair. Apply patches flat, without stretching the mesh.
When to Choose Alternatives
When ultra-fine mesh creates too much heat: In hot, humid environments like Southeast Asia or the U.S. Gulf Coast in summer, 30×30 mesh can reduce airflow enough to make sleep uncomfortable. In these scenarios, a combination of 20×20 mesh plus permethrin treatment is a better balance than maximum mesh density.
When your tent’s structure is the real problem: If your tent mesh is sagging, poorly tensioned, or has gaps at the seams, no mesh density upgrade will fully solve the problem. Insects enter through structural gaps, not just mesh openings. Address seam tape and structural integrity with a 30-minute tent seam sealing routine before focusing on mesh spec.
When the bug pressure is extreme: In environments with severe black fly or sandfly pressure — certain regions of northern Canada, coastal Scotland, or tropical rainforest camping — even 20×20 mesh combined with permethrin may be insufficient without additional strategies like DEET on exposed skin or a fully enclosed bivy. No single solution covers every insect in every environment.
When to Seek Expert Help
If you’re repairing a tent under warranty, contact the manufacturer before attempting DIY repairs — unauthorized repairs may void coverage. For structural damage near seams or attachment points, a sail or canvas repair specialist can assess whether the surrounding fabric is compromised. This matters particularly for expedition-grade tents where structural integrity is a safety consideration.
Frequently Asked Questions
Can no-see-ums get through tent mesh?
No-see-ums can absolutely get through standard tent mesh — it’s one of the most common and frustrating camping problems. Standard 16×16 or 18×14 mesh creates openings of roughly 156 per square inch, which is wide enough for biting midges (1–3 mm in body width) to pass through without resistance. Only mesh rated at 20×20 or finer — with openings below 0.85 mm — physically blocks these insects. Purdue University Extension confirms that standard window screens are insufficient against biting midges and that specific fine screening is required (Purdue University Extension, 2024). If you’re getting bitten inside your tent, check your mesh count first.
What size mesh stops no-see-ums?
A 20×20 mesh (400 openings per square inch) is the minimum effective specification for stopping no-see-ums, gnats, and biting midges. For high-infestation environments, the University of Arizona recommends 30×30 mesh for near-complete insect exclusion (University of Arizona, 2024). The practical sweet spot for most campers is 20×20, as it stops the insects while maintaining acceptable airflow.
What is no-see-um mesh?
No-see-um mesh is an ultra-fine netting specifically designed to block tiny biting insects that pass through standard mosquito netting. The defining characteristic is a tight 20×20 weave that creates openings too small for insects measuring under 0.85 mm to penetrate. The mesh is named for its ability to stop biting midges, which are so small they’re nearly invisible.
What kills no-see-ums instantly?
No single field-available treatment kills no-see-ums instantly — but permethrin-treated mesh combined with DEET on exposed skin is the most effective combination available. Permethrin is a contact insecticide: insects that land on treated mesh are killed or repelled on contact. A PubMed Central field study found that permethrin-treated tents reduced mosquito bites by 84–94% for occupants inside (PubMed Central, 2003). For insects already inside a tent, a DEET-based repellent on skin is the most effective immediate defense. Thermacell devices that emit allethrin — a pyrethroid insecticide — create a repellent zone around your campsite and are widely used by campers in high-midge environments.
The Right Mesh Makes the Difference
For campers who’ve spent a miserable night watching gnats crawl through the screen holes, no-see-um tent mesh is not a luxury upgrade — it’s the correct tool for the job. Standard mesh fails against biting midges because the holes are simply too large. A verified 20×20 weave with 400 or more openings per square inch creates a physical barrier these insects cannot penetrate.
The Mesh Specs Ladder framework gives you the language to shop intelligently: look for the mesh count number, not just a marketing label. For most camping environments, 20×20 is the sweet spot between protection and breathability. For high-infestation areas, premium tricot-knit mesh at 1,054 holes per square inch or 30×30 woven mesh provides near-complete exclusion. Add a permethrin treatment — the CDC-recommended 0.5% concentration reduces insect landings by 44% at the campsite level — and you’ve built a two-layer defense that handles the worst midge seasons.
When your mesh does tear — and fine mesh will eventually tear — the repair is manageable. Adhesive patches like Coghlan’s Mesh Repair Patches handle field emergencies; a lock-stitch sewing repair with OAZ Nylon Repair Patches as backing material provides a permanent fix at home. The investment in knowing how to maintain your mesh extends the life of your shelter significantly.
Start with your current tent: check the mesh count in the product specs. If you can’t find a number, assume it’s standard mesh and consider either a retrofit insert or a targeted permethrin treatment before your next trip. You don’t need to replace your entire tent to sleep better — you just need the right mesh density for where you’re camping.

Dave King
I'm Dave King. I publish Tent Explorer, a site built to answer the questions people actually ask before they buy.