Home/Tent Troubleshooting and Maintenance
Tent Troubleshooting and MaintenanceHow to Repair Tent Seams: Fix Leaks & Rips (2026)
 Dave King
Updated May 13, 2026
20 min read
Dave King
Updated May 13, 2026
20 min read
You wake up at 3 a.m. to a damp sleeping bag, and the offending seam is right above your head — dripping steadily. Or you unpack your tent the night before a big trip and find a ripped seam you somehow missed. Both situations are genuinely frustrating, and the instinct is to either grab whatever tape is nearby or toss the whole tent.
Here’s what most campers don’t realize: a $200+ tent is routinely thrown away over a $15 repair. The actual problem isn’t the leaking or torn seam — it’s not knowing which sealant to use for which fabric. Apply the wrong product to your tent, and the repair peels off within days. This guide teaches you exactly how to repair tent seams the right way, whether they’re leaking or structurally ripped, by starting with the one diagnostic step every other guide skips: identifying your tent’s fabric coating before anything else.
You’ll walk through fabric identification using The Rub Test, surface preparation, the correct sealing method for your fabric type, a full hybrid repair for ripped seams, and a product comparison to help you buy with confidence.
Learning how to repair tent seams correctly requires identifying your fabric coating first — using the wrong sealant on Silnylon vs. PU-coated fabric is the #1 cause of repair failure.
- Do The Rub Test first: Rub your fingertip firmly along the coated side of the seam; if it feels slick or waxy, you have Silnylon — use silicone-based sealant only
- Leaking seam: Clean the surface, remove flaking tape, apply Seam Grip WP (PU tents) or Seam Grip SIL (Silnylon tents), and allow 8–24 hours to cure
- Ripped seam: Sew the tear if possible, apply Tenacious Tape on both sides, then apply liquid seam sealer over the stitching
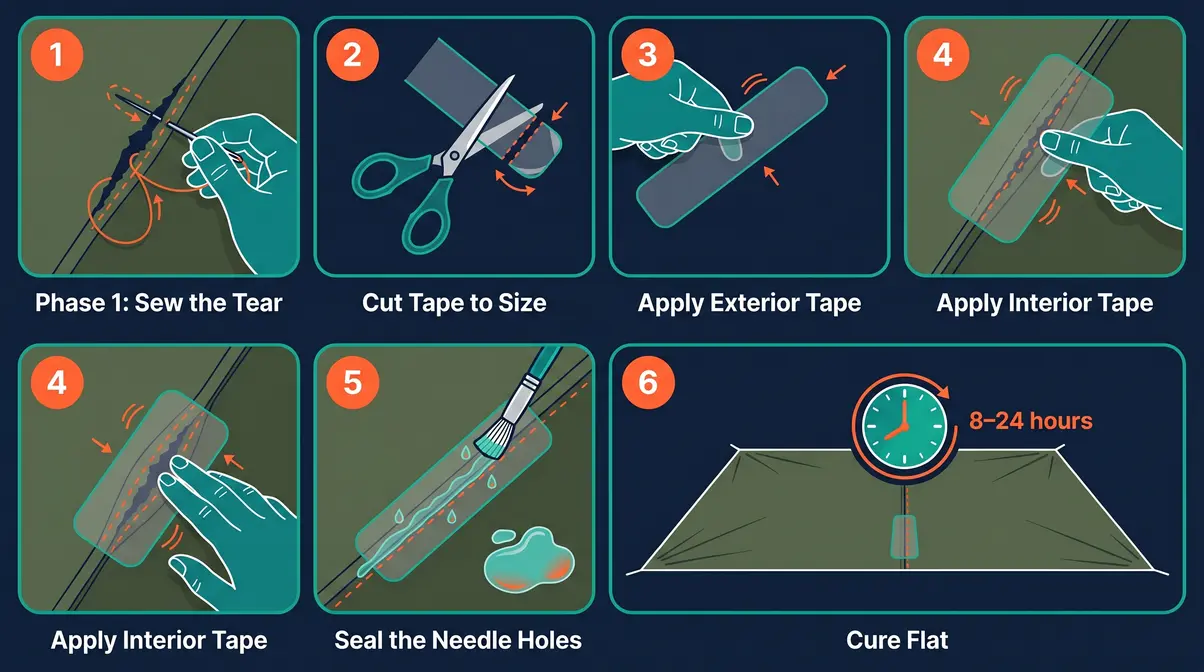
- Repair lifespan: PU-coated tent seams typically require re-sealing every 2–3 seasons; silicone-coated (Silnylon) seams, once properly sealed, can last the life of the tent (SectionHiker, 2026)
What You’ll Need: Tools and Materials
Having the right materials before you start is the difference between a repair that holds for three seasons and one that peels off on your next trip. The products you need for tent seam repair differ based on your fabric type — you’ll confirm yours in Step 1 using The Rub Test. Before you begin, work outdoors or in a well-ventilated space; liquid sealants off-gas during application and curing, and the fumes are not pleasant in a closed room.
Routine tent maintenance starts with the right toolkit. As the National Wildfire Coordinating Group notes in their Camp Equipment Manual, actively repairing holes, tears, and seams is essential to tent care and longevity.
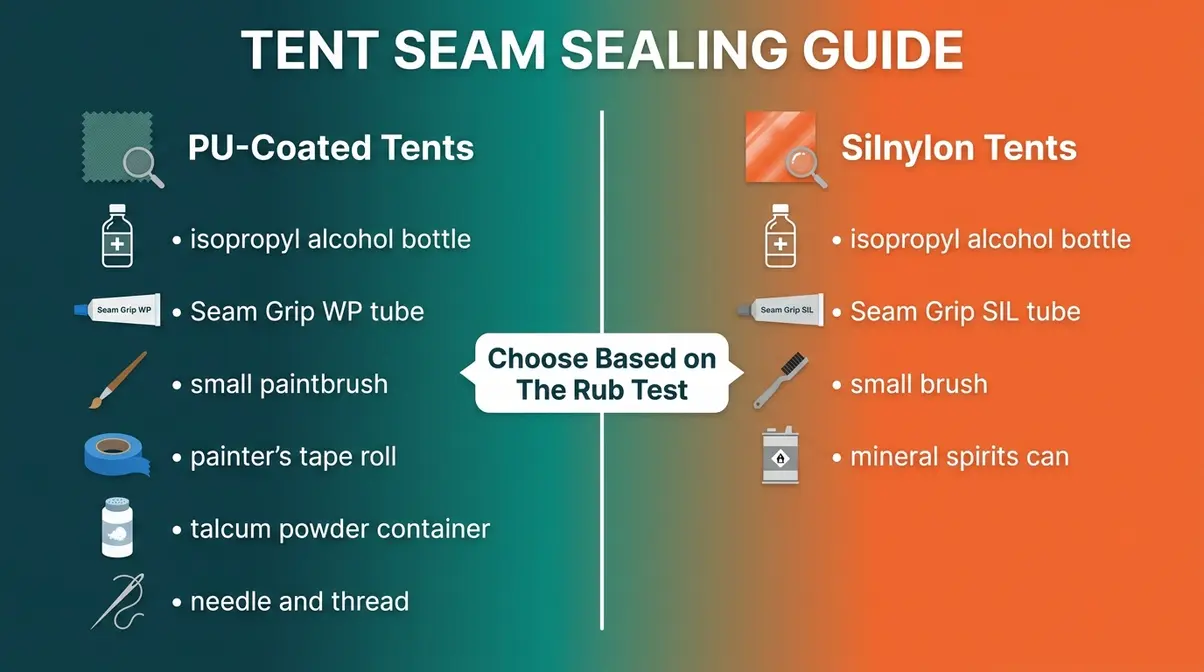
For PU-Coated Tents (polyurethane coating — the standard waterproof treatment on most standard camping tents):
- Isopropyl alcohol (90%+) and clean rags — for surface degreasing
- Seam Grip WP, a urethane-based liquid seam sealer by GEAR AID — primary sealant
- Small paintbrush or applicator brush — for even, controlled application
- Painter’s tape — to mask surrounding fabric and keep lines clean
- Talcum powder or baby powder — prevents the seam from bonding to itself when folded after curing
- Needle and thread — for ripped seams, before sealing
For Silnylon Tents (Silnylon, a silicone-coated nylon fabric used in ultralight and backpacking tents):
- Isopropyl alcohol (90%+) and clean rags
- Seam Grip SIL or McNett Silnet — silicone-based sealant only; urethane will not bond to silicone-coated fabric (Metro Sealant, 2026)
- Small brush or clean fingertip for application
- Mineral spirits — for brush cleanup after application
- Also useful for both types:
- GEAR AID Tenacious Tape, a pressure-sensitive waterproof repair patch — for structural rips
- Headlamp or bright work light — seams are small and hard to see in poor lighting
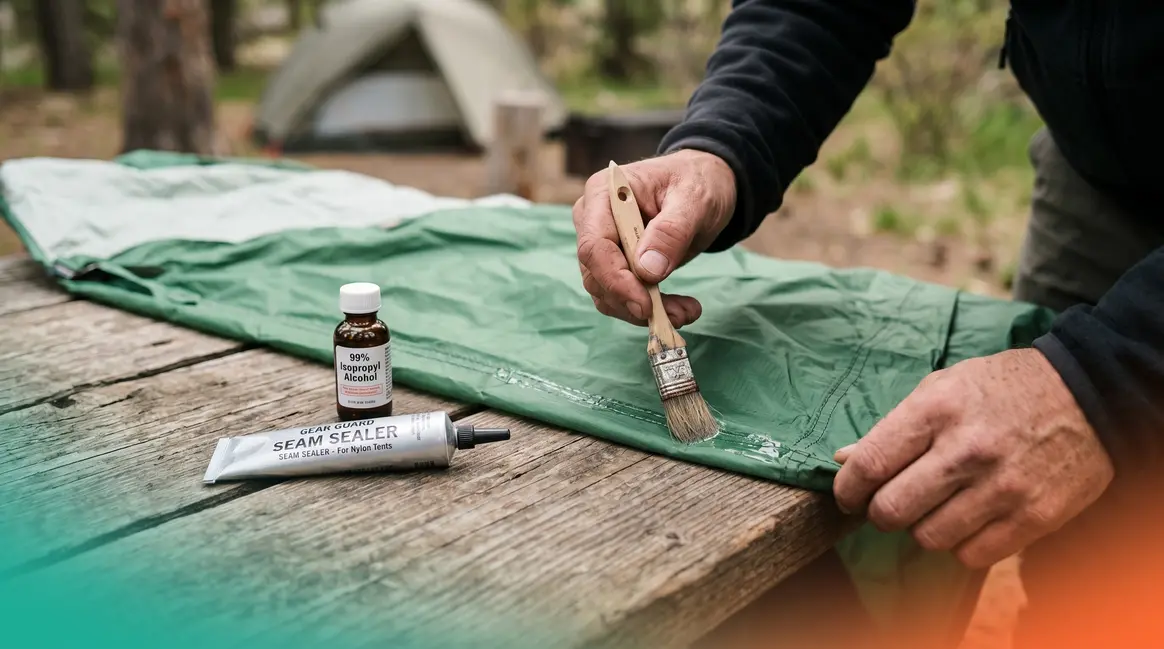
“The single most common tent seam repair mistake is applying a urethane-based sealant to a Silnylon tent — the two materials are chemically incompatible, and the repair will peel within days.” (GEAR AID, 2026)
Step 1: Identify Your Tent Fabric
Before any product touches your tent, you need to know what your tent is made of. This is the step that 100% of other tent repair guides skip — and it’s the reason most repairs fail. The right sealant for one fabric type is completely wrong for the other. According to the NOLS guide on repairing waterproof gear, getting this identification wrong doesn’t just mean a wasted tube of sealant. It means a repair that looks fine initially but fails completely the first time rain hits it.
Silnylon vs. PU-Coated Tents
Most camping tents fall into one of two categories based on their waterproof coating.
Polyurethane (PU) coating is the most common waterproof treatment on standard camping and family tents. It’s applied to the inner surface of the fly fabric and forms a slightly matte, sometimes tacky surface. PU-coated tents accept urethane-based sealants like Seam Grip WP, which bond chemically to the coating. Over time, PU coatings degrade — you may notice flaking, peeling seam tape, or a sticky, de-laminating interior surface. These are signs the coating is breaking down.
Silnylon is a silicone-coated nylon fabric used primarily in ultralight and backpacking tents. The silicone impregnates the weave itself, giving the fabric a noticeably slick, waxy feel. Because silicone has low surface energy, urethane-based sealants cannot form a durable bond with it — they sit on top of the surface rather than adhering to it, and peel away within days (Metro Sealant, 2026). Silnylon requires a silicone-based sealant like Seam Grip SIL.
Canvas tents are a distinct third category — they use wax-based sealants like beeswax or paraffin, not liquid polyurethane or silicone products. If you have a canvas tent, the Rub Test still applies, but your product selection will differ.
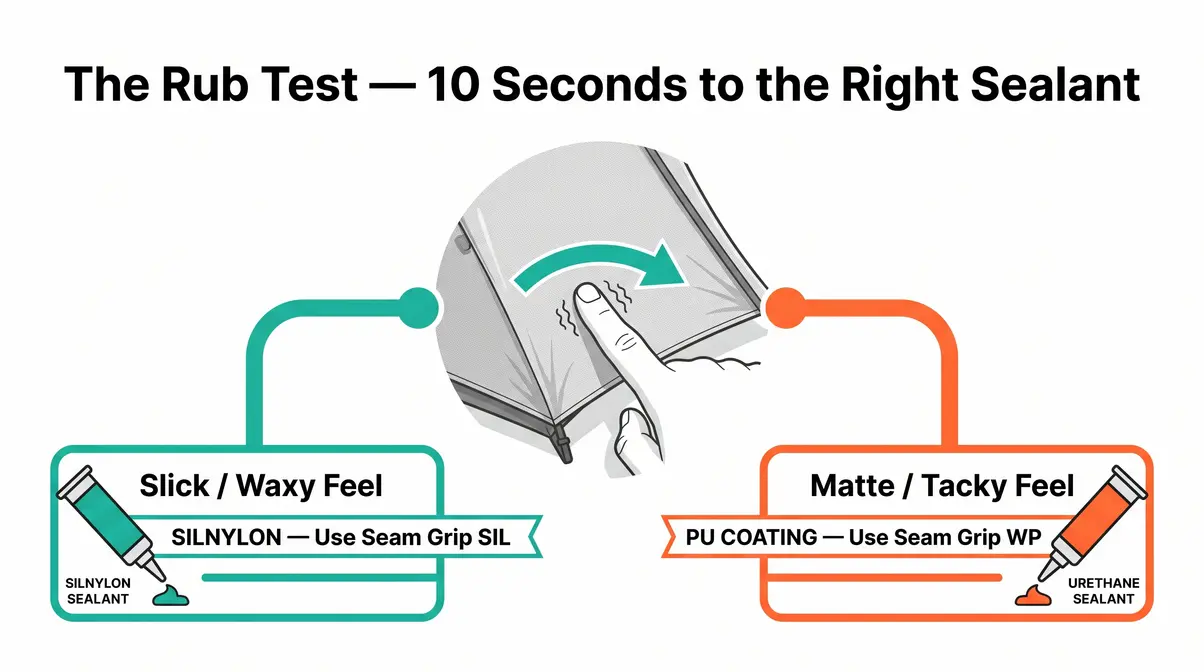
The 10-Second Rub Test
The Rub Test is a 10-second field diagnostic that tells you exactly which sealant category your tent belongs in.
- Find the coated side of your tent fly. This is usually the inside surface — the side that faces the tent body, not the sky.
- Rub your fingernail or fingertip firmly along the seam area. Apply moderate pressure for 2–3 seconds.
- Read the result:
- Slick, waxy, or slightly greasy feel → You have Silnylon. Use silicone-based sealant only (Seam Grip SIL or Silnet).
- Matte, slightly tacky, or rubbery feel → You have a PU coating. Use urethane-based sealant (Seam Grip WP).
- No distinct coating feel, rough or natural texture → Likely canvas or an older wax-treated fabric. Research your specific tent model.
- Check your tent’s documentation. If you still aren’t sure, look up your tent model online — most manufacturers list the fabric type in the technical specs. Ultralight tents (under 3 lbs) are almost always Silnylon.
Step 2: Assess and Prepare the Seam
With your fabric type confirmed, the next step is understanding exactly what kind of repair you’re dealing with. Not all seam problems are the same, and choosing the wrong repair path wastes time and materials.
Leaking vs. Ripped Seams
Run your hand along every seam on the fly and inner tent body in good light. You’re looking for two distinct problems:
A leaking seam shows no visible structural damage — the fabric is intact, but water passes through the seam stitching. Common signs include wet gear directly under a seam after rain, or visible peeling seam tape on the interior of the fly. This is a waterproofing failure, not a structural one. Your repair path is Step 3 (liquid seam sealer method).
A ripped seam means the stitching has failed or the fabric has torn along or near the seam line. The tent may still technically keep water out in light rain, but the structural integrity is compromised. Under wind stress or heavy rain, a ripped seam will open further. Your repair path is Step 4 (hybrid rip repair method).
Some seams show both problems simultaneously — a torn seam that also leaks. In that case, always address the structural rip first (Step 4), then apply seam sealer over the finished repair.
Removing Old Tape and Cleaning
This step is where many repairs fail before they even start. Sealant applied over old, de-laminating tape or a dirty surface will not bond properly — you’ll end up with a sticky mess that peels off in the rain.
To remove old peeling seam tape:
- Work in a warm room if possible — heat makes old adhesive more pliable.
- Gently peel back any tape that is already lifting. Use your fingernail to lift the edge; do not use a blade near tent fabric.
- Pull slowly at a low angle (nearly parallel to the fabric) to avoid tearing the underlying material.
- For stubborn adhesive residue, apply a small amount of isopropyl alcohol on a clean rag and rub gently in circular motions. Allow 2 minutes to lift the adhesive.
- Repeat until the surface is clean and no sticky residue remains.
To clean the seam surface before sealing:
- Wipe the entire seam with isopropyl alcohol (90%+) on a clean rag.
- Allow the surface to dry completely — at least 10–15 minutes.
- Do not touch the cleaned area with bare fingers before applying sealant; skin oils interfere with adhesion.
“Clear silicone, rub it on with your finger. Smells like vinegar while it cures. Just make sure to clean the fabric well first.”
— Community consensus from outdoor gear forums, reflecting the most repeated advice across tent repair discussions
Can taped seams be repaired?
Yes — taped seams can be repaired, but the old tape must be fully removed first. As detailed in university-hosted tent maintenance instructions, factory seam tape that is peeling, de-laminating, or flaking off creates an uneven surface that prevents new sealant from bonding properly. Peel away all loose tape, remove adhesive residue with isopropyl alcohol, and allow the surface to dry completely. Once clean, apply fresh liquid seam sealer directly to the bare stitching. Attempting to apply new sealant over deteriorating old tape is a common mistake that guarantees a failed repair.
Step 3: Repair a Leaking Seam
When figuring out how to repair tent seams that leak, liquid seam sealer is the correct fix for a seam with no structural damage. If you want to achieve perfect tent seam sealing in 30 minutes tested by expert campers, liquid seam sealer is the correct fix. The method differs slightly depending on your fabric type — this is where The Rub Test result from Step 1 directly dictates your approach. As recommended in a recent Popular Mechanics tent repair tutorial, applying the right product to a properly prepared surface produces a permanent, waterproof bond. According to GEAR AID’s seam sealer guidance, applying the right product to a properly prepared surface produces a permanent, waterproof bond.
Applying Seam Grip WP to PU Tents
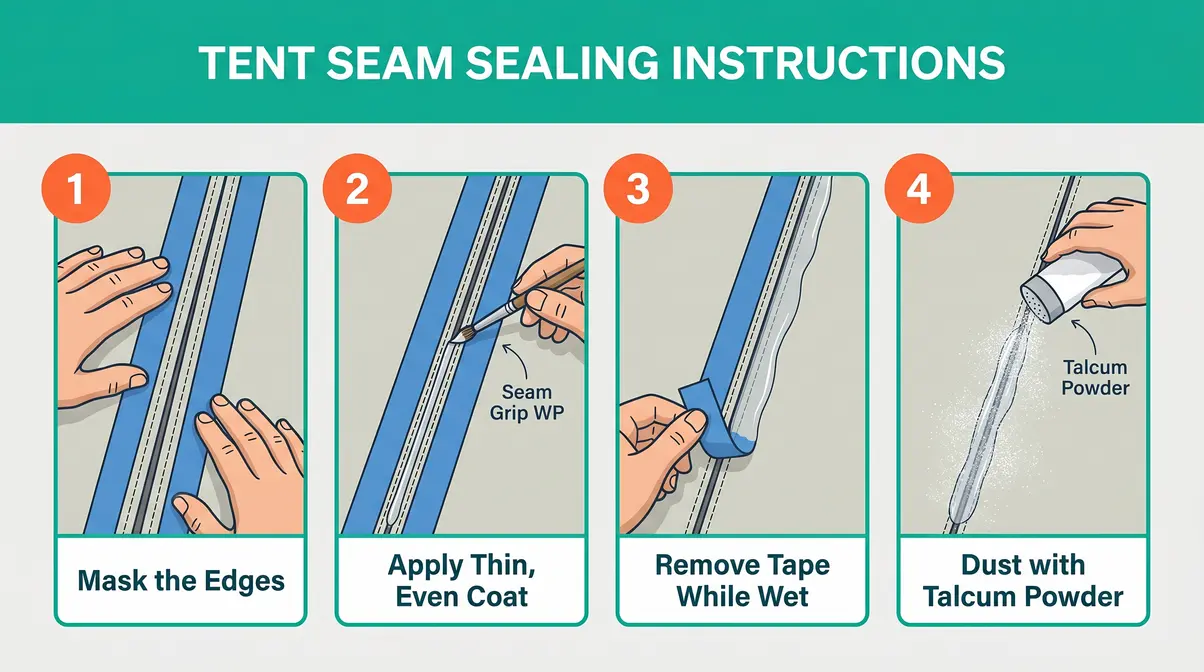
Seam Grip WP cures in 8–10 hours and one 1 oz tube seals up to 12 feet of seams (GEAR AID, 2026). Apply it to the interior surface of the fly — the coated side — not the exterior.
- Confirm your surface is clean, dry, and free of old tape residue (see Step 2).
- Apply painter’s tape along both edges of the seam to keep application neat.
- Using a small paintbrush, apply a thin, even coat of Seam Grip WP directly over the seam stitching. Work in one direction; don’t brush back and forth.
- Extend the sealant 3–4 mm on each side of the stitching line to cover the needle holes fully.
- Remove painter’s tape while the sealant is still wet.
- Dust the wet sealant lightly with talcum powder. This prevents the treated seam from bonding to itself or the tent body when the fly is packed away.
- Allow to cure flat, with the seam facing up, for 8–10 hours minimum. Avoid folding or packing the tent until fully cured.
Applying Seam Grip SIL to Silnylon
Seam Grip SIL (formerly sold as McNett Silnet) is a silicone-based sealant that self-levels and dries to a clear, flexible matte finish. One 1.5 oz tube typically seals up to 24 feet of seams on most two-person tents (GEAR AID, 2026). Unlike Seam Grip WP, it can be applied with a fingertip — and many experienced backpackers prefer this method for better control on lightweight fabrics.
- Confirm the surface is clean and dry (isopropyl alcohol wipe, fully dried).
- Squeeze a small bead of Seam Grip SIL along the seam.
- Spread evenly using a clean fingertip or small brush, working the sealant into the stitching. The product self-levels to some degree, so thin application is better than thick.
- Allow to cure for 8–24 hours. The sealant will smell like vinegar as it cures — this is normal acetic acid off-gassing from the silicone.
- No talcum powder is needed; cured Seam Grip SIL does not stick to itself.
For cleanup, use mineral spirits on the brush immediately after application — water will not remove uncured silicone.
Step 4: Repair a Ripped Tent Seam
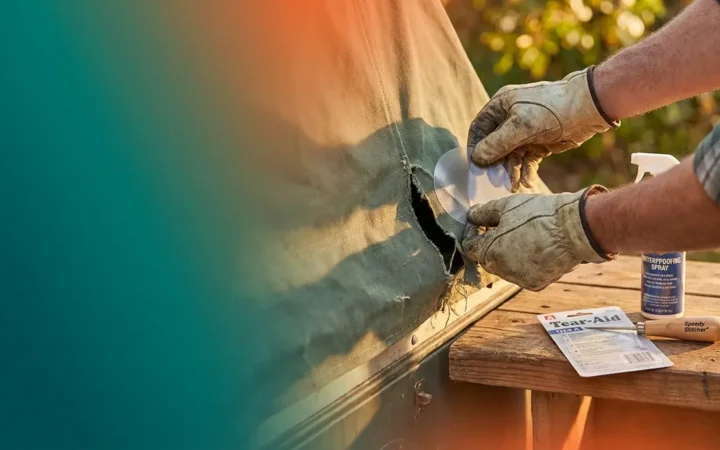
A ripped seam is a structural failure, not just a waterproofing one. Liquid sealant alone will not hold a torn seam under load — the stitching needs to be reinforced first. This section covers both field repair (getting through the night) and permanent home repair. According to REI’s tent repair guide, addressing structural damage before resealing is essential for a lasting fix.
Field Repair: Get Through the Night
When a seam rips mid-trip and you need a fast, functional fix:
- Dry the area as much as possible using a rag or clothing.
- Cut a piece of GEAR AID Tenacious Tape slightly larger than the rip — round the corners to prevent edge peeling.
- Apply to the outside of the tent fabric, pressing firmly from the center outward to eliminate air bubbles.
- Apply a second piece to the interior side if you can reach it. Two-sided coverage dramatically increases field repair durability.
- Press the tape for 60 seconds with firm, even pressure — body heat helps activate the adhesive.
This repair will hold through a night of moderate rain and wind. It is not permanent. Plan a full home repair as soon as you return.
Permanent 6-Step Home Repair
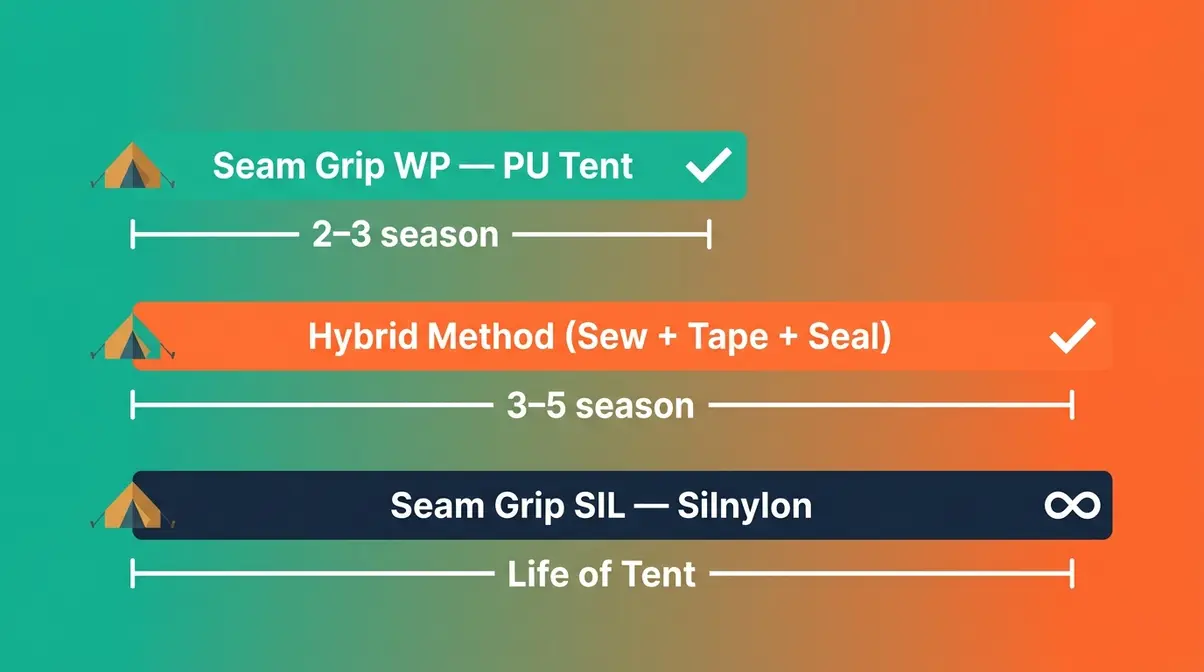
The hybrid method combines sewing, tape reinforcement, and liquid seam sealer for a repair that restores both structural integrity and waterproofing. Based on manufacturer guidelines from GEAR AID, REI expert advice, and community-tested methods across outdoor gear forums, this sequence produces the most durable long-term result.
Tools needed: Needle and thread (nylon or polyester, matching weight to your tent fabric), Tenacious Tape, Seam Grip WP or SIL (per your fabric type), scissors, isopropyl alcohol, clean rags. Estimated time: 45–90 minutes plus 8–24 hours curing.
- Phase 1: Preparation and Sewing
- Assess the tear. If the rip is longer than 2 cm or runs along a stress point (corner, pole attachment), sewing is strongly recommended before taping. Shorter tears in low-stress areas can skip to step 3.
- Sew the seam closed. Use a simple running stitch or, for better strength, a backstitch. Keep stitches tight and evenly spaced at 2–3 mm intervals. Knot securely at both ends.
- Clean the repair area with isopropyl alcohol. Allow to dry fully (10–15 minutes minimum).
- Phase 2: Taping and Sealing
- Apply Tenacious Tape over the stitched repair on the exterior side. Cut the tape to overlap the tear by at least 2 cm on each end. Round all corners. Press firmly for 60 seconds.
- Apply a second strip of Tenacious Tape on the interior side if accessible. For most tent flies, you can reach the interior through the door opening.
- Apply liquid seam sealer (Seam Grip WP for PU; Seam Grip SIL for Silnylon) over the stitching line on the coated side, using the method from Step 3. This seals the needle holes from the sewing step and waterproofs the entire repair zone.
Allow to cure flat for 8–24 hours before packing or using the tent.
Step 5: Choose the Right Product for Your Repair
Knowing which product category you need (from The Rub Test) is the first decision. The second is picking the right specific product within that category. Here’s how the main options compare.
Liquid Seam Sealers Compared
Three products cover the vast majority of tent seam repair scenarios:
| Product | Base | Best For | Coverage | Cure Time |
|---|---|---|---|---|
| Seam Grip WP (GEAR AID) | Urethane | PU-coated tents, all standard camping tents | ~12 ft / 1 oz | 8–10 hrs |
| Seam Grip SIL (GEAR AID) | Silicone | Silnylon, ultralight tents | ~24 ft / 1.5 oz | 8–24 hrs |
| Silnet (Six Moon Designs) | Silicone | Silnylon, silicone-coated tarps | ~40 ft / 1.5 oz (thinned) | 8–24 hrs |
Seam Grip WP is the right choice for the overwhelming majority of standard camping tents — three out of four GEAR AID product representatives recommend matching the sealant chemistry to the fabric coating (99Boulders, 2026). Seam Grip SIL and Silnet are functionally similar; Silnet can be thinned with mineral spirits for a lighter, more penetrating application on very lightweight fabrics. Neither silicone product should ever be used on a PU-coated tent, and Seam Grip WP will not bond to Silnylon.
Repair Tapes Compared
| Tape | Waterproof | Flexibility | Long-Term Durability | Best For |
|---|---|---|---|---|
| GEAR AID Tenacious Tape | Yes | High | Excellent — survives machine washing | Tent fabric patches, structural rip reinforcement |
| Gorilla Clear Repair Tape | Partial | Medium | Fair — can become gummy over time | Emergency field repair only |
| Generic duct tape | No | Low | Poor — adhesive fails in moisture and heat | Not recommended for tent repair |
Gorilla Tape is strong in raw tensile terms, but outdoor gear community consensus consistently flags it as a temporary solution — it becomes gummy with prolonged exposure to heat and moisture (Backpacking Light, 2026). Tenacious Tape, by contrast, has been documented surviving 30°C machine wash cycles while maintaining adhesion (UKClimbing Forums, 2026). For anything beyond a single-night emergency fix, Tenacious Tape is the correct choice.
What is the best tape for tent repair?
GEAR AID Tenacious Tape is the best tape for tent repair for most scenarios — it is waterproof, highly flexible, and has been documented surviving machine washing while maintaining adhesion (UKClimbing Forums, 2026). It comes in clear and fabric-color options and is available in both patch and roll formats. For seam-specific reinforcement, use Tenacious Tape in combination with liquid seam sealer, not as a standalone fix. Gorilla Tape is a reasonable emergency substitute for a single night but is not suitable for permanent repairs.
How Long Do Tent Seam Repairs Last?
Understanding repair lifespan helps you set realistic expectations and plan for re-treatment before your tent fails in the field. Longevity varies considerably based on fabric type, repair method, and how the tent is stored.
Repair Lifespan by Method
| Repair Type | Fabric | Expected Lifespan | Notes |
|---|---|---|---|
| Liquid seam sealer (Seam Grip WP) | PU-coated | 2–3 seasons | PU coatings degrade faster overall; re-seal proactively |
| Liquid seam sealer (Seam Grip SIL) | Silnylon | Life of tent | Silicone bonds are highly durable; rarely need re-sealing (SectionHiker, 2026) |
| Hybrid method (sew + tape + seal) | Both | 3–5 seasons | Tape reinforcement extends lifespan significantly |
| Tenacious Tape field repair only | Both | 1–3 nights | Temporary; follow up with full repair |
Silicone-coated tents have a structural advantage here — once properly sealed, the silicone bond is extremely durable and essentially unaffected by UV, mold, or mildew (SectionHiker, 2026). PU coatings are more vulnerable to hydrolysis (breakdown from moisture over time), which is why most standard camping tents need periodic re-sealing every couple of seasons regardless of whether you’ve noticed active leaking.
Signs Your Repair Has Failed
Check your repair before each camping season. Signs of failure include:
- Visible lifting at the tape edges — the tape is delaminating from the fabric surface
- Wet gear under a previously repaired seam — the sealant has cracked or peeled
- Sticky or tacky residue on the repair area — PU breakdown is continuing beneath the repair
- Bubbling or wrinkling in the sealant layer — the bond has broken and moisture has infiltrated
If any of these appear, the repair needs to be fully stripped and redone — not patched over. Applying new sealant over a failed repair compounds the problem. Strip the old material with isopropyl alcohol, return to Step 2, and work through the full process again.
Common Mistakes That Ruin Tent Seam Repairs
Even with the right products and technique, a handful of execution errors consistently cause repairs to fail prematurely. Across outdoor gear communities, these two mistakes account for the majority of reported repair failures. Properly staking your tent with the best tent stakes for high winds prevents the fabric from flapping aggressively and stressing the seams. Similarly, using the best tent stakes for sand when beach camping minimizes structural stress that can lead to premature sealant failure.
Sealing a Dirty or Damp Surface
This is the most frequently reported cause of early repair failure. Liquid sealants rely on direct contact with the fabric coating to form a bond — any contaminant between the sealant and the fabric (body oil, dirt, residual adhesive from old tape, or moisture) creates a barrier that prevents proper adhesion.
The consequence is a repair that appears to have set correctly but lifts cleanly off the fabric within one or two rain events. Common issues reported by campers include sealant peeling off in a single sheet, leaving the seam completely unprotected.
The fix is straightforward: always wipe with isopropyl alcohol (90%+) and allow the surface to dry completely before applying any sealant. Ten minutes of patience here prevents a full redo later.
Using the Wrong Fabric Sealant
This is the mistake The Rub Test exists to prevent. Polyurethane sealant cannot form a durable bond with silicone-coated fabric due to silicone’s low surface energy — the sealant simply sits on the surface rather than bonding to it (Metro Sealant, 2026). The result looks fine when wet but peels away as it dries and flexes.
The reverse error — applying silicone sealant to a PU tent — is less common but similarly problematic. Silicone does not adhere well to PU coatings either, and the repair will lack the structural bond that Seam Grip WP provides.
If you’ve already made this mistake: strip the failed repair completely with isopropyl alcohol, allow to dry, perform The Rub Test to confirm your fabric type, and start over with the correct product. There is no shortcut that salvages a chemically incompatible repair.
Frequently Asked Questions
How to repair a ripped tent seam?
Repairing a ripped tent seam requires a three-step hybrid method: sew the tear closed with nylon or polyester thread, reinforce both sides with GEAR AID Tenacious Tape, then apply liquid seam sealer (Seam Grip WP for PU tents, Seam Grip SIL for Silnylon) over the stitching. Liquid sealant alone will not hold a structural rip under load — the stitching and tape provide the structural strength, while the sealant restores waterproofing over the needle holes. For a mid-trip emergency, Tenacious Tape on both sides will hold through one night until a full home repair is possible.
How do you reseal seams on a tent?
Resealing tent seams starts with removing all old, flaking tape and cleaning the surface with 90%+ isopropyl alcohol. Once dry, apply the correct liquid seam sealer to the interior coated surface: Seam Grip WP for standard PU-coated tents, or Seam Grip SIL for Silnylon. Use a small brush for even coverage, extend 3–4 mm past each side of the stitching, and cure flat for 8–24 hours. Dust with talcum powder before packing if using Seam Grip WP. Most PU-coated tents benefit from resealing every 2–3 seasons proactively.
Is Gorilla Tape good for tent repair?
Gorilla Tape is acceptable for emergency field repairs only — it is not suitable for permanent tent seam repair. It provides strong short-term adhesion, but outdoor gear communities consistently report that it becomes gummy with prolonged heat and moisture exposure (Backpacking Light, 2026). Its adhesive is not formulated for the repeated wet-dry cycles a tent experiences. For a multi-night trip or permanent fix, GEAR AID Tenacious Tape significantly outperforms Gorilla Tape in waterproofing and long-term flexibility.
What tape is used to mend tents?
GEAR AID Tenacious Tape is the standard choice for mending tents — it bonds to nylon, polyester, and coated fabrics, stretches with the material under stress, and holds in wet conditions. For seam reinforcement specifically, Tenacious Tape should be paired with liquid seam sealer for a complete repair. Factory seam tape (the iron-on type used in manufacturing) is a different product and requires heat-activation equipment; it is not practical for field or home repairs. Ripstop repair tape is another option for fabric tears away from seams. If you’re tired of maintenance, you might explore the best glamp tent options for luxury camping instead.
Wrapping Up: The Right Repair, Done Once
For intermediate campers dealing with a leaking or torn seam, mastering how to repair tent seams is genuinely manageable — but only when you start with the right diagnostic. Applying the correct sealant to the correct fabric type is the single variable that separates a repair that lasts three seasons from one that peels off in the first rainstorm. Based on manufacturer specifications from GEAR AID and community-tested methods across outdoor gear forums, matching your product to your fabric (Seam Grip WP for PU, Seam Grip SIL for Silnylon) is the foundation of every successful repair.
The Rub Test makes that decision simple — ten seconds of fabric identification before you buy anything prevents the most common and costly repair failure. Whether you’re resealing a leaking seam or working through the full hybrid method on a structural rip, the sequence is the same: identify, clean, repair in the right order, and allow full cure time before packing.
Your next step: perform The Rub Test on your tent today. If the fly feels slick or waxy, order Seam Grip SIL. If it feels matte or slightly tacky, grab Seam Grip WP. Then set aside an afternoon, follow Steps 2 through 4, and give your tent another 3–5 seasons of reliable use — for around $15 and an hour of work. Once your tent is waterproof again, you can safely use the best electric heaters for tent camping without worrying about moisture damage. If you decide the damage is too extensive, it might be time to upgrade to the best hot tent for winter camping. Ultimately, knowing how to fix your gear is a key part of how to improve sleep camping naturally, as you’ll rest easy knowing you’re protected from the elements.

Dave King
I'm Dave King. I publish Tent Explorer, a site built to answer the questions people actually ask before they buy.