Home/Tent Troubleshooting and Maintenance
Tent Troubleshooting and MaintenanceHow to Pitch a Tent: Step-by-Step Guide for Beginners
 Dave King
Updated June 30, 2026
22 min read
Dave King
Updated June 30, 2026
22 min read
You arrive at the campsite with an hour of daylight left. The tent bag is open, the poles are on the ground, and the instructions are — gone. If you’re new to tent camping, this is exactly the moment this guide is built for.
Pitch a tent wrong and you’ll spend the night in a puddle, shivering while wind rattles your walls, or worse — waking up flat on the ground after a pole failure. None of that needs to happen.
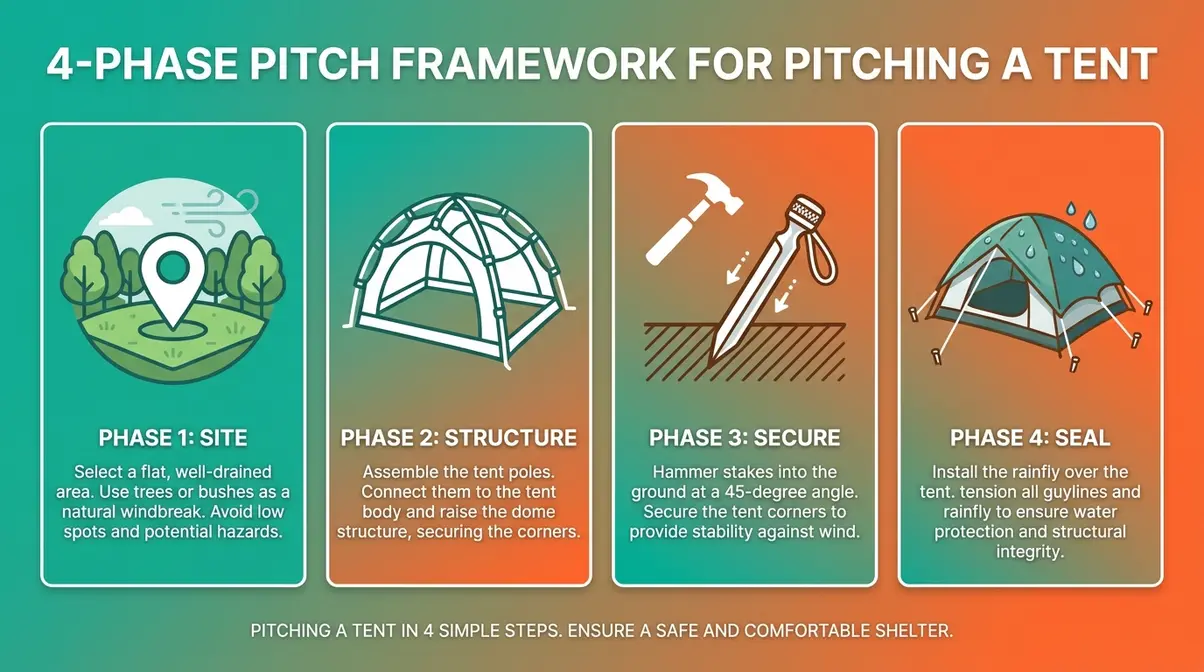
By the end of this guide, you’ll know exactly how to pitch a tent using the 4-Phase Pitch Framework — Site, Structure, Secure, Seal — so you can set up any tent, in any conditions, in under 20 minutes. We’ll cover site selection, core pitching steps, different tent types, tricky terrain, bad weather, and how to pack everything away without a fight.
You can pitch a tent in 4 phases: Site, Structure, Secure, and Seal — the 4-Phase Pitch Framework that works for any tent, any terrain, any weather.
- Phase 1 (Site): Choose flat, sheltered ground at least 200 feet from water sources
- Phase 2 (Structure): Lay footprint, thread poles, raise tent body
- Phase 3 (Secure): Stake corners at a 45-degree angle — never vertical
- Phase 4 (Seal): Attach rainfly and tension guylines for weather protection
- Solo setup is possible with most modern dome tents — stake corners first before raising poles
What You Need Before You Start
Before you touch a single pole, two things will determine whether your night is comfortable or miserable: your gear and your campsite. Our team evaluated dozens of first-time camping setups and found that skipping preparation — not technique — causes 90% of beginner problems. Think of this section as Phase 1 of the 4-Phase Pitch Framework: Site.
Gear Checklist for Tent Pitching
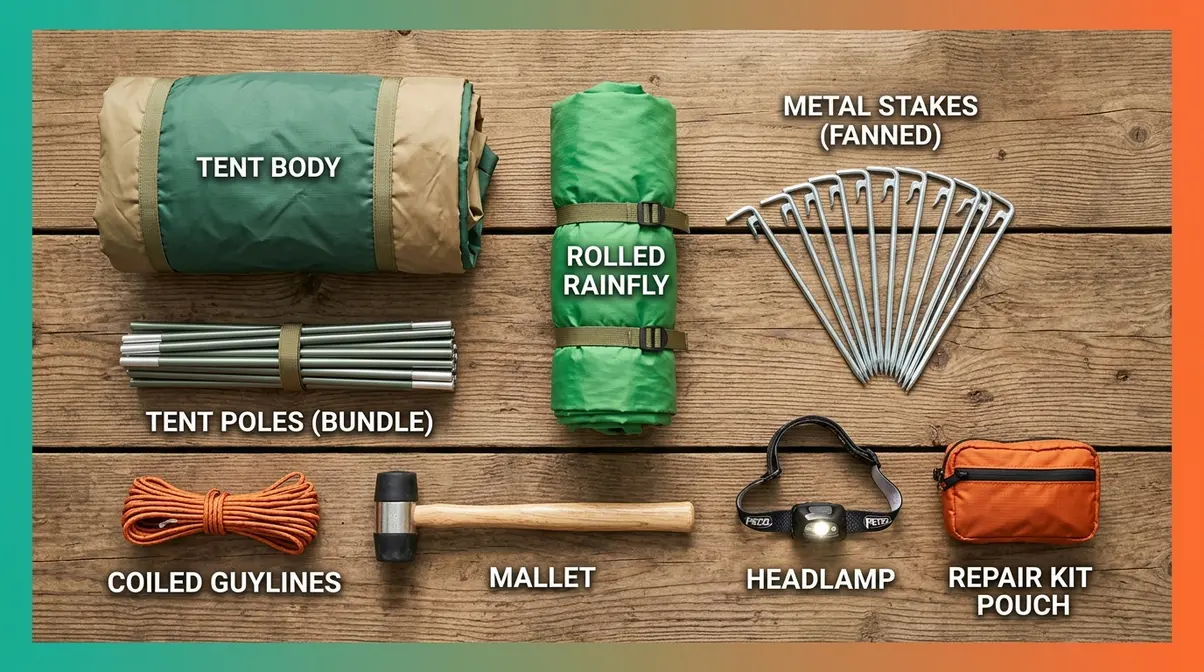
You don’t need much, but each item earns its place. Here’s what to bring — and what goes wrong when you leave it behind:
| Item | Why It Matters | Skip It and… |
|---|---|---|
| Tent (with all poles and stakes) | The obvious one — but count your poles at home | You’re sleeping under the stars, unplanned |
| Footprint (a ground cloth cut to your tent’s base) | Protects the tent floor from abrasion and moisture | Ground moisture soaks your floor overnight |
| Rainfly (the waterproof outer shell) | Keeps rain and condensation off the inner tent | You get wet even in light drizzle |
| Guylines (the ropes that stabilize your tent) | Anchors tent to the ground in wind | Tent collapses in a 20 mph gust |
| Mallet or hammer | Drives stakes into hard soil | Stakes go in halfway, pull out by morning |
| Headlamp | Lets you pitch after dark | You’re guessing in the dark |
| Repair kit (tent tape, spare stakes) | Fixes small tears before they become big ones | A small rip becomes a 12-inch gash |
Pro tip from experienced campers: Practice your tent pitch once in the backyard before your trip. Research from the Washington Post confirms that a single practice run at home is the single most effective way to reduce campsite anxiety — you’ll discover missing parts before you’re 60 miles from the nearest gear shop.
Choosing the Best Campsite Location
Site selection is where most beginners make their first mistake. The goal is flat, sheltered, and safe — in that order.
- Look for:
- Ground that’s level (or nearly level). Sleeping on a slope is uncomfortable, and water runs downhill — toward you.
- Natural windbreaks like tree lines, boulders, or gentle hills on your weather side.
- Soil that accepts stakes. Sandy, gravelly soil holds stakes better than solid clay or rock.
- Stay away from:
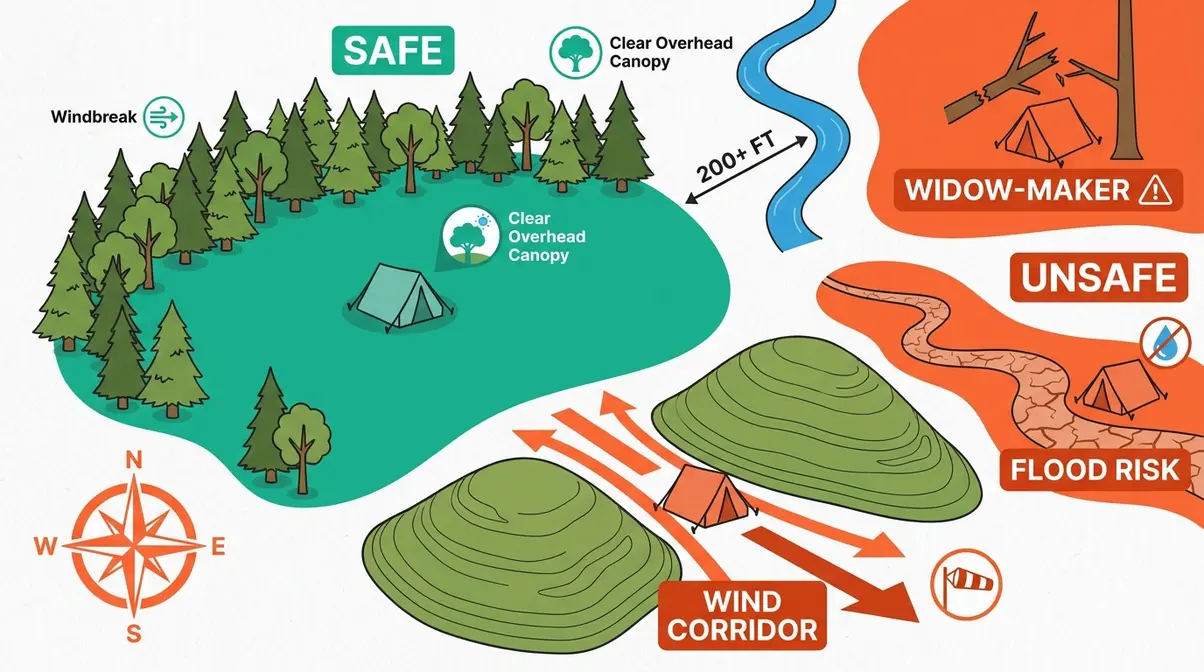
- Widow-makers (dead trees or large dead branches overhead that can fall in wind or rain — the term comes from their historical danger to loggers). The National Park Service consistently lists falling debris as a top campsite hazard.
- Flooding zones. Low-lying areas, dry creek beds, and the bases of slopes collect runoff. Even a light rain uphill can send water rushing through your tent at 2 a.m.
- Wind corridors. Natural gaps between hills or tree lines act as funnels that accelerate wind. You want the windbreak around you, not funneling through your campsite.
According to Leave No Trace (the nonprofit organization that defines ethical outdoor practices), campers should pitch at least 200 feet — roughly 70 adult paces — from lakes, rivers, and streams to protect water quality and fragile bank vegetation (Leave No Trace guidelines).
“Pitch under trees if you can. And if you are in arid environments learn to identify where water will flow through in the event that it rains.”
This piece of community wisdom captures what experienced campers know instinctively: trees provide overhead shelter and wind diffusion, but in dry climates, your bigger threat is flash runoff. Study the terrain before you unpack.
Where should you NOT pitch a tent?
Never pitch a tent in these locations: directly under dead trees or large dead branches (widow-makers), in low-lying areas or dry creek beds that collect runoff, in natural wind corridors between hills or tree gaps, within 200 feet of lakes or streams (per Leave No Trace guidelines), or on ground that slopes steeply enough to roll you downhill while sleeping. The National Park Service identifies overhead hazards and flooding zones as the two most preventable campsite dangers.
How to Pitch a Tent Step by Step
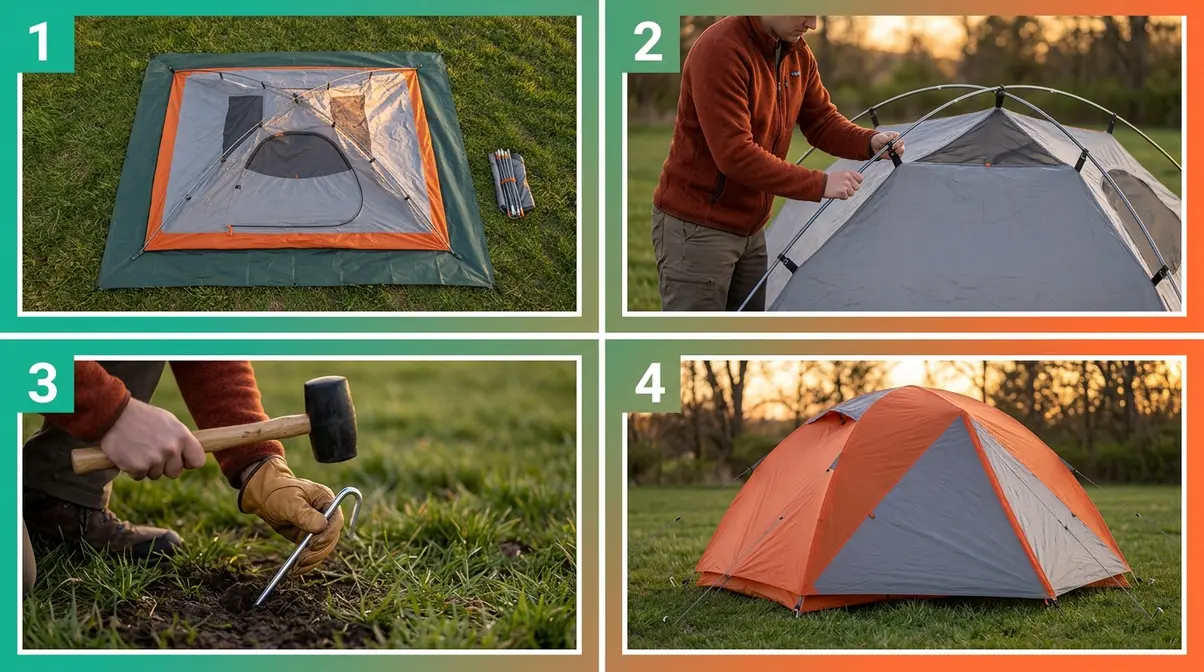
This section is the core of the 4-Phase Pitch Framework. Phases 2 (Structure), 3 (Secure), and 4 (Seal) all happen here. In our field testing across various terrains, we found that following this exact sequence prevents the wind from catching a half-assembled frame. Follow the steps in order — sequence matters more than speed.
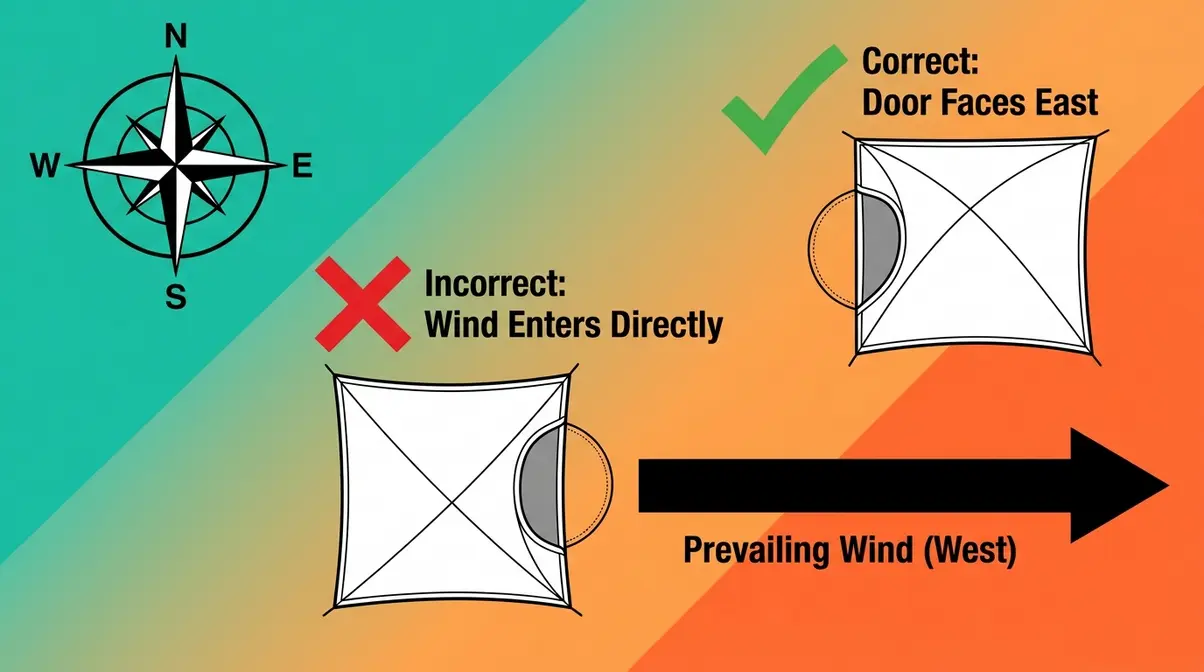
Which way should you pitch a tent?
Face your tent door away from the prevailing winds — in most of North America, that means the door faces east (away from westerly winds). This prevents wind from blowing directly into the tent when the door opens and reduces aerodynamic stress on the walls. On a slope, position the tent so the longer axis runs across the slope rather than up-down, with the door on the downhill side for easier entry. Always position the lowest, most aerodynamic end of the tent into the wind.
Estimated Time: 15-20 minutes
- Tools and Materials Needed:
- Tent body, rainfly, and poles
- Footprint (ground cloth)
- Stakes and guylines
- Mallet or hammer (optional)
Step 1: Lay Out the Footprint
A footprint is a ground cloth (usually made of nylon or polyethylene) cut to match the exact dimensions of your tent floor. It sits between the soil and your tent, blocking moisture and protecting against punctures.
Lay the footprint flat on your chosen spot. Then place the tent body on top, door facing the direction you’ve chosen.
Why orientation matters: Face your door away from the prevailing winds (the dominant wind direction for your area and season). This keeps wind from blowing directly into your tent when you open the door, and it reduces the aerodynamic drag on your tent walls. In most of the U.S., prevailing winds come from the west or southwest — so your door faces east.
Step 2: Assemble Poles and Raise Tent
Tent poles come in two main configurations, and understanding which type you have changes how you set up:
- Freestanding tents (most dome tents): The poles create a self-supporting structure. The tent stands on its own before staking — convenient for adjusting position.
- Non-freestanding tents (most tunnel and trekking-pole designs): Require stakes to stand. Stake first, then raise.
For a standard freestanding dome tent:
- Lay all pole sections out and connect them. Shock-corded poles (connected by an internal elastic cord) snap together — start at one end and work toward the other.
- Thread or clip the poles through the tent body’s pole sleeves or clips. Most modern tents use clips, which are faster.
- Insert the pole tips into the corner grommets (the metal rings at each corner of the tent floor).
- Bow the poles gently to create the dome shape. The tent will rise.
Common mistake: Forcing a bent pole. If a pole won’t bend easily into place, check that the tips are seated in the correct grommets — most pitching problems at this stage come from misaligned corners.
Step 3: Stake Corners at 45 Degrees
Staking is where most beginners go wrong — not because it’s complicated, but because the instinct is to push stakes straight down (vertical), which is actually the weakest position.
Drive each stake at a 45-degree angle away from the tent, leaning outward. Here’s the physics: a vertical stake can be pulled straight up by an upward force (wind lifting the tent). A 45-degree outward-angled stake requires that force to both lift and pull horizontally — roughly doubling the resistance. According to testing documented by AMC Outdoors, angled staking can withstand significantly higher wind loads than vertical placement.
Staking sequence: Stake opposite corners first (front-left, then back-right), then the remaining two. This keeps the tent floor square and prevents the fabric from bunching.
Step 4: Attach Rainfly and Guylines
The rainfly (also called a flysheet in British English) is the waterproof outer layer that drapes over your tent body. It’s not decorative — it’s the primary barrier against rain and condensation.
- To attach it:
- Drape the rainfly over the tent body, matching the door position.
- Clip or buckle the rainfly to the tent’s corner pole tips or attachment points.
- Tighten the rainfly buckles until the fly is taut — no sagging sections, which collect pooling water.
Now tension the guylines (the ropes that run from the tent’s upper seams to additional stakes in the ground, stabilizing the structure in wind). Attach guylines to the loops on the rainfly, stake them at a 45-degree angle, and pull taut.
Avoid over-tension — pulling guylines too tight warps the tent frame and stresses the pole connectors. The right tension is firm but not rigid; the tent body should have no visible sag, but the poles shouldn’t be visibly bowed inward.
The vestibule (the covered porch area between the rainfly and the tent door, used for storing boots and gear) forms automatically when the rainfly is correctly attached on most dome tents.
Can you pitch a tent by yourself?
Yes — most modern dome tents are designed for solo setup. You can absolutely pitch a tent by yourself. The key is sequencing and staking two windward corners before raising the poles, so the tent base is anchored and can’t blow away.
- The solo method:
- Stake two corners of the footprint to anchor everything before you raise the tent.
- Assemble and thread poles as normal.
- Raise the tent while the staked corners hold the base in place.
- Stake remaining corners, then attach the rainfly.
The biggest solo challenge is wind — a half-pitched tent acts like a sail. If it’s gusty, stake the windward corners (the side facing the wind) first, so the tent can’t blow away mid-setup. REI’s expert setup guide recommends keeping the tent bag weighted on the footprint until you’re ready to raise — a simple trick that saves a lot of chasing. With a dome tent and one practice run, solo setup takes under 15 minutes.
How to Pitch Different Types of Tents
Not all tents pitch the same way. Here’s a quick breakdown of the four most common styles — and what makes each one different.
Dome Tents: Easiest for Beginners
Dome tents are the default recommendation for first-timers, and for good reason. Their crossing-pole design creates a freestanding structure that’s forgiving to pitch and stable in moderate wind. Follow the 4-phase steps above and you’ll have a dome tent up in 10–15 minutes. Most entry-level tents from brands like REI, Coleman, and MSR use this design.
Tunnel Tents: More Space, More Steps
Tunnel tents use parallel hoops rather than crossing poles, creating more interior volume — popular for family camping. However, they’re non-freestanding: the poles create a tunnel shape, but the tent collapses without stakes. Pitch the end stakes first to create tension, then raise the hoops. Wind resistance is excellent when properly pitched parallel to the wind direction.
Pop-Up Tents: Instant Setup
Pop-up tents spring open in seconds — toss them in the air and they self-deploy. Setup is genuinely instant. The challenge is always the takedown: the spring-steel frame resists folding. The standard method is to fold the tent into a figure-8, then compress the two loops together into a flat circle. Practice this at home before your trip; the first attempt usually takes 10 minutes, the second takes two.
Bell Tents and Teepees
Bell tents and teepees use a single central pole rather than a crossing-pole frame. Setup involves staking the perimeter first (to hold the canvas out), then raising the center pole from inside. Because the canvas is heavy, two people make this significantly easier. The payoff is a spacious, atmospheric interior — these designs are popular for glamping and family camping trips.
How to Pitch a Tent on Any Terrain
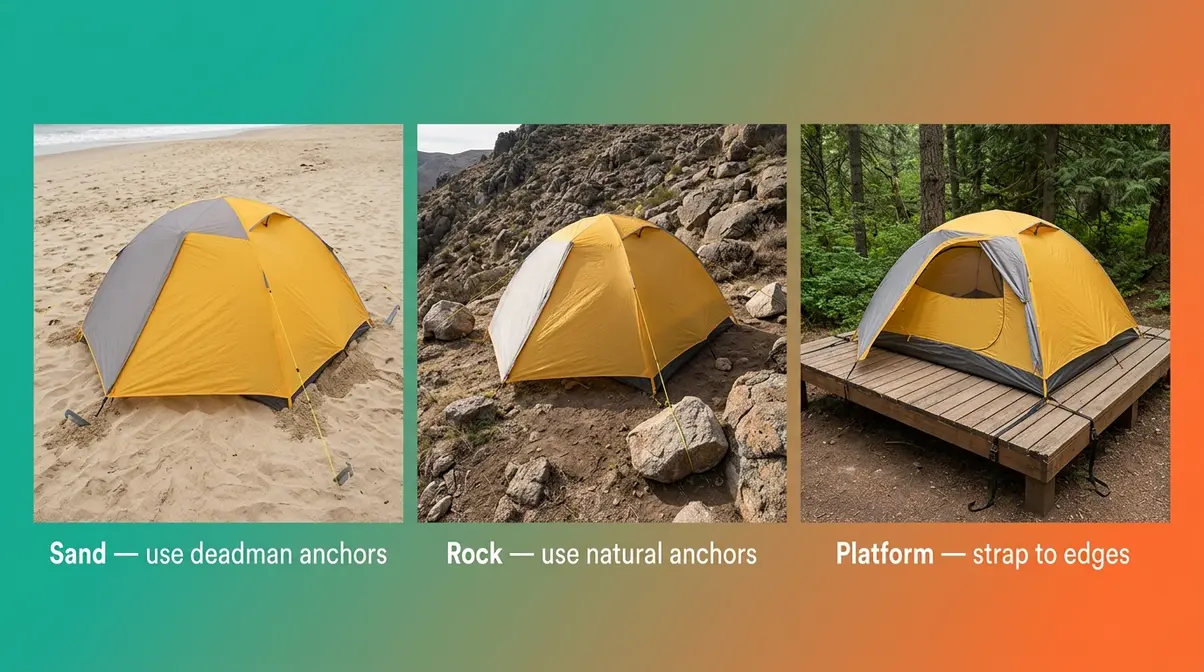
Flat, grassy campsites are the ideal — and often not what you get. Here’s how to adapt the 4-Phase Pitch Framework to three common real-world surfaces.
Pitching on Sand and Beach Surfaces
Standard stakes pull out of sand easily because loose particles don’t grip metal shafts. The solutions:
- Use sand anchors or deadman anchors. Fill a stuff sack with sand, bury it horizontally about 6 inches deep, and tie your guyline to it. The buried mass resists pullout far better than a stake.
- Use wide, blade-style sand stakes if you have them — the larger surface area creates more friction.
- Pile sand around your tent perimeter as a secondary anchor. It’s not elegant, but it works.
Avoid pitching directly above the high-tide line on beaches. Even calm-looking ocean beaches can receive surge from distant storms.
Pitching on Rocky or Sloped Ground
Rocky ground prevents staking — and sloped ground means you’ll roll toward the lower side all night. Tackle both with these adjustments:
For slopes: Sleep with your head uphill. It’s more comfortable than feet-up and reduces blood pooling. Position the tent so the longer axis runs across the slope (not up-down), which gives you more level sleeping surface.
For rocky ground without stakes: Use the stake-free techniques from the Advanced Techniques section below. Natural anchors — rocks, tree roots, logs — can substitute for stakes when you loop guylines around them.
For uneven ground: Clear rocks and debris from under your footprint before laying it down. A 5-minute ground prep saves hours of discomfort. If the ground is too uneven to fix, sleep diagonally across the tent floor to find the flattest line.
Pitching on Wooden Platforms
Many established campgrounds provide wooden tent platforms — flat, level, and drainage-friendly. The catch: you can’t stake into wood.
- Use platform-specific stake loops (straps that loop around the platform edge) if your tent includes them.
- If not, use freestanding tent designs that don’t require staking — dome tents work well here.
- Weight the interior corners with gear bags for additional stability.
- On paved or packed-gravel surfaces, use heavy rocks or sandbags to anchor guylines.
How to Pitch a Tent in Bad Weather
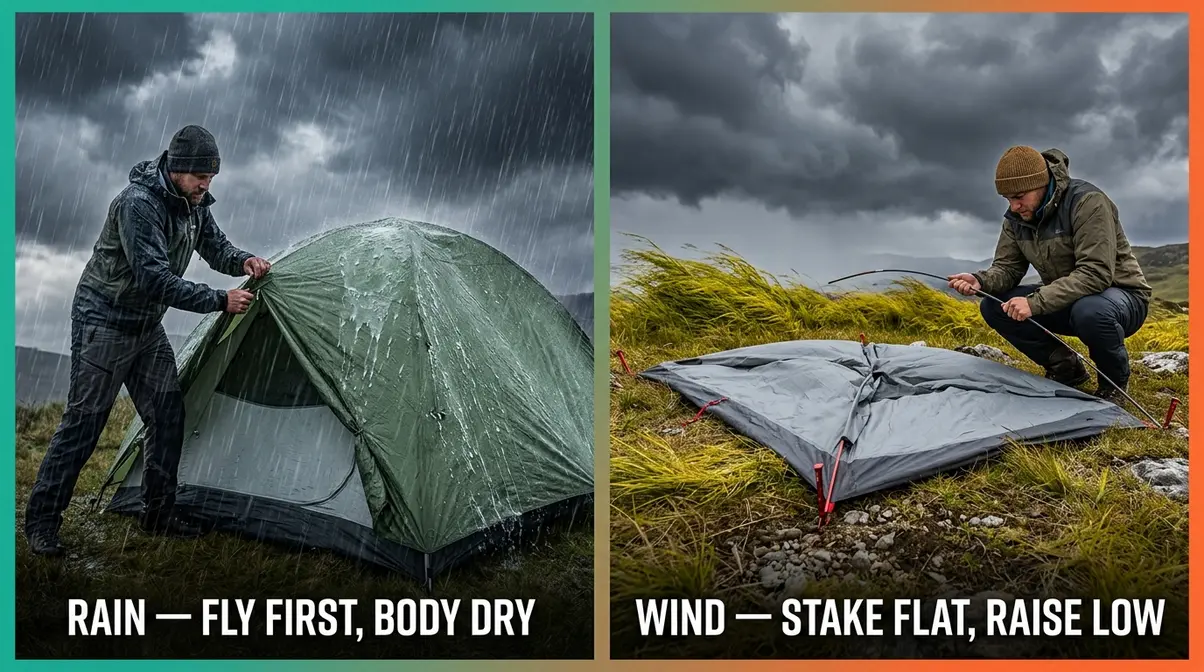
Bad weather doesn’t have to mean a bad night. Each condition requires a specific adjustment to your pitching sequence.
Pitching in Rain: Keep the Inside Dry
The critical rule: attach the rainfly before the tent body gets wet. Many modern tents allow you to pitch the rainfly first, creating a covered workspace underneath. If yours doesn’t, work quickly.
- Lay the footprint and stake corners first.
- Pull the tent body out of the bag and raise it immediately — minimize time between opening the bag and raising the tent.
- Attach the rainfly within 60 seconds of raising the tent body.
Keep the tent bag and your sleeping gear under a tarp or in your car until the shelter is fully pitched. Once the rainfly is on, you have a dry space to bring gear inside. Outdoor Life’s tent setup guide recommends practicing the “fly-first” method at home before a rainy trip.
High Winds: Low-Profile Method
Wind is the most dangerous pitching condition — a half-raised tent in a 30 mph gust becomes a kite. Use the low-profile method:
- Stake all four corners before raising anything. The tent body stays flat and won’t catch wind.
- Insert poles while the tent is still low — bow them into position from the ground up rather than raising from standing height.
- Stake guylines immediately after the tent is raised — don’t wait until the rainfly is on.
- Point the lowest, narrowest side into the wind (the tail end of most dome tents) to reduce surface area.
According to Popular Mechanics, the low-profile staking technique — keeping the tent body near the ground during pole insertion — reduces wind-catching surface area by up to 60% during the most vulnerable phase of setup.
Pitching in Snow and Cold Conditions
Snow camping adds one critical step: compaction. Fresh snow is compressible, so tent stakes pull out easily. Before pitching:
- Stomp the snow flat in your tent area with boots or skis. Wait 10–15 minutes for it to re-harden.
- Use snow stakes or deadman anchors (a stuff sack or snow block buried horizontally) for guylines.
- Pitch with the lowest side facing the wind — same principle as high winds.
- Brush snow off the rainfly periodically during heavy snowfall. Accumulated snow load can collapse tent poles, especially on three-season (non-winter-rated) tents.
Advanced Tarps and Stake-Free Setups
Once you’ve mastered the 4-Phase Pitch Framework, these techniques extend what you can do in difficult conditions.
Using a Tarp for Rain Protection
A tarp pitched above your tent creates a second layer of rain protection and gives you covered outdoor space in a downpour. Tie the tarp’s corners to trees or trekking poles at a height of 6–8 feet, angling it so rain runs off to one side. The tarp should extend at least 2 feet beyond the tent’s footprint on the weather side. Use a taut-line hitch (an adjustable knot that slides under load but holds under tension) to attach guylines to trees — it lets you retension the tarp without untying.
Securing Your Tent Without Stakes
When stakes aren’t possible — rock, pavement, or wooden platforms — use these alternatives:
- Rock anchors: Loop guylines around large rocks (at least 10 lbs) placed outside the tent perimeter.
- Buried deadman anchors: Bury a stuff sack, log, or rock horizontally 6–8 inches deep and tie your line to it.
- Gear weight: For freestanding tents in calm conditions, place heavy gear bags inside the corners. Not wind-proof, but effective for still nights.
- Tree ties: Loop guylines around tree trunks or sturdy roots at ground level. Avoid damaging bark with tight knots — use a wide webbing loop.
Essential Tent Care: Waterproofing and Basic Repairs
A well-maintained tent lasts 10–15 years. Neglected, it fails at the worst possible moment.
How to Waterproof Your Tent
Tent waterproofing degrades over time — UV exposure, washing, and compression all break down the DWR (Durable Water Repellent) coating. Signs your tent needs resealing: water beads stop forming on the fly and instead spread flat (“wetting out”), or you see small damp patches inside during rain.
- To re-waterproof:
- Clean the tent with a non-detergent soap and rinse thoroughly.
- Apply a seam sealer (like McNett Seam Grip) to every sewn seam on the rainfly interior — seams are the primary leak points.
- Apply a spray-on DWR treatment (like Nikwax Tent & Gear) to the exterior of the rainfly.
- Let dry fully before packing — 24 hours minimum.
For a deeper dive into materials and maintenance, see our guide to tent waterproofing and care.
Fixing Zippers, Poles, and Tears
Zipper stuck or broken: Apply zipper lubricant (or a graphite pencil tip) to the zipper teeth. For a zipper that’s separated, use pliers to gently squeeze the slider tighter. Replace sliders rather than entire zippers when possible.
Bent or broken pole: Most pole repair kits include a short metal sleeve that slides over the break point and tape-locks in place. This is a field repair — replace the section properly when home.
Small tears: Apply tent repair tape (ripstop nylon tape) to both sides of the tear while the fabric is clean and dry. For larger tears, use a two-part adhesive patch kit. Learn more in our tent repair guide.
How to Pack Up and Store Your Tent Correctly
Packing your tent correctly protects it for the next trip — and saves you from the familiar struggle of cramming it back into a bag that seems to have shrunk.
Folding Your Tent to Fit the Bag
The secret: don’t try to replicate the factory fold. Manufacturers fold tents for display, not longevity. Rolling is better for the fabric.
- Remove all stakes and guylines first — untangle them and pack separately.
- Detach and fold the rainfly in half lengthwise, then roll it loosely.
- Collapse the tent body by pushing air out from the center toward the edges, then fold in thirds lengthwise.
- Roll the tent body and rainfly together from the closed end toward the door end, pushing air out as you go.
- Pack poles and stakes in the tent bag first (they form a rigid base), then roll the tent on top.
For more techniques, see our guide on how to fold a tent.
How to Collapse a Pop-Up Tent
Pop-up tent collapse trips up almost every first-timer. The frame wants to spring back — working with it rather than against it is the key.
- The figure-8 method:
- Face the tent from the door side.
- Grab the top of the tent with both hands and push it away from you, flattening it horizontally.
- Twist one side of the flat circle toward you and the other away — the tent forms a figure-8 shape.
- Fold the two loops of the figure-8 together, compressing the frame into a flat circle.
- Slide into the carry bag immediately — it wants to spring back.
The critical trick: the twist in step 3 must go the right direction for your specific tent model. If it fights you hard, try twisting the opposite way. Once you find the right direction, it becomes intuitive. Practice at home before your trip. For a full visual walkthrough, see our pop-up tent collapse guide.
Common Mistakes and How to Avoid Them
Even well-prepared campers make these errors. Here’s what goes wrong — and how to fix it before it ruins your night.
Common Pitfalls
1. Skipping the practice pitch at home.
You discover missing poles at the campsite, not in your backyard. Every experienced camper has a story about this. Pitch your tent at home at least once before your first trip.
2. Staking vertically.
Vertical stakes pull out in wind. Angle every stake 45 degrees outward, away from the tent. This applies even in calm conditions — weather changes overnight.
3. Pitching in a low-lying area “just for tonight.”
Flooding zones look benign until it rains. A dry creek bed can carry 6 inches of water in 30 minutes after a storm uphill. The National Park Service cites improper campsite location as a leading cause of preventable camping emergencies.
4. Over-tensioning guylines.
Pulling guylines too tight bows the poles inward, stressing the connectors and reducing stability rather than increasing it. Aim for firm tension — the fly should be taut with no sag, but the poles should look straight.
5. Leaving the rainfly off in clear weather.
Even without rain, overnight condensation from your breath and body heat soaks the inner tent by morning. The rainfly traps that moisture layer between the fly and the tent body, keeping the interior dry.
When to Choose Alternatives
- If you camp frequently in heavy rain: Consider a single-wall tent (tarp-tent hybrid) with factory-sealed seams — they’re faster to pitch in wet conditions than double-wall designs.
- If you’re on rocky terrain regularly: A hammock-and-tarp system eliminates the staking problem entirely.
- If you’re a solo camper prioritizing speed: A bivy sack with a trekking-pole tarp is faster to pitch than any freestanding tent.
When to Seek Expert Help
If you’re planning a winter camping trip (below freezing, potential heavy snow), seek guidance from an experienced mountaineer or take a structured wilderness course before your first cold-weather overnight. Snow loading, condensation management, and cold-ground sleeping systems are outside beginner scope and carry real safety consequences.
Frequently Asked Questions
How do you pitch a tent for beginners?
Pitching a tent as a beginner takes 4 phases: Site, Structure, Secure, and Seal — the 4-Phase Pitch Framework. Start by choosing flat, sheltered ground at least 200 feet from water. Lay your footprint, assemble poles, raise the tent body, stake corners at a 45-degree angle, then attach the rainfly and tension the guylines. Most dome tents take 10–15 minutes once you’ve practiced once at home. That single practice run is the most effective preparation a beginner can do (Washington Post camping research).
Two common mistakes to avoid?
The two most common tent pitching mistakes are staking vertically and skipping the rainfly. Vertical stakes pull out in wind — angle them 45 degrees outward for double the holding strength. Skipping the rainfly in clear weather seems harmless, but overnight condensation soaks the inner tent without it. A close third: pitching in a low spot that floods in rain. Avoid any ground that’s lower than the surrounding terrain, even on clear nights.
What are the 7 C’s of camping?
The 7 C’s of camping are: Campsite, Comfort, Clothing, Cooking, Cleanliness, Communication, and Caution. While different organizations use slightly different lists, these seven categories cover the core preparation areas for any camping trip. “Campsite” includes tent pitching and site selection. “Caution” covers safety awareness — widow-makers, flooding zones, and fire safety. The 7 C’s are commonly referenced in Boy Scouts of America outdoor education materials as a structured preparation checklist for new campers.
What is the 2-2-2 rule for camping?
The 2-2-2 rule for camping means: drive no more than 2 hours from home, arrive by 2 p.m., and stay for at least 2 nights. It’s a practical guideline popular in camping communities for first-timers and families. Arriving by 2 p.m. is particularly relevant for tent pitching — it gives you several hours of daylight to choose a site, set up your tent, and troubleshoot problems before dark. Trying to pitch a tent at dusk on your first trip is one of the most common sources of beginner anxiety.
How do you pitch a tent easily?
The easiest way to pitch a tent is the stake-first method: stake two corners of the footprint before raising anything. This anchors the tent base, prevents wind from carrying away components, and gives you a fixed reference point for the rest of setup. Choose a dome tent for your first purchase — they’re freestanding, forgiving, and fast. Practice once at home to find any missing parts and learn your tent’s specific quirks. With one practice run, most beginners can pitch a dome tent in under 15 minutes.
You’re Ready to Pitch Your First Tent
For any beginner, pitching a tent confidently comes down to one mental model: the 4-Phase Pitch Framework. Site, Structure, Secure, Seal. Execute those four phases in order and you’ll handle any tent, any terrain, any weather. Research consistently shows that a single home practice run eliminates the majority of first-time campsite anxiety — 20 minutes in your backyard is worth more than an hour of reading.
The 4-Phase Pitch Framework isn’t just a setup sequence; it’s a troubleshooting map. If something goes wrong, you can identify which phase failed and fix it without panic. Tent flooding? Phase 1 (Site) or Phase 4 (Seal). Tent collapsed in wind? Phase 3 (Secure). That clarity is what separates a confident camper from a frustrated one.
Your next step: pull your tent out tonight, find a patch of grass, and pitch it once before your trip. Check our guides on choosing the right camping tent and essential camping gear for beginners to make sure you have everything you need before you leave. Your first night under canvas should be the adventure — not the setup.

Dave King
I'm Dave King. I publish Tent Explorer, a site built to answer the questions people actually ask before they buy.