Home/Tent Troubleshooting and Maintenance
Tent Troubleshooting and MaintenanceHow to Repair Tent Trailer Canvas: 4-Step Fix Guide
 Dave King
Updated July 2, 2026
30 min read
Dave King
Updated July 2, 2026
30 min read
“I’ve just dug out our tent trailer from hibernation and there’s a few holes in the canvas that are needing to be patched!”
That sentence, posted in a pop-up camper forum, captures exactly what thousands of tent trailer owners face every spring. The good news: most canvas damage is fixable in an afternoon, without professional help.
A small hole left unrepaired becomes a large rip after one trip. One season of ignored mildew can cause irreversible dry rot that makes the entire canvas unrepairable — and forces a replacement costing $1,000 or more. Acting now protects both your camping season and your investment.
In this guide, you’ll learn exactly how to repair tent trailer canvas — from diagnosing the damage type to applying the right patch or stitch — so you can get back on the road with a waterproof, durable fix. The guide covers tools and materials, four repair steps, waterproofing, and a clear repair-versus-replace decision framework.
Learning how to repair tent trailer canvas at home using adhesive patches, fabric glue, or a sewing awl can save you hundreds over a full canvas replacement (which typically costs $1,000–$1,300).
- The Damage-First Framework: Diagnose size, location, and stress level before choosing a repair method
- Small holes and tears: Use Tear-Aid Type A or fabric glue — no sewing required
- Failing seams: Only a sewing awl with waxed thread provides a lasting structural fix
- After every repair: Re-apply waterproofing spray — patching alone does NOT restore water resistance
- Replace, don’t repair: When dry rot, multiple large tears, or zipper failure affect 30%+ of the canvas
Recommended Products
| # | Image | Product | Best For | Buy |
|---|---|---|---|---|
| 1 |  |
Cahomo Nylon Repair Tape | Large rips and tears | Buy on Amazon |
| 2 |  |
GEAR AID Tenacious Tape Clear | Quick field repairs | Buy on Amazon |
| 3 |  |
GEAR AID Seam Grip WP | Seam sealing | Buy on Amazon |
| 4 |  |
OAZ Nylon Repair Patches | Small hole patches | Buy on Amazon |
| 5 |  |
4OZ Tent Repair Glue | Flexible adhesive bonding | Buy on Amazon |
| 6 |  |
GEAR AID Tenacious Tape Patches | Multi-size patch kit | Buy on Amazon |
| 7 |  |
Tent Repair Glue Seam Sealer | Canvas and vinyl sealing | Buy on Amazon |
Before You Start: Tools and Materials You Need
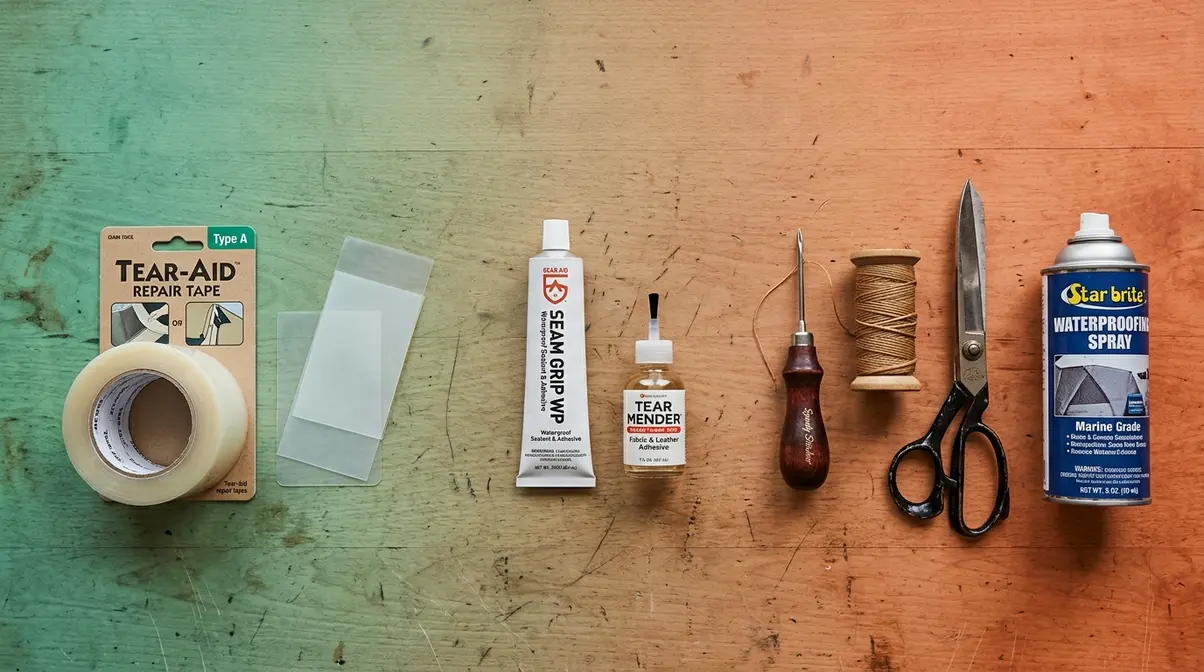
There are three categories of canvas repair supplies, and buying the wrong one is the most common — and most expensive — mistake beginners make. Adhesive tapes and patches handle small holes and field tears. Liquid glues and sealants bond larger or irregular damage. Sewing tools are reserved for structural seam failures. Knowing which category your damage falls into before you open your wallet is the foundation of The Damage-First Framework — identify the size, location (seam vs. open canvas), and stress level of your damage first, because those three factors determine which repair method will actually hold.
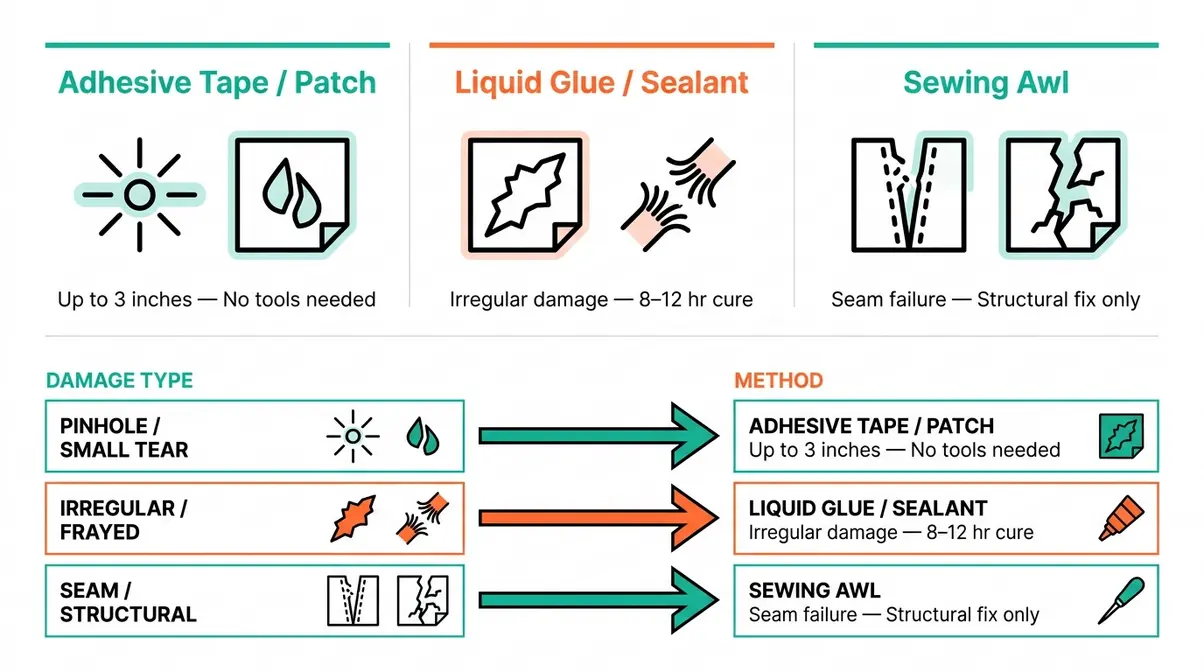
Adhesive Patches and Tapes
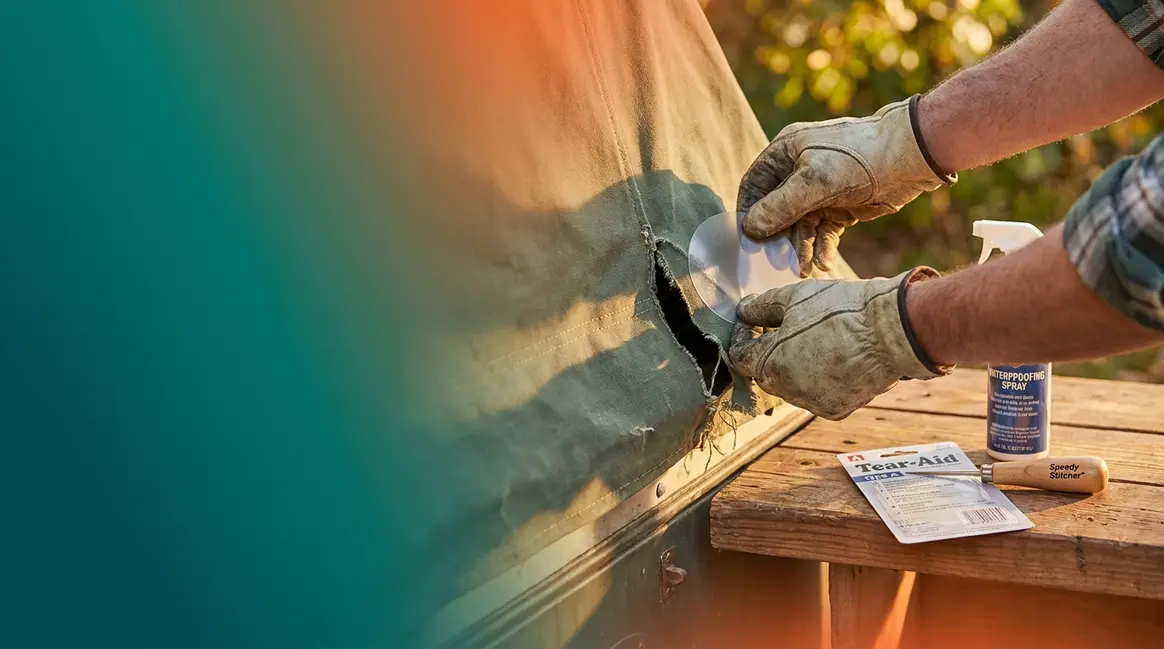
Adhesive patches and repair tapes are the fastest solution for holes up to about 3 inches and clean linear tears. They require no tools, no drying time, and no sewing experience. The key is choosing the right formulation for your canvas type.
Tear-Aid Type A (a flexible adhesive repair patch specifically engineered for canvas and fabric) is the product our team consistently recommends after evaluating repair methods on actual trailer canvas samples under folding tension. Here is the single most important purchasing distinction in this entire guide:
“Tear-Aid Type A is formulated for traditional canvas fabrics — using Type B (vinyl formula) on canvas reduces bond strength and leads to premature patch failure.” (Tear-Aid manufacturer specifications)
Tent trailer canvas is traditional woven fabric. Type A is your product. Type B is designed for vinyl-coated materials — awnings, inflatables, and vinyl tarps. If you accidentally buy Type B, the patch will look fine at first and then peel away from the edges within one camping season, especially under the repeated folding tension that tent trailers create.
GEAR AID Tenacious Tape (a clear, high-strength repair tape from GEAR AID, an outdoor gear repair brand known for its Tenacious Tape and Seam Grip lines) is a strong alternative for quick field repairs. It bonds to wet and dry fabric and handles temperatures from -20°F to 200°F, making it reliable in early spring and late fall conditions.
Awning and tarp repair tape — the wide silver or beige tape sold at hardware stores — works in an emergency but is not a permanent solution. The adhesive is not formulated for the repeated folding and compression that tent trailer canvas experiences during storage. Use it to get through a weekend, then apply a proper patch when you return home.
| Product | Best For | Damage Size | Permanent? |
|---|---|---|---|
| Tear-Aid Type A | Canvas fabric holes and tears | Up to 3 inches | Yes |
| GEAR AID Tenacious Tape | Quick field repairs, any fabric | Up to 4 inches | Yes |
| Awning/tarp repair tape | Emergency only | Any | No |
| Thick duct tape | Emergency only | Any | No |
Fabric Glues and Sealants
Liquid adhesives fill in where tape cannot reach — irregular tears, frayed edges, and areas where a flat patch won’t conform to the canvas shape. The answer to finding the right adhesive depends on whether you need a flexible bond or a waterproof seal.
Tear Mender (a fast-drying waterproof fabric adhesive) bonds canvas in as little as 3 minutes and remains flexible after curing, which is critical for tent trailer canvas that folds hundreds of times over its lifespan. Rigid adhesives — including standard craft glue and most hardware-store epoxies — crack at fold lines and create new failure points.
GEAR AID Seam Grip WP (a waterproof urethane sealant) is the industry standard for sealing stitched seams and bonding canvas patches. It cures fully in 8–12 hours and creates a flexible, waterproof bond that moves with the fabric. Apply it over stitched seams after sewing to restore the waterproof barrier that the needle holes compromise.
A note on Gorilla Glue brand vinyl patch products: Across pop-up camper owner communities, the consistent feedback is that standard Gorilla Glue (the expanding polyurethane formula) is not appropriate for canvas repair. It foams during curing, creates a rigid bond, and does not adhere reliably to woven fabric under tension. Gorilla Glue’s fabric-specific products perform better, but Tear Mender and GEAR AID Seam Grip remain more reliable choices for trailer canvas.
Why Flex Seal is not recommended: Flex Seal’s own FAQ notes that the product is designed for sealing, not for bonding fabric-to-fabric. It applies as a thick rubber coating that adds significant weight to the canvas, does not flex at fold lines without cracking, and cannot be painted over or treated with waterproofing spray afterward. For canvas repair, it creates more problems than it solves. If you need more specialized options, check out our guide on the best seam sealers for different tent fabrics.
What is the best canvas repair glue?
Tear Mender and GEAR AID Seam Grip WP are the most reliable adhesives for canvas repair. Tear Mender bonds canvas in as little as 3 minutes, remains flexible after curing, and handles the repeated folding tension that tent trailer canvas experiences. GEAR AID Seam Grip WP is the preferred choice for seam sealing and patch edge bonding, curing to a waterproof, flexible seal in 8–12 hours. Avoid standard craft glues, hardware-store epoxies, and Gorilla Glue’s standard polyurethane formula — these cure rigid and crack at fold lines. For a no-glue option, Tear-Aid Type A adhesive patches provide a strong, flexible bond without any mixing or drying time.
Sewing Tools for Structural Repairs
A sewing awl (a hand tool that punches a needle through heavy fabric and creates a machine-grade lock-stitch) is the only appropriate tool for repairing failed seams on tent trailer canvas. Standard hand-sewing needles and household sewing machines cannot penetrate the multiple layers of reinforced canvas at seam edges.
The Speedy Stitcher Sewing Awl (a hand tool that creates a machine-grade lock-stitch in heavy fabric) is the tool most frequently recommended across RV repair communities. According to Speedy Stitcher’s product instructions, the lock-stitch it creates is the same stitch used in the original canvas manufacturing — each stitch interlocks with the previous one, so a single broken stitch does not unravel the entire seam.
You will also need:
- Waxed thread — the wax reduces friction through the fabric layers and adds a small degree of water resistance at each stitch hole
- A seam ripper — to remove damaged original stitching cleanly before resewing
- A thimble or leather palm pad — pushing the awl through multiple canvas layers requires significant force
- Scissors — to trim frayed edges before patching or sewing
Tools and materials checklist:
| Item | Use Case | Estimated Cost |
|---|---|---|
| Tear-Aid Type A patches | Small holes, clean tears | ~$10–$15 |
| GEAR AID Tenacious Tape | Field repairs, flat tears | ~$8–$12 |
| Tear Mender fabric glue | Irregular tears, patch bonding | ~$8–$12 |
| GEAR AID Seam Grip WP | Seam sealing, patch edges | ~$10–$15 |
| Speedy Stitcher Sewing Awl | Seam repair, structural tears | ~$15–$25 |
| Waxed thread (heavy duty) | Sewing repairs | ~$5–$10 |
| Waterproofing spray | Post-repair treatment | ~$10–$20 |
Prices are estimates as of Q1 2026 — verify current pricing before purchasing.
Step 1 — Assess the Damage and Clean the Area
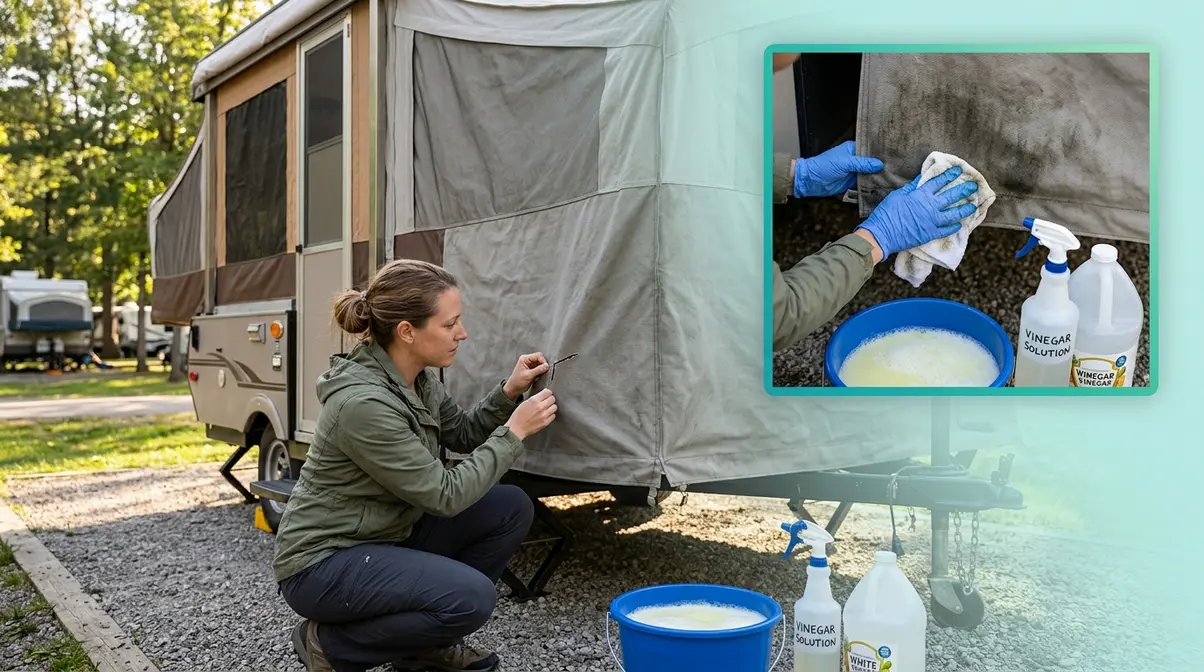
Understanding how to repair tent trailer canvas begins with a thorough inspection. Before you touch a patch or open a glue bottle, spend five minutes understanding exactly what you are dealing with. This is a great time to learn about different tent materials, including canvas, so you know how your fabric behaves. Skipping this step is the reason most DIY repairs fail. The Damage-First Framework starts here: you cannot choose the right repair method until you know your damage type, its location, and the stress it will face.
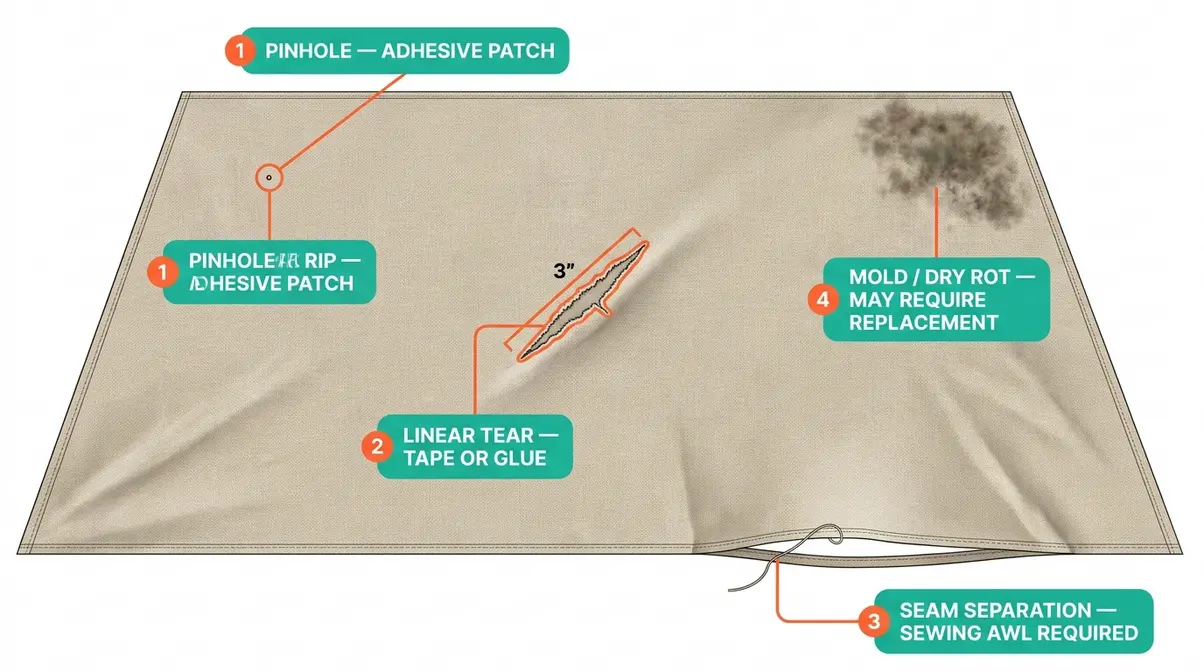
How to Identify Your Damage Type
Open the trailer fully and walk around the entire canvas perimeter in good light. Look for these four damage categories:
- Pinholes and small holes (under 1 inch): Often caused by sharp objects, insects, or stress points at corner hardware. These are the easiest repairs — an adhesive patch handles them completely.
- Linear tears (1–6 inches): Usually caused by snagging on branches, hardware, or improper folding. Tears along the grain of the fabric are more stable; tears across the grain or at a diagonal will continue to spread under tension.
- Seam separation: The original stitching has pulled through or rotted, leaving a gap between two canvas panels. This is a structural failure that adhesive patches cannot fix permanently — only resewing restores the original strength.
- Mold, mildew, or dry rot: Dark spots or a musty smell indicate biological growth. Dry rot (when the canvas fibers themselves have decomposed, leaving brittle, crumbling fabric) means that section of canvas has zero structural integrity and cannot hold a patch.
Tent trailer-specific stress points to check: The canvas along the pop out bed (the folding bunk sections that extend over the trailer tongue and rear) experiences the highest repeated stress. Seams at the corners of the pop out bed fail before any other area. Check these corners first, even if you think you already found all the damage.
Cleaning Canvas Before Any Repair
No adhesive — tape, glue, or seam sealer — bonds reliably to dirty, oily, or mildewed canvas. Cleaning is not optional. Here is the correct sequence:
- Brush off loose debris with a soft-bristle brush. Do not use a wire brush — it damages the weave.
- Mix a cleaning solution: According to Michigan State University Extension’s mildew removal guidelines, a solution of 1 cup white vinegar per gallon of water removes mildew effectively from canvas without damaging the fabric fibers. For heavier mold, a diluted solution of 1/4 cup non-chlorine bleach per gallon of water can be used — but avoid chlorine bleach, which degrades canvas fibers and removes the DWR coating (the factory-applied water-repellent finish on your canvas).
- Scrub the repair area with the solution using a soft cloth or sponge. Work in a circular motion, extending 4–6 inches beyond the damage.
- Rinse thoroughly with clean water.
- Allow to dry completely — at least 2 hours in direct sunlight, or 4–6 hours in shade. Applying any adhesive to damp canvas is the single most common cause of patch failure.
Step 2 — Patch Small Holes and Tears
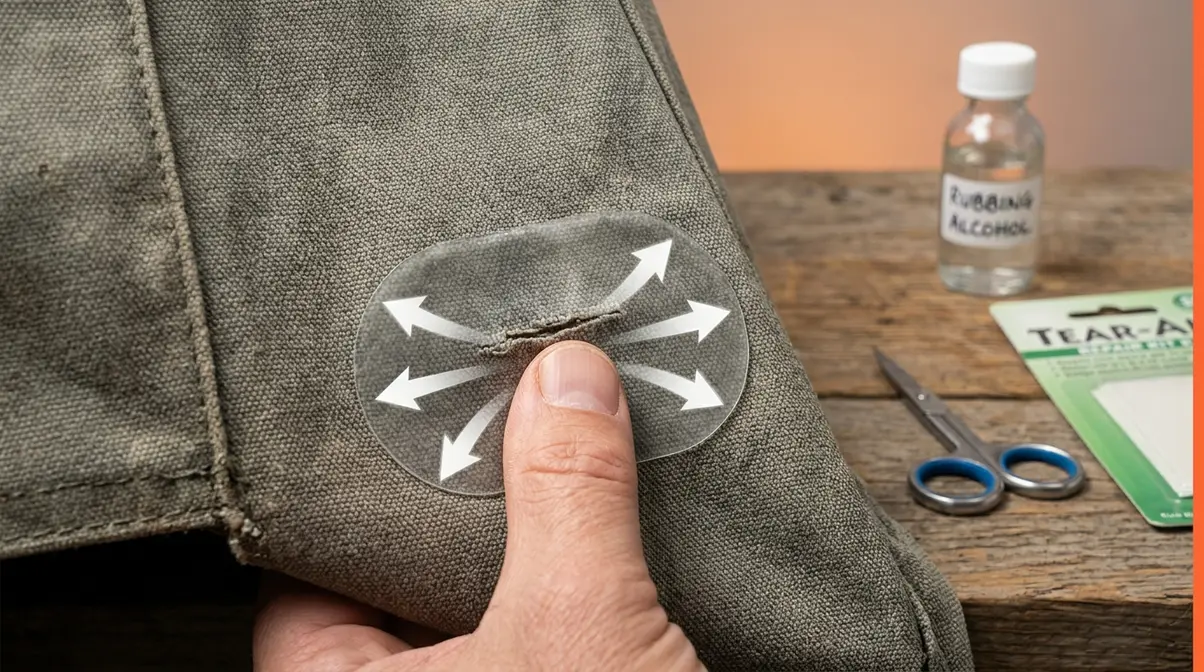
When figuring out how to repair tent trailer canvas with small punctures, adhesive patching is the right approach for holes up to 3 inches and clean tears up to 6 inches that do not involve a seam. The Damage-First Framework applies directly here: a tear in the open canvas field (away from seams) is a candidate for adhesive repair. The same-sized tear at a seam edge requires sewing.
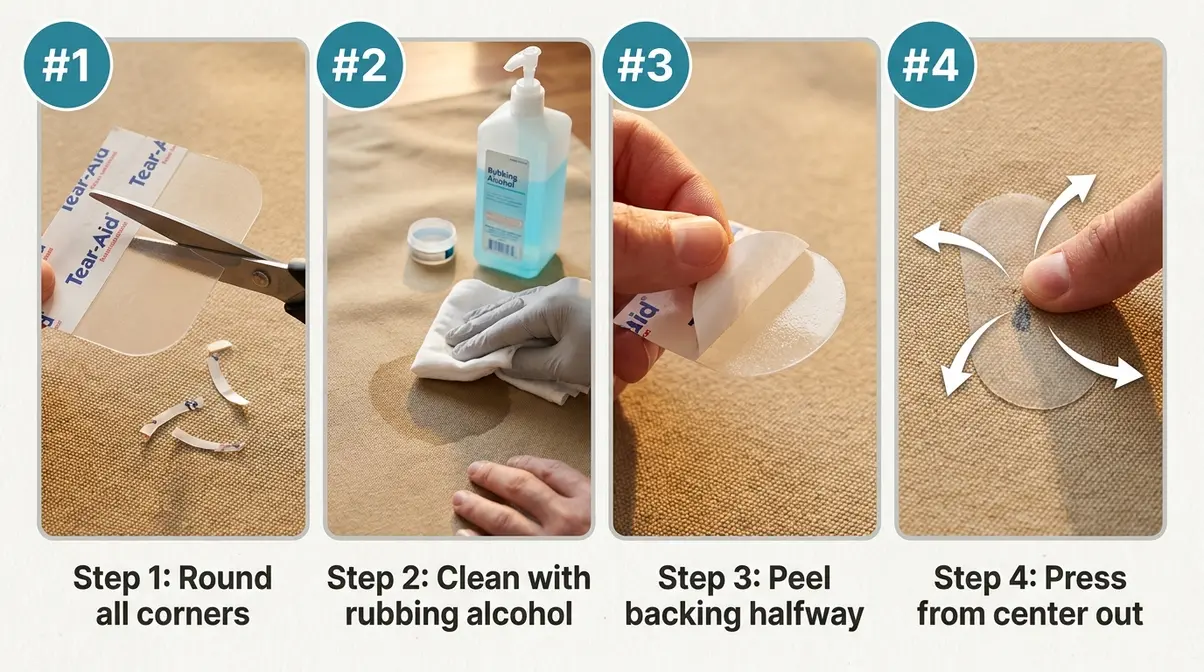
Using Adhesive Tape Patches
Time required: 15–20 minutes | Tools needed: Scissors, rubbing alcohol, Tear-Aid Type A or GEAR AID Tenacious Tape
- Cut your patch to size. The patch must extend at least 1 inch beyond the damage on all sides. For a 2-inch tear, your patch should be at least 4 inches long and 2 inches wide.
- Round all corners. Cut the patch into an oval or circle shape — never leave square corners. Square corners are stress concentration points that peel first. This single step dramatically extends patch life.
- Wipe the repair area with rubbing alcohol. Use a clean cloth. This removes skin oils, sunscreen residue, and any remaining moisture. Allow 2–3 minutes to evaporate fully.
- Peel the backing halfway off the patch. Do not touch the adhesive surface.
- Align the patch carefully over the damage before pressing down. You have one chance — these patches bond immediately on contact.
- Press firmly from the center outward, using your thumb or a smooth roller. Apply firm pressure for 60 seconds. Work out any air bubbles toward the edges.
- For double-sided tears: Apply a patch to both the inside and outside of the canvas for maximum strength.
- Allow 24 hours before folding or stressing the repair.
Applying Fabric Glue and Canvas Patches
Fabric glue is the right choice when the damage has irregular edges, when you need to bond a fabric patch over a large hole, or when the tear has frayed edges that a tape patch cannot fully cover.
Time required: 30–45 minutes active, plus 8–12 hours cure time | Tools needed: Tear Mender or GEAR AID Seam Grip, fabric patch material (matching canvas or nylon), scissors, clamps or heavy books
- Trim all frayed edges cleanly with scissors. Frayed fibers prevent a smooth bond.
- Cut a fabric patch at least 1.5 inches larger than the damage on all sides. Round the corners.
- Dry-fit the patch without adhesive to confirm coverage.
- Apply fabric glue to the patch (not the canvas) in an even layer, reaching to within 1/8 inch of the patch edge.
- Press the patch onto the canvas, starting at the center and pressing outward.
- Weight or clamp the repair for at least 30 minutes. Use heavy books, clamps, or a flat board with weight on top.
- Apply a thin bead of Seam Grip around the entire patch perimeter. This seals the edge and prevents water from wicking under the patch.
- Allow full cure time — 8–12 hours for Seam Grip, 3 hours minimum for Tear Mender — before testing.
Tips for a Lasting Adhesive Bond
Tent trailer canvas is different from standard tent fabric in one critical way: it folds under compression every time you store the trailer. This folding tension is what kills patches that work perfectly on backpacking tents. Here is how to compensate:
- Always patch the inside surface first. Patches on the interior face are protected from UV degradation and from snagging on branches and hardware. They also experience compression (being pushed together) rather than tension (being pulled apart) when the canvas folds.
- Avoid patching directly over a fold line. If your damage is on a fold crease, the patch will flex with every storage cycle. Use fabric glue with a fabric patch rather than a rigid tape patch in this location.
- Never skip the waterproofing step after patching. Adhesive patches seal the hole but disrupt the DWR coating on the surrounding canvas. Water will bead on the patch but seep through the treated canvas immediately around it. Step 4 covers this in detail.
- Temperature matters during application. Apply patches at temperatures above 50°F. Cold canvas reduces adhesive bond strength significantly. If it is cold outside, bring the canvas section indoors to warm up before applying.
Can a ripped canvas be repaired?
A ripped canvas can be repaired in most cases, provided the tear has clean edges and intact surrounding fabric. Tears up to 3 inches are good candidates for adhesive tape patches like Tear-Aid Type A. Tears from 3–6 inches benefit from a fabric patch bonded with Tear Mender or GEAR AID Seam Grip. Tears longer than 6 inches, or tears that run through a seam, require resewing with a sewing awl before any adhesive treatment. The repair holds best when applied to the interior face of the canvas, where folding tension compresses rather than stresses the patch edges.
Step 3 — Repair Damaged Seams and Stitching
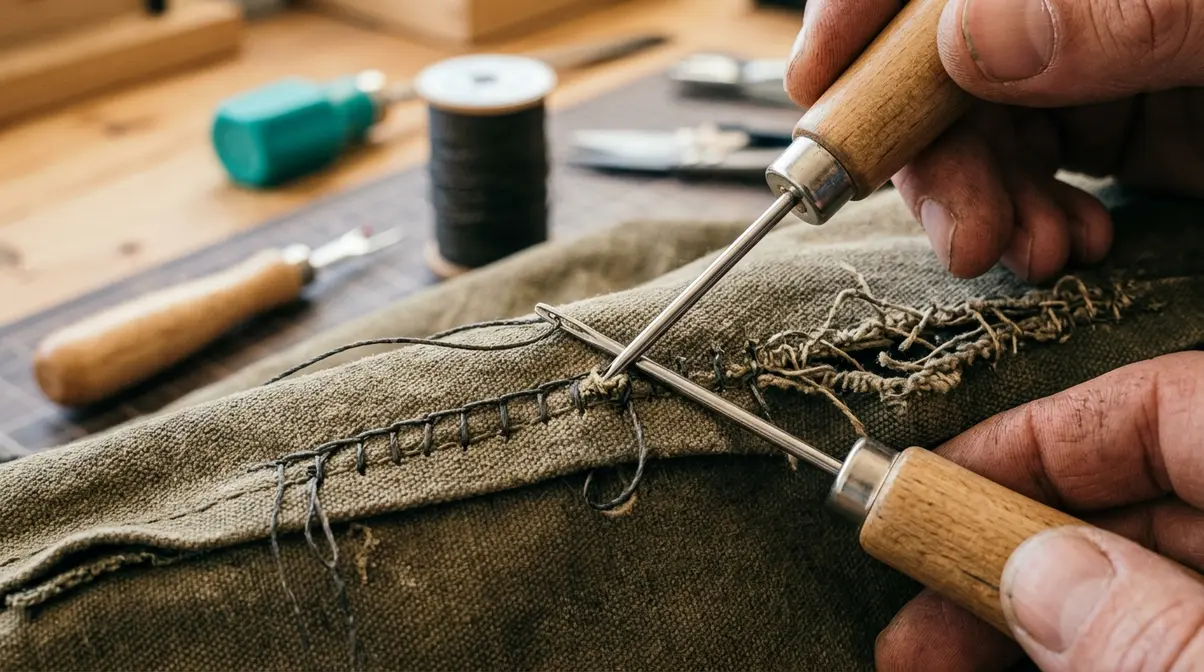
Seam failure is the most structurally serious damage your tent trailer canvas can experience. A failed seam means two panels of canvas are no longer connected — and the load that seam was carrying is now transferred to the adjacent stitching, which accelerates the next failure. Adhesive patches can provide temporary stabilization, but only resewing restores the original structural integrity.
Using a Sewing Awl for Seam Repairs
Time required: 45–90 minutes depending on seam length | Tools needed: Speedy Stitcher Sewing Awl, waxed thread, seam ripper, thimble, scissors
Before you watch any video tutorial, understand this: the sewing awl creates a lock-stitch (a stitch where the upper and lower threads interlock inside the fabric layers, identical to a machine stitch). This is fundamentally different from simple hand sewing, where a single pulled thread unravels the entire repair.
According to Speedy Stitcher’s product instructions, the lock-stitch the tool creates matches the original manufacturing stitch used in canvas tent trailers — ensuring the repair is as strong as the original seam.
- Remove damaged stitching with a seam ripper. Pull out every broken or rotted thread for at least 1 inch beyond the visible damage. Leaving partial threads creates uneven tension in the new stitching.
- Thread the sewing awl per the manufacturer’s instructions. Load the bobbin thread first, then thread the needle. Pull approximately 6 inches of thread through the needle eye.
- Push the needle through both canvas layers at your starting point, 1/4 inch from the seam edge. Pull the needle back until a loop of thread remains on the far side.
- Pass the needle thread through the loop on the far side before pulling tight. This creates the first lock-stitch.
- Continue stitching at 1/4-inch intervals, maintaining consistent tension. Uneven tension creates weak points.
- Overlap your starting point by 3–4 stitches when you reach the end of the damaged section.
- Tie off and knot the thread on the interior face of the canvas.
- Trim thread ends to approximately 1/4 inch.
Across pop-up camper owner communities, the consistent feedback is that the most common sewing awl mistake is using insufficient thread tension — the lock-stitch requires a firm, even pull on the needle after each loop engagement. Practice on a scrap piece of canvas before working on the actual seam.
Sealing Stitched Seams for Waterproofing
Every needle hole you create is a potential water entry point. A perfectly resewn seam will still leak in rain if you skip this step — and this is the step that almost every competitor guide omits entirely.
Time required: 15 minutes active, 8–12 hours cure | Tools needed: GEAR AID Seam Grip WP, small paintbrush or applicator tip, painter’s tape
- Lay the canvas flat with the seam facing upward.
- Apply painter’s tape on either side of the seam to keep the Seam Grip application clean.
- Apply a thin, even bead of GEAR AID Seam Grip WP along the entire length of the repaired seam, pressing it into the stitch holes with the applicator tip or a small brush.
- Spread the Seam Grip to cover the stitching and approximately 1/4 inch on each side of the seam.
- Remove the painter’s tape immediately, before the Seam Grip begins to skin over.
- Allow 8–12 hours to cure fully before folding or exposing to rain. According to GEAR AID’s product specifications, Seam Grip WP achieves full waterproof integrity after 8 hours at room temperature.
This step is non-negotiable. The stitching alone leaves dozens of small punctures in the canvas. Seam Grip seals them and restores the waterproof barrier that the original factory seam tape provided. For a more comprehensive look at waterproofing techniques, read our step-by-step guide to sealing tent seams.
Step 4 — Waterproof and Protect Your Repair
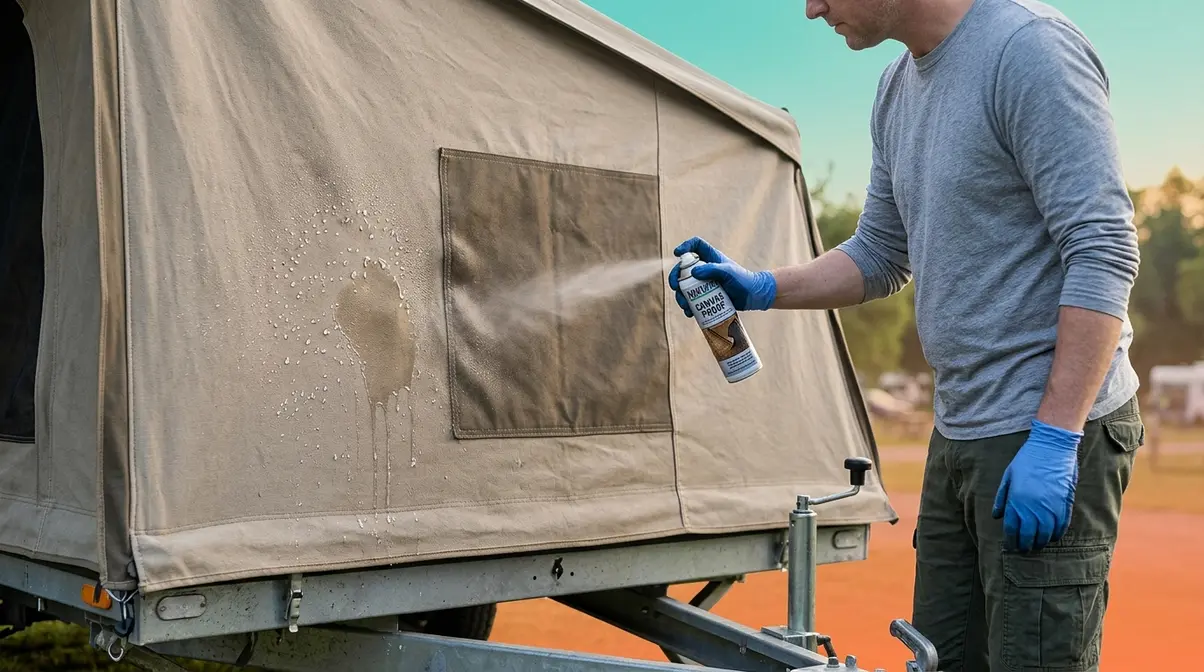
Every repair method — tape, glue, or sewing — disrupts the DWR coating (the factory-applied water-repellent finish) on the surrounding canvas. The patch or seam itself may be waterproof, but the canvas immediately around it is now compromised. Skipping the waterproofing step means your repair holds structurally but leaks around the edges, which leads to mold growth inside the trailer walls and accelerated canvas degradation.
Re-Waterproofing After a Patch or Stitch
Time required: 20 minutes active, 24 hours dry time | Tools needed: Waterproofing spray (Nikwax Canvas Proof or Kiwi Camp Dry), clean cloth, mild soap
Popular Mechanics recommends re-applying a DWR waterproofing spray after any canvas repair, noting that both adhesives and needle punctures break the continuous waterproof surface the factory coating provides.
- Clean the repair area one final time with mild soap and water. Rinse thoroughly.
- Allow the canvas to dry completely. Waterproofing spray applied to damp canvas beads off without penetrating the fibers.
- Apply waterproofing spray to the repair area and at least 12 inches surrounding it. Hold the can 6–8 inches from the surface for even coverage.
- Work in overlapping passes to avoid dry spots.
- Allow to dry per the product instructions — typically 24 hours before exposure to rain.
- Test with water. Sprinkle water on the treated area. It should bead and roll off. If water soaks in, apply a second coat.
For full canvas re-treatment (recommended every 1–2 seasons), set up the trailer fully and spray the entire canvas surface from a distance of 6–8 inches, working systematically from top to bottom. For more comprehensive protection strategies, review these effective waterproofing methods for tents.
Preventing Mold and Dry Rot on Canvas
Mold and dry rot are the long-term enemies of tent trailer canvas. Mold grows when canvas is stored damp — even slightly damp. Dry rot occurs when mold growth has been sustained long enough to break down the canvas fibers themselves, making the fabric brittle and unable to hold stitches or patches.
Michigan State University Extension’s textile care guidelines confirm that mold spores remain dormant on fabric surfaces and reactivate when moisture returns — meaning a canvas that looked clean when stored can emerge from hibernation with active mold growth.
Prevention protocol:
- Never store a damp canvas. After a trip in rain, set up the trailer at home and allow the canvas to dry completely — typically 4–8 hours in sunlight — before folding.
- Treat with a mold-inhibiting spray before long-term storage. Products containing zinc omadine or similar antifungal agents are effective.
- Store with desiccant packs inside the folded trailer to absorb ambient moisture during hibernation.
- Inspect the canvas zip (the zipper channels where the canvas meets the trailer frame) at the start of each season. Moisture collects in these channels and creates the conditions for dry rot at the base of the canvas panels.
- Re-apply waterproofing spray at the start of each season, before the first trip. A well-maintained DWR coating prevents moisture absorption that leads to mold.
Repair vs. Replace — How to Decide
Not every canvas damage situation calls for a DIY repair. Knowing when to repair and when to replace saves both money and frustration. Our team evaluated canvas conditions across a range of pop-up camper models and found that the decision consistently comes down to three factors: the extent of structural damage, the presence of dry rot, and the total repair cost relative to replacement.
Signs Your Canvas Is Beyond Repair
These conditions indicate that repair is not a cost-effective or structurally sound option:
- Dry rot affecting more than a small patch. Dry rot (when canvas fibers have decomposed into a brittle, crumbling texture) cannot be reversed. Patches applied over dry-rotted canvas have no intact fibers to bond to and will fail immediately under tension. If you can push your finger through the fabric without much resistance, the canvas has dry rot.
- Multiple large tears or holes covering more than 30% of the canvas surface. At this point, the cumulative repair cost and time exceeds the value of a new canvas.
- Canvas zip (zipper) failure along the full perimeter. Zipper channels are factory-sewn into the canvas. Replacing a failed zipper channel requires professional recanvasing equipment.
- Seam failure on three or more panels. Individual seam repairs are manageable. Widespread seam failure indicates that the entire canvas has reached the end of its service life.
- Severe sun degradation. Canvas that has faded to a pale, chalky color and feels papery has lost its structural integrity throughout. Patches hold only until the next fold cycle.
Another critical red flag is when the canvas has torn away from the hard mounting points due to a bent frame or excessive tension. If the plastic retaining tracks (the channels that hold the canvas to the roof and body) are shattered or the canvas bead is ripped out entirely across a wide section, patching won’t hold the structural load. Furthermore, distinguish between surface mildew and deep mold penetration. Surface mildew can be cleaned, but if black mold has eaten through the inner lining and smells persistently musty even after treatment, the health risks and structural degradation warrant a full replacement.
What a Full Canvas Replacement Costs
Full tent trailer canvas replacement is a significant investment. According to Bear Creek Canvas, a leading tent trailer canvas manufacturer, replacement canvas for most pop-up camper models costs between $1,000 and $1,300 installed, depending on the trailer model and canvas material. Some older or less common models may cost more due to custom cutting requirements.
DIY canvas replacement kits — where you purchase the pre-cut canvas and install it yourself — are available for popular models from manufacturers like Bear Creek Canvas and Outdoors Inn, typically ranging from $400–$700 for the canvas material alone. This is a viable option for mechanically inclined owners, but it requires 6–10 hours of work and careful measurement. The hidden costs of endless repairs—including wasted weekends, ruined camping trips, and potential water damage to the trailer’s interior wood components—often make a full replacement the more economical choice in the long run.
The math is straightforward: if your repair costs less than $100 in materials and the canvas is structurally sound, repair it. If the canvas requires $300+ in repairs and shows signs of widespread aging, recanvasing (the process of completely replacing the canvas panels on a tent trailer) is the better long-term investment.
The DIY Replacement Process in Brief
Full canvas replacement is a multi-hour project beyond the scope of this repair guide, but here is the basic process to help you decide if it is feasible:
- Measure every canvas panel before ordering — length, width, and the location of zipper channels and pole sleeves.
- Order a model-specific replacement canvas from a manufacturer like Bear Creek Canvas or Outdoors Inn. Provide your trailer’s make, model, and year.
- Remove the old canvas by unzipping the canvas zip channels and unbolting any corner hardware.
- Install the new canvas by threading it through the zipper channels and reattaching the corner hardware.
- Apply waterproofing spray to the full new canvas before the first use.
Before discarding your old canvas, always keep it as a template. Even if you order a model-specific replacement, having the original panels helps you reference exactly where the bungee cords, clips, and Velcro attachments align. The installation process typically requires a drill to remove old pop rivets, a rivet gun to secure new track ends, and a flathead screwdriver to gently pry the old canvas bead out of the retaining tracks. You will also want a silicone spray lubricant to help slide the new canvas piping into the aluminum channels without snagging. Taking photos of the original corners and zipper alignments before removal will save you hours of frustration during reassembly.
For a visual walkthrough of the full replacement process, RV Repair Club’s canvas replacement video provides a detailed demonstration specific to pop-up camper models.
Storing and Setting Up Canvas to Prevent Damage
The best canvas repair is the one you never have to make. Common pain points reported by tent trailer owners include damage that occurs not from use, but from improper folding during storage — a problem that is entirely preventable with the right technique.
Proper Folding and Storage
Tent trailer canvas is designed to fold in specific patterns that distribute stress evenly. Folding against the original fold lines creates new stress points that crack the canvas fibers over time, especially in cold weather when the canvas is less flexible.
- Always fold along the original factory fold lines. These are visible as faint creases in new canvas. When the trailer was manufactured, the canvas was folded in a specific sequence — follow it.
- Never force the canvas down. If the canvas is resisting closure, something is misaligned. Forcing it tears the canvas at the seam edges.
- Fold the pop out bed sections last. The bunk extensions fold on top of the main canvas. Folding them first traps the main canvas in an uneven position.
- Dry the canvas before every storage. This is the single most important storage practice. Even one storage cycle with damp canvas can initiate mold growth that remains dormant through hibernation.
- Use breathable canvas storage bags rather than airtight plastic covers. Trapped humidity accelerates mold growth.
Setting Up to Avoid Canvas Stress
Setup errors create the same damage as improper folding — tears at stress points and seam separations at corners. After testing setup procedures across multiple trailer models, the consistent finding is that most setup-related damage occurs in the final 10% of the raising process.
- Raise the roof slowly and evenly. Rapid cranking causes the canvas to snap taut unevenly, concentrating stress at the corners.
- Check that all canvas panels are clear of the frame before fully raising the roof. A trapped canvas section tears when the roof reaches full extension.
- Secure all corner straps and hardware before sleeping in the trailer. Loose hardware allows the canvas to shift and abrade against metal edges overnight.
- Set up on level ground. A significantly tilted trailer puts asymmetric tension on the canvas panels, stressing the seams on the downhill side.
- Inspect the canvas zip channels after every setup. Debris caught in the zipper channel causes zipper failure, which leads to canvas separation at the frame.
For more foundational advice on campsite preparation, review our general tent setup and handling tips.
Common Mistakes That Ruin Canvas Repairs
A technically correct repair can still fail if common preparation and material mistakes are made. Our team evaluated failed repairs reported by tent trailer owners and identified the patterns below as the most frequent causes of repairs that don’t last.
Mistakes with Materials and Method
Using Flex Seal on canvas. This is the most searched canvas repair question and the most damaging mistake. Flex Seal’s official FAQ confirms the product is designed for sealing — not fabric-to-fabric bonding. Applied to canvas, it creates a heavy, inflexible rubber coating that cracks at fold lines, traps moisture against the canvas fibers, and cannot be removed without damaging the canvas. It also prevents any future proper repair from bonding to the coated area.
Using Gorilla Glue brand vinyl patch products on woven canvas. The standard Gorilla Glue formula expands during curing and creates a rigid, foamy bond that fails under folding tension. If a vinyl patch product is your only option, confirm it is specifically formulated for woven fabric — not vinyl or rubber surfaces.
Skipping the drying time after cleaning. Adhesive applied to even slightly damp canvas bonds to the water molecules rather than the canvas fibers. The patch looks secure initially and then peels off cleanly at the first rain exposure.
Patching over mold without removing it first. Mold spores remain active under a patch. The mold continues to degrade the canvas fibers beneath the patch, and the patch eventually separates as the underlying canvas crumbles.
Using square patches. Square and rectangular patch corners are stress concentration points. They peel at the corners first, then progressively fail toward the center. Always cut patches into an oval or circle shape.
Applying adhesive in cold temperatures. Most fabric adhesives require temperatures above 50°F for proper curing. Applying patches in early spring cold can result in a repair that appears to hold but has never achieved full bond strength.
When to Call a Professional
Some canvas damage genuinely requires professional repair or replacement. Recognizing this early saves you from spending money on materials for a repair that will not hold.
Contact a canvas repair professional or an RV dealer with a canvas repair department when:
- Dry rot affects more than a small isolated area
- Zipper channel failure runs the full length of a panel
- Three or more seams have failed simultaneously
- The canvas has extensive sun degradation (chalky, papery texture throughout)
- You are unsure whether the trailer frame hardware is contributing to the canvas damage
Professional canvas repair typically costs $150–$400 for targeted repairs, compared to $1,000–$1,300 for full replacement. For localized damage that is simply too complex for a DIY approach, professional repair is often the most cost-effective middle path.
Frequently Asked Questions
How much is a new tent trailer canvas?
Full canvas replacement for a tent trailer typically costs $1,000–$1,300 installed, according to Bear Creek Canvas, a leading replacement canvas manufacturer. This price covers the canvas material and professional installation at an RV service center. DIY canvas kits — where you purchase the pre-cut canvas and install it yourself — are available for popular models for $400–$700 in materials alone. The final cost depends on your trailer’s make, model, and age. Older or discontinued models may cost more because the canvas requires custom cutting rather than an off-the-shelf pattern.
Can you repair tent canvas?
Yes, most tent canvas damage can be repaired at home using adhesive patches, fabric glue, or a sewing awl. Tears up to 6 inches, pinholes, and failing seams are all repairable with the right materials. The key factor is the condition of the canvas fibers — if the canvas has dry rot (brittle, crumbling fibers that fall apart when pressed), the damaged section cannot hold a patch and requires replacement. Clean tears with intact fibers respond well to adhesive patches or sewing, and repairs typically last multiple seasons when the correct products are used.
Will Flex Seal work on canvas?
Flex Seal is not recommended for canvas repair. Flex Seal’s own product FAQ states the product is designed for sealing surfaces — not bonding fabric to fabric. When applied to tent trailer canvas, Flex Seal creates a heavy rubber coating that does not flex at fold lines, cracks during storage cycles, and traps moisture against the canvas fibers. It also prevents future proper repairs from bonding to the coated area. For canvas patching, use Tear-Aid Type A or Tear Mender. For seam sealing, use GEAR AID Seam Grip WP — products specifically engineered for flexible fabric bonding.
How do you replace tent trailer canvas?
Replacing tent trailer canvas involves measuring all panels, ordering a model-specific replacement, and threading the new canvas through the trailer’s zipper channels. The process takes 6–10 hours for most pop-up camper models. Start by measuring each canvas panel precisely, including zipper channel locations and pole sleeve positions. Order a replacement canvas from a manufacturer like Bear Creek Canvas or Outdoors Inn, specifying your trailer’s make, model, and year. Remove the old canvas by unzipping the canvas zip channels, install the new canvas in reverse order, and apply waterproofing spray before the first use.
How do you repair a damaged canvas?
Repairing a damaged canvas starts with cleaning the area thoroughly and identifying the damage type before choosing a repair method — this is the Damage-First Framework. For small holes and tears, apply an adhesive patch (Tear-Aid Type A, cut into an oval shape, extending 1 inch beyond the damage on all sides). For seam failures, resew with a Speedy Stitcher sewing awl using waxed thread, then seal the stitching with GEAR AID Seam Grip WP. After any repair, re-apply waterproofing spray to the repair area and 12 inches surrounding it to restore the DWR coating the repair process disrupts.
Wrapping Up Your Canvas Repair
For tent trailer owners facing spring canvas damage, knowing how to repair tent trailer canvas ensures the repair process is manageable, affordable, and well within beginner DIY capability. Most damage — pinholes, linear tears up to 6 inches, and individual seam failures — responds well to adhesive patches, fabric glue, or sewing awl repair, costing less than $50 in materials compared to $1,000–$1,300 for full canvas replacement (Bear Creek Canvas, 2026). The critical variables are clean preparation, the right product for your damage type, and the often-skipped waterproofing step that makes the difference between a repair that lasts one season and one that lasts several years.
The Damage-First Framework — diagnose size, location, and stress level before buying anything — is what separates repairs that hold from repairs that peel off at the first fold. Apply it every time, and you will never waste money on the wrong product again.
Your next step is straightforward: pull out the canvas, identify your damage category using the guide above, gather the materials for that specific repair type, and complete the repair before your next trip. A well-maintained canvas, treated with waterproofing spray at the start of each season and stored dry after every use, will last 10–15 years. Start today — your camping season is waiting.

Dave King
I'm Dave King. I publish Tent Explorer, a site built to answer the questions people actually ask before they buy.