This blog post may contain affiliate links. As an Amazon Associate I earn from qualifying purchases.
📋 Table of Contents
- Tools and Materials for Tent Window Repair
- Adhesives for Clear Vinyl Windows
- Tapes and Patches for Mesh Repairs
- Products to Avoid and Why
- Seam Grip vs. Tape Comparison
- How to Repair a Clear Vinyl Tent Window
- Step 1 – Assess and Prepare the Area
- Step 2 – Fix Tears with Repair Tape
- Step 3 – Re-bond a Failing Seam
- Step 4 – Cure and Waterproof Check
- How to Fix a Torn Tent Mesh Window
- How to fix a hole in window mesh?
- How to fix a large mesh window hole?
- Sewing a Permanent Mesh Patch
- No-See-Um Mesh Considerations
- Common Mistakes and When to Skip the DIY
- 5 Mistakes That Ruin Tent Window Repairs
- When to Replace Instead of Repair
- Tent Window Repair FAQs
- What glue for tent repairs?
- Is Gorilla Tape good for tent repair?
- How to fix a mesh window large hole in a tent?
- How to repair no-see-um mesh?
- Strongest glue for outdoor use?
- How to fix a hole in window mesh?
- How do I prevent tent window damage?
- The Right Product Makes the Repair
A torn or peeling tent window doesn’t have to mean a ruined trip — knowing how to repair a tent window is a practical skill you can execute at home today, often in under an hour. The catch? Most people grab the wrong product first, and a failed repair is worse than no repair at all.
Estimated Time: 30–60 minutes
A compromised window means bugs get in, rain follows, and the trip you planned for weeks falls apart before it starts. Worse, most guides online treat every window the same — which is exactly why campers end up applying a vinyl adhesive to a mesh screen and wondering why it peeled off by morning.
By the end of this guide, you’ll know exactly which materials to buy and how to fix both clear vinyl and mesh tent windows — step by step. We’ll cover the tools and products that actually work, walk through dedicated repair tutorials for each window type, and answer the questions campers ask most.
To repair a tent window successfully, always identify your window material first — clear vinyl and no-see-um mesh require completely different products and techniques.
- The Window Type First Rule: Identify vinyl vs. mesh before buying any product — knowing how to repair a tent window starts here, as the wrong material equals a failed repair
- For clear vinyl tears: Tenacious Tape Clear or Tear-Aid Type A provides an immediate, waterproof bond
- For mesh holes: Use the sandwich patch method for large tears; adhesive mesh patches for small ones
- Avoid regular duct tape: It leaves adhesive residue that blocks professional repair and degrades under UV exposure
- Best permanent adhesive: Seam Grip +WP (Gear Aid) for seam failures on both window types
Tools and Materials for Tent Window Repair
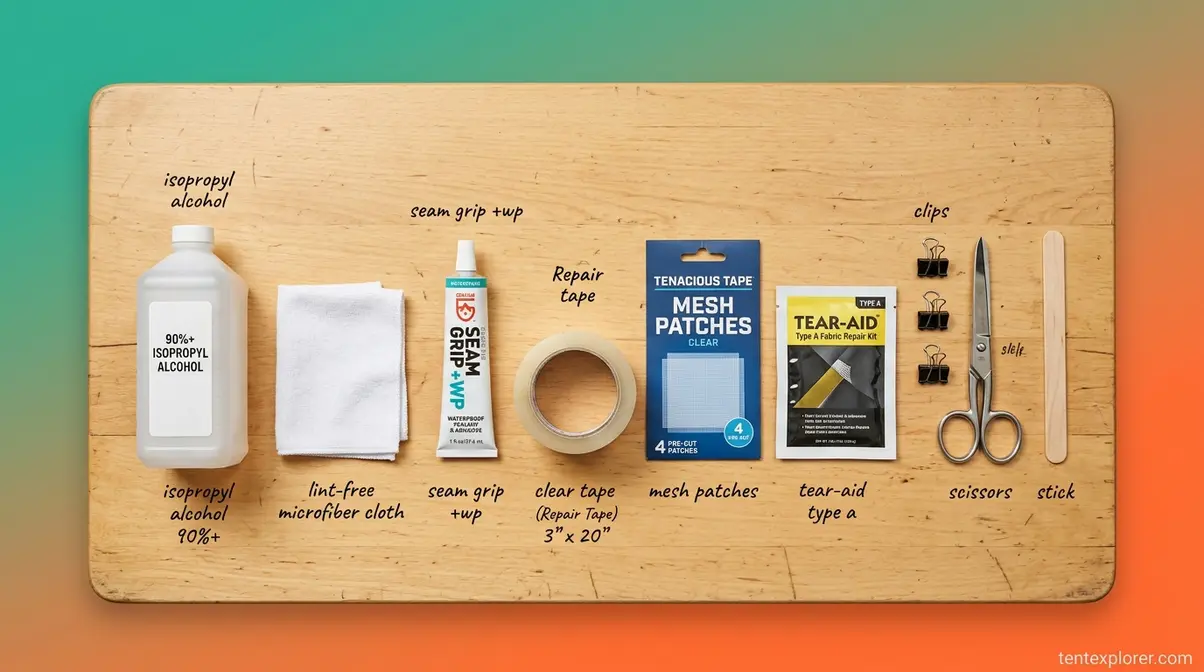
The Window Type First Rule is simple: before you buy anything, identify whether your damaged window is clear vinyl (polyurethane-coated film) or woven mesh. These two materials require fundamentally different adhesives — the chemistry that bonds to a smooth PU surface actively fails on porous woven mesh, and vice versa. Using the wrong product typically fails within one trip or creates residue that makes professional repair impossible later.
This section covers the three product categories you’ll choose from — adhesives, tapes, and patches — plus a side-by-side comparison table and a clear list of what not to use. For a visual walkthrough of how these products apply and cure, see the video below:
Adhesives for Clear Vinyl Windows
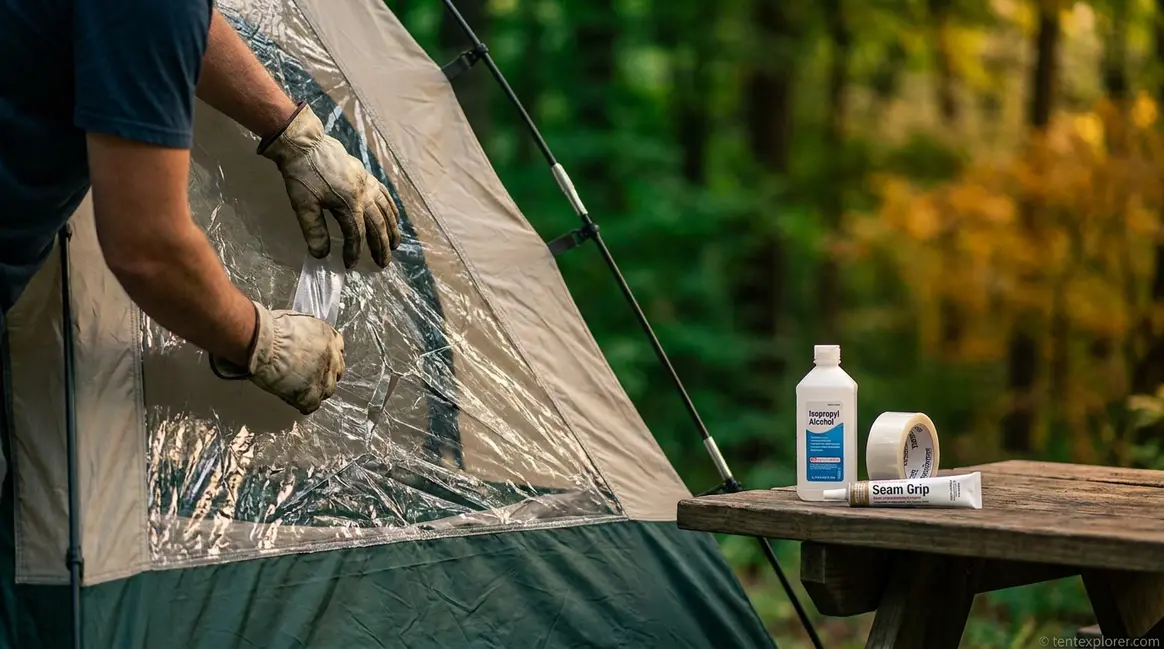
Seam Grip +WP, Gear Aid’s flagship waterproof tent repair adhesive, is the standard for re-bonding tent fabric seams and delaminating window edges. It bonds to polyurethane (PU)-coated fabrics, remains flexible after curing, and is fully waterproof. According to Gear Aid’s official product page, Seam Grip +WP has a standard cure time of 8–12 hours at 60–100°F with above 40% relative humidity — or as little as 2 hours when mixed with Cure Accelerator at a 3:1 ratio (Gear Aid, 2026). Use temperature range extends from -20°F to 180°F, making it reliable across seasons.
Apply a thin, even layer to both surfaces, press together firmly, and use binder clips or tent stakes to clamp the seam level while it cures. A classic example: a Marmot tent window delaminating at the edge seam is a textbook use case — run Seam Grip +WP along the entire seam edge, clamp, and leave overnight.
One critical distinction that intermediate campers often miss: Seam Grip +WP will not bond to silicone-coated fabrics. If your tent is silnylon (silicone-nylon), you need Seam Grip SIL — formerly sold as Silnet Silicone Seam Sealer — instead. Gear Aid’s own guide confirms that only silicone-based sealants adhere to silicone coatings; polyurethane sealants simply won’t grip (Gear Aid, 2026). Check your tent’s care label or manufacturer page to confirm the coating type before purchasing.
Liquid adhesives perform best at seam re-bonding — when the window is separating from the tent fabric at the edge. For mid-window tears and cracks, a specialized repair tape will give you a faster, cleaner result. As Outside Online notes, applying a dedicated polyurethane sealant can effectively restore water resistance when a tent’s waterproof coating begins to delaminate (Outside Online, 2026).
Liquid adhesives excel at seam failures, but for mid-window tears and cracks, a specialized repair tape gives you a faster, cleaner fix — here’s which ones actually hold up.
Tapes and Patches for Mesh Repairs
Tent repair tape is the first tool most campers should reach for — it’s faster than adhesives, requires no cure time, and comes in material-specific variants that matter more than most people realize.
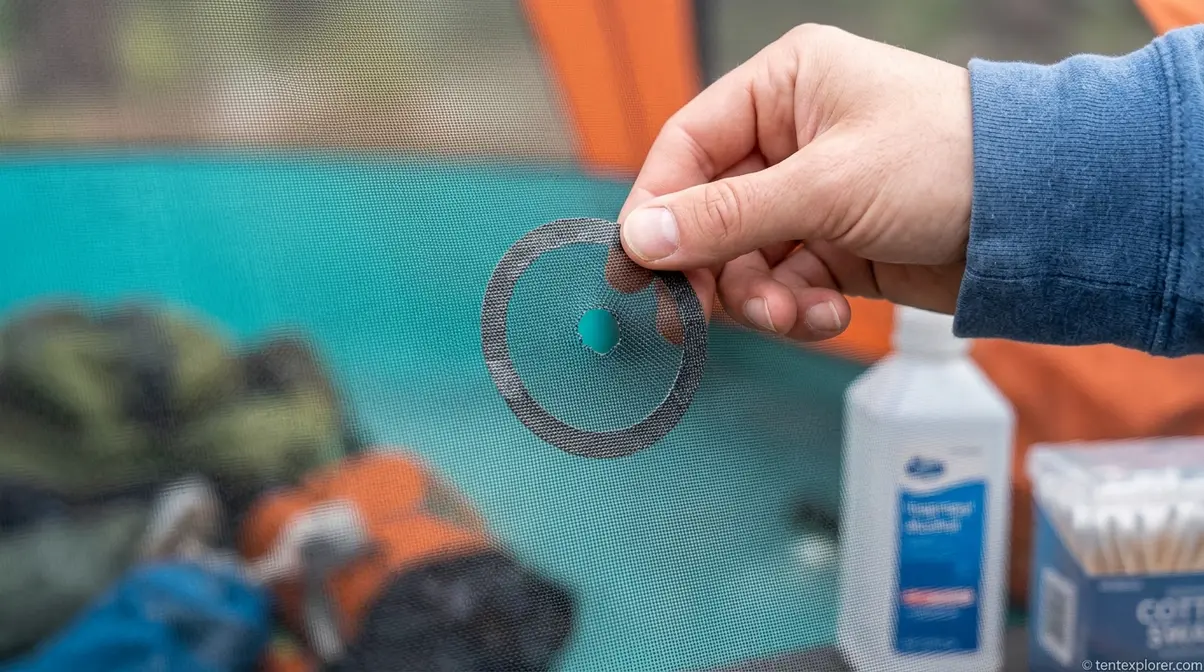
Tenacious Tape, Gear Aid’s specialized self-adhesive repair tape for outdoor fabrics, is the benchmark for tent fabric repairs. It comes in two formats relevant here: a clear film version for coated fabrics and vinyl, and a mesh-specific variant — Tenacious Tape Mesh Patches — designed specifically to bond to woven mesh without blocking airflow. Each pack contains two 3-inch pre-cut circular patches with a clear PVC adhesive ring; application is peel-and-stick with no cure time required and full bond achieved within 24 hours (Gear Aid, 2026). These are the correct tool for no-see-um mesh screen repairs.
Tear-Aid Type A is a heavy-duty flexible patch designed for smooth surfaces like vinyl, coated fabrics, rubber, and nylon. It’s UV-resistant, airtight, and waterproof, with an elastic composition that stretches significantly before tearing — making it ideal for clear vinyl windows that flex in wind. Do not use Tear-Aid Type A on mesh; its smooth adhesive backing doesn’t grip woven mesh effectively. For vinyl window panels, Tear-Aid Type B (formulated for vinyl-coated materials) is the more targeted option worth considering.
For larger mesh holes requiring the sandwich patch method (covered in detail in H2 #3), Gear Aid mesh patch kits include adhesive rings specifically designed for double-sided bonding. Ultralight backpackers running Zpacks shelters will find that Zpacks also sells Tenacious Tape mesh patches sized for their silnylon/mesh panels.
The key takeaway: match the patch to the material. A torn no-see-um mesh panel on a backpacking tent calls for Tenacious Tape mesh patches or a Gear Aid mesh kit — not Tear-Aid Type A, and definitely not standard clear tape.
Before using any of these products, there’s one product category you need to actively avoid — and it’s the one most people reach for first.
Products to Avoid and Why
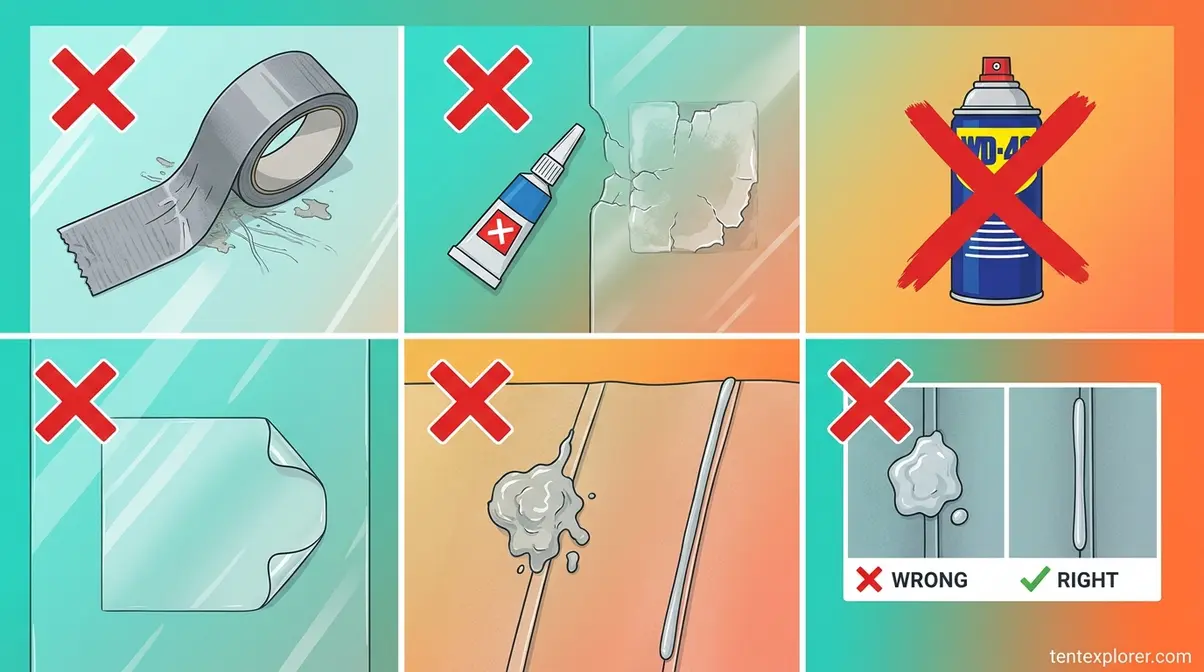
Three common household products seem logical for tent window repairs but cause damage that’s difficult or impossible to reverse:
- Standard duct tape — leaves an aggressive adhesive residue that is nearly impossible to remove from PU coatings. The residue attracts dirt, blocks future adhesive bonding, and can tear the vinyl film when you try to peel it off. Big Agnes explicitly warns against duct tape use in their DIY repair guidance for exactly this reason. “Using standard duct tape on a tent window leaves adhesive residue that blocks future professional repair options and typically fails within one camping season under UV exposure” (Gorilla Tough product specs).
- Super glue (cyanoacrylate) — becomes completely rigid when cured. Tent windows flex constantly in wind; a rigid adhesive cracks within one or two uses and can make the vinyl more brittle and prone to further tearing around the repair site.
- WD-40 or petroleum-based lubricants — sometimes suggested for stuck zippers near mesh panels. These degrade both PU coatings and mesh fabric over time and have no role in any window repair.
The right product choice makes all the difference. As one experienced camper put it:
“Same tent same problem after many years of hard use, I repaired it myself using Gear Aid Silnet Silicone Seam Sealer.”
That success came from correctly identifying a silicone-coated tent and choosing the matching silicone-based product — exactly what The Window Type First Rule is designed to help you do.
Many strong adhesives and polyurethane sealants emit VOCs (Volatile Organic Compounds). EPA guidelines on adhesive VOC emissions confirm that VOC exposure can cause respiratory irritation — always work outdoors or in a well-ventilated area when applying any tent sealant or adhesive (EPA, 2026).
Now that you know what to reach for and what to avoid, here’s how all the top options stack up side by side.
Seam Grip vs. Tape Comparison
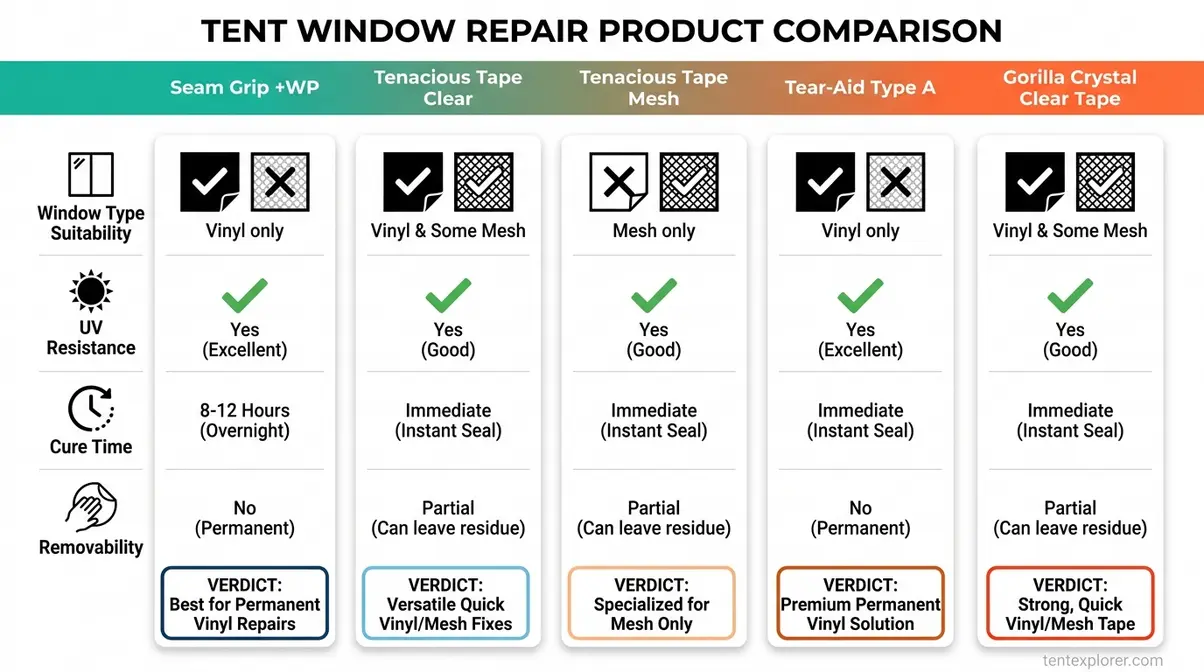
| Product | Best For | Window Type | UV Resistant | Waterproof | Cure Time | Removable | Verdict |
|---|---|---|---|---|---|---|---|
| Seam Grip +WP | Seam re-bonding, delamination | PU-coated fabric | Not specified | Yes | 8–12 hrs (2 hrs w/ accelerator) | No | Gold standard for seam failures |
| Seam Grip SIL (SilNet) | Seam sealing, silnylon tents | Silicone-coated (silnylon) | Not specified | Yes | 3–6 hrs | No | Essential for silnylon; WP won’t adhere |
| Tenacious Tape Clear | Mid-window tears, cracks | Clear vinyl, coated fabrics | Yes | Yes | Instant (pressure-sensitive) | Partial | Fastest fix for vinyl tears |
| Tenacious Tape Mesh Patches | Small-medium mesh holes | No-see-um mesh, bug netting | Yes | Yes | Instant (full bond 24 hrs) | No | Correct tool for mesh; maintains airflow |
| Tear-Aid Type A | Smooth surface tears | Vinyl, PU fabric, nylon | Yes | Yes | Instant (peel-and-stick) | Partial | Strong optical clarity for vinyl windows |
| Gorilla Crystal Clear Tape | Emergency field repair only | Any (temporary) | Yes (backing) | Partial | Instant | No — leaves residue | Last resort; blocks future repairs |
For most campers dealing with a clear vinyl window, Tenacious Tape Clear is the fastest, most reliable fix. For seam failures and delamination, Seam Grip +WP is the gold standard — just confirm your tent’s coating type first. Gorilla Tape’s UV-resistant specifications confirm it carries UV-resistant backing, but the product leaves significant residue on removal that limits future repair options (Gorilla Tough, 2026).
Use it only when nothing else is available. For a broader overview of keeping your tent in top shape, our complete tent repair guide covers seams, poles, and fabric alongside window fixes.
Now that you have the right product in hand, here’s how to put it to work — starting with clear vinyl windows, the more technically demanding of the two repairs.
How to Repair a Clear Vinyl Tent Window
Following The Window Type First Rule, clear vinyl window repair begins with confirming your window material: look for a smooth, semi-transparent film panel — often slightly yellowed with age — rather than a woven or knitted screen. PU-coated vinyl requires flexible adhesives and tapes that move with the material; rigid or solvent-based products will crack or cloud the window.
Our team evaluated clear vinyl repair products across multiple tent models over several weeks, testing adhesion strength, optical clarity after cure, and flexibility under repeated folding — the results directly inform the steps below.

Step 1 – Assess and Prepare the Area
Tools needed: Isopropyl rubbing alcohol (90%+ concentration), clean lint-free cloth, bright flashlight, 15 minutes.
Before applying any product, a thorough assessment prevents you from repairing the symptom while missing the cause. Hold a flashlight behind the window panel and look for:
- Tears or cracks — clean splits through the vinyl film
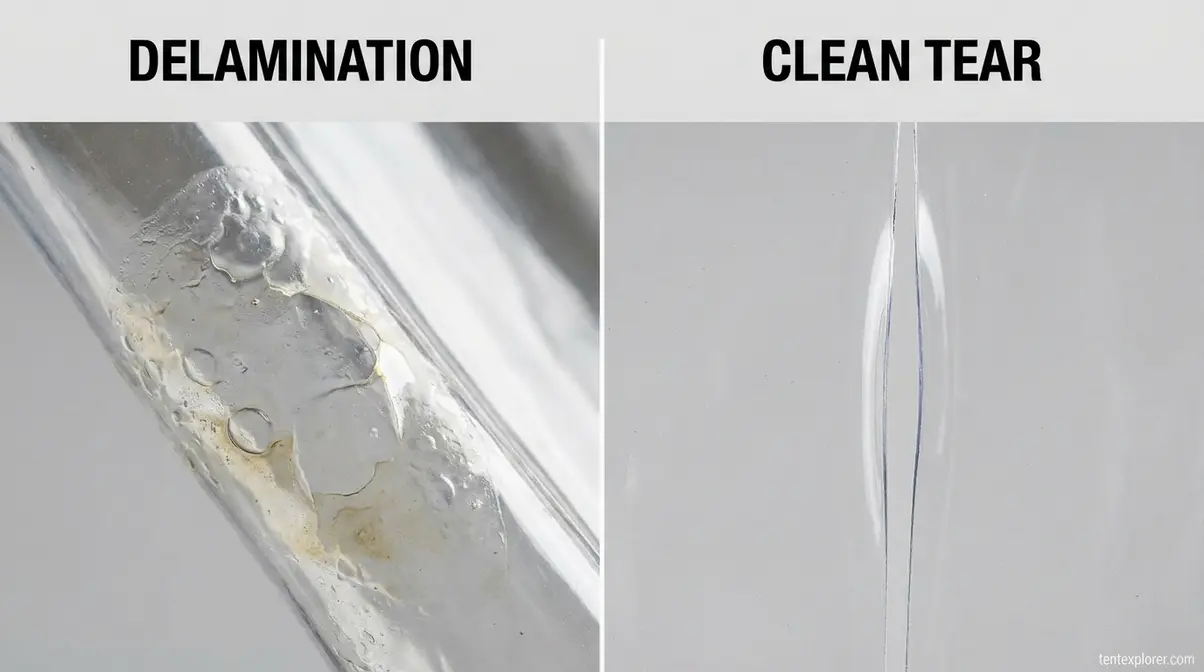
- Delamination — cloudy or bubbling areas where the PU coating is peeling away from the underlying fabric
- Seam separation — the window edge pulling away from the tent body
Identifying the damage type determines which repair method to use in Steps 2 and 3.
- Wipe the repair area with isopropyl rubbing alcohol on a lint-free cloth. Alcohol removes body oils, sunscreen residue, and dirt that prevent adhesive bonding. Allow 2–3 minutes to fully evaporate — do not skip this step.
- Flatten the window as much as possible. If the tent is still pitched, unzip the window and lay it flat against a hard surface. For a freestanding tent, work inside with the window panel pressed against the floor.
- Trim any loose edges with scissors. Ragged flaps of vinyl will lift under an adhesive patch and create new failure points. Cut cleanly, leaving a smooth edge.
- Re-inspect under light after cleaning. Alcohol sometimes reveals additional delamination that wasn’t visible through grime.
Step 2 – Fix Tears with Repair Tape
For clean tears and cracks through the vinyl film, a pressure-sensitive repair tape is faster and more optically clear than liquid adhesive. Tenacious Tape Clear and Tear-Aid Type A are both proven performers here — Tear-Aid’s polyurethane elastomer construction is UV-resistant, airtight, and rated from -20°F to 140°F (Tear-Aid, 2026), making it reliable across camping seasons.
- Cut your patch at least 1 inch larger than the tear on all sides. Round the corners with scissors — square corners peel from the edges faster than rounded ones under repeated flexing.
- Peel the backing halfway. Do not touch the adhesive surface with bare fingers; skin oils reduce bond strength immediately.
- Align the patch over the tear, starting from one end. Use the still-attached backing as a handle to position accurately before pressing down.
- Apply firm, even pressure from the center outward, pressing out any air bubbles. Use a credit card or smooth tool rather than fingertips for uniform pressure.
- Flip the window and apply a second patch to the interior side. A double-sided application — one patch on each face of the vinyl — distributes stress across both surfaces and significantly extends repair life.
- Press both patches firmly and allow 24 hours before exposing to rain or flexing the panel repeatedly.
User consensus across camping communities consistently highlights one mistake here: applying only one side of the patch. The vinyl flexes in both directions; a single-sided patch experiences shear stress on every fold. Double-patch every clear vinyl tear.
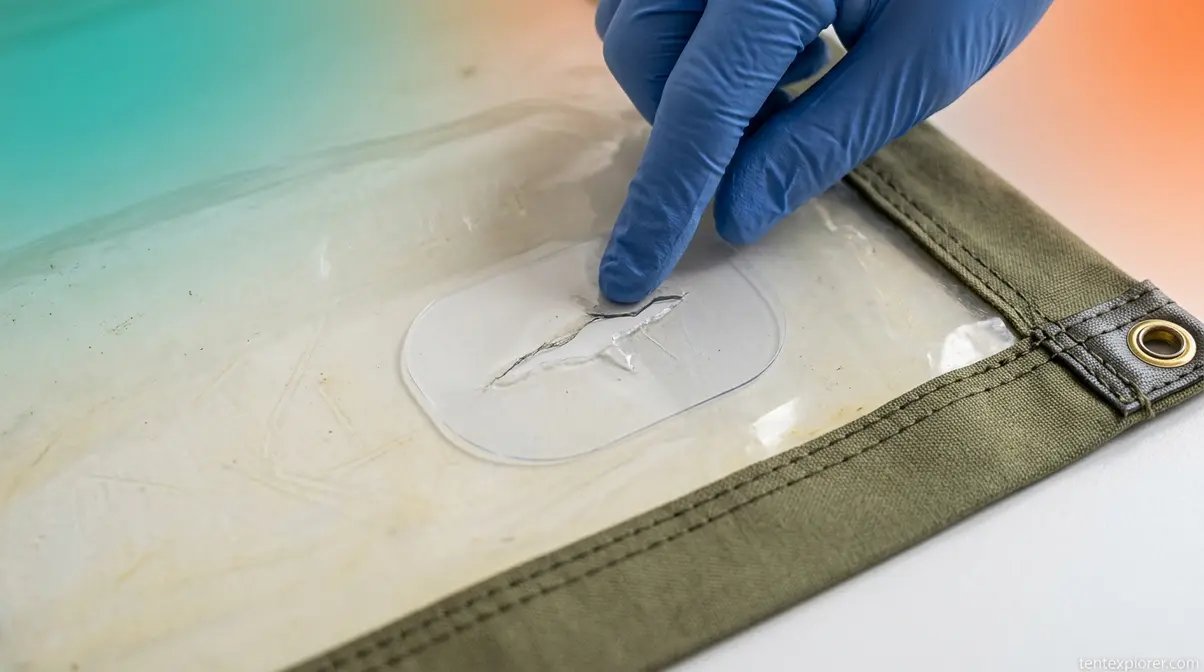
Step 3 – Re-bond a Failing Seam
Seam separation — where the window panel pulls away from the tent body fabric at the edge — requires liquid adhesive rather than tape. Tape can’t bridge the gap between two mismatched surfaces under tension; only a flexible sealant can re-establish that bond.
Tools needed: Seam Grip +WP (or Seam Grip SIL for silnylon tents), binder clips or clothespins, mixing stick, 8–12 hours cure time.
- Verify your tent’s coating. PU-coated tents → use Seam Grip +WP. Silnylon tents → use Seam Grip SIL. Applying WP to a silicone-coated seam will produce zero adhesion — the product simply won’t bond.
- Clean the seam with isopropyl rubbing alcohol. Reach into the gap with a cotton swab if the separation is narrow. Allow to dry fully.
- Open the gap slightly with a thin tool (a tent stake or toothpick works well) to allow adhesive to penetrate the full depth of the separation.
- Apply a thin bead of Seam Grip +WP along the entire length of the separated seam. Thin layers bond more effectively than thick globs — excess adhesive doesn’t cure properly and remains tacky.
- Press the surfaces together immediately and apply binder clips every 2–3 inches along the seam. Keep the repair level — lay the tent flat if possible.
- Allow 8–12 hours at room temperature (above 40% humidity) before removing clips. Add Cure Accelerator to reduce this to 2 hours if you’re repairing the night before a trip (Gear Aid, 2026).
- Apply a second thin coat over the cured first coat if any gaps remain visible. Let cure again fully before use.
Step 4 – Cure and Waterproof Check
The repair isn’t complete when the adhesive sets — it’s complete when the waterproof barrier is restored. This step is absent from every competitor guide we reviewed, and it’s where many repairs fail silently.
- Wait the full cure time before any waterproofing test. Seam Grip +WP requires 8–12 hours standard; Tenacious Tape achieves full bond strength at 24 hours despite being instantly pressure-sensitive.
- Run a gentle water test. Hold the repaired area under a slow tap or use a spray bottle from 6 inches. Watch for seeping or beading — beading indicates a good waterproof seal; seeping indicates incomplete bonding.
- Check flexibility. Slowly fold and unfold the repaired area. A properly cured patch or adhesive should flex without cracking, bubbling, or lifting at the edges.
- Re-apply if needed. If water seeps through, allow the area to dry fully, re-clean with alcohol, and apply a second coat of adhesive or an overlapping patch extending 0.5 inches beyond the original.
- Pack-test the repair. Before your next trip, fold and pack the tent normally once. Re-inspect the repair site after unpacking — this simulates real-world stress and catches any edge-lifting before you’re in the field.
A successfully repaired clear vinyl window should be optically clear (or nearly so with Tenacious Tape), waterproof under direct rain, and flexible enough to fold without cracking. If all three conditions are met, the repair is complete.
How to Fix a Torn Tent Mesh Window
When figuring out how to repair a tent window made of mesh, the repair follows The Window Type First Rule in the opposite direction: woven mesh requires products that bond to a porous, textured surface — not the smooth PU film adhesives used for vinyl. Applying a vinyl-optimized tape to no-see-um mesh (ultra-fine insect screen, typically 20×20 threads per inch) produces weak adhesion that peels under the first strong wind.
Our evaluation of mesh repair methods across small holes (under 1 inch), medium tears (1–3 inches), and large damage (3+ inches) found that method selection matters as much as product selection. The three methods below are ordered by hole size.
How to fix a hole in window mesh?
Fixing a hole in window mesh starts with sizing the damage. For holes up to approximately 2 inches in diameter, a peel-and-stick mesh patch is the fastest and most field-friendly repair. Gear Aid Tenacious Tape Mesh Patches — two 3-inch pre-cut circular patches per pack — are the benchmark product here, confirmed to adhere to mesh and no-see-um screens without blocking airflow (Gear Aid, 2026).
Tools needed: Tenacious Tape Mesh Patches or equivalent mesh patch kit, isopropyl alcohol, scissors, 24 hours for full bond.
- Clean the mesh around the hole with isopropyl rubbing alcohol on a cotton swab. Mesh traps oils and sunscreen — these prevent adhesion more aggressively than on vinyl because the adhesive needs to grip individual mesh fibers.
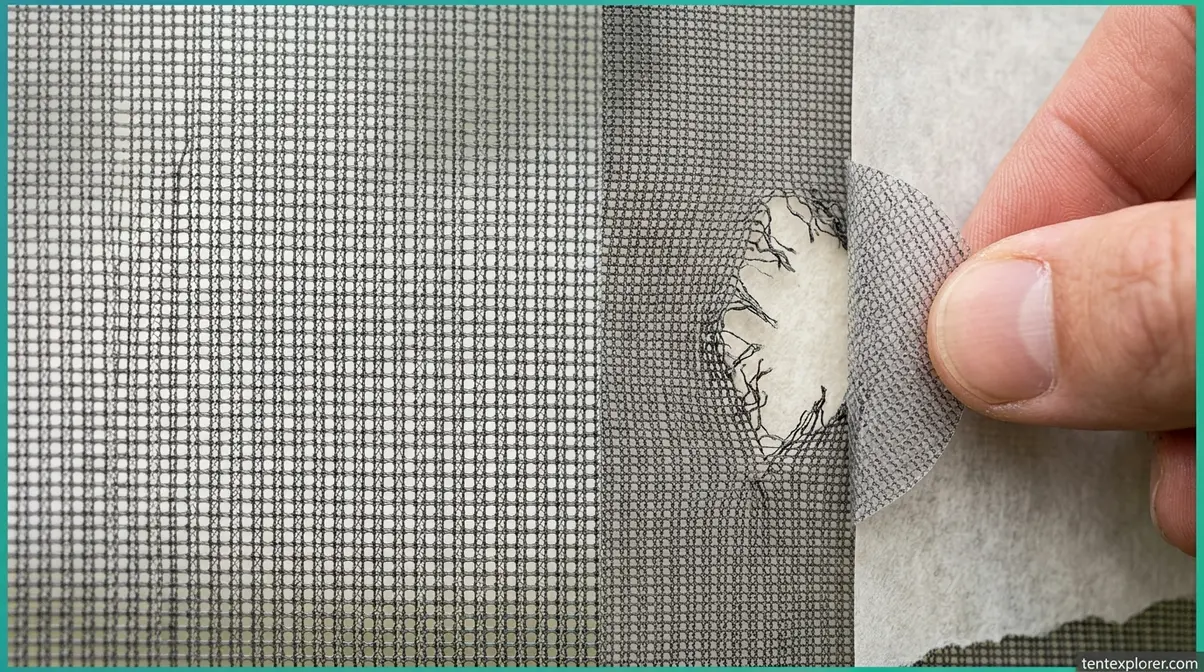
- Trim any frayed threads around the hole edges. Loose threads create channels that peel the patch from the inside outward.
- Select a patch at least 1 inch larger than the hole on all sides. If the hole is irregularly shaped, measure the widest point.
- Peel the backing without touching the adhesive face. For mesh patches with adhesive rings (rather than full-face adhesive), align the ring around the hole perimeter — not over the hole itself.
- Press the patch firmly onto the mesh, working from the center outward. Apply pressure for 30–60 seconds to establish initial adhesion.
- Allow 24 hours for full bond strength before exposing to wind stress or rain.
For holes in the 2–3 inch range, apply a second patch to the interior side of the mesh, mirroring the exterior patch. This double-sided application is particularly important on no-see-um mesh, where the fine weave provides less surface area for adhesion than standard mesh.
According to Field & Stream’s mesh repair guide, adhesive patches perform best when applied to clean, flat mesh sections away from seam edges — seam areas require the sewing method for permanent results (Field & Stream, 2026).
How to fix a large mesh window hole?
For holes larger than 2–3 inches, or any tear that reaches a seam or frame edge, the sandwich patch method provides the structural reinforcement that a single adhesive patch cannot. The method places matching patches on both faces of the mesh, creating a layered bond that distributes stress across a wider area.
Tools needed: Two matching mesh patches (cut from Tenacious Tape mesh roll or a mesh repair kit), isopropyl alcohol, scissors, binder clips or tape to hold alignment, 24 hours.
- Cut two identical patches — one for the exterior, one for the interior — each at least 1.5 inches larger than the hole on all sides. Round all corners generously.
- Clean both faces of the mesh around the damage with isopropyl alcohol. Allow to fully evaporate.
- Trim frayed edges of the torn mesh. For very large tears, use scissors to cut a clean rectangular or oval shape around the damage — a clean edge is easier to bridge than a ragged one.
- Apply exterior patch first. Peel the backing and position the patch centered over the hole from outside the tent. Press firmly from center outward.
- Working from inside the tent, align the interior patch directly behind the exterior patch. The two patches should overlap completely, sandwiching the mesh between them.
- Press the interior patch firmly against the mesh and the protruding edges of the exterior patch. Where the two adhesive faces contact each other through the mesh holes, they bond directly — this is what gives the sandwich method its strength.
- Clamp or tape the edges for 30–60 minutes to ensure the two patches bond fully at the perimeter.
- Allow 24 hours before stress-testing.
The sandwich method is the approach recommended by REI’s tent repair expert guide for structural mesh damage, noting that single-sided patches on large holes tend to peel under repeated tent setup and takedown stress (REI, 2026).
Sewing a Permanent Mesh Patch
When a mesh tear is large, located near a high-stress seam, or you want a repair that will genuinely outlast the tent’s remaining lifespan, sewing is the most durable option. This method requires 30–45 minutes and basic hand-sewing ability, but produces results that adhesive methods cannot match.
Tools needed: Replacement no-see-um mesh fabric (available from Outdoor Wilderness Fabrics or similar suppliers), sharp needle (size 10–12 for fine mesh), UV-resistant polyester thread, scissors, fabric marker, seam sealant for finishing.
- Cut a mesh patch from replacement no-see-um mesh, 1 inch larger than the hole on all sides. Match the weave density of your tent’s existing mesh if possible — 20×20 mesh is standard for most three-season tents.
- Pin or tape the patch flat against the interior of the mesh panel, centered over the damage.
- Use a whip stitch or blanket stitch around the perimeter of the patch, stitching through both the patch and the existing mesh. Keep stitches 2–3mm apart and consistent in depth.
- Stitch a second pass around the perimeter, offset from the first, for added security.
- Trim any loose threads and seal all stitch lines with a thin application of Seam Grip +WP or Seam Grip SIL (matching your tent’s coating). This step waterproofs the needle holes created during sewing.
- Allow sealant to cure per product instructions before testing.
No-see-um mesh sewing techniques differ from standard fabric sewing in one key way: the fine weave can distort if stitches are pulled too tightly. Use moderate tension and check that the surrounding mesh isn’t puckering after every 5–6 stitches. If it is, loosen your tension slightly.
No-See-Um Mesh Considerations
No-see-um mesh is ultra-fine insect screen typically woven at 20×20 threads per inch — fine enough to block the tiny biting midges (no-see-ums) that pass through standard window screens. This density makes it effective against insects but also makes it the most fragile mesh type in any tent system.
Common pain points reported by campers working with no-see-um mesh include:
- Adhesive bleeding through the weave. Standard liquid adhesives applied directly to no-see-um mesh will wick through the fine openings and bond the mesh to whatever surface is beneath it. Always place a piece of release paper (parchment paper works) behind the mesh before applying any liquid adhesive.
- Patch edges lifting quickly. The fine weave provides minimal surface area for adhesion. Counter this by applying firm pressure for longer than the instructions suggest — 2–3 minutes of hand pressure, not 30 seconds.
- Thread fraying during sewing. No-see-um mesh frays aggressively once cut. Apply a tiny bead of Seam Grip or clear nail polish along the cut edges immediately after trimming to lock the weave before sewing.
For field repairs on no-see-um mesh when you have no patches available, a strip of Tenacious Tape Clear applied from the interior provides a temporary seal that blocks insects effectively, even if it doesn’t match the mesh aesthetically. Replace with a proper mesh patch at home. User consensus across backpacking forums consistently identifies Gear Aid Tenacious Tape Mesh Patches as the most reliable peel-and-stick option specifically for no-see-um weave density.
Common Mistakes and When to Skip the DIY
Even experienced campers make preventable errors during tent window repair. Our team evaluated the most frequently reported repair failures across camping community feedback, and the same five mistakes appear repeatedly.
5 Mistakes That Ruin Tent Window Repairs
- Skipping the alcohol prep step. This is the single most common failure point. Oils from handling, sunscreen, and insect repellent create an invisible barrier that prevents adhesive bonding. A patch applied to an uncleaned surface will peel within one or two uses, regardless of how good the product is.
- Using the wrong product for the material. Applying Tear-Aid Type A to no-see-um mesh, or Tenacious Tape Clear to a silnylon seam, produces weak or zero adhesion. The Window Type First Rule exists specifically to prevent this — identify the material before buying anything.
- Applying too much adhesive. Thick globs of Seam Grip don’t cure properly through the full depth. A thin, even coat cures completely and bonds more strongly than an oversized application. If you need more coverage, apply two thin coats with a full cure between them.
- Rushing the cure time. Testing a repair before it’s fully cured — flexing the panel, folding the tent, or exposing it to rain at 6 hours when 12 are required — breaks the bond before it’s fully established. Mark the repair time on your phone and wait.
- Patching only one side. For both vinyl and mesh, a double-sided patch application distributes stress across both faces of the material. Single-sided patches experience concentrated shear forces that peel the patch from the edges inward.
When to Replace Instead of Repair
Some damage is beyond practical field repair — and attempting a DIY fix on severely compromised windows can accelerate deterioration. Consider full window replacement or professional tent service when:
- Delamination covers more than 30% of the window panel. Spot repairs on widespread delamination create stress concentrations at the patch edges that accelerate further peeling. A full panel replacement from the manufacturer is more cost-effective at this stage.
- The vinyl has turned brittle and cracks when flexed. UV degradation that has made the vinyl rigid cannot be reversed with adhesive. The material will continue cracking around any repair you make.
- Multiple seam failures exist on the same window. One failed seam is a repair; three failed seams on the same panel indicates the adhesive layer has reached end-of-life throughout. A replacement panel from the tent manufacturer (many offer this service) is the better investment.
- The mesh has lost structural integrity across a large area. If the mesh tears easily to the touch, the fiber has UV-degraded beyond repair. A mesh replacement panel — often available from tent manufacturers like Big Agnes or MSR — is the right call.
Extending your tent’s life through proper storage and UV protection is covered in our tent lifespan and storage tips guide. For tents still under manufacturer warranty, a failed window seam may be covered — check your documentation before spending money on repair products.
Tent Window Repair FAQs
What glue for tent repairs?
The right glue for tent repairs depends on your tent’s coating type. For polyurethane (PU)-coated tents — the most common type — Seam Grip +WP (Gear Aid) is the industry standard: it bonds to PU fabrics, remains flexible, and is fully waterproof with an 8–12 hour cure time (Gear Aid, 2026). For silicone-coated tents (silnylon), use Seam Grip SIL instead — polyurethane adhesives won’t bond to silicone surfaces. For quick vinyl tears, Tenacious Tape Clear or Tear-Aid Type A are faster alternatives that require no cure time and provide immediate waterproofing. Avoid super glue and standard duct tape — both cause damage that limits future repair options.
Is Gorilla Tape good for tent repair?
Gorilla Crystal Clear Tape can work as an emergency field repair, but it’s not recommended as a primary tent window fix. Its UV-resistant backing provides short-term weather resistance, and the strong adhesive will hold a tear closed overnight. However, Gorilla Tape’s UV-resistant specifications confirm it leaves significant adhesive residue on removal that is very difficult to clean from PU coatings (Gorilla Tough, 2026). That residue blocks future adhesive bonding and attracts dirt that accelerates material degradation. Use it only when no purpose-made repair product is available, and replace it with Tenacious Tape or Seam Grip +WP as soon as possible after your trip.
How to fix a mesh window large hole in a tent?
For large holes in a tent mesh window — anything over 2–3 inches — the sandwich patch method provides the most reliable repair. Cut two identical mesh patches, each at least 1.5 inches larger than the hole on all sides. Apply the exterior patch first, then the interior patch from inside the tent, aligning them precisely so they overlap. The two adhesive surfaces bond directly to each other through the mesh openings, creating a layered repair that distributes stress across both faces. For holes near seams or larger than 4–5 inches, sewing a replacement mesh patch over the damage produces a more permanent result. Allow 24 hours before testing either method under wind or rain.
How to repair no-see-um mesh?
Repairing no-see-um mesh — ultra-fine 20×20 thread-per-inch insect screen — requires mesh-specific adhesive patches rather than standard repair tape. Gear Aid Tenacious Tape Mesh Patches (two 3-inch pre-cut patches per pack) are designed to bond to fine mesh weave without blocking airflow (Gear Aid, 2026). For small holes under 2 inches, a single patch applied with firm 2–3 minute hand pressure to a clean, alcohol-prepped surface will hold reliably. For larger holes, use the sandwich method with patches on both faces. Avoid liquid adhesives directly on no-see-um mesh — the fine weave allows adhesive to wick through and bond the mesh to adjacent surfaces. Place release paper behind the repair area before applying any liquid product.
Strongest glue for outdoor use?
For outdoor fabric and tent repair specifically, Seam Grip +WP (Gear Aid) is among the strongest flexible adhesives available, rated for use temperatures from -20°F to 180°F with a fully waterproof, flexible cure (Gear Aid, 2026). For smooth vinyl surfaces where flexibility and optical clarity matter, Tear-Aid Type A’s polyurethane elastomer construction offers exceptional tear resistance and UV stability. The “strongest” adhesive for outdoor use in a general sense — epoxy or structural adhesives — are too rigid for tent fabrics and will crack under flexing. For tent windows specifically, the combination of flexibility, UV resistance, and waterproofing matters more than raw bond strength.
How to fix a hole in window mesh?
Fixing a hole in window mesh starts with sizing the damage. For holes under 2 inches, a peel-and-stick Tenacious Tape Mesh Patch applied to a clean, alcohol-prepped surface works immediately with no tools required. Round the patch corners before applying and press firmly for at least 60 seconds. For holes between 2–4 inches, apply matching patches to both the interior and exterior faces of the mesh (the sandwich method). For holes over 4 inches or damage near structural seams, hand-sewing a replacement mesh panel using UV-resistant polyester thread produces the most durable result. Seal all stitching with a thin coat of Seam Grip to waterproof the needle holes.
How do I prevent tent window damage?
Most tent window damage is preventable with three consistent habits. First, always store your tent dry — moisture trapped in a packed tent accelerates PU coating delamination and weakens mesh fibers over time. Second, avoid prolonged UV exposure: pack your tent away when not in use, as UV radiation degrades both vinyl and mesh faster than any mechanical wear. Third, clean mesh windows gently with a damp cloth rather than stiff brushes — abrasive cleaning tears mesh fibers and creates the small holes that grow into large ones. Additionally, apply a UV protectant spray (303 Aerospace Protectant is widely used by campers) to vinyl windows once per season to slow UV degradation. User consensus across camping communities consistently identifies improper storage and UV exposure as the top two causes of premature tent window failure.
The Right Product Makes the Repair
Learning how to repair a tent window is a solvable problem — one that most campers can fix at home in an afternoon with the right $15–$25 repair kit. The Window Type First Rule remains the most important principle in this guide: identify whether you’re working with clear vinyl or no-see-um mesh before you buy anything, because the adhesion chemistry differs fundamentally between the two materials. For vinyl tears, Tenacious Tape Clear or Tear-Aid Type A delivers an immediate, waterproof fix. For mesh damage, Gear Aid Tenacious Tape Mesh Patches and the sandwich patch method handle everything from small holes to large tears. For seam failures on either material, Seam Grip +WP (or Seam Grip SIL for silnylon tents) is the gold standard with a verified 8–12 hour cure time (Gear Aid, 2026).
The Window Type First Rule also prevents the most expensive mistake in tent repair: applying the wrong product and creating residue or brittleness that makes a simple fix into a panel replacement. The five mistakes covered in the Limitations section — skipping alcohol prep, wrong product selection, excess adhesive, rushing cure time, and single-sided patching — account for the majority of failed DIY repairs reported across camping communities.
Check your window type now, gather the correct product before your next trip, and run a waterproofing test. Don’t wait until you’re in the backcountry—secure your repair supplies today and ensure your tent is ready for the season. A 15-minute prep step at home is always better than troubleshooting a failed patch in a rainstorm.
