Tent Floor Design Guide: Materials, DIY Footprints & Platforms
 Dave King
Updated July 2, 2026
22 min read
Dave King
Updated July 2, 2026
22 min read
You packed the right sleeping bag, picked a great campsite, and zipped the tent shut — yet you still woke up cold and stiff. Nine times out of ten, the problem isn’t your sleeping bag. It’s your tent floor.
Most campers never think about what sits between them and the ground. That gap in planning costs comfort, warmth, and — in wet conditions — an entire night’s sleep. By the end of this tent floor design guide, you’ll know exactly which materials to choose, how to build a DIY footprint for under $10, and when to upgrade to a full raised platform, so you can sleep warm and dry every time.
This guide covers everything from basic material science to glamping platforms, organized around a simple 3-layer framework called The Ground-Up Stack.
A great tent floor system requires three sequential decisions — not one. Most cold, damp nights trace back to skipping the Protection Layer entirely.
- The Ground-Up Stack has three layers: Protection (footprint), Structure (floor material), and Comfort (interior layer) — master all three and you master tent floor design
- PVC outperforms PE in long-term durability and waterproofing — confirmed by materials science research on polymer performance under sustained stress
- A DIY Tyvek footprint costs under $10 and protects your tent floor better than most store-bought options when sized correctly
- Raised wooden platforms are the gold standard for glamping and semi-permanent event setups
- Leave No Trace principles require camping on durable surfaces — your floor choice directly affects the ground beneath you
Understanding Your Tent’s Floor System
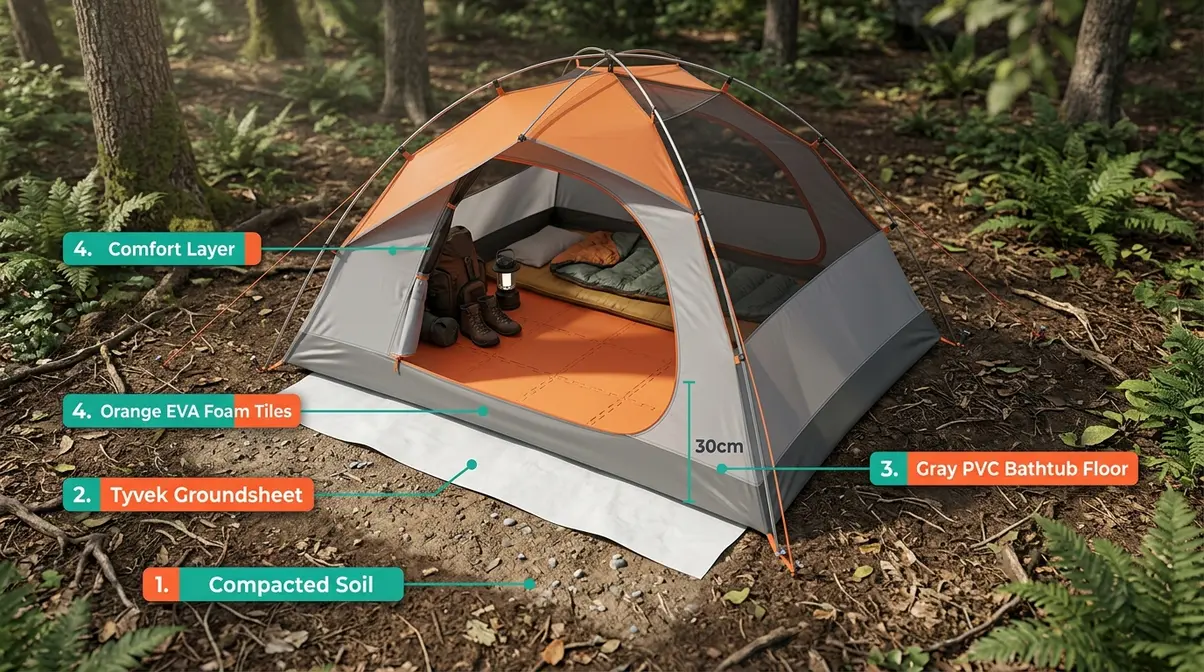
A tent floor system is not just the fabric underfoot — it is the complete stack of layers between your body and the ground. Most camping discomfort originates at the floor level, not the sleeping bag. The Ground-Up Stack is the organizing framework for this guide: three distinct layers, each solving a different problem, each building on the one below it.
“Bathtub floor, bug netting attached permanently, typical deploying a rain fly on top. This is a 2 wall tent. This is 98% of tents in the world.”
That description captures what most modern tents look like out of the box. The bathtub floor (the tub-shaped sewn-in floor that curves up the tent walls to block ground water and insects) is already doing some work — but it still needs protection from below and comfort from above to perform at its best.
The Three-Part Ground-Up Stack
Every tent floor design guide decision maps to one of three layers:
- Layer 1 — Protection: A footprint or groundsheet placed under the tent. It shields the tent floor from abrasion, sharp rocks, and moisture wicking up from the soil. Skipping this layer is the single most common beginner mistake.
- Layer 2 — Structure: The tent floor material itself — PE, PVC, coated nylon, or canvas. This is what your tent manufacturer chose, and what you choose when buying a footprint or replacement floor.
- Layer 3 — Comfort: Everything placed inside the tent on top of the floor — foam tiles, rugs, sleeping pads, or carpet squares. This layer determines how warm and cushioned the surface feels underfoot.
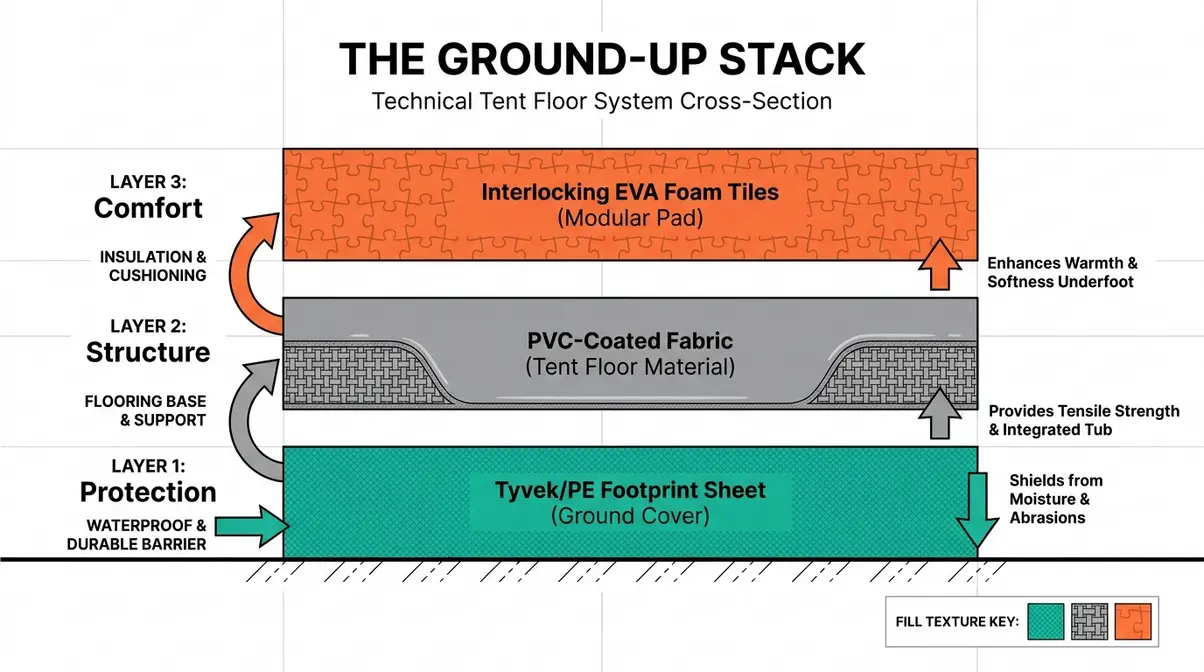
Now that you can see the full system, let’s examine the most critical technical decision in Layer 2: which material your tent floor and footprint should be made from.
What Is a Bathtub Floor — and Why It Matters
A bathtub floor is a sewn-in tent floor whose edges curve up 6–12 inches around the tent’s perimeter, forming a tub shape that blocks rain splash and crawling insects at ground level. It is the primary waterproof barrier in the vast majority of modern tents.
Here is the limitation beginners miss: a bathtub floor cannot withstand repeated abrasion from rocks, grit, and roots. The floor coating degrades over time. Seams are the most vulnerable points. Even a tent with a high-quality bathtub floor will develop pinholes and delamination after a season or two of unprotected ground contact — which is exactly why Layer 1 (the Protection footprint) is non-negotiable, not optional.
Choosing the Right Tent Floor Material
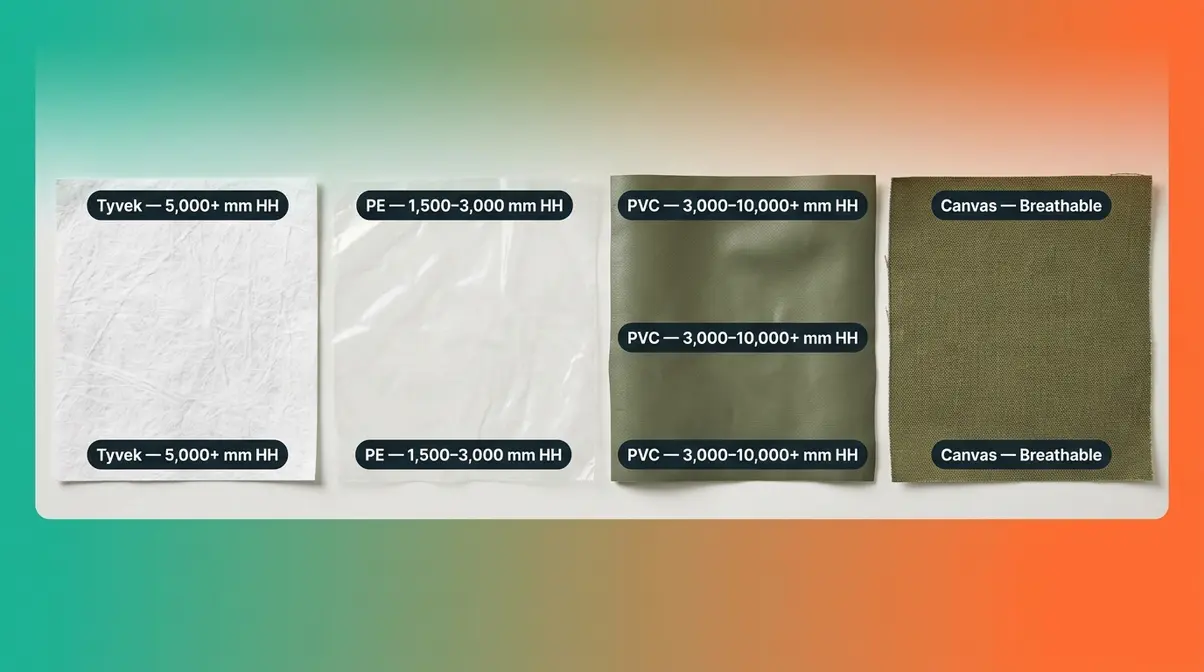
The Structure Layer — Layer 2 of the Ground-Up Stack — is the most technically complex decision in tent floor planning. The material your tent floor is made from determines its waterproof rating, weight, durability, and environmental impact. Our team evaluated the four most common tent floor materials across multiple criteria to give you a clear comparison.
PE vs. PVC: The Definitive Comparison
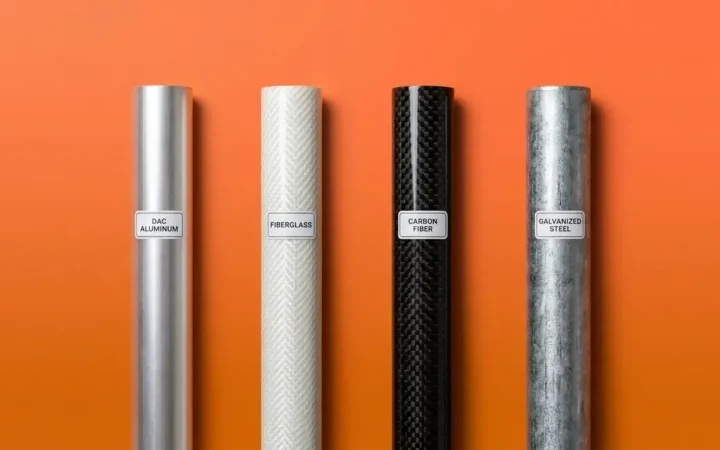
Polyethylene (PE) and polyvinyl chloride (PVC) are the two dominant materials in tent floors and groundsheets. Both are waterproof polymers, but they behave very differently under field conditions.
| Property | PE (Polyethylene) | PVC (Polyvinyl Chloride) |
|---|---|---|
| Waterproof Rating | 1,500–3,000 mm HH | 3,000–10,000+ mm HH |
| Weight | Lighter (2–4 oz/sq yd) | Heavier (5–10 oz/sq yd) |
| Cold-Weather Flexibility | Stiffens below 0°C | Remains flexible to −20°C |
| Abrasion Resistance | Moderate | High |
| UV Resistance | Moderate | High (with stabilizers) |
| Chemical Resistance | Good | Excellent |
| Recyclability | Yes (Type 2/4) | Difficult (chlorine content) |
| Typical Cost | Lower | Higher |
| Best For | Lightweight backpacking, short trips | Base camps, events, permanent setups |
Materials science research confirms that PVC’s cross-linked polymer structure delivers superior tensile strength and resistance to hydrostatic pressure compared to standard PE formulations (ScienceDirect polymer research). For tent floors tested under ASTM D751 standards — the industry benchmark for coated fabrics measuring burst strength, tear resistance, and waterproof integrity — PVC consistently outperforms PE in long-term durability testing.
The practical takeaway: PE is a reasonable choice for weekend backpackers who prioritize weight savings. For base camps, glamping setups, or any tent that stays pitched for more than a few days, PVC’s superior abrasion resistance and higher hydrostatic head (HH) rating justify the extra weight and cost.
The main disadvantages of PE plastic in tent floor applications: it stiffens in freezing temperatures (making it brittle and prone to cracking at seams), offers only moderate UV resistance without additives, and its thinner gauge means it punctures more readily under sharp rock contact.
Tyvek and Coated Nylon: Lightweight Alternatives
Two materials dominate the ultralight and DIY footprint world: Tyvek and coated nylon (ripstop nylon).
Tyvek is a flash-spun high-density polyethylene (HDPE) fabric manufactured by DuPont. According to DuPont’s technical specifications, Tyvek HomeWrap achieves a hydrostatic resistance exceeding 500 cm (approximately 5,000 mm HH), making it genuinely waterproof rather than merely water-resistant. It weighs roughly 1.4 oz per square yard — lighter than any PE or PVC groundsheet at comparable coverage. The trade-off: it sounds noticeably crinkly underfoot, and the surface can be slippery in wet conditions. For a DIY Tyvek tent footprint, it is the gold-standard material.
Coated ripstop nylon (typically silicone-coated or polyurethane-coated) offers a softer, quieter surface than Tyvek. Silnylon (silicone-coated nylon) achieves 1,200–3,000 mm HH and packs down to almost nothing. However, it stretches when wet, which can cause fit problems with custom-cut footprints. Coated nylon is the preferred choice for three-season backpackers who want a quieter, more packable footprint than Tyvek.
Canvas (cotton duck or poly-cotton blend) is the traditional choice for wall tents and canvas bell tents. It breathes naturally, which reduces condensation inside the tent — a significant advantage over fully synthetic floors. The downside: canvas is heavy (12–24 oz per square yard), absorbs moisture if not treated, and requires regular re-proofing with a wax or silicone treatment.
Understanding Hydrostatic Head Ratings
Hydrostatic head (HH) is the industry measure of waterproof rating, expressed in millimeters of water pressure a fabric can withstand before leaking. Under ASTM D751 testing standards, a fabric earns a waterproof designation when it resists a column of water of a given height for a sustained period.
Here is what the numbers mean in practical terms:
| HH Rating | What It Withstands | Suitable For |
|---|---|---|
| Under 1,000 mm | Light drizzle only | Not recommended for tent floors |
| 1,000–1,500 mm | Moderate rain | Minimum acceptable for tent floors |
| 1,500–3,000 mm | Heavy rain, sustained contact | Good for backpacking tents |
| 3,000–5,000 mm | Ground moisture, pooling water | Recommended for base camp floors |
| 5,000 mm+ | Standing water, event setups | Glamping, platforms, wet climates |
For tent floors specifically, a minimum of 1,500 mm HH is the baseline — but 3,000 mm or higher is strongly recommended if you camp in wet climates or on ground that retains moisture after rain. A footprint in the Protection Layer adds a second waterproof barrier, which is why even a 1,500 mm tent floor can perform well when paired with a 3,000 mm PE or Tyvek footprint underneath.
Where the Structure Layer ends, the Protection Layer begins — and building that Protection Layer yourself costs a fraction of what manufacturers charge.
How to Make a DIY Tent Footprint
A manufacturer-specific tent footprint typically costs $40–$80. A DIY Tyvek footprint covers the same ground for under $10 and, when sized correctly, performs just as well. Our team evaluated Tyvek footprints across multiple camping trips in wet Pacific Northwest conditions and found that a properly cut, correctly sized DIY footprint eliminated ground moisture transfer entirely.
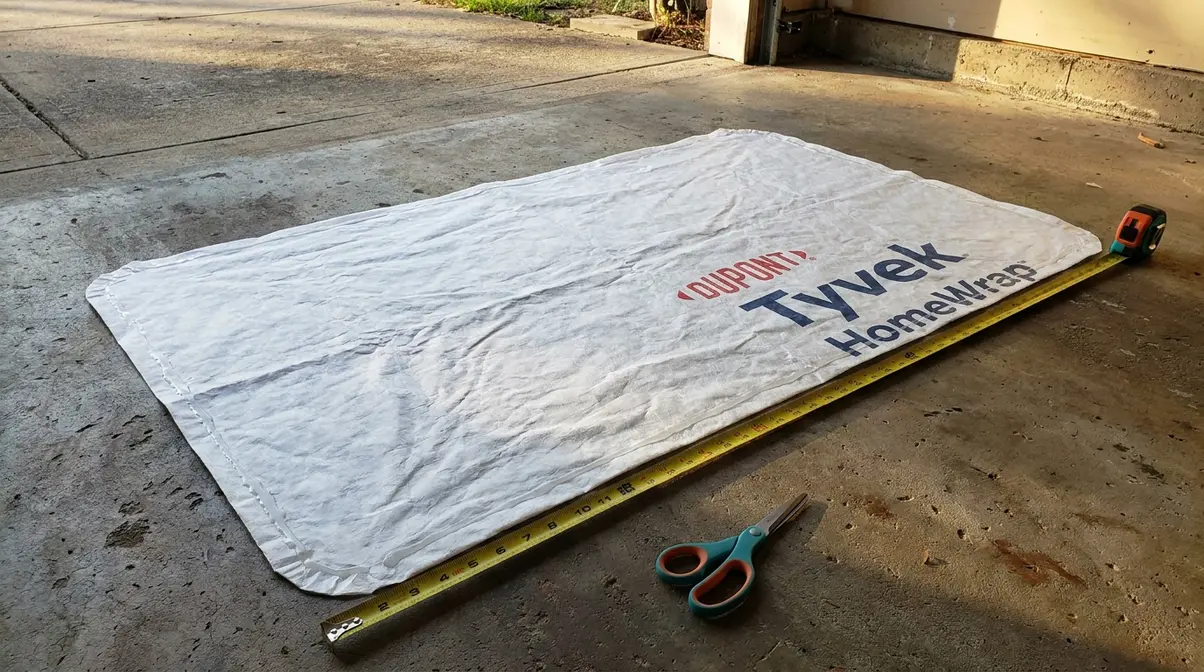
What You’ll Need: Materials and Tools
Estimated time: 30–45 minutes
Estimated cost: $5–$10
- Materials:
- Tyvek HomeWrap (sold at hardware stores by the roll, or as pre-cut sheets online) — 1 square yard more than your tent floor dimensions
- Seam sealer (optional but recommended for sewn edges)
- Tent footprint grommets or reinforcing tape (optional)
- Tools:
- Measuring tape
- Permanent marker
- Sharp scissors or a rotary cutter
- Flat work surface (a driveway or garage floor works well)
- Your tent or its floor dimensions (check the manufacturer’s spec sheet)
Step-by-Step: Cutting and Sizing Your Tyvek Footprint
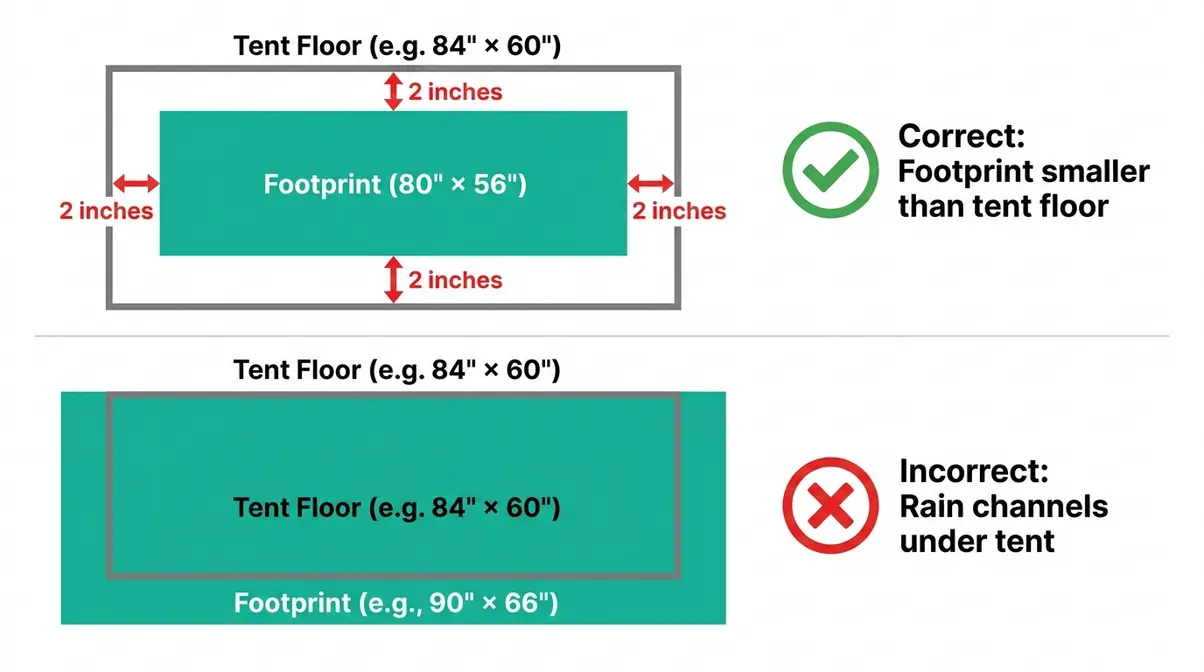
The National Park Service recommends that tent footprints be cut smaller than the tent floor — not the same size. Why? A footprint that extends beyond the tent’s perimeter acts as a rain channel, funneling water under the tent rather than away from it. The correct sizing rule: cut 1–2 inches smaller than the tent floor on every side.
Follow these steps:
Step 1 — Measure your tent floor. Pitch your tent on a flat surface or use the manufacturer’s stated floor dimensions. Write down length × width.
Step 2 — Subtract 2 inches per side. If your tent floor is 84″ × 60″, your footprint should be 80″ × 56″. This prevents the footprint edge from catching rainwater.
Step 3 — Mark the Tyvek. Lay the Tyvek flat on your work surface. Use a permanent marker and measuring tape to draw the footprint outline. Mark corner curves if your tent has rounded corners — a rounded footprint fits better and is less likely to fold under the tent.
Step 4 — Cut cleanly. Use sharp scissors or a rotary cutter along your marked lines. Tyvek cuts cleanly with a single pass of a sharp blade. Avoid tearing — it weakens the edge.
Step 5 — Seal the edges (optional but recommended). Apply a thin bead of seam sealer along all cut edges to prevent fraying and reinforce the perimeter. Allow to dry fully before use.
Step 6 — Field test before your trip. Lay the footprint under your pitched tent and confirm no edge is visible beyond the tent perimeter. Tuck any exposed edge inward.
According to Backpacker Magazine’s guide to DIY groundcloths, Tyvek HomeWrap is the preferred material for ultralight footprints because it balances waterproof performance, durability, and packability at a fraction of the cost of specialty outdoor fabrics. Polycro (a polyester film used in ultralight backpacking) is a lighter but more fragile alternative — it weighs about 0.5 oz per square yard but tears more easily on rough ground.
How to Make Your Tent Floor More Comfortable
Layer 3 of the Ground-Up Stack — the Comfort Layer — is where most glamping upgrades happen. It is also where budget campers can make the biggest improvement for the least money. Across camping community forums and gear testing discussions, the consistent feedback is that a $15 foam tile mat transforms a hard tent floor into something that actually feels like a bedroom.
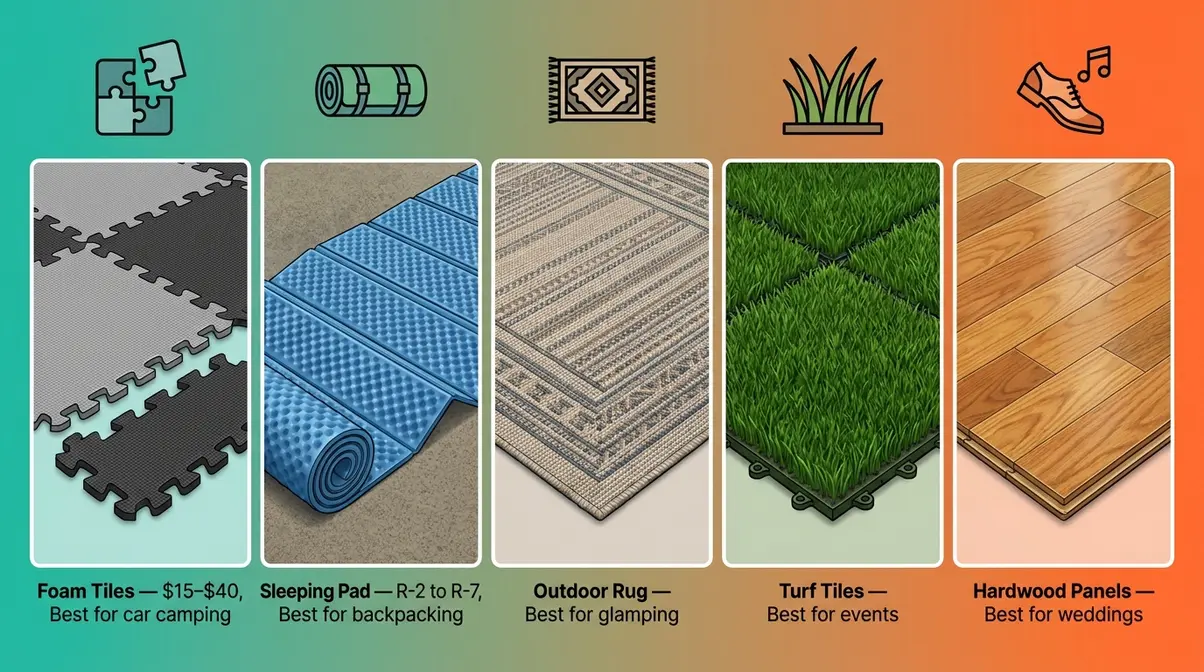
Five Comfort Options: From Foam Tiles to Rugs
Here are the five most practical Comfort Layer options, with honest pros and cons for each:
1. Interlocking Foam Tiles
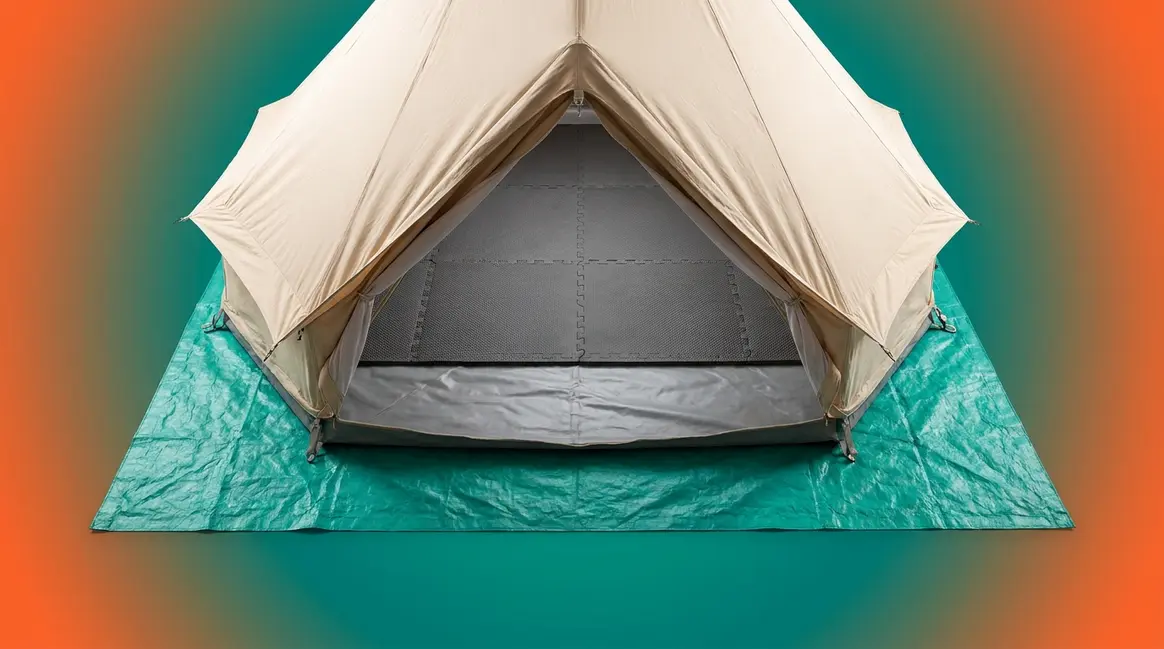
The most popular choice for car campers and glamping setups. EVA foam tiles (the kind used in gym flooring) snap together to cover any tent floor shape, provide 1/2–3/4 inch of cushioning, and insulate against cold ground effectively. They cost $15–$40 for a set that covers a 3-person tent. Downside: bulky to pack and not suitable for backpacking.
2. Sleeping Pads (Foam or Inflatable)
The backpacker’s default. A closed-cell foam sleeping pad (like a Therm-a-Rest Z Lite) provides an R-value (a measure of thermal resistance, where higher numbers mean better insulation) of 2.0 — adequate for three-season camping. Inflatable sleeping pads reach R-values of 4.0–7.0 for cold-weather use. Pros: lightweight, packable. Cons: cover only the sleeping area, not the full floor.
3. Outdoor Rugs and Carpet Squares
A 5′ × 8′ outdoor rug turns a tent floor into something that genuinely feels like a room. Polypropylene outdoor rugs are the best choice — they resist moisture, dry quickly, and handle the grit that gets tracked inside. For glamping setups, American Tent’s flooring ideas guide recommends layering an outdoor rug over foam tiles for maximum comfort and insulation. Cons: heavy, requires vehicle transport.
4. Artificial Grass / Turf Tiles
A growing trend in event tent setups and glamping. Interlocking turf tiles create a natural-feeling surface that is easy to clean and visually appealing. They add approximately 1/2 inch of cushioning. Best suited for event tents on hard surfaces (concrete, compacted gravel) where a softer visual is the goal.
5. Dance Floor Panels and Hardwood Tiles
For weddings and formal events, portable hardwood-finish dance floor panels (typically 1′ × 1′ interlocking squares) create a solid-as-a-hardwood-floor surface inside a frame tent. They elevate the comfort experience entirely. The trade-off: cost ($3–$6 per square foot to rent) and the need for a level, firm sub-surface.
Layering for Warmth: Matching Your Comfort Layer to the Season
Ground temperature is a more significant factor in sleep quality than most beginners realize. Even on a 60°F night, the ground beneath your tent can be 40°F or colder — cold enough to pull heat from your body through conduction regardless of your sleeping bag’s temperature rating.
The rule of thumb: match your R-value to your season.
| Season | Ground Temp | Recommended R-Value | Best Comfort Layer |
|---|---|---|---|
| Summer (above 60°F nights) | 50–60°F | R-1 to R-2 | Thin foam pad or outdoor rug |
| Three-Season (30–60°F nights) | 35–50°F | R-2 to R-4 | Foam tiles + sleeping pad |
| Winter (below 30°F nights) | Below 35°F | R-4 to R-7+ | Foam tiles + high-R inflatable pad |
| Glamping / Event | Varies | R-2+ | Rug over foam tiles or hardwood panels |
For cold-weather camping specifically, foam tiles alone are insufficient. Layer a high-R sleeping pad on top of the foam tiles for maximum ground insulation. The foam tiles insulate the areas you walk on; the sleeping pad insulates the area where you actually sleep.
Advanced Tent Floor Design: Platforms and Event Setups
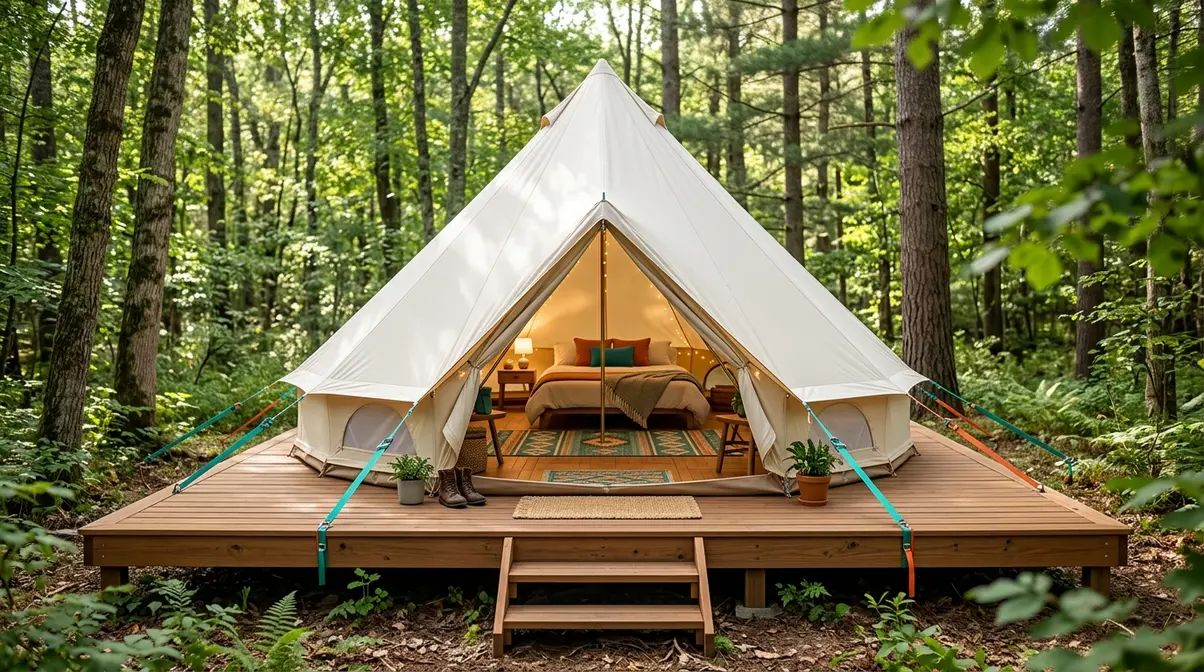
Raised platforms represent the top tier of tent floor design — the point where a temporary campsite becomes a semi-permanent or event-grade installation. When done correctly, a wooden platform eliminates ground moisture entirely, improves air circulation under the tent, and dramatically extends the tent’s lifespan. Stout Tent’s platform and deck guide documents glamping operators who report 3× longer tent floor lifespans when using raised platforms versus direct ground contact.
Site Preparation and Leave No Trace Planning
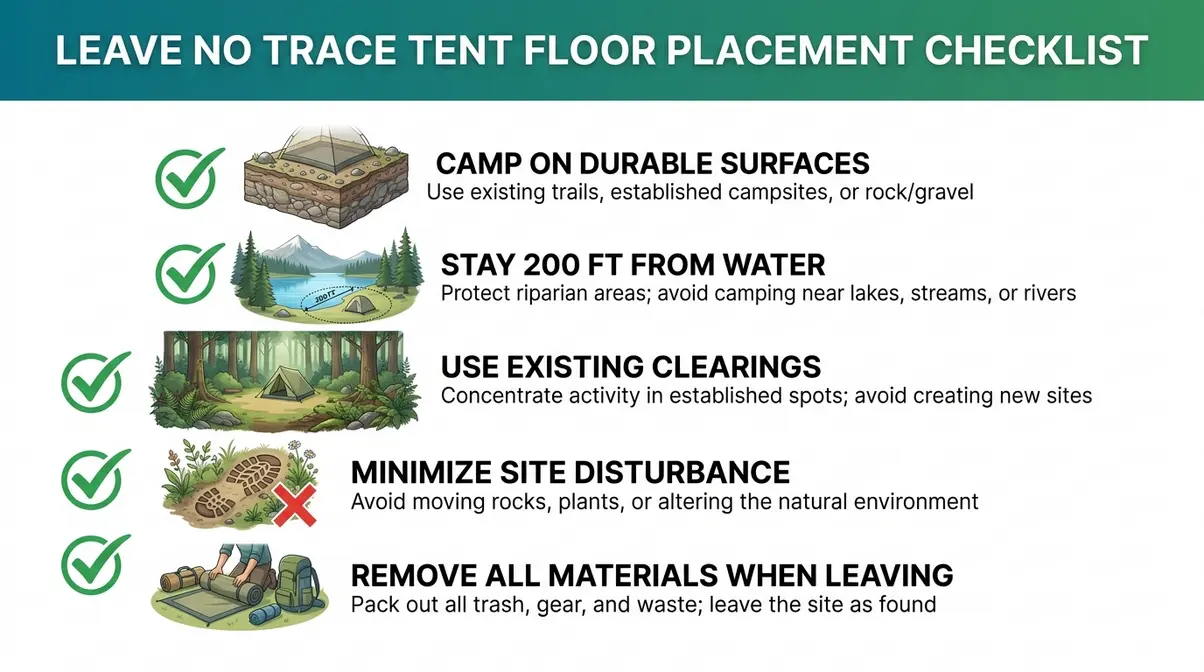
Before breaking ground on any platform, site preparation is both a practical and ethical requirement. The Leave No Trace Center for Outdoor Ethics identifies “Travel and Camp on Durable Surfaces” as one of its seven core principles — and your tent floor choice is a direct expression of that principle.
Key Leave No Trace considerations for tent floor planning:
- Camp on durable surfaces. Rock, gravel, dry grass, and compacted soil are durable. Cryptobiotic soil crust, wet meadows, and living vegetation are not. Your footprint and platform footprint should land on durable ground.
- The 200-foot rule. The Leave No Trace Center recommends camping at least 200 feet (approximately 70 adult paces) from lakes and streams to protect riparian zones — a factor that affects where you can legally and ethically install a platform.
- Minimize site disturbance. Use existing clearings and previously disturbed sites before creating new ones. A platform placed on an existing hardened surface has far less ecological impact than one carved out of undisturbed forest.
For permitted glamping operations and event setups, OSHA 1910.22 workplace walking surface standards provide a useful structural baseline: platforms must support the intended load, have even surfaces, and include edge protection where drop heights exceed 4 inches.
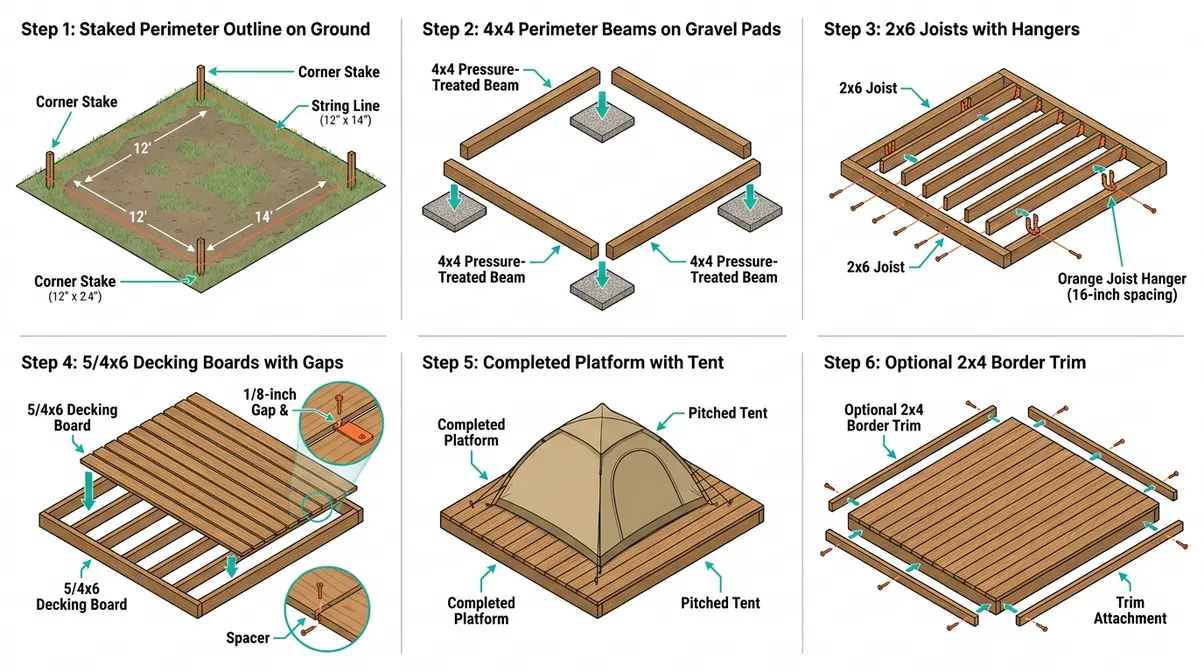
Building a Wooden Tent Platform: Step-by-Step
A basic wooden tent platform for a 10′ × 14′ tent can be built in a single day with standard lumber and basic carpentry tools. Here is the process our team evaluated against Stout Tent’s platform construction guidance:
Materials needed: 4×4 pressure-treated lumber (posts/beams), 2×6 pressure-treated lumber (joists), 5/4×6 decking boards (surface), galvanized joist hangers, decking screws, a post level, and gravel for drainage.
Step 1 — Mark and level the site. Use stakes and string to outline the platform perimeter. Check for level across all corners. A platform that is even 1/2 inch out of level will cause the tent structure to rack over time.
Step 2 — Set the perimeter beams. Lay 4×4 pressure-treated beams along the perimeter on compacted gravel pads (not buried in soil — buried wood rots). Recheck level.
Step 3 — Install interior joists. Place 2×6 joists at 16-inch on-center spacing across the short dimension of the platform. Use galvanized joist hangers at each connection point for structural integrity.
Step 4 — Lay the decking. Run 5/4×6 decking boards perpendicular to the joists. Leave a 1/8-inch gap between boards for drainage and expansion. Secure with two decking screws per joist crossing.
Step 5 — Install the tent. Set the tent directly on the completed platform. Use tent anchor straps or sandbags rather than ground stakes on a wooden surface.
Step 6 — Add edge trim (optional). A 2×4 border around the platform perimeter creates a clean edge, prevents decking boards from splitting, and gives the platform a finished appearance.
Modular Tent Flooring for Events
Modular tent flooring consists of interlocking panels — typically polypropylene, wood-finish composite, or rubber — that snap together to create a continuous floor surface inside a frame tent or pole tent. Unlike a fixed wooden platform, modular systems are fully reversible, require no tools to install, and can be reconfigured for different tent shapes and event layouts.
American Tent’s event flooring guide identifies three primary use cases for modular flooring:
- Wedding and formal events: Wood-finish composite panels create an elegant surface suitable for dance floors and seated dinners. Layout tip: position the dance floor at the center or end of the tent, with seating areas on the perimeter — this maximizes traffic flow.
- Corporate and trade show events: Interlocking rubber tiles provide a durable, non-slip surface that handles heavy foot traffic and equipment loads.
- Glamping and hospitality setups: Sewn-in groundsheets (integrated into the tent base) paired with modular foam or wood tiles create a fully enclosed, comfortable floor system. This is sometimes called a ZIG (zipped-in groundsheet) system — a design where the groundsheet zips into the tent base rather than lying loose, preventing drafts and insect entry at the floor perimeter.
For event planning, the key layout consideration is load distribution. Modular panels typically support 300–500 lbs per square foot when installed over a firm sub-surface. On soft ground, a base layer of compacted gravel or a geotextile fabric beneath the panels prevents uneven settling.
Common Tent Floor Mistakes and When to Try Something Different
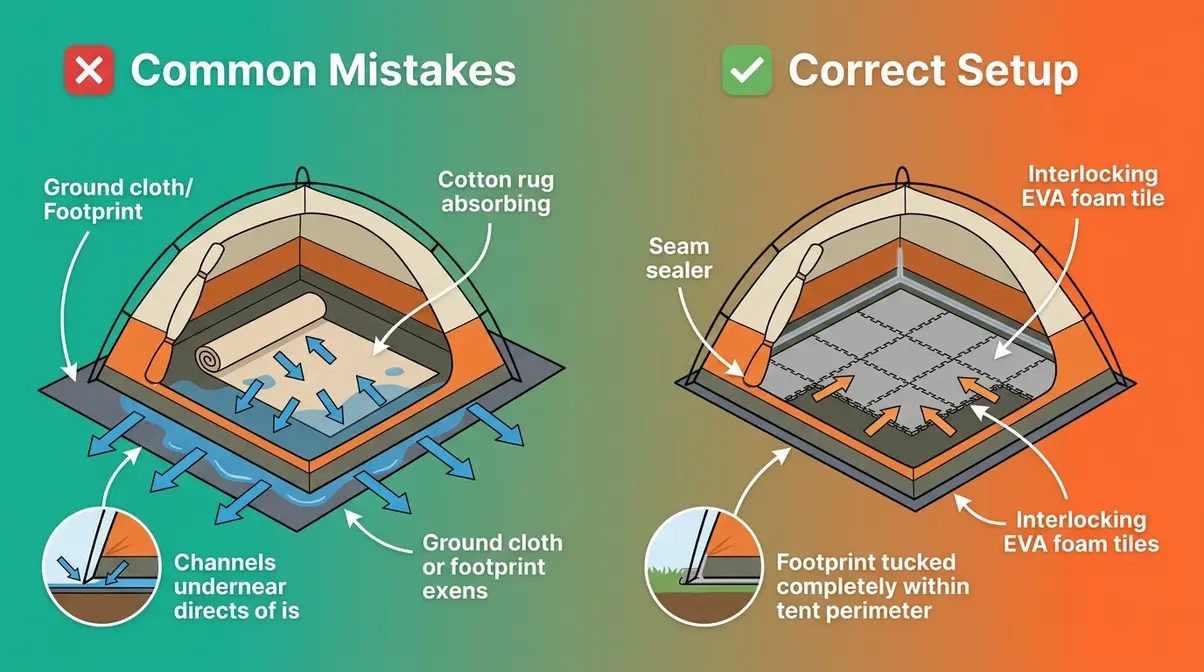
Even with the right materials, tent floor setups fail when the fundamentals are skipped. Our team has identified the five mistakes that account for the majority of cold nights, damaged tent floors, and wasted money in the field.
Five Mistakes That Ruin Your Tent Floor
Mistake 1 — Using a footprint that’s larger than the tent floor.
A footprint extending beyond the tent perimeter collects rain and channels it directly under the tent. Always cut or buy a footprint 1–2 inches smaller on each side. This is the most common DIY error.
Mistake 2 — Ignoring seam sealer on new tents.
Factory seam sealing is rarely complete. Water enters tent floors almost exclusively through seams, not through the fabric itself. Apply a seam sealer (like McNett Seam Grip) to all floor seams before the first trip. Allow 24 hours to cure.
Mistake 3 — Using a cotton rug or blanket as a comfort layer without a moisture barrier below.
Cotton absorbs moisture and holds it against the tent floor, accelerating delamination. If you want a soft comfort layer, use a moisture-wicking synthetic rug or place a thin PE groundsheet between the rug and the tent floor.
Mistake 4 — Skipping the Protection Layer entirely because the tent has a bathtub floor.
A bathtub floor protects against rain splash and insects — not abrasion. Without a footprint underneath, rocks and grit act like sandpaper on the floor coating every time you move around inside the tent. Even a $5 PE tarp extends floor life significantly.
Mistake 5 — Building a platform without checking drainage.
A platform on flat ground with no drainage gap underneath will trap moisture between the wood and the soil, causing both the platform and the tent floor to develop mold and rot. Always build platforms on compacted gravel pads with at least 4 inches of clearance beneath the lowest beam.
When a Simple Footprint Is All You Need
Platforms, modular flooring, and elaborate comfort layers are the right solution for glamping, events, and semi-permanent setups. For the majority of weekend campers, a well-cut footprint and a sleeping pad cover 90% of tent floor performance needs.
If you are backpacking, car camping for 1–3 nights, or camping on established tent pads at designated campsites, a DIY Tyvek footprint (Protection Layer) and a closed-cell foam pad (Comfort Layer) are sufficient. You do not need to spend $200 on a modular floor system to sleep warm and dry on a weekend trip.
The Ground-Up Stack is a framework, not a mandate to buy everything. Start with Layer 1 (a $5–$10 footprint), assess whether you need more, and build up from there.
Frequently Asked Questions
What is the best material for a tent floor?
PVC-coated polyester is the best material for most tent floor applications — it combines a high hydrostatic head rating (3,000–10,000+ mm), excellent abrasion resistance, and flexibility in cold temperatures. For ultralight backpacking footprints, Tyvek HomeWrap (HDPE fabric by DuPont) achieves 5,000+ mm HH at roughly 1.4 oz per square yard. The right choice depends on your use case: PVC for durability, Tyvek for weight savings, canvas for breathability in wall tents (American Tent, 2026).
Is PE better than PVC for tent flooring?
PE (polyethylene) is not better than PVC for tent flooring in most conditions. PVC outperforms PE in hydrostatic head ratings, cold-weather flexibility, UV resistance, and long-term abrasion resistance — all confirmed by ASTM D751 coated fabric testing. PE has two genuine advantages: it is lighter and easier to recycle. For weekend backpackers prioritizing weight, PE is a reasonable compromise. For base camps, glamping, and event setups where the floor stays pitched for days, PVC is the more durable choice.
What should I put on the floor of my tent?
Start with a footprint under the tent, then add a comfort layer inside. Under the tent: a Tyvek or PE footprint cut 1–2 inches smaller than the tent floor on each side. Inside the tent: interlocking foam tiles ($15–$40) work for car camping, while a high-R sleeping pad (R-2 to R-7 depending on season) is the backpacker’s standard. For glamping, layer an outdoor polypropylene rug over foam tiles for a surface that feels genuinely room-like. The combination of Protection Layer + Comfort Layer eliminates the most common causes of cold, damp sleeping.
What fabric is 100% waterproof?
No fabric is permanently 100% waterproof — but several achieve ratings high enough for practical purposes. PVC-coated fabrics with 5,000+ mm hydrostatic head are considered fully waterproof under ASTM D751 standards for normal camping use. Tyvek HomeWrap achieves 5,000+ mm HH per DuPont technical specifications. The critical caveat: waterproofing degrades at seams, which is why seam sealer is essential on any tent floor claiming waterproof status. Fabrics rated above 3,000 mm HH will repel sustained rain and ground moisture in all but the most extreme conditions.
How do I make my tent floor more comfortable?
The fastest upgrade is interlocking EVA foam tiles placed inside your tent. They cost $15–$40, cover the full floor area, provide 1/2–3/4 inch of cushioning, and add meaningful insulation against cold ground. For sleeping specifically, add a closed-cell foam pad (R-2) or inflatable sleeping pad (R-4 to R-7) on top of the tiles to address ground conduction. For glamping, combine foam tiles with an outdoor polypropylene rug for a surface that looks and feels like a real room. The full three-layer approach — footprint outside, foam tiles inside, sleeping pad on top — represents the maximum comfort upgrade for any tent floor.
Building the Right Floor for Your Setup
The Ground-Up Stack is the clearest framework for tent floor design because it turns one overwhelming question — “what do I put under and inside my tent?” — into three sequential, manageable decisions. Protection first (a $5–$10 Tyvek footprint), then Structure (choosing PVC over PE where durability matters, confirmed by materials science data), then Comfort (foam tiles, sleeping pads, or rugs matched to your season and style). Most cold, damp nights trace back to skipping Layer 1 entirely — a problem that costs less than $10 to solve permanently.
The Ground-Up Stack scales from a single overnight backpacking trip to a 200-person wedding under a frame tent. A DIY Tyvek footprint and a foam sleeping pad handle 90% of weekend camping scenarios. A wooden platform with modular hardwood panels handles the other 10%. Understanding which scenario you are in — before you spend money — is what this tent floor design guide was built to deliver.
Start with Layer 1 this week. Buy a roll of Tyvek at your local hardware store, spend 30 minutes cutting your footprint to the correct dimensions, and seal the edges. Test it on your next trip. If you want more comfort after that, add Layer 3. The system builds naturally — and so does your confidence.
Limitations and Alternatives
Common Pitfalls
Pitfall 1 — Treating waterproof ratings as permanent. A 5,000 mm HH rating reflects new-fabric performance. UV exposure, abrasion, and washing degrade coatings over time. Reapply a DWR (durable water repellent) treatment to tent floors and footprints every 1–2 seasons to maintain rated performance.
Pitfall 2 — Buying a platform before checking site regulations. Many national parks and wilderness areas prohibit permanent or semi-permanent structures, including wooden platforms, without a permit. Always check land management rules before building. The National Park Service and USFS both publish site-specific regulations online.
Pitfall 3 — Assuming modular flooring works on uneven ground. Interlocking panels require a level, firm sub-surface to interlock correctly. On soft or uneven ground, panels separate at the joints, creating trip hazards. Prepare the sub-surface first — compacted gravel is the minimum standard.
When to Choose Alternatives
If you are ultralight backpacking: Skip the foam tiles and use a Polycro footprint (lighter than Tyvek but less durable) combined with a high-R sleeping pad. The Ground-Up Stack applies, but Layer 3 and Layer 1 are both consolidated into the sleeping pad system.
If you are camping in a designated site with a tent pad: A tent pad is a durable surface that already serves as your Protection Layer. In this case, you may not need a footprint at all — check whether the pad surface is abrasive before skipping it.
When to Seek Expert Help
For permitted glamping operations, event tent installations, or platforms exceeding 100 square feet, consult a licensed contractor familiar with OSHA 1910.22 walking surface standards. Structural load calculations, drainage engineering, and local building permits are beyond the scope of DIY guidance — and getting them wrong creates genuine safety risks for guests and staff.

Dave King
I'm Dave King. I publish Tent Explorer, a site built to answer the questions people actually ask before they buy.