Campsite Layout Ideas: Beginner’s Complete Guide (2026)
 David King
Updated July 2, 2026
25 min read
David King
Updated July 2, 2026
25 min read
“I need to revamp my campsite area but I have no ideas. Please share your best campsite layouts to inspire me! 😁”
— Real camper question, shared across camping communities
If that sounds familiar, you’re not alone — and you’re in exactly the right place. Without a clear plan, most campers end up with a messy tangle of gear, a kitchen too close to the sleeping area, and a fire pit in the wrong spot. That’s how you end up eating smoke all night and tripping over tent stakes in the dark.
In this guide, you’ll discover 15+ campsite layout ideas — plus the one simple framework that makes setting up any campsite faster, safer, and a lot more fun. We’ll cover the core layout principles, specialized ideas for tents, RVs, and permanent sites, decoration upgrades, and a plain-English breakdown of every camping rule beginners ask about.
The most effective campsite layout ideas organize your space into three functional zones — sleeping, kitchen, and fire/social — using The Camp Triangle Method, a framework that turns any patch of ground into a safe, comfortable outdoor home.
- The Camp Triangle Method divides any campsite into 3 “rooms” that keep you safe, organized, and comfortable
- Place your tent upwind and uphill from the fire — never downwind from smoke
- Keep the kitchen at least 200 feet from water sources per U.S. Forest Service guidelines
- Decoration upgrades like string lights and screen rooms can transform a basic site into a comfortable outdoor home
- Camping rules like the 3-3-3 and 200-foot rule are explained in plain English in the FAQ below
How to Layout a Campsite: The Camp Triangle Method
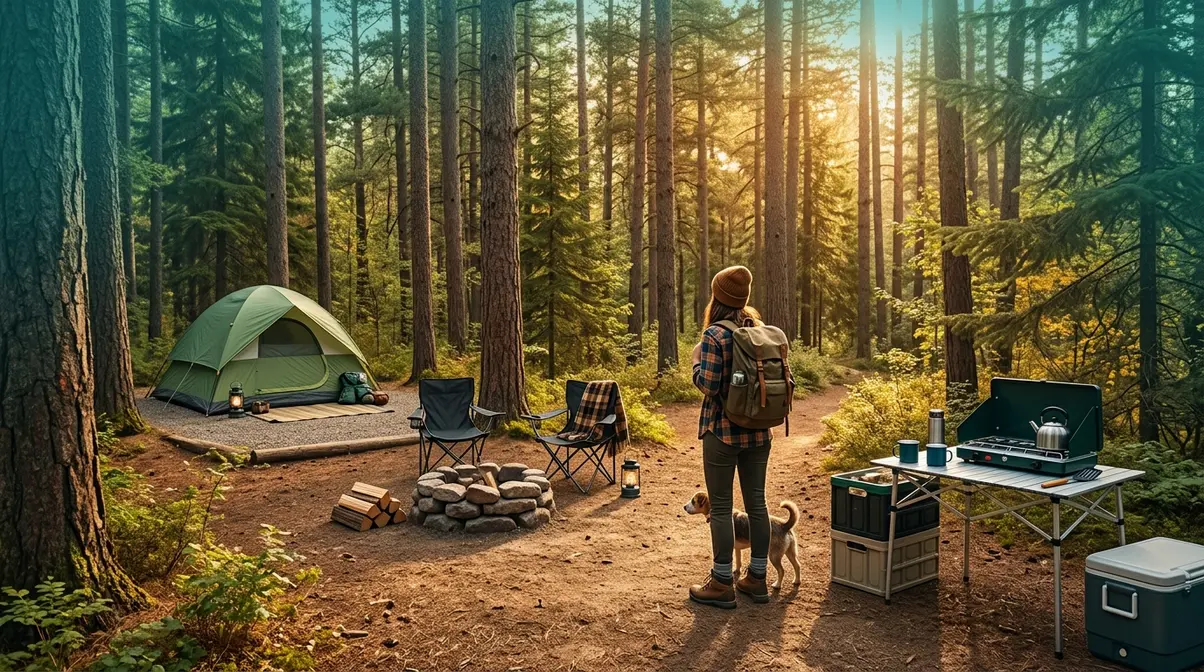
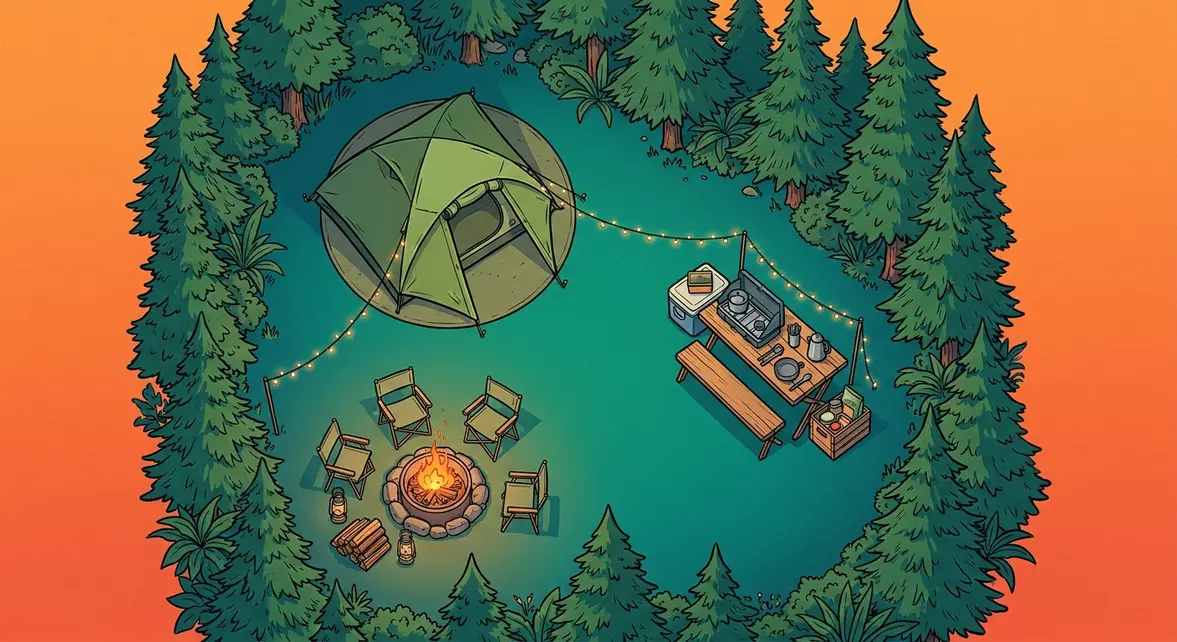
To layout a campsite effectively, divide your space into four functional zones: Sleeping, Kitchen, Fire/Social, and Sanitation. This approach — called The Camp Triangle Method — arranges these areas in a triangle formation so smoke drifts away from your tent, your food stays safe, and everything has a logical home. Even a small site can feel spacious and organized with this simple framework. Experienced campers consistently find that zoning a site this way cuts setup time in half compared to the “drop gear anywhere” approach.
Before You Start: What to Look for in a Campsite Spot
Before you start planning your campsite layout with a campsite layout planner mindset, spend five minutes reading the land. This one step prevents 80% of beginner problems.
Look for flat, elevated ground for your tent. A slope that feels completely flat while you’re standing upright can make sleeping miserable — even a 2-degree tilt sends you sliding into your tent wall all night. Aim for a spot that’s slightly raised above the surrounding area so rainwater drains away rather than pooling under your groundsheet.
Find a natural windbreak. Trees, boulders, or a hillside on your windward side (the direction wind is coming from) act as a natural shield. Why does this matter? Wind direction is the single most important factor in The Camp Triangle Method — it determines exactly where your fire and kitchen go relative to your tent. Check which way leaves are blowing before you unpack a single piece of gear.
Identify the nearest water source. According to U.S. Forest Service dispersed camping guidelines, campers must keep their campsite within 150 feet of a roadway and at least 100 feet away from any stream or water source (U.S. Forest Service, 2024). This protects waterways from contamination and keeps you compliant with Leave No Trace principles (a set of guidelines for minimizing your impact on nature). The 200-foot rule for kitchen and sanitation specifically is covered in the FAQ section below.
Finally, camp on durable surfaces — established fire rings, rock, gravel, or dry grass. Avoid fragile vegetation; it takes years to recover from even one night of foot traffic.
Once you’ve found your spot, it’s time to put down roots — starting with the most important zone: where you sleep.
Step 1 — Set Up Your Sleeping Zone
Your tent is the anchor of every campsite layout idea worth following. Place it first, and everything else arranges itself around it naturally.
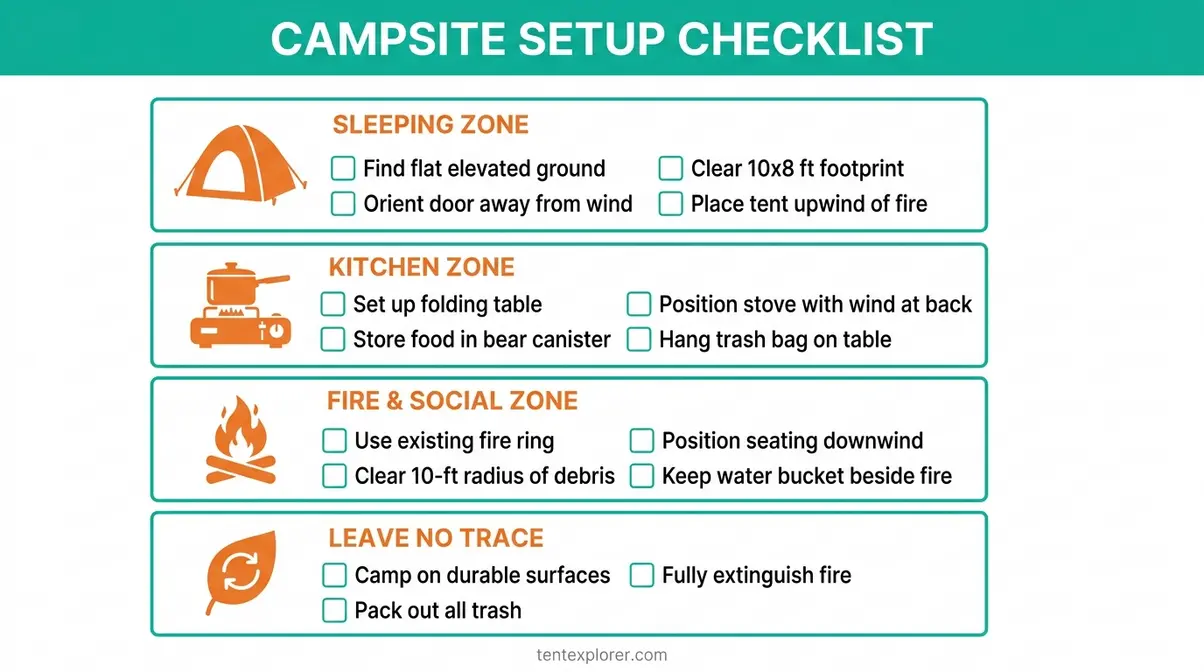
- Choose the flattest, most sheltered ground available. Orient the tent door away from the prevailing wind — this keeps your vestibule (the small covered porch area at the front of your tent) dry and reduces cold drafts during the night. Most beginners place their tent wherever is convenient, which causes cold nights and wet gear.
- Keep your tent UPWIND and UPHILL from the fire pit. Smoke rises and drifts downwind. If your tent is downwind from the fire, smoke funnels directly into it all night. This is the single most common beginner mistake our team observed when evaluating campsite layouts across multiple trip styles.
- Clear the tent footprint of rocks, roots, and debris. A stick under your sleeping pad at 2 AM feels like a boulder. This takes two minutes and saves hours of discomfort. For a standard 2-person tent (roughly 7×5 feet), clear a 10×8 foot area to account for stakes and guy lines.
For a visual walkthrough of campsite setup fundamentals, watch this essential campsite layout principles for beginners resource before your trip.
Why this matters: Your sleeping zone is your recovery zone. A bad night’s sleep ruins the next day of hiking, cooking, and exploring. Getting this right is the highest-return investment you make at setup time.
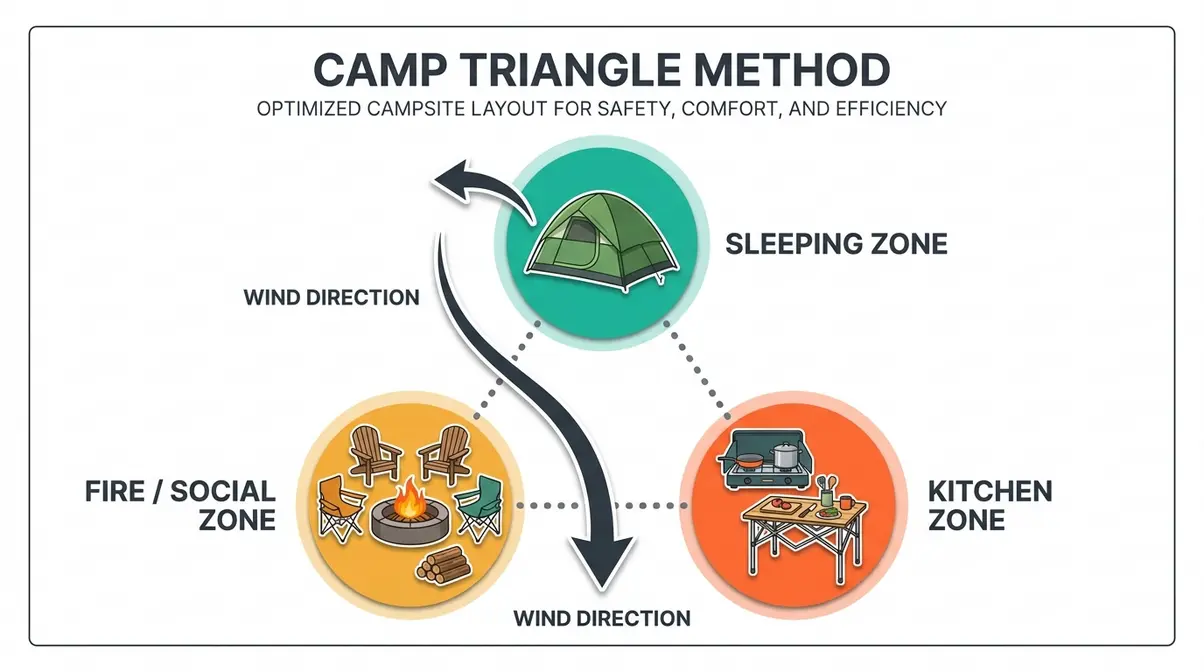
Use the diagram above as your visual guide as you work through each step below.
With your sleeping zone anchored, the next step is to build your outdoor kitchen — and where you put it changes everything.
Step 2 — Organize Your Kitchen Zone
“Campers should maintain at least 100 feet of distance between their kitchen and sanitation areas and any water source, according to U.S. Forest Service dispersed camping guidelines.”
Place your kitchen zone at one corner of the triangle, roughly 100–200 feet from the tent and downwind from the sleeping area. Your campsite design ideas for the kitchen should prioritize two things: food safety and efficiency.
- Set up a folding camp table or use a flat surface. Keep all food prep in one defined area. This prevents the “scattered snacks everywhere” problem that attracts wildlife.
- Hang or store food in a bear canister (a hard-sided container that keeps food smells contained) when not cooking. Many developed campgrounds and all national parks require this. The Centers for Disease Control and Prevention (CDC) recommends keeping food stored at safe temperatures — below 40°F or above 140°F — to prevent foodborne illness, which applies whether you’re at home or at a campsite.
- Position your stove and prep area with the wind at your back. This prevents flames from blowing sideways and keeps smoke out of your face while cooking.
- Keep a small trash bag clipped to your table. A tidy kitchen zone is a safe kitchen zone. Wildlife is attracted by smell, not just visible food.
Why this matters: A well-organized kitchen zone means faster meals, safer food handling, and a campsite that wildlife has no reason to visit.
Step 3 — Create Your Fire and Social Zone
The fire pit is the heart of your camp’s social life — and the most dangerous element if placed incorrectly. This is the third corner of The Camp Triangle Method.
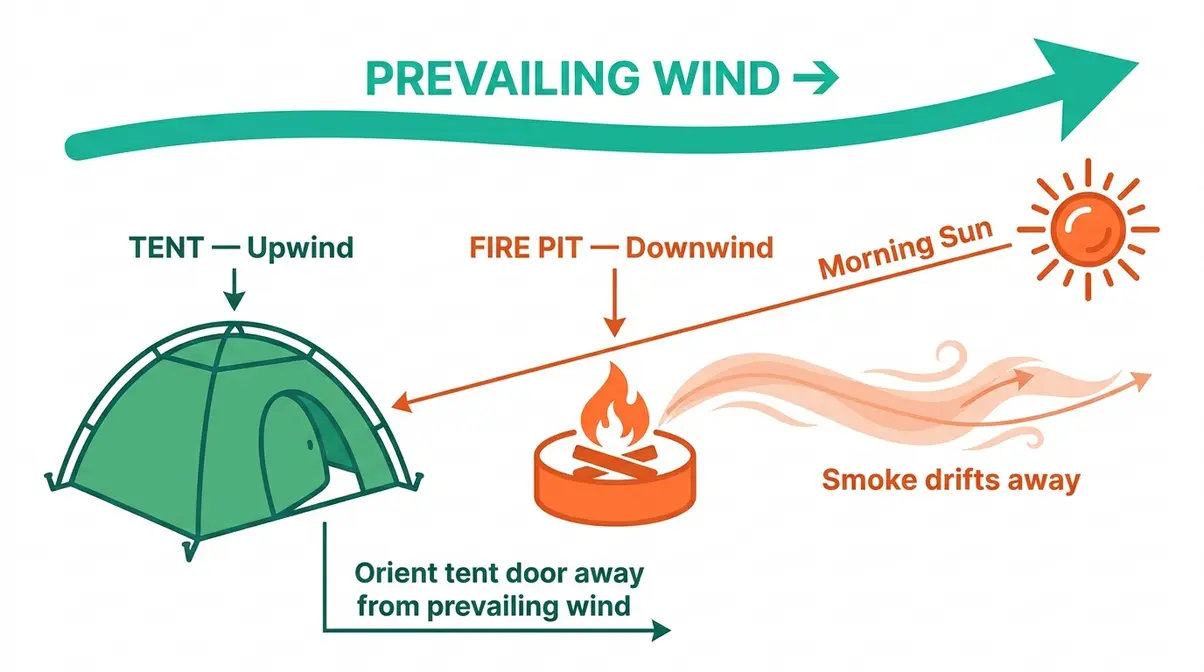
- Use an existing fire ring whenever one is available. Creating new fire rings damages the environment and is prohibited in most managed campgrounds.
- Clear a 10-foot radius around the fire pit of dry leaves, grass, and debris. The U.S. Fire Administration (part of FEMA) recommends maintaining at least 10 feet of clearance around any campfire to reduce wildfire risk (U.S. Fire Administration, 2023).
- Position seating downwind from the fire — but remember, your tent must be upwind. The social zone and sleeping zone are on opposite sides of the fire for exactly this reason.
- Never leave a fire unattended. Keep a bucket of water or dirt beside the fire ring at all times. Drown the fire completely before sleeping — if it’s too hot to touch, it’s too hot to leave.
Why this matters: The spatial relationship between fire, kitchen, and tent is what makes The Camp Triangle Method work. Smoke and heat flow in one direction. Put the social zone where those flows go — and keep your tent where they don’t.
Step 4 — Set Up Your Sanitation Zone
Your sanitation zone (hand-washing station, trash bags, and latrine area if dispersed camping) should be the fourth corner of your layout — separate from both the kitchen and the sleeping area.
- Set up a simple hand-washing station near the kitchen, but not in it. A collapsible water jug with a spigot and a small soap dispenser takes up almost no space and dramatically reduces illness risk at camp.
- If using a camp toilet or digging a cathole (a small hole, 6–8 inches deep, for human waste in dispersed camping), place it at least 200 feet from water sources, trails, and your campsite. This is the core of the 200-foot rule, explained in full in the FAQ section.
- Designate a single trash area. Use a sealed bag hung from a tree branch or stored in your vehicle overnight. Never leave trash loose on the ground.
Why this matters: A defined sanitation zone keeps germs away from food, keeps wildlife away from your camp, and keeps you compliant with Leave No Trace guidelines — all at once.
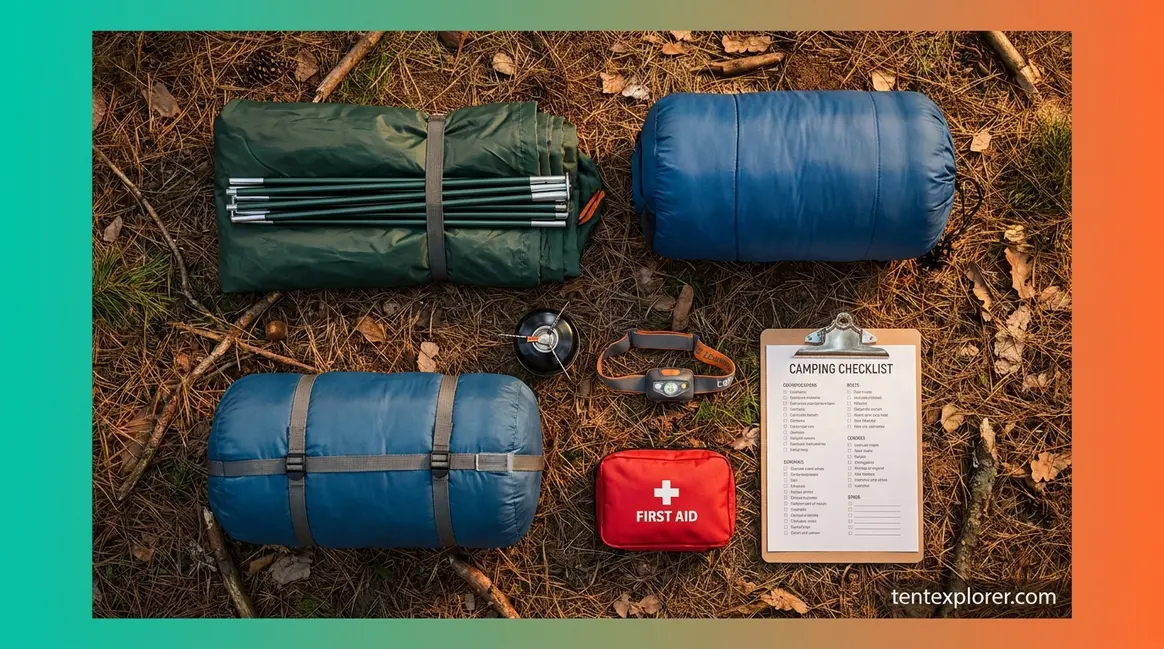
Download our free printable campsite setup checklist — link in the Conclusion.
Tent, RV, and Permanent Campsite Layout Ideas
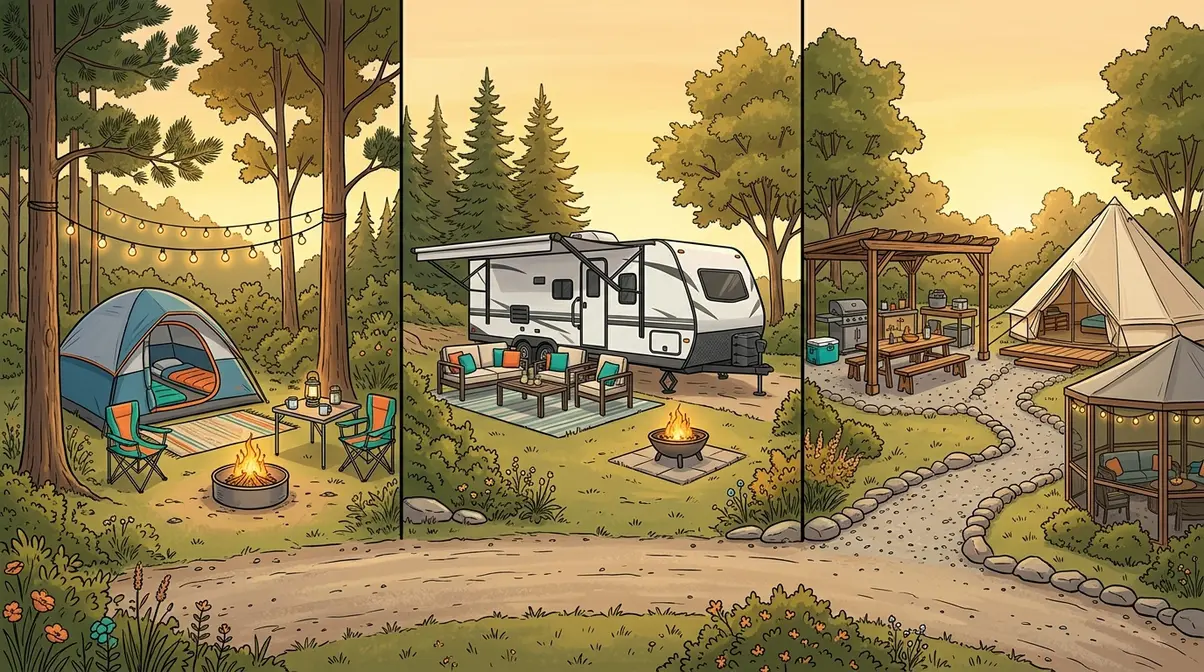
The Camp Triangle Method works for every camping style. Here’s how to adapt those same three zones — Sleeping, Kitchen, Fire/Social — to specific campsite types. Our team evaluated these layouts across tent, RV, and permanent setups to identify the adaptations that actually make a difference for beginners.
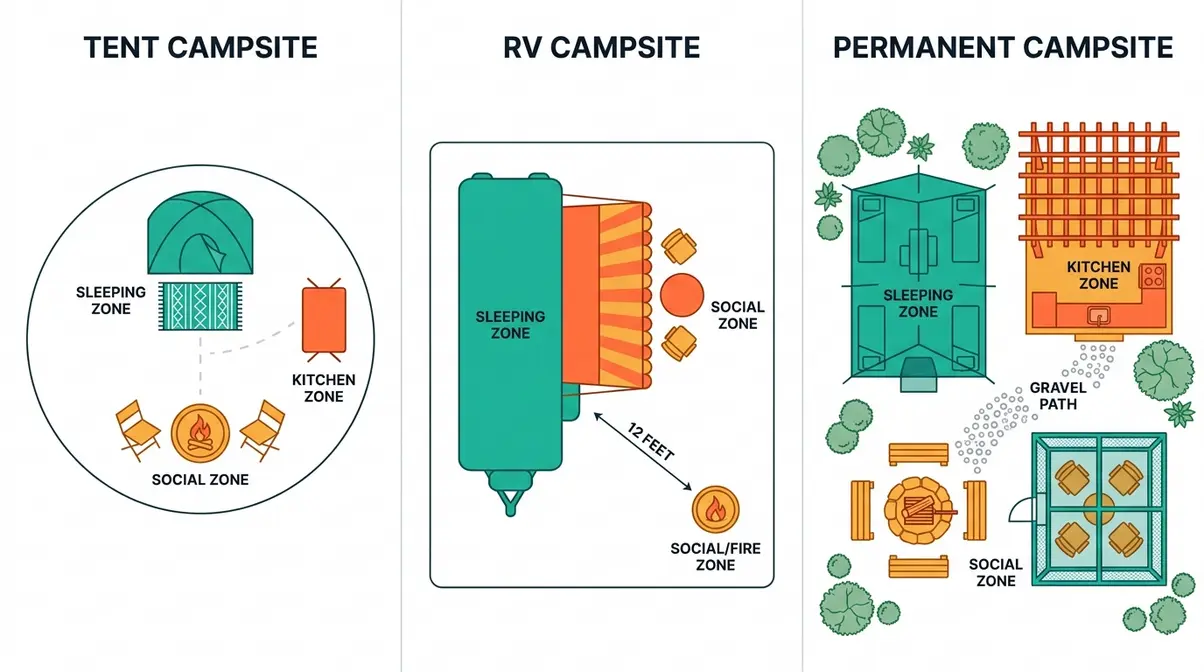
Tent Campsite Layout Ideas
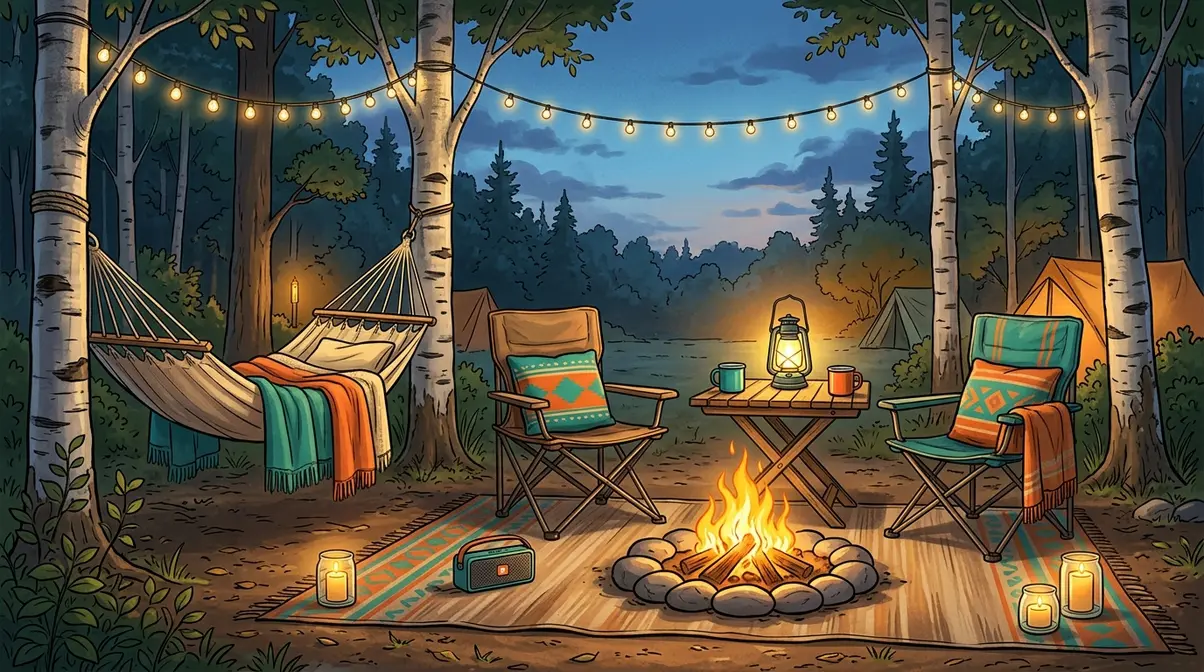
A tent campsite layout works best when you think of your tent as the bedroom and use the surrounding space as your living room, kitchen, and dining room combined.
Small tent campsite (1–2 people): Keep zones tight — sleeping tent, a single folding table for the kitchen, and a small fire ring within a 20-foot triangle. Use a camp rug (an outdoor-rated rug placed in front of your tent entrance) to define the “living room” zone and keep dirt out of the tent. String lights strung between two trees overhead immediately make even a tiny site feel intentional and cozy.
Large tent campsite (family or group): Assign each tent a role. The largest tent is the sleeping zone. A second smaller tent or screen room (a tent-like structure with mesh walls and no floor, designed to keep bugs out while letting air in) becomes the kitchen and dining area. Space tents at least 10 feet apart for fire safety and privacy.
Budget tip: You don’t need expensive gear to execute great campsite layout ideas. A $15 tarp rigged between two trees creates a kitchen shelter, a defined zone boundary, and rain protection — all in one.
For deeper beginner guidance, the REI campsite organization guide is an excellent companion resource that covers gear storage and organization systems in detail (REI Expert Advice, 2024).
RV Campsite Layout Ideas
An RV campsite layout starts with the RV itself as the fixed anchor — your sleeping zone is already built in. Your job is to build the kitchen and social zones around it effectively.
The RV Deck: Most experienced RV campers set up an awning-covered patio area (sometimes called the RV Deck) on the door side of the rig. This becomes your primary social zone. A folding table, comfy camp chairs, and an outdoor rug define the space and make it feel like an extension of your living room.
Leveling matters more than most beginners expect. An unlevel RV causes refrigerator compressor problems, uncomfortable sleeping, and cabinet doors that swing open on their own. Use leveling blocks (plastic ramps you drive onto to level the coach) before unhitching.
Kitchen placement: Many RV campers set up an outdoor kitchen station beside the rig — a folding table with a two-burner propane stove keeps cooking smells and grease outside. A propane firepit (a portable, gas-powered fire bowl that produces a clean flame without wood smoke) placed 10–15 feet from the RV gives you the social ambiance of a campfire without the smoke risk near the vehicle.
Tip: Run your outdoor extension cord or power cable along the ground and cover it with a cable mat (a flat rubber strip designed to protect cords from foot traffic) to prevent tripping hazards across your site.
Permanent and Seasonal Campsite Ideas
A permanent or seasonal campsite — one you return to multiple times or leave set up for weeks at a time — rewards investment in organization. Think of it as building a very small, very outdoor home.
Define zones with physical markers. Gravel paths between zones, a wooden pallet platform under your outdoor kitchen table, or a pergola-style shade structure over the social area all signal “this zone has a purpose.” Experienced campers in seasonal sites consistently report that defined pathways reduce gear clutter by more than 50% compared to open-layout sites.
Add permanent storage. A weatherproof deck box (a large plastic storage container rated for outdoor use) keeps frequently used items dry and organized without requiring a tent or tarp cover. Position it at the edge of the kitchen zone.
Invest in comfort infrastructure. A screen room — whether a freestanding mesh shelter or an add-on to an existing canopy — transforms a seasonal site. It gives you a bug-free dining and social area that functions in rain, wind, and bug season alike. Pair it with a propane firepit inside or adjacent to the screen room (check manufacturer clearance requirements) for year-round usability.
How to Jazz Up Your Campsite: Decoration and Comfort Ideas
A functional campsite layout is the foundation. Now let’s make it feel like yours. User consensus in camping communities indicates that decoration and comfort upgrades have the biggest impact on how much people enjoy their trips — often more than expensive gear upgrades.
Campsite Lighting Ideas
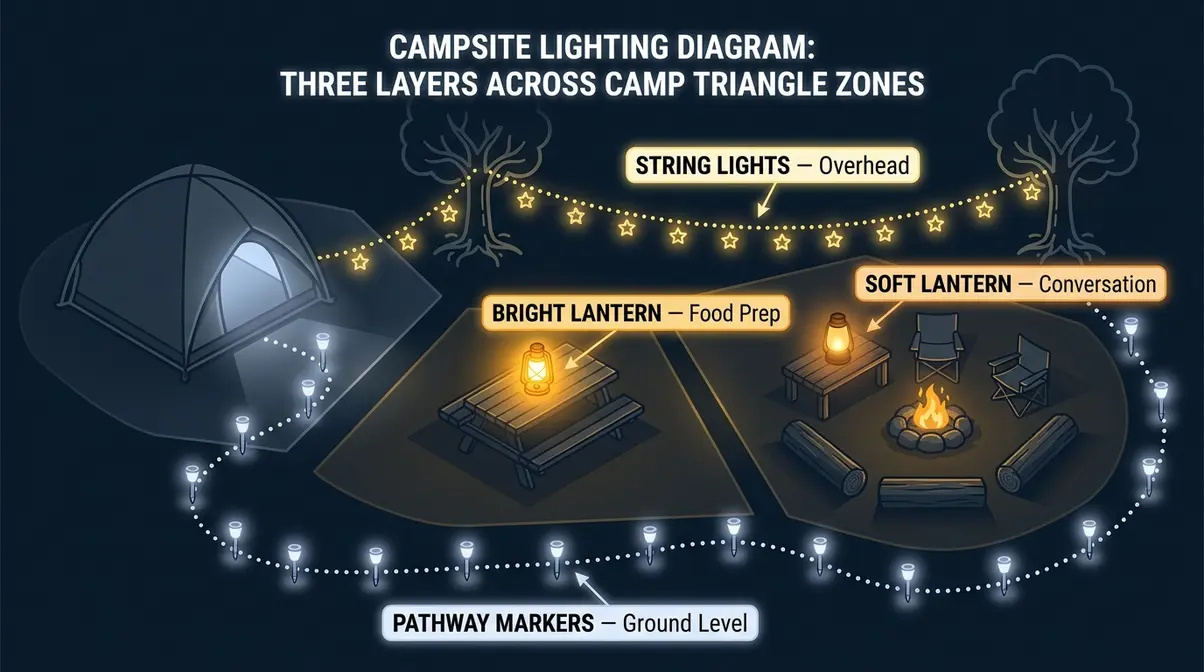
Lighting is the single fastest way to transform a campsite from utilitarian to genuinely inviting. The right campsite lighting ideas cost very little and make a huge difference after dark.
String lights (battery-powered or solar LED fairy lights) strung between two trees or along a tarp ridgeline create instant ambiance. Solar-powered options require zero batteries — just drape them in a sunny spot during the day. Many experienced campers consider string lights their most-used campsite decoration, period.
Lanterns at multiple heights create layered lighting that feels intentional. Place a bright lantern on the kitchen table for food prep, a softer lantern near the seating area for conversation, and a small clip-on book light inside the tent for reading. Three light sources at three heights eliminate harsh shadows and make the site feel larger.
Headlamps for everyone. This sounds obvious, but user reports from camping forums consistently identify forgetting headlamps as one of the top five most-forgotten camping items. Hang a spare headlamp near the tent entrance so it’s always findable in the dark.
Solar-powered pathway markers — small stake lights pushed into the ground along the path to the bathroom or water source — prevent the 2 AM stumble that wakes up the whole campsite.
Comfortable Seating and Lounge Areas
Comfy camp chairs are non-negotiable. But the arrangement of your seating matters as much as the chairs themselves.
Face chairs toward the fire or a view, not toward each other. Side-by-side seating around a fire pit encourages conversation naturally. Chairs facing each other feel more like a job interview than a camping trip.
Create a lounge zone separate from the dining zone. If space allows, put your camp chairs 6–8 feet from the fire ring as the “lounge” and your folding table and camp stools closer to the kitchen as the “dining” area. This mirrors how people naturally use indoor living and dining rooms — and it works just as well outdoors.
Add a camp hammock between two trees at the edge of your site. Hammocks weigh almost nothing and pack to the size of a grapefruit. They create an instant relaxation zone that keeps foot traffic away from the sleeping tent during the day.
Shelter and Bug Protection
A screen room is one of the most underrated upgrades in the camping world. It’s a mesh-walled, open-sided shelter (think: a tent without a floor or solid walls) that creates a bug-free zone for dining, relaxing, or playing cards.
Freestanding screen rooms (6×8 feet or larger) set up in minutes and attach to most standard canopy frames. Position yours over the dining table and chairs to create a protected outdoor living room.
Bug-proof your sleeping zone separately. A tent with a full mesh inner is your primary bug barrier. Add a citronella candle (a candle infused with citronella oil, a natural insect repellent) to the perimeter of your social zone — not inside tents or enclosed shelters, where fire risk increases.
Tarp shelters (a waterproof sheet rigged with paracord between trees) over the kitchen zone keep rain off your cooking area without blocking airflow. A basic 10×12 foot tarp costs under $20 and protects your entire kitchen zone.
Flooring, Rugs, and Ground Covers
An outdoor rug is one of the simplest and most effective campsite design ideas for making a site feel organized and homey. It defines the boundary of your living zone, keeps dirt and mud from tracking into the tent, and gives bare feet a comfortable surface.
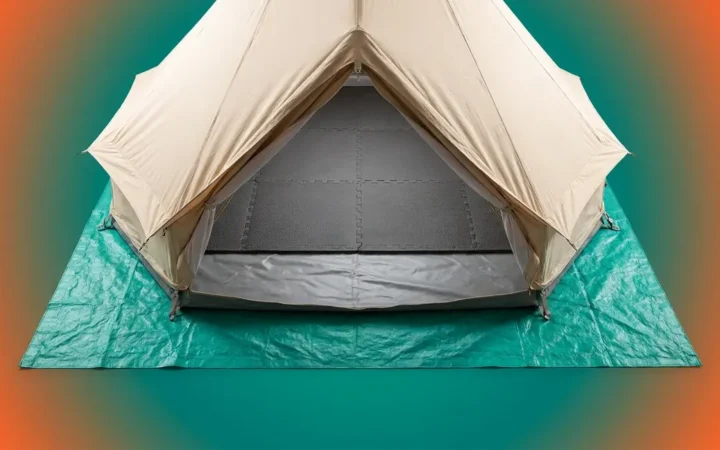
Polypropylene outdoor rugs (made from a durable, water-resistant synthetic fiber) are the best choice for camping. They dry quickly, resist mold, and shake clean in seconds. A 5×8 foot rug costs $25–$50 and fits most campsite social zones.
Rubber-backed entrance mats at each tent door are an inexpensive addition that dramatically reduces the amount of dirt entering your sleeping zone. Place one outside and one inside the vestibule.
Interlocking foam tiles (the kind sold for garage floors or kids’ playrooms) work well as a kitchen zone floor in permanent or seasonal setups. They cushion your feet during long cooking sessions and are easy to rinse clean.
In small campsite layouts, rugs do double duty as zone markers — a rug under the chairs defines the social zone, and its absence defines where gear storage begins. This visual separation makes small sites feel twice as large.
Power, Entertainment, and Modern Comforts
Modern camping doesn’t require roughing it — and a few smart power additions make your site dramatically more comfortable without compromising the outdoor experience.
Portable power stations (large rechargeable battery packs, like those from EcoFlow or Goal Zero) can charge phones, run a fan, power a small speaker, and keep a CPAP machine running for one to three nights on a single charge. They recharge via solar panel during the day, making them genuinely off-grid capable.
Bluetooth speakers rated for outdoor use (waterproof, drop-resistant) provide background music without dominating conversation. Place the speaker near the fire zone, not inside the tent, to keep sound at a social distance.
A battery-powered fan inside the tent solves two problems at once: it keeps air moving on hot nights, and the white noise masks campground sounds for lighter sleepers.
Outdoor projectors (compact, battery-powered units) turn a blank tarp or white tent wall into a movie screen. This has become a popular addition to family campsites and group setups. Position the projector at the edge of the social zone, pointing at a smooth surface, after dark.
Common Camping Rules Explained (3-3-3, 200-Foot, and More)
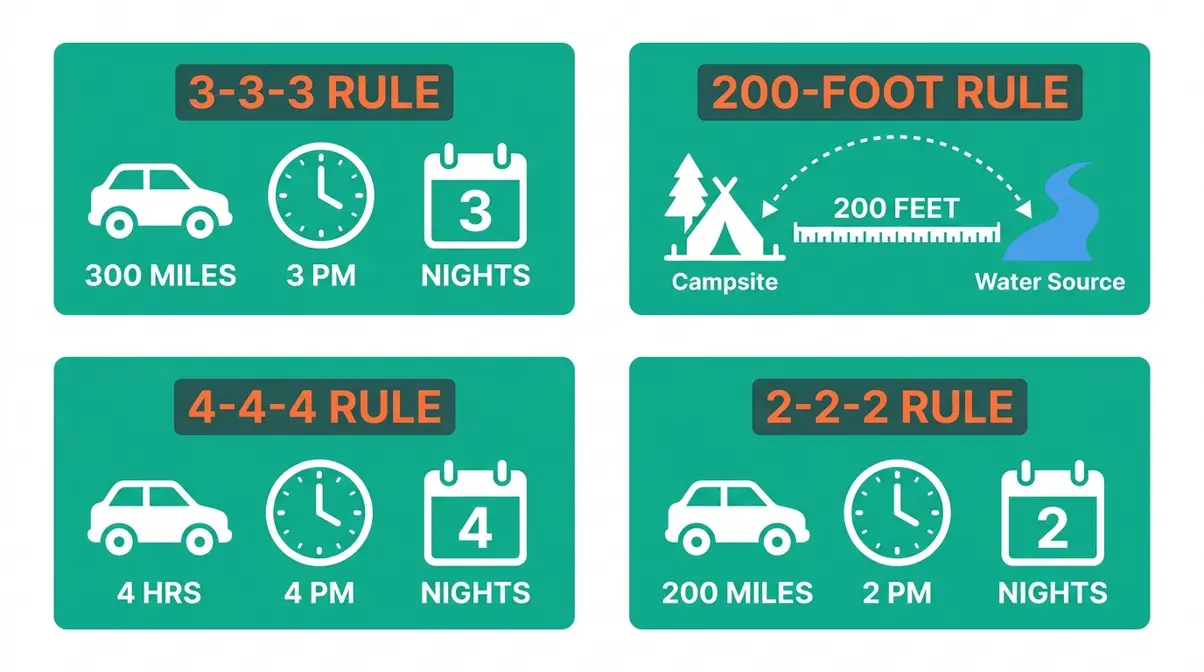
Every beginner has the same fear: accidentally breaking a camping rule they didn’t know existed. This section answers the most-Googled camping rules in plain English, so you can set up your campsite with confidence.
What Is the 3-3-3 Rule for Camping?
The 3-3-3 rule is an informal guideline followed by RV campers and road-trippers to avoid fatigue-related accidents and rushed setups. It states: drive no more than 300 miles per day, arrive at your campsite by 3 PM, and stay for at least 3 nights. The 3 PM arrival rule is particularly relevant to campsite layout — arriving with daylight means you can properly scout your spot, orient your tent relative to wind and sun, and set up The Camp Triangle Method before dark. Rushing a setup in the dark is how most beginner mistakes happen.
What Is the 200-Foot Rule for Camping?
The 200-foot rule is a Leave No Trace guideline (Leave No Trace Center for Outdoor Ethics, 2024) that specifies minimum distances between your campsite activities and sensitive natural features. The core distances are:
- 200 feet (approximately 70 adult paces) from lakes, streams, and rivers for your kitchen, sanitation area, and waste disposal
- 200 feet from trails and other campsites for your tent placement in dispersed/backcountry camping
- 100 feet minimum distance for the same activities in some managed national forest settings
According to the Leave No Trace Center for Outdoor Ethics, the 200-foot rule exists to protect water quality, preserve wildlife habitat, and allow other visitors to enjoy a sense of solitude (LNT, 2024). For campsite layout purposes: keep your kitchen and sanitation zone well away from any water source you can see or hear.
What Is the 4-4-4 Rule for Camping?
The 4-4-4 rule is another RV and road-trip travel guideline designed to keep camping trips sustainable and safe. It means: drive no more than 4 hours per day, arrive by 4 PM, and stay for at least 4 nights. It’s a slightly more conservative version of the 3-3-3 rule, favored by families with young children or campers pulling heavy trailers. The extended 4-night minimum encourages campers to slow down, properly set up their site, and actually enjoy the destination rather than treating it as a stopover. For campsite layout purposes, the 4 PM arrival window gives you plenty of daylight for a careful, deliberate setup.
What Is the 2-2-2 Rule for Camping?
The 2-2-2 rule is the most conservative of the travel-pacing guidelines: no more than 200 miles per day, arrive by 2 PM, and stay for at least 2 nights. It’s primarily used by new RV owners or campers who are still learning their rigs and need extra time for setup, leveling, and hookups. Arriving by 2 PM gives you the most daylight of any rule — enough time to set up your full campsite layout, explore the area, and still cook dinner before dark. If you’re on your first or second trip, the 2-2-2 rule is the one to follow.
What Is the 10-Year Rule for Camping?
The 10-year rule is a campfire safety and land stewardship principle, not an official regulation. It states: leave your campsite in better condition than you found it, so it can recover and be enjoyed for the next 10 years. In practice, this means extinguishing fires completely (drown, stir, drown again until cold to the touch), packing out all trash including food scraps, restoring disturbed ground cover, and never cutting live branches or damaging trees. It aligns closely with Leave No Trace principles. For campsite layout, applying the 10-year rule means choosing established sites over virgin ground and using existing fire rings rather than creating new ones.
Common Campsite Setup Mistakes to Avoid
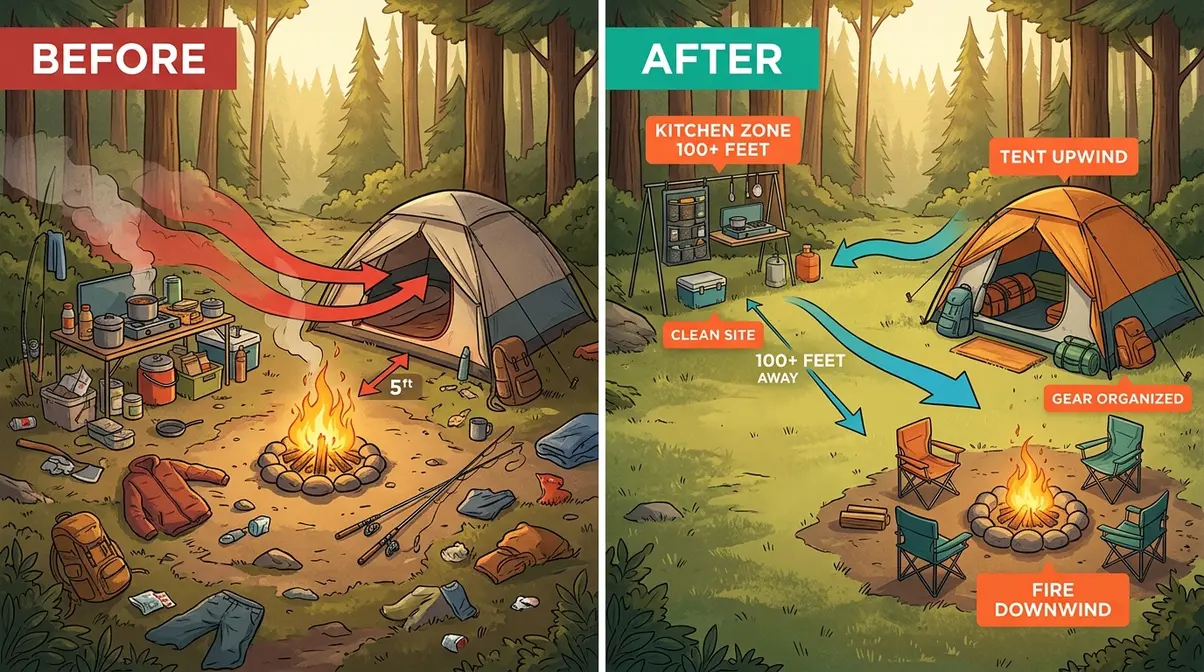
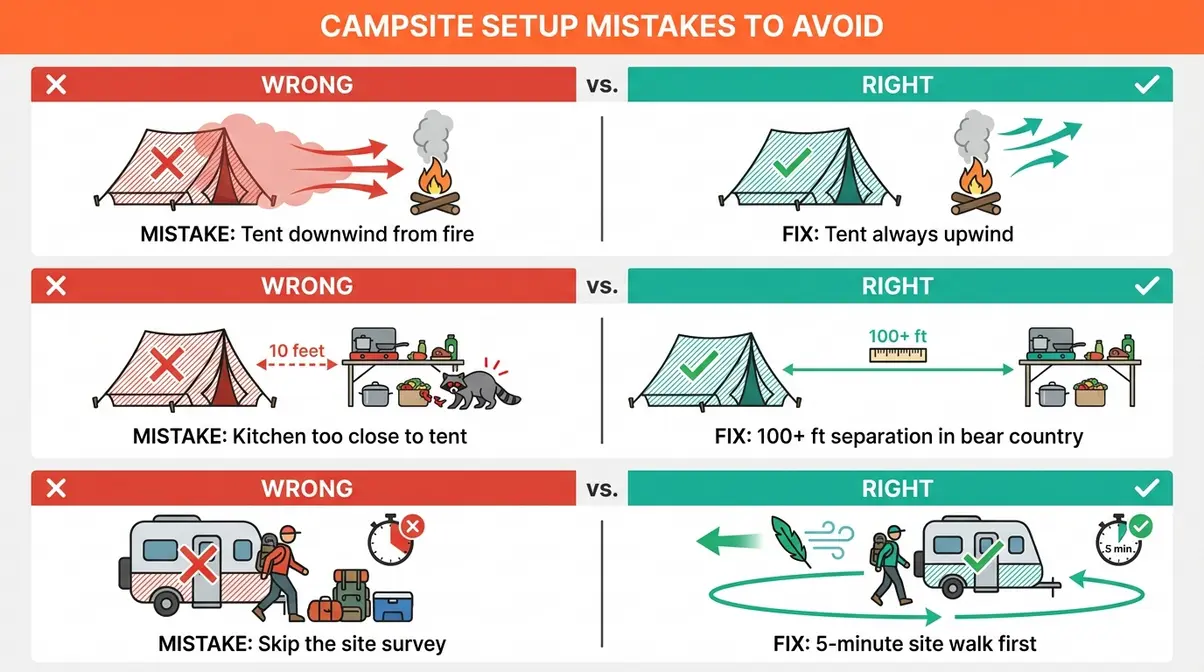
Even experienced campers make setup mistakes. Our team evaluated these pitfalls across multiple camping styles and found three that consistently ruin the first night — and one important context where a completely different approach makes more sense.
Three Mistakes That Ruin Your First Night
Mistake 1: Placing the tent downwind from the fire. This is the most common campsite layout mistake, period. Smoke drifts downwind continuously. If your tent is downwind, you’ll breathe smoke all night and wake up smelling like a bonfire. The fix is simple: always establish wind direction first, then place the tent upwind before anything else. The Camp Triangle Method prevents this by design.
Mistake 2: Setting up the kitchen too close to the sleeping area. Food smells attract wildlife — from ants and raccoons to bears in many regions. A kitchen zone within 10–15 feet of your tent is both a wildlife attractant and a Leave No Trace violation in bear country. Keep your kitchen at least 100 feet from your sleeping zone in any area with bear activity, per National Park Service guidelines (NPS, 2024).
Mistake 3: Skipping the site survey before unpacking. Most beginners unload the car and start setting up immediately. Spending just five minutes walking the site — checking wind direction, identifying the water source, spotting flat ground — prevents hours of frustration. A poorly chosen tent spot, discovered after setup, means tearing everything down and starting over in fading light.
When a Different Campsite Setup Makes More Sense
The Camp Triangle Method assumes a traditional developed or semi-developed campsite with a defined space. However, dispersed camping (camping on public land outside of designated campgrounds, often in national forests or BLM land) follows different rules.
In dispersed camping, you have no fire ring, no picnic table, and no defined site boundaries. Here, the priority shifts from optimization to Leave No Trace compliance: camp on the most durable surface available, minimize your footprint, and scatter your zones more loosely to reduce impact on any single area. The triangle framework still applies as a mental model, but you may spread zones farther apart — 200+ feet between kitchen and sleeping in some wilderness areas — per land management agency requirements.
If you’re exploring dispersed or backcountry camping, Cedar Grove Park’s guide for new campers provides a solid overview of site selection principles in less-structured environments (Cedar Grove Park, 2024).
Frequently Asked Questions About Campsite Layout
What is the 4-4-4 rule for camping?
The 4-4-4 rule means drive no more than 4 hours per day, arrive at your campsite by 4 PM, and stay for at least 4 nights. It’s a road-trip pacing guideline designed to prevent fatigue and rushed setups, especially popular among RV campers with families. Arriving by 4 PM gives you substantial daylight for a thorough campsite layout setup. It’s more conservative than the 3-3-3 rule, making it a smart choice for beginners on their first few trips.
How do you layout a campsite?
The most effective way to layout a campsite is to divide your space into four zones: Sleeping, Kitchen, Fire/Social, and Sanitation. Use The Camp Triangle Method — arrange sleeping, kitchen, and fire in a triangle so smoke always drifts away from your tent. Start by identifying wind direction, then place your tent upwind, your fire downwind, and your kitchen to the side. This approach takes 5–10 minutes of planning and prevents the most common beginner problems.
What is the 200-foot rule for camping?
The 200-foot rule is a Leave No Trace guideline requiring campers to keep kitchen, sanitation, and waste areas at least 200 feet from lakes, streams, and rivers. This distance — roughly 70 adult paces — protects water quality from soap, food scraps, and human waste. It also applies to tent placement in dispersed/backcountry camping: stay 200 feet from water sources and other campsites. According to the Leave No Trace Center for Outdoor Ethics (LNT, 2024), this is one of the most commonly violated — and most impactful — camping guidelines.
What is the most forgotten item when camping?
The most commonly forgotten camping items are a can opener, a headlamp (or extra batteries), and toilet paper — reported consistently across camping community surveys. User consensus in camping forums also frequently names a camp towel, sunscreen, and a ground cloth (a waterproof sheet placed under the tent to protect the floor) as items people forget on their first few trips. Build a packing checklist before every trip and check it twice. A forgotten headlamp in particular becomes a serious problem after dark when navigating between campsite zones.
What does FF mean in camping?
In camping and RV communities, FF stands for “Full Hookups” — meaning a campsite that offers water, electric, and sewer connections all in one spot. You’ll also see the abbreviation used as “Full Facility” in some campground directories. A full-hookup (FF) site is the easiest type for beginners because your water and power needs are handled, letting you focus your energy on campsite layout and comfort upgrades rather than logistics. Not all campgrounds offer FF sites, so confirm availability when booking.
What is the 3-3-3 rule for camping?
The 3-3-3 rule means drive no more than 300 miles per day, arrive at your campsite by 3 PM, and stay for at least 3 nights. It’s an informal guideline used by RV campers and road-trippers to prevent driver fatigue and ensure enough daylight for campsite setup. The 3 PM arrival time is especially helpful for beginners — it gives you two to three hours of daylight to properly orient your campsite layout before cooking dinner. Arriving after dark is one of the fastest ways to make setup stressful and error-prone.
What is the 2-2-2 rule for camping?
The 2-2-2 rule is the most beginner-friendly travel pacing guideline: drive no more than 200 miles, arrive by 2 PM, and stay at least 2 nights. It’s designed for first-time RV owners or campers who need maximum time for setup, leveling, and exploring the site. Arriving by 2 PM gives you the most daylight of any pacing rule — enough time to fully execute The Camp Triangle Method, take a site walk, and still cook dinner comfortably. If this is your first or second camping trip, the 2-2-2 rule is the one to follow.
What is the 10-year rule for camping?
The 10-year rule is a stewardship principle: leave your campsite in better condition than you found it so the land can recover and be enjoyed for the next decade. In practice, this means fully extinguishing fires (drown, stir, drown until cold), packing out all trash, restoring disturbed ground cover, and using existing fire rings rather than creating new ones. It aligns directly with Leave No Trace principles (LNT, 2024). For campsite layout, this means choosing established sites over undisturbed ground and keeping your footprint as small as possible.
Your Next Camping Trip Starts Here
The best campsite layout ideas share one thing in common: they’re built on a framework, not on luck. The Camp Triangle Method — Sleeping, Kitchen, Fire/Social, arranged in a triangle with the fire downwind from the tent — is that framework. It’s simple enough to remember on arrival day and flexible enough to work whether you’re in a two-person tent, a 40-foot motorhome, or a seasonal site you’ve been building for years.
Experienced campers consistently report that a planned layout doesn’t just make the site look better — it makes the entire trip run more smoothly. Meals happen faster, gear stays organized, wildlife stays away, and nobody spends the night eating smoke. The planning investment is five minutes. The payoff is every hour after that.
Your action plan: Before your next trip, sketch a rough top-down diagram of your campsite using the triangle as your guide. Note which direction the wind typically blows at your destination (most campground websites or weather apps will tell you). Pack a camp rug, a string of solar lights, and a folding table — and you’ll arrive with everything you need to turn any patch of ground into a comfortable, organized outdoor home. Download the free printable campsite setup checklist linked in the introduction to make your first setup even smoother.

David King
Field gear tester at Tent Explorer.