Rubber Mallet Guide: Uses, Types & Pro Tips (2026)
 Dave King
Updated June 28, 2026
24 min read
Dave King
Updated June 28, 2026
24 min read
You’ve just opened the flat-pack furniture box, spread the pieces across your living room floor, and there it is — instruction step 4: “Use a rubber mallet to fit the shelves into the slots.” You stare at your toolbox. You have a regular hammer. You wonder: will that do the same job? The short answer is no — and using the wrong tool here is the difference between a clean, professional result and a dented, scuffed piece you’ll spend the next three years hiding behind a plant.
A steel hammer transfers its full force in a sharp, concentrated point. That’s great for driving nails. It’s catastrophic for wood joints, tile, and laminate edges. A rubber mallet delivers a softer, cushioned impact that moves parts into place without marking or dimpling the surface. This mallet rubber tool guide covers everything you need to know: what the tool actually does, the seven most common uses, a plain-language buyer’s guide, and the exact techniques that prevent marks and damage on your project.
What you’ll need to follow this guide: a rubber mallet (or you’re shopping for one), a project that requires gentle force — furniture, flooring, woodworking, or tiling — and a surface you don’t want to damage. No prior tool knowledge needed.
A rubber mallet delivers firm, controlled force without denting, marking, or fracturing surfaces — making it the right tool for any situation where a steel hammer would cause damage.
- Material matters: White/grey mallets are non-marking; black mallets can leave scuffs on light surfaces
- Weight guide: 16 oz for woodworking and assembly; 24–32 oz for flooring and tiling
- The Impact Triad: Every good mallet decision comes down to Material, Mass, and Method — get all three right and your project stays mark-free
- Key rule: Never use a rubber mallet to drive nails — it’s designed for surface-to-surface force, not fasteners
What Is a Rubber Mallet? Core Principles
A rubber mallet is a striking tool with a head made from solid rubber rather than steel. Its entire design is built around one idea: delivering force without damage. Understanding how it works — and how it differs from a regular hammer — will help you know exactly when to reach for it and when to leave it on the shelf.
The Science of Controlled Impact
A rubber mallet works by absorbing a portion of the impact energy inside its head before that energy reaches your workpiece. When the rubber head strikes a surface, the material compresses slightly on contact, spreading the force over a wider area and a slightly longer time window. The result is a softer, more distributed blow — one that moves parts into position without concentrating enough force to dent wood fibers, crack tiles, or chip laminate edges.
This compression also creates a noticeable rebound. After the head strikes, the rubber springs back, which is why you feel a slight bounce in your wrist. That rebound is not wasted energy — it’s confirmation that the rubber absorbed the shock instead of your workpiece. The head is typically cylindrical, made from vulcanized rubber (natural or synthetic), and attached to a handle of wood, fiberglass, or steel.
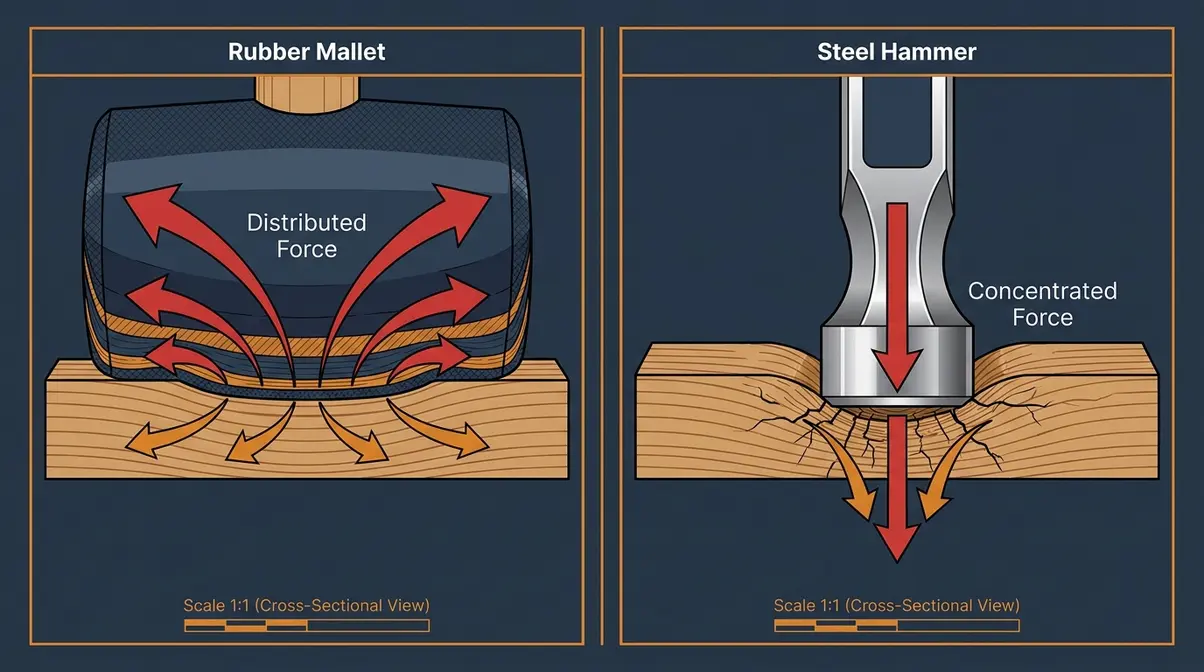
One key property to understand is durometer (a rubber’s hardness rating). Softer rubber compresses more, absorbs more energy, and is gentler on delicate surfaces. Harder rubber compresses less, transfers more force, and handles heavier tasks. Most DIY mallets fall in the mid-range — firm enough to move stubborn joints, soft enough not to leave marks on finished wood or tile.
Rubber Mallet vs. Regular Hammer
The most common question beginners ask is: “Can I just use my regular hammer?” The honest answer depends entirely on what you’re hitting — but for most DIY projects, the answer is no.
A steel hammer has a hardened metal face that transfers nearly all of its kinetic energy in a sharp, millisecond impact at a very small point of contact. That concentrated force is exactly what you need to drive a nail through hardwood. It’s also exactly what shatters ceramic tile, dents softwood furniture panels, and chips the locking edges off laminate flooring planks.
A rubber mallet spreads that same energy across the full face of the rubber head, cushioning the blow. Here’s a direct comparison:
| Feature | Steel Hammer | Rubber Mallet |
|---|---|---|
| Face material | Hardened steel | Vulcanized rubber |
| Force transfer | Sharp, concentrated | Soft, distributed |
| Surface marking | Leaves dents/marks | Non-marking (white) or minimal-marking (black) |
| Best for | Driving nails, splitting wood | Fitting joints, flooring, tile, assembly |
| Rebound | Minimal (solid head) | Noticeable bounce |
| Cost | $10–$30 | $8–$25 |
The critical distinction: a steel hammer deforms what it hits; a rubber mallet moves what it hits. Both tools have their place — but swapping one for the other on the wrong job causes damage that’s often impossible to reverse.
When to Choose a Rubber Mallet
Reach for a rubber mallet any time the surface you’re striking is one you care about — meaning it’s a finished, visible surface, a fragile material, or a component that’s already in its final position. Specific scenarios where the rubber mallet is the right choice include: fitting press-fit furniture joints together, tapping laminate or hardwood flooring planks into their click-lock connections, seating ceramic or porcelain tiles into adhesive, tapping wooden dowels into pre-drilled holes, and nudging assembled cabinets into alignment.
Keep the steel hammer for tasks that require penetration: driving nails, setting anchors, breaking concrete. The rule of thumb is straightforward — if the surface needs to stay intact after you hit it, use a rubber mallet.
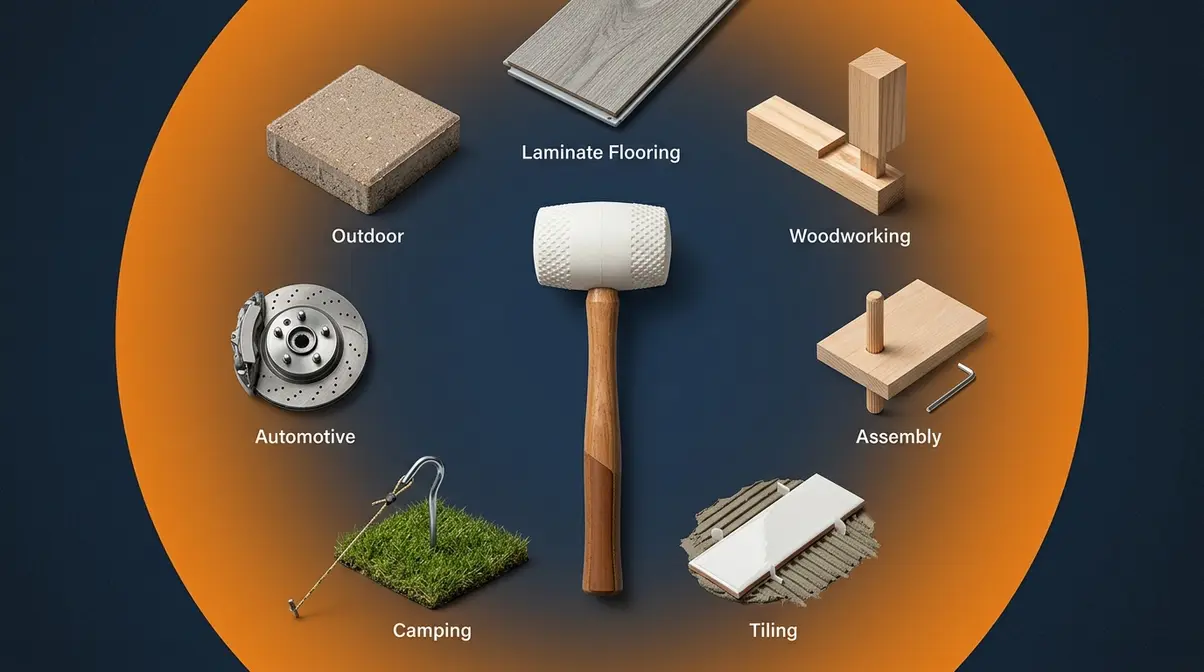
7 Key Rubber Mallet Applications
A rubber mallet is one of the most versatile tools in a DIY kit. Professional builders, flooring installers, woodworkers, and even automotive technicians rely on it for any task that needs controlled force without surface damage. Based on analysis of professional tool-use guidelines from sources including Tri-C and CPWR, the rubber mallet’s non-marring impact makes it irreplaceable across at least seven distinct application areas.
Woodworking: Tapping Joints Safely
In woodworking, a rubber mallet’s job is to close joints without bruising the wood grain. When you’re assembling a mortise-and-tenon joint (where a projecting piece fits into a corresponding slot), the fit is deliberately tight — that friction is what holds the piece together without relying solely on glue. Tapping the joint closed with a steel hammer would crush the wood fibers at the point of contact, permanently weakening the joint and leaving an ugly dent on a visible surface.
The correct technique: hold the mallet near the end of the handle for maximum control, aim squarely at the joint, and use short, firm taps rather than full swings. Work around the joint evenly — tap one side, then the other — so the joint closes straight without racking (twisting out of square). According to KM Tools’ woodworking mallet guide, rubber mallets are well-suited for “knocking tight joinery together or apart” and for aligning workpieces on a bench without damaging the surface.
One limitation worth knowing: rubber mallets are not ideal for driving chisels. The rebound wastes energy, and the force isn’t concentrated enough for clean, controlled chisel cuts. For chisel work, a dedicated wooden joiner’s mallet is the better choice — more on that in the Limitations section.
Flooring: Fitting Planks and Tiles
Flooring installation is probably the most common DIY use for a rubber mallet, and it’s where choosing the right mallet head color genuinely matters. Both laminate and luxury vinyl plank (LVP) flooring use click-lock systems that require the planks to be tapped firmly into each other’s locking profile. Hitting the plank edge directly with any hammer would chip or crush the locking tongue — making the joint loose or impossible to close.
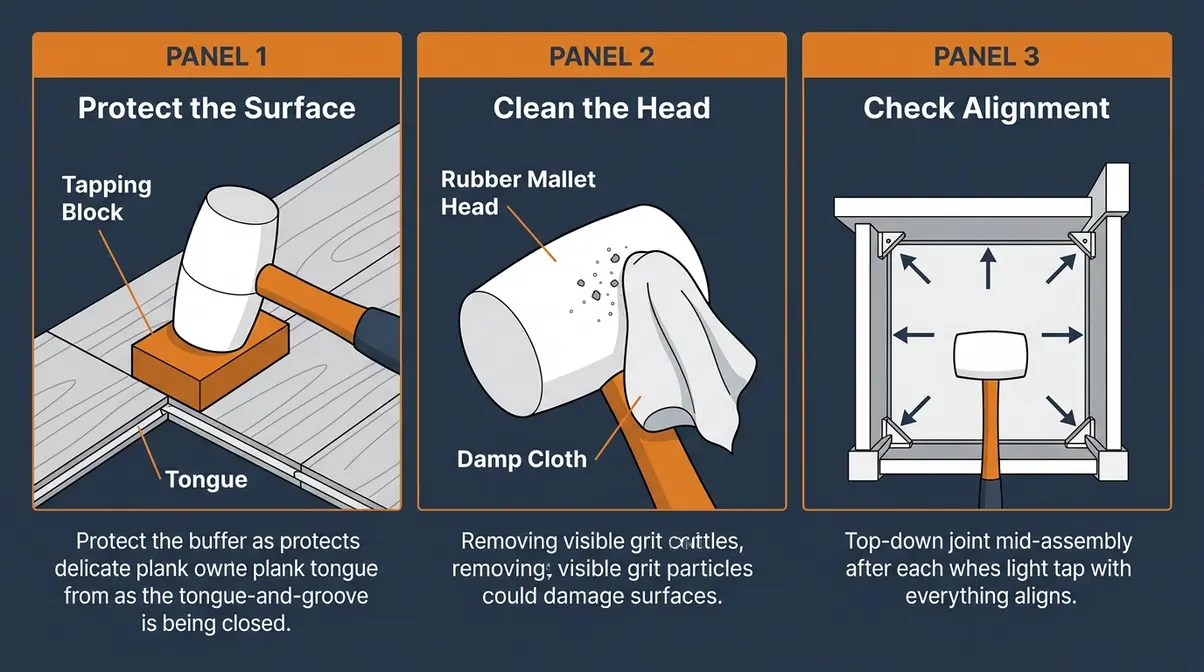
The standard method: place a tapping block (a short piece of scrap flooring or a manufacturer-supplied tool) against the plank edge, then tap the block with your rubber mallet. According to The Home Depot’s laminate flooring installation guide, you should tap toward the joint to tighten the click-lock connection, maintaining a 3/8-inch expansion gap at the walls. Never tap the flooring edge directly — always use the tapping block as a buffer.
For ceramic and porcelain tile, the technique is slightly different. After placing tiles on thinset mortar, lay a straight 2×4 piece of lumber across three or four tiles and tap it lightly with your mallet. This simultaneously levels the tiles and embeds them fully in the adhesive — two steps in one. A white or soft-rubber mallet is strongly recommended here: Roff’s project guide specifically notes that “a soft rubber mallet hammer is usually suggested for tile work to prevent chipping or breaking the tiles.”
Furniture Assembly: Press-Fit Parts
This is the scenario that brings most beginners to this rubber mallet guide. Flat-pack furniture relies heavily on press-fit connections — where two parts are forced together by friction alone, with no screws or bolts holding the joint. The dowels, cam locks, and shelf pins in flat-pack pieces are designed to fit tightly enough that hand pressure alone won’t close them. You need to apply force. But that force must be controlled.
“The instructions say to use a ‘Rubber Mallet’ to put it together and whack the shelves into the slots. Left my ex-wife, all my tools, house etc.”
This quote from a real DIY community post captures exactly the moment this guide is designed to help with. You’re not being irrational — this is a genuinely confusing instruction if you’ve never used the tool before. The rubber mallet is the answer because it delivers enough force to seat the press-fit joint while the rubber face absorbs the shock that would otherwise crack the wood panel or chip the laminate surface coating.
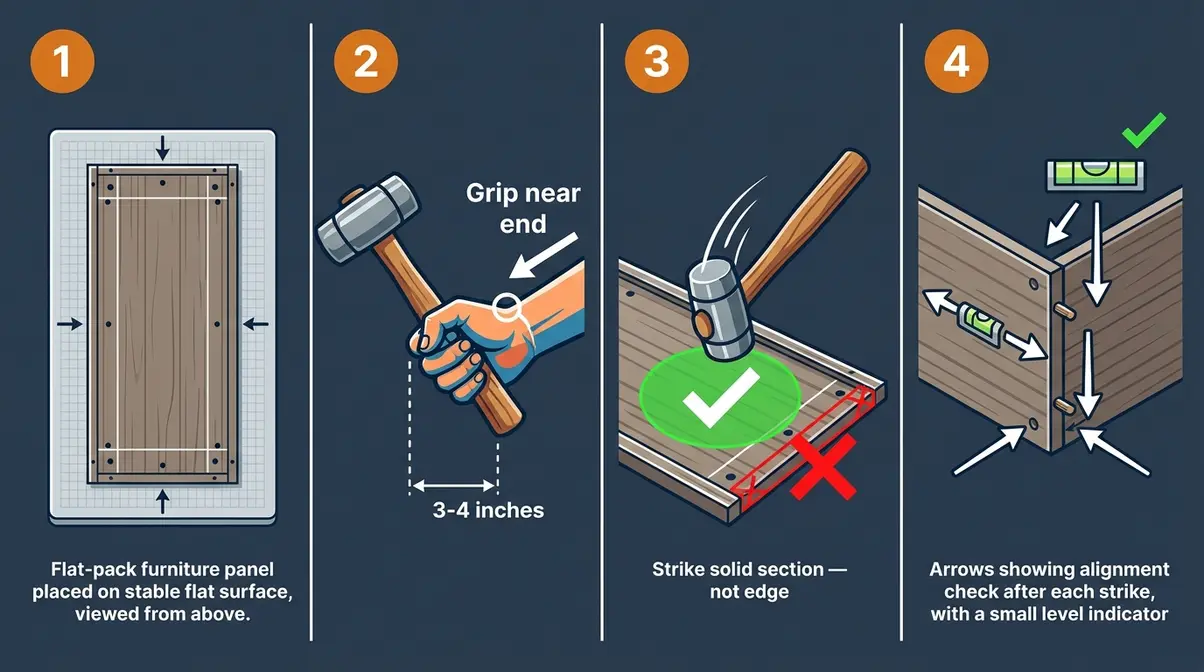
- Technique for furniture assembly:
- Place the part to be joined on a stable, flat surface.
- Hold the mallet near the end of the handle for controlled force.
- Aim at the solid section of the panel — not the edge or corner.
- Use short, firm taps and check alignment after each one.
- If a joint won’t close after several taps, check for debris in the hole before applying more force.
Auto Body and Mechanical Assembly
In automotive work, a rubber mallet handles tasks that need force without metal-on-metal contact. Common applications include tapping body panels back into rough shape before detailed repair, seating wheel hub components, removing stuck brake drums (by tapping around the drum perimeter to break the rust bond), and fitting rubber grommets and seals into their housings.
The key advantage here is that a rubber mallet won’t scratch painted surfaces or score metal components the way a steel hammer or brass mallet would. For seating bearings or driving tight-fitting mechanical parts, however, a dead blow hammer is generally the better choice — it transfers more force and doesn’t bounce. User consensus in professional mechanic communities indicates that the rubber mallet handles light body work and rubber/plastic components well, while the dead blow hammer takes over for harder-to-move metal assemblies. More on that distinction in the Buyer’s Guide.
Camping and Outdoor Applications
Outside the workshop, a rubber mallet is the standard tool for driving tent pegs and ground stakes into firm or rocky soil. Unlike a steel hammer, it won’t mushroom (deform the top of) steel pegs, and the softer impact is safer when you’re striking near your hands in an awkward outdoor position.
- Other specialized uses include:
- Paver installation: Tapping concrete or stone pavers into a sand bed to achieve a level surface
- Leather crafting: Striking stamps and punches into leather without damaging the work surface beneath
- Plumbing assembly: Seating push-fit pipe connections and rubber gaskets
- Drywall installation: Nudging panels into alignment before fastening
For all outdoor and rough-use applications, a black rubber mallet is the practical choice — the surface marking risk is irrelevant on pegs and pavers, and black rubber tends to be more wear-resistant on abrasive surfaces (Fixtec Tools, 2026).
Rubber Mallet Buyer’s Guide
Choosing a rubber mallet comes down to three factors: the head material, the weight, and the handle. Get these right for your specific task and you’ll have a tool that works cleanly every time. Get them wrong and you’ll either leave marks on your project or spend twice as long finishing the job. This section walks through each factor in plain language — organized around The Impact Triad framework: Material, Mass, and Method.
Head Material: White, Black, or PU
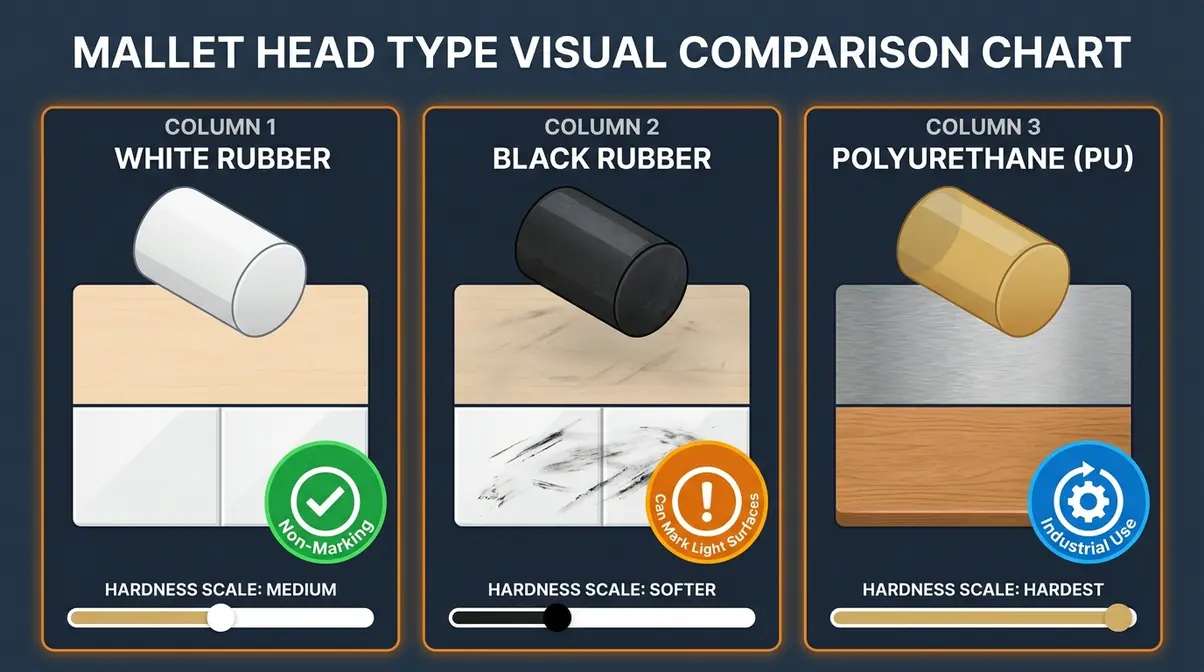
This is the question no competitor guide answers properly — and it’s the one that matters most if you’re working on light-colored flooring, white furniture panels, or polished tile. Here’s what actually differs between the three main rubber types:
| Head Type | Color | Marking Risk | Hardness | Best For |
|---|---|---|---|---|
| White/Grey Rubber | White or grey | Non-marking | Slightly firmer | Tile, laminate flooring, light-colored furniture, finished wood |
| Black Rubber | Black | Can leave dark scuffs on light surfaces | Softer, more flexible | General DIY, woodworking, camping, outdoor use, industrial surfaces |
| Polyurethane (PU) | Usually tan/yellow or custom color | Minimal marking | Hardest of the three | Industrial assembly, automotive, dead-blow applications, precision striking |
White rubber mallets are slightly denser than black, which gives them a firmer feel and a sharper sound on contact. Their most important property is that they won’t transfer rubber pigment onto light surfaces. According to Amtech DIY’s explanation of mallet colors, the white mallet “is non-marking, so you may be tapping surfaces together, you may be doing tiling, and you don’t want to leave a black mark on it.” This is the right choice for tile work, laminate flooring, and light-colored furniture panels.
Black rubber mallets are softer and more flexible, providing more cushioning per blow. They’re perfectly fine for woodworking, camping, and any application where surface marking on light materials isn’t a concern. The Esseio material comparison guide notes that black rubber “can leave scuff marks on lighter surfaces if used carelessly, due to carbon black and other pigments in the rubber compound.”
Polyurethane (PU) mallets are harder than either rubber type, offer significantly reduced rebound, and are highly resistant to oils and chemicals. They’re available in multiple hardness levels (measured in Shore A — from 60A soft to 75D hard), making them the preferred choice in industrial and automotive settings. Polyurethane Products’ technical review highlights their “greater hardness and reduced rebound” as the defining advantage over standard rubber. For most DIY applications, a standard white or black rubber mallet is sufficient — PU mallets are worth the premium only if you’re doing regular automotive or industrial work.
The Impact Triad’s Material rule: Match the rubber color to your surface. Light or finished surface → white. General workshop use → black. Industrial/automotive → PU.
What Weight Rubber Mallet to Get?
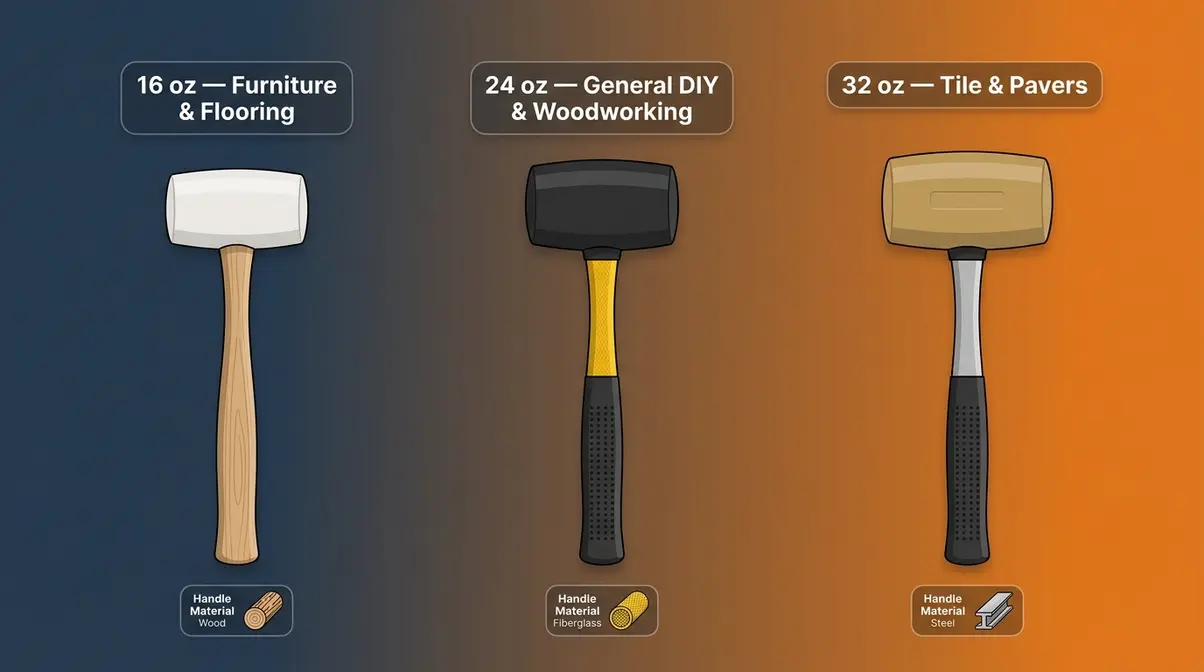
A 16 oz rubber mallet handles most beginner DIY tasks, including furniture assembly, laminate flooring, and light woodworking. For ceramic or porcelain tile installation and paver work, step up to 24–32 oz for more efficient force transfer per swing.
Mallet weight directly controls how much force you deliver per swing. Too light and you’ll tire yourself out with repeated taps that barely move the joint. Too heavy and you’ll overdriving the workpiece, cracking tile or splitting wood joints. The standard weight ranges break down cleanly by task type:
| Weight | Task Type | Example Applications |
|---|---|---|
| 12–16 oz | Light precision work | Furniture assembly, dowel fitting, leather crafting, small woodworking joints |
| 18–24 oz | Mid-range DIY | Laminate flooring, cabinet assembly, general woodworking |
| 24–32 oz | Heavy-duty installation | Ceramic/porcelain tile, paver installation, concrete form work |
| 32 oz+ | Industrial/professional | Large stone pavers, structural timber, heavy mechanical assembly |
For most beginner DIYers assembling flat-pack furniture or laying a first floor, a 16 oz mallet covers 80% of tasks. If you’re planning a tiling or paving project, step up to 24 oz for more efficient force transfer per swing — you’ll finish the job faster with less fatigue.
The Impact Triad’s Mass rule: Start lighter than you think you need. You can always swing harder. You can’t un-crack a tile.
Handle vibration is worth considering here too. Heavier mallets generate more vibration per strike, which adds up during a long flooring installation. Fiberglass handles absorb significantly more vibration than wood handles — a practical comfort advantage if you’re laying 200+ square feet of tile in a single session.
Handles: Wood, Fiberglass, Steel
The handle affects grip, vibration, durability, and cost. Here’s the honest breakdown for each:
Wooden handles are the traditional choice — comfortable, easy to grip, and inexpensive. The main drawback is that they can dry out, crack, or loosen over time, particularly if stored in a garage with fluctuating humidity. OSHA 29 CFR 1926.301(d) specifically requires that “the wooden handles of tools shall be kept free of splinters or cracks and shall be kept tight in the tool.” For occasional DIY use, wood is perfectly adequate.
Fiberglass handles are the best all-around choice for regular use. They don’t absorb moisture, won’t crack or warp, and absorb vibration better than wood. Most mid-range and professional rubber mallets now use fiberglass handles with a rubber grip over the striking zone.
Steel handles (usually with a rubber grip sleeve) are the most durable option and won’t loosen or break. The trade-off is that steel transmits more vibration to your hand, which becomes uncomfortable during extended use.
For a first rubber mallet, a 16 oz white rubber head on a fiberglass handle covers furniture assembly, light woodworking, and flooring installation — and will last for years with basic care.
Rubber Mallet vs. Dead Blow Hammer
This is the comparison that no other rubber mallet guide addresses — and it’s a genuinely important distinction for anyone who’s browsed a hardware store and seen both tools on the shelf.
A dead blow hammer looks similar to a rubber mallet but works on a fundamentally different principle. The head is hollow and partially filled with steel shot or sand. When you swing, the shot shifts to the front of the head at the moment of impact, continuing forward for a split second after contact. This follow-through effect — described by Wikipedia’s dead-blow hammer entry as “delivering momentum over a longer period” — transfers significantly more energy into the workpiece while almost completely eliminating rebound.
| Feature | Rubber Mallet | Dead Blow Hammer |
|---|---|---|
| Head construction | Solid rubber | Hollow, shot/sand-filled |
| Rebound | Noticeable bounce | Near-zero rebound |
| Force transfer per swing | Lower (rubber absorbs some) | Higher (shot continues forward) |
| Surface protection | Excellent — very soft face | Good — soft/semi-soft face |
| Best applications | Furniture, flooring, light woodworking | Automotive, bearing seats, heavy assembly |
| Typical weight | 12–32 oz | 16–48 oz |
| Price range | $8–$25 | $15–$60 |
| Quick ID test | Solid, no rattle | Rattles when shaken |
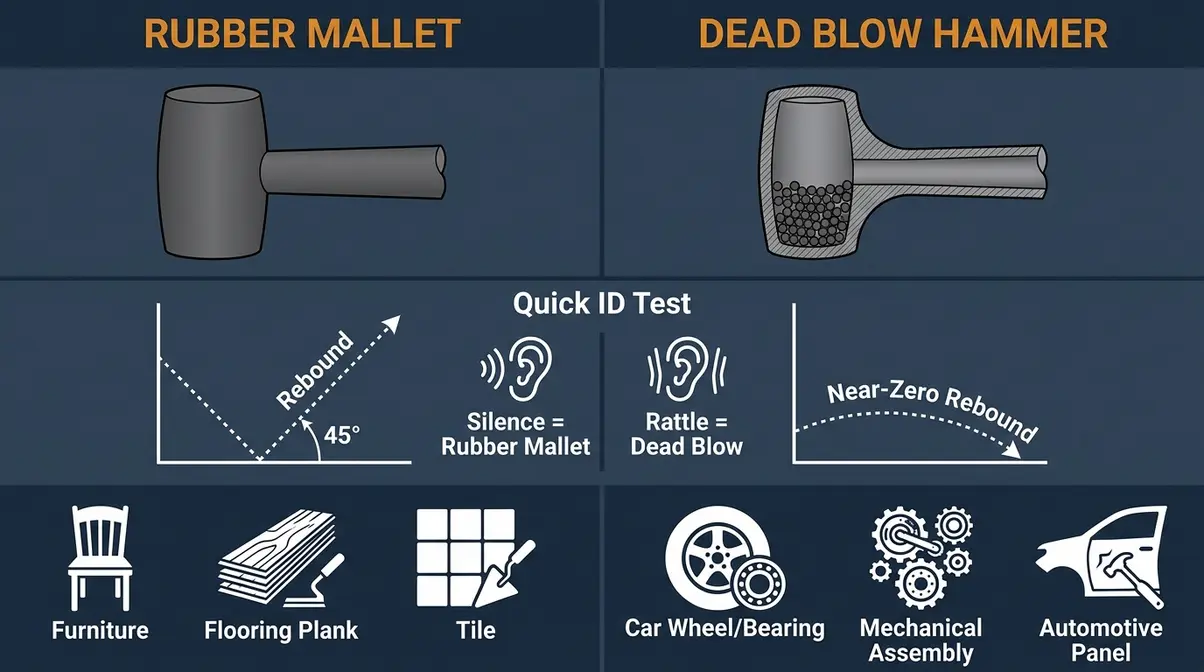
Choose a rubber mallet when protecting the surface is the priority and moderate force is sufficient — furniture assembly, laminate flooring, tile installation, and light woodworking. Choose a dead blow hammer when you need maximum force with minimal bounce — removing stuck automotive components, seating bearings, or driving tight mechanical assemblies. As HowToHardscape’s comparison notes, “using a rubber mallet when you should be using a dead blow hammer will require a lot more energy to achieve the result you are looking for.”
For most beginners, a rubber mallet comes first. A dead blow hammer is a useful second purchase once you’ve encountered a task that needs more driving force.
Techniques and Best Practices
Knowing which mallet to buy is half the equation. Using it correctly — with the right grip, swing, and surface protection — is what separates a clean result from a marked-up project. This section covers the three core techniques every beginner needs.
What you’ll need: your rubber mallet, the project (flooring, furniture, or woodworking), a tapping block for flooring work, and a clean cloth if using a white mallet on finished surfaces.
Proper Grip and Swing Technique
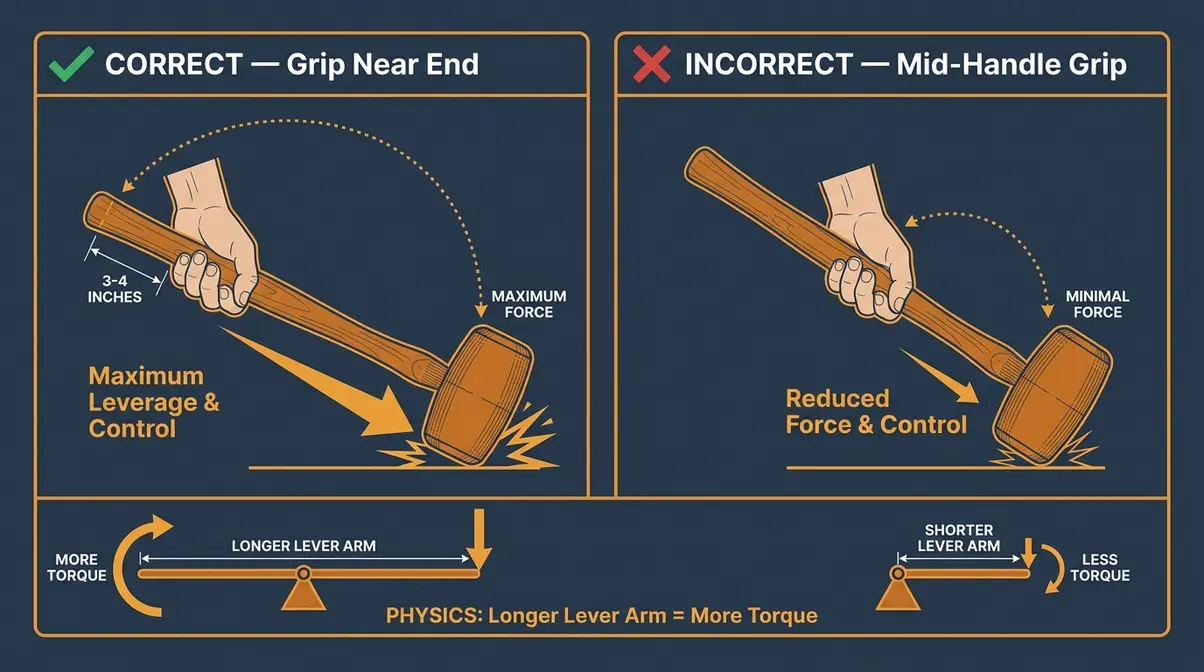
The grip position on the handle controls force more than swing speed does. Hold the mallet near the end of the handle (3–4 inches from the base) for maximum leverage and control. Gripping higher up the handle — close to the head — shortens your swing arc and dramatically reduces force, which is useful for very fine adjustments but inefficient for most tasks.
- Step-by-step technique:
- Stand with your feet shoulder-width apart and the workpiece at a comfortable working height.
- Grip the handle near the end with a firm but relaxed hand — white-knuckle gripping causes fatigue and reduces accuracy.
- Swing from the elbow, not the shoulder, for short, controlled strokes. Use your shoulder only when more force is needed.
- Strike the workpiece squarely — a glancing blow wastes energy and can cause the mallet to slip sideways.
- Let the mallet rebound naturally after each strike. Fighting the bounce tires your wrist and reduces accuracy on the next swing.
- Check alignment after every two or three strikes before continuing.
A quotable principle from professional tool-use guidance: “Light, repeated taps beat a single heavy swing every time.” Multiple controlled strikes let you check progress, correct alignment, and avoid overdriving — all impossible with one forceful blow.
How to Strike Without Leaving Marks?
Use a white rubber mallet on light-colored surfaces, keep the head clean, and place a tapping block between the mallet and any finished surface. Marks are almost always caused by one of three things: using a black mallet on a pale surface, striking with a dirty or grit-contaminated head, or using a worn head that has hardened and cracked. Clean the head with a damp cloth before use, inspect for surface cracks, and replace the head (or the whole mallet) if the rubber has lost its suppleness.
Leaving marks on your project is the most common rubber mallet complaint — and it’s almost always preventable.
- Prevention checklist:
- Use a white mallet on light surfaces. A black mallet’s pigment can transfer to white furniture panels, pale tile, and light-colored laminate — especially when the head is warm from use.
- Clean the head before use. Grit, sawdust, or debris embedded in the rubber face will scratch surfaces even when the rubber itself doesn’t mark. Wipe the head with a damp cloth before starting.
- Use a protective buffer on finished surfaces. Place a scrap of hardboard, a folded cloth, or a commercial tapping block between the mallet and any finished surface you’re not confident about.
- Don’t use a worn or hardened head. Old rubber that has dried out and cracked transfers marks much more readily than a fresh, supple head. If your mallet head has surface cracks or feels rigid, replace it.
For flooring work specifically, never strike the tongue or groove edge of a plank directly. Always use a tapping block to distribute the impact across the full edge profile. This single habit prevents the most common flooring installation mistake — crushing the locking edge and creating a gap that can’t be closed.
Mallet Care and Maintenance
A rubber mallet is a simple tool that lasts years with minimal maintenance. The rubber head is the only component that degrades, and it does so slowly unless exposed to heat, ozone (UV light), or harsh chemicals.
Cleaning: Wipe the head with a damp cloth after each use. For black marks left on a white head, a small amount of isopropyl alcohol on a cloth removes most rubber pigment transfer. Avoid solvent-based cleaners — they accelerate rubber degradation.
Storage: Store your mallet away from direct sunlight and heat sources. Rubber oxidizes faster when exposed to UV light and high temperatures, which causes the surface to harden, crack, and lose its non-marking properties. A toolbox, a cabinet, or a hanging rack in a shaded area is ideal.
Inspection: Before each use, check that the head is firmly attached to the handle. Per OSHA 29 CFR 1926.301(a), “employers shall not issue or permit the use of unsafe hand tools” — and a loose head is an unsafe condition regardless of whether you’re on a job site or in your own garage. Grip the handle and try to twist the head — any rotation or wobble means the handle needs to be re-secured or replaced. Check the handle for cracks or splinters, particularly on wooden handles that have been stored in variable humidity.
Risks: When a Rubber Mallet Fails
A rubber mallet is not a universal tool, and understanding where it fails is just as important as knowing where it excels. Based on community reports and professional tool guidance, here are the situations that cause the most problems — and what to use instead.
Common Mistakes to Avoid
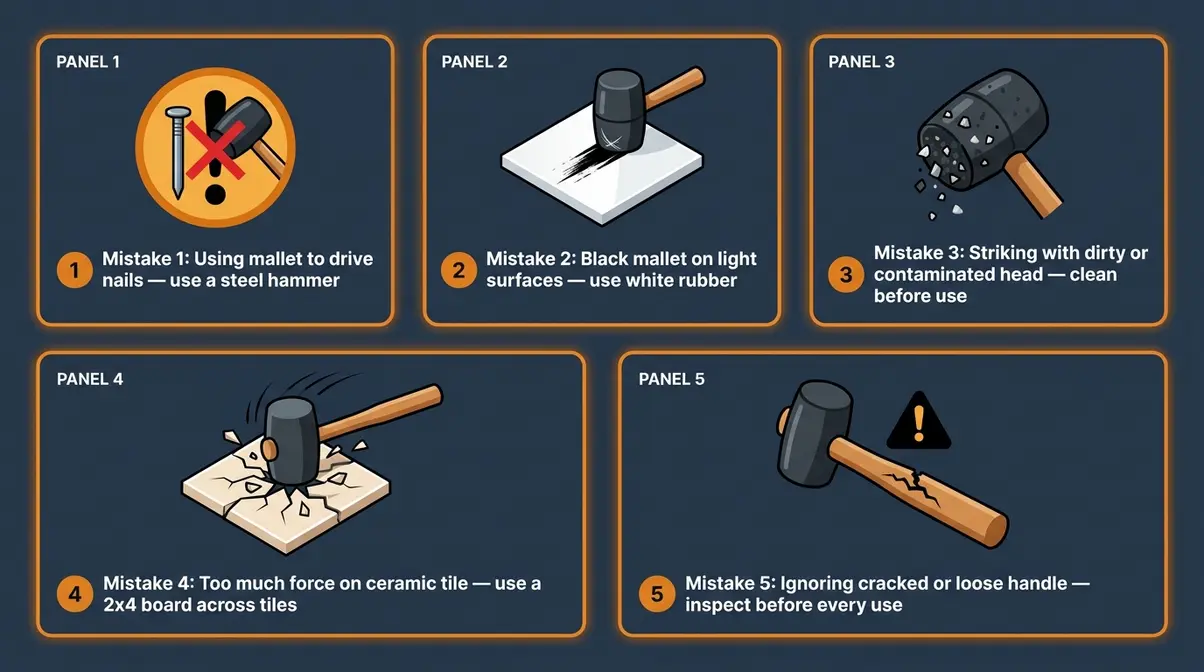
Mistake 1: Using a rubber mallet to drive nails. The rubber head absorbs too much energy to drive a fastener efficiently, and the soft face will deform around the nail head rather than driving it flush. Use a steel hammer for any task involving nails, screws, or anchors.
Mistake 2: Using a black rubber mallet on light-colored surfaces. This is the most common marking mistake. Even a clean black head can leave faint rubber transfer on white tile or pale laminate, particularly after prolonged use when the head warms up. Always match head color to surface color.
Mistake 3: Striking with a worn or contaminated head. A rubber head embedded with grit from a previous job will scratch surfaces that a clean head would protect. Clean the head before switching between tasks — especially before moving from outdoor/camping use to furniture assembly.
Mistake 4: Using too much force on ceramic or porcelain tile. Tile is strong under compression but brittle under point impact. A heavy swing on a single tile — especially without a tapping board across multiple tiles — can crack the tile from the underside even when the top surface looks intact. Use a 2×4 board across multiple tiles and tap gently.
Mistake 5: Ignoring handle condition. A cracked or loose wooden handle is a safety hazard. The head can separate mid-swing and become a projectile. Inspect the handle before every use session.
When to Choose a Different Tool
For chisel work in woodworking: A rubber mallet’s rebound wastes significant energy and reduces the precision of each chisel cut. KM Tools’ woodworking mallet guide explicitly notes that rubber mallets have “lots of recoil, so you lose a lot of force in each swing — why they’re not ideal for chisel work.” A dedicated wooden joiner’s mallet or a carver’s mallet transfers force more efficiently to a chisel handle.
For heavy mechanical assembly: When you need to seat a bearing, remove a stuck brake drum, or drive tight-fitting metal components, a dead blow hammer delivers more force with less bounce and fewer strikes. The rubber mallet will eventually get the job done, but it takes significantly more effort and risks overswinging.
For demolition or breaking tasks: No soft-face mallet belongs in a demolition scenario. Use a steel hammer or sledgehammer for breaking concrete, removing tile from walls, or splitting lumber.
For any task requiring a nail or fastener: The rubber mallet is surface-to-surface only. Any task involving a nail, screw, or anchor requires a steel-faced hammer.
Frequently Asked Questions
What is a rubber mallet used for?
A rubber mallet is used to apply force without damaging surfaces — making it the right tool for furniture assembly, flooring installation, tile work, woodworking joints, and automotive body work. Its rubber head absorbs part of the impact energy, so the force is distributed rather than concentrated. For example, it’s the standard tool for tapping laminate flooring planks into their click-lock connections without crushing the locking edge. It is not suitable for driving nails or any task requiring a hard, penetrating strike.
What is the difference between a white and black rubber mallet?
White rubber mallets are non-marking and won’t transfer pigment onto light-colored surfaces like tile, white furniture panels, or pale laminate. Black rubber mallets are softer and more flexible — better at absorbing heavy impact — but can leave dark scuff marks on light surfaces if used carelessly (Esseio, 2026). For tile installation and furniture assembly with light-colored materials, always choose white. For general woodworking, outdoor use, and applications where surface marking isn’t a concern, black is perfectly fine.
What is the difference between a rubber mallet and a dead blow hammer?
A rubber mallet has a solid rubber head that bounces after impact; a dead blow hammer has a hollow head filled with steel shot that nearly eliminates rebound. The dead blow transfers more force per swing and is better for heavy mechanical assembly, automotive work, and driving tight-fitting parts. A rubber mallet is gentler and better for delicate surfaces — flooring, furniture, and tile. The quick field test: shake the tool. A rattle means dead blow; silence means rubber mallet (Reddit r/Tools, 2026).
Can a rubber mallet break tile?
Yes, a rubber mallet can break tile if you strike too hard or use a mallet that is too heavy. While the rubber head cushions the blow, ceramic and porcelain are brittle under point impact. Always use a tapping block or a 2×4 piece of lumber across multiple tiles to distribute the force evenly.
Are polyurethane mallets safe for wood?
Polyurethane mallets are generally safe for wood, but they are harder than standard rubber and transfer more force. Because they have less rebound, they are excellent for driving stubborn joints. However, for very soft woods or delicate finishes, a white rubber mallet remains the safer, non-marring choice.
The Right Hit, Every Time
For beginner DIYers tackling furniture assembly, flooring installation, or tile work, a rubber mallet is the tool that separates a clean, professional-looking result from a damaged, marked-up project. As this mallet rubber tool guide has shown, a 16 oz white rubber mallet on a fiberglass handle covers the vast majority of home improvement tasks — and at a typical price of $10–$20, it’s one of the best-value additions to any starter tool kit.
The Impact Triad — Material, Mass, and Method — gives you a simple decision system for every project. Match the rubber color to your surface (white for light materials, black for general use). Match the weight to your task (16 oz for assembly, 24–32 oz for tile and pavers). Use controlled, short taps rather than full swings, and always check alignment as you go. These three principles prevent the overwhelming majority of marking, cracking, and joint-damage mistakes that beginners encounter.
Your next step: pick up a 16 oz white rubber mallet before your next assembly or flooring project. Use a tapping block on flooring edges, clean the head before switching surfaces, and inspect the handle before each use. You’ll finish your project faster, with cleaner results, and without the frustration of damage that can’t be undone.

Dave King
I'm Dave King. I publish Tent Explorer, a site built to answer the questions people actually ask before they buy.