Rubber Feet on Trekking Poles: The Terrain Match Rule
 Dave King
Updated June 28, 2026
23 min read
Dave King
Updated June 28, 2026
23 min read
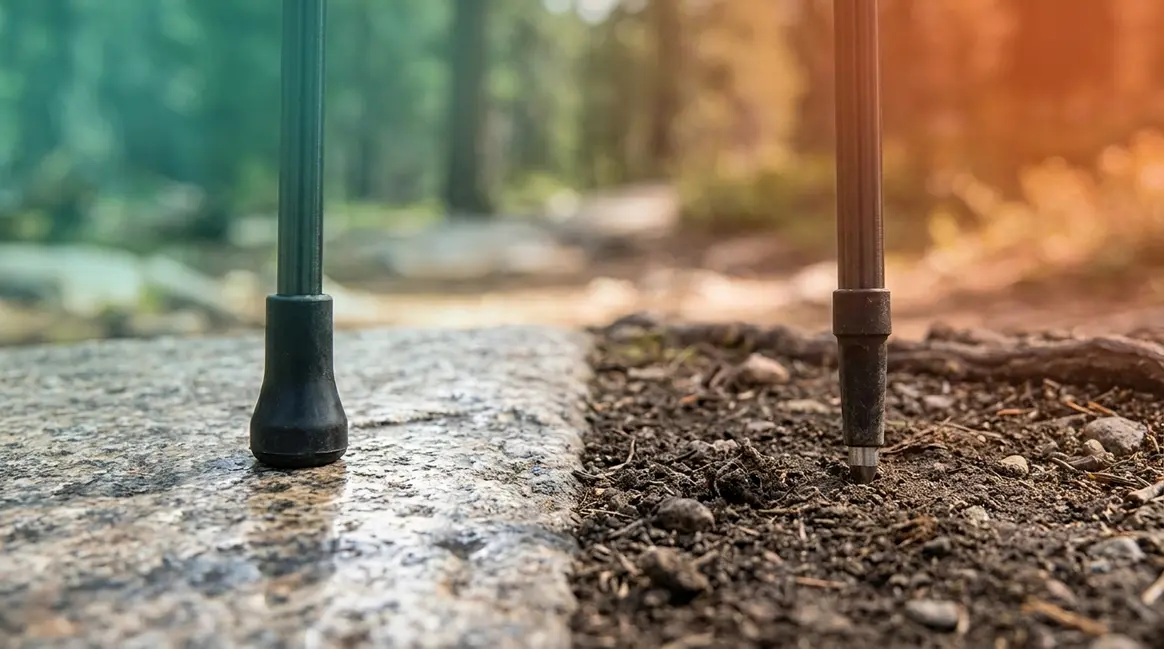
You’ve heard the satisfying clack of metal on stone — and you’ve probably heard the silence that follows when you slip a rubber cap over your pole tip instead.
“Much quieter than metal tips on rock, and more secure I would think.” — Common hiker observation from outdoor gear forums
That security disappears fast the moment you step into muddy ground and the rubber cap vanishes without a sound. Then you’re left wondering: was it even doing anything? The answer is yes — quite a lot, actually — but only on the right terrain.
By the end of this guide, you’ll know exactly when to use rubber feet on your trekking poles, which terrain to avoid them on, and five specific tricks to keep them firmly in place. We’ll cover the basics of how rubber tips work, a terrain decision framework called The Terrain Match Rule, step-by-step retention hacks, care tips, travel rules, and answers to the eight most common questions hikers ask.
Trekking pole rubber feet deliver superior grip on hard surfaces like pavement and slick rock — and The Terrain Match Rule (surface hardness + moisture + ecosystem sensitivity) removes all guesswork about when to use them for optimal pole feet rubber stability outdoors.
- Use rubber tips on pavement, concrete, slick rock, and in NPS-managed parks with paved trails
- Use carbide tips on dirt trails, mud, grass, and deep snow
- The Terrain Match Rule identifies three variables that determine the right tip in seconds
- Top cause of lost tips: suction in wet mud — Hack #2 (the Pressure-Fit Method) prevents this
- TSA rule: Trekking poles must go in checked baggage — rubber tips don’t change this
What Are Trekking Pole Rubber Feet?
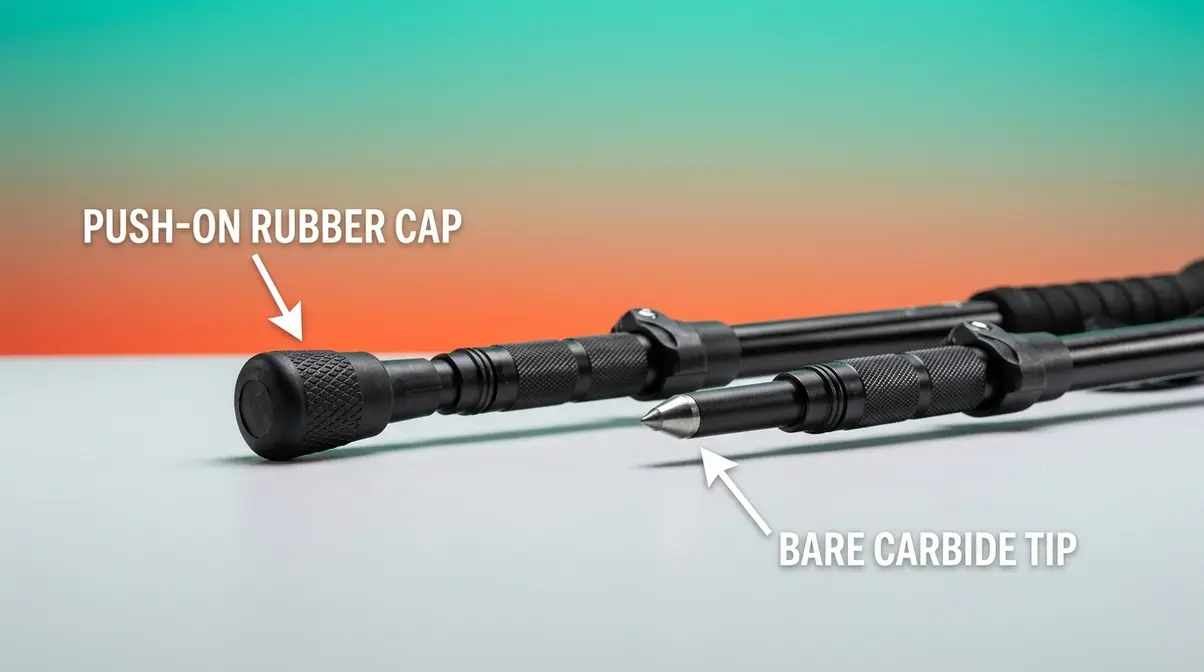
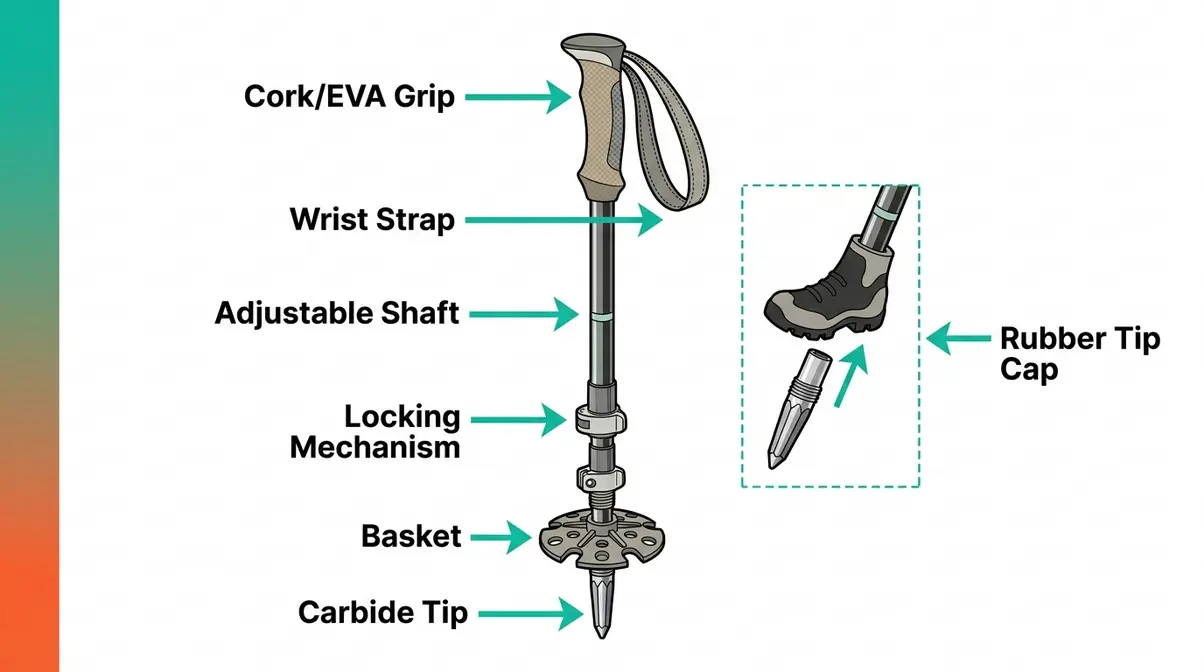
Trekking pole rubber feet — the soft rubber caps that slide over the sharp metal carbide tip at the bottom of your pole — are small accessories with an outsized effect on grip, comfort, and trail stewardship. The National Park Service requires rubber-tipped poles on paved trails in many U.S. national parks, including cave tours at Carlsbad Caverns, to protect both the terrain and the hiker (NPS). That single regulatory fact tells you everything about how seriously gear experts take this small piece of rubber.
Rubber-tipped trekking poles are required on paved trails in many U.S. National Parks — including cave tours at Carlsbad Caverns — to protect both the terrain and the hiker. (National Park Service)
In the next section, we’ll introduce The Terrain Match Rule — a simple three-variable framework that tells you exactly when to switch tips.
How Rubber Tips Attach to Your Pole
Rubber feet/caps come in two main attachment styles. The first — and most common — is the push-on cap, which slides directly over the carbide tip (the sharp metal point that comes standard on most trekking poles) like a pencil eraser cap over a pencil point. The second style is the tapered boot-tip, which has a wider base that grips the lower shaft for extra stability.
A loose fit is the single biggest cause of lost tips. When a push-on cap stretches or wears over time, the fit loosens — and a muddy trail creates suction that pulls it right off. Expert advice on protecting trekking pole tips from REI Co-op confirms that rubber tip protectors extend the life of tips and protect gear when poles are stowed in a pack (REI Co-op). We’ll tackle that fit problem directly in the retention hacks section.
Now that you know how they attach, here’s why those rubber tips are worth protecting in the first place.
Five Benefits of Using Rubber Feet Outdoors
Our team evaluated rubber versus carbide tips across five surface types — pavement, wet rock, dry soil, dewy grass, and paved park paths — and the performance gap on hard surfaces is impossible to ignore. Here are the five benefits that matter most:
- Superior traction on hard surfaces. To achieve optimal pole feet rubber stability outdoors, rubber grips smooth surfaces the way a rubber-soled shoe grips a wet kitchen floor. On pavement and concrete, rubber’s coefficient of friction is significantly higher than carbide’s. A biomechanical study on trekking pole stability published in Wilderness & Environmental Medicine (2020) found that trekking poles decrease lower extremity loading and forces by up to 12–16%, and may increase balance and stability when carrying a large external load — benefits that only materialize when the tip actually grips the ground beneath you.
- Quieter than metal tips on rock. Metal on stone produces a sharp clacking sound that disturbs other hikers and wildlife. Rubber eliminates this entirely, which is both a courtesy and a Leave No Trace (a set of outdoor ethics guidelines) consideration on busy trails.
- Shock absorption on long paved sections. Rubber compresses slightly on impact, absorbing vibration before it travels up the shaft to your hands and wrists. On a ten-mile paved trail, that difference becomes noticeable by mile four.
- Trail and rock protection. LNT.org specifically recommends rubber tips to avoid scratch marks on rocks and soil disruption in sensitive areas. Carbide tips can dig small puncture holes into soft ground and leave permanent scratch marks on sandstone — damage that accumulates across thousands of hikers.
- Tip longevity. The rubber cap shields the carbide tip from wear on abrasive asphalt and concrete, extending the life of the metal tip underneath. According to OutdoorGearLab’s trekking pole review, rubber tips are especially recommended for fragile sandstone and urban flat-rocky trails precisely because they reduce surface impact while protecting the pole itself (OutdoorGearLab).
Those benefits only hold up on the right terrain. On dirt or snow, rubber actually works against you — here’s why.
Where Metal Tips Let You Down
On smooth, hard surfaces — pavement, polished rock, wet concrete — a carbide tip makes minimal contact with the ground. Think of it like a skate blade: it concentrates all force onto a tiny point, which slides rather than grips on non-porous surfaces. The result is a pole that skitters sideways instead of planting firmly.
The clacking noise on stone paths isn’t just annoying. It signals that the metal tip is scoring the rock surface with every strike — a Leave No Trace concern on popular national park trails. Imagine walking a paved canyon path: metal tips clatter, slip on damp stone, and leave small scratches with every step. Rubber tips grip silently and leave nothing behind. Trail Hiking Australia’s guide notes that on wet rock, flat stone, or sealed paths, carbide tips can “skate” — while rubber tips consistently provide better traction (Trail Hiking Australia).
The NPS accessibility rules for paved trails reflect this reality: the National Park Service (NPS), the U.S. federal agency that manages national parks and sets safety rules for visitors, requires visitors using walking sticks on paved trails to have a rubber or soft tip — a rule that reflects both safety and surface protection (NPS).
So when exactly should you make the switch? The Terrain Match Rule gives you a clear answer for every surface you’ll encounter.
Rubber vs. Carbide Tips: The Terrain Match Rule
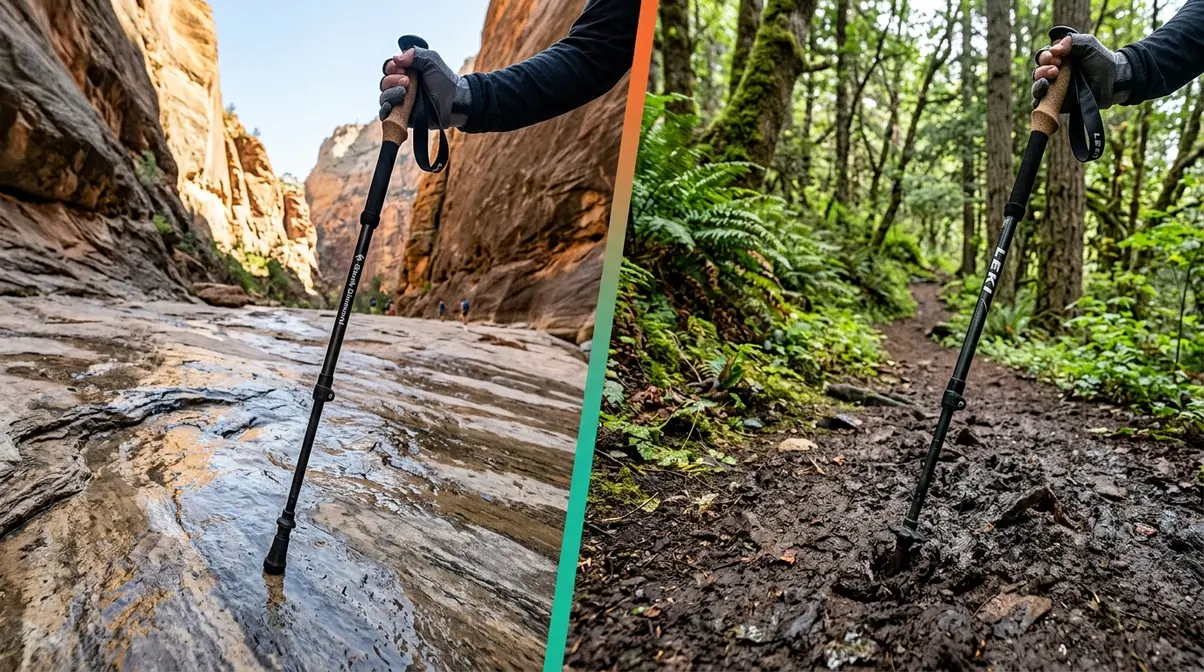
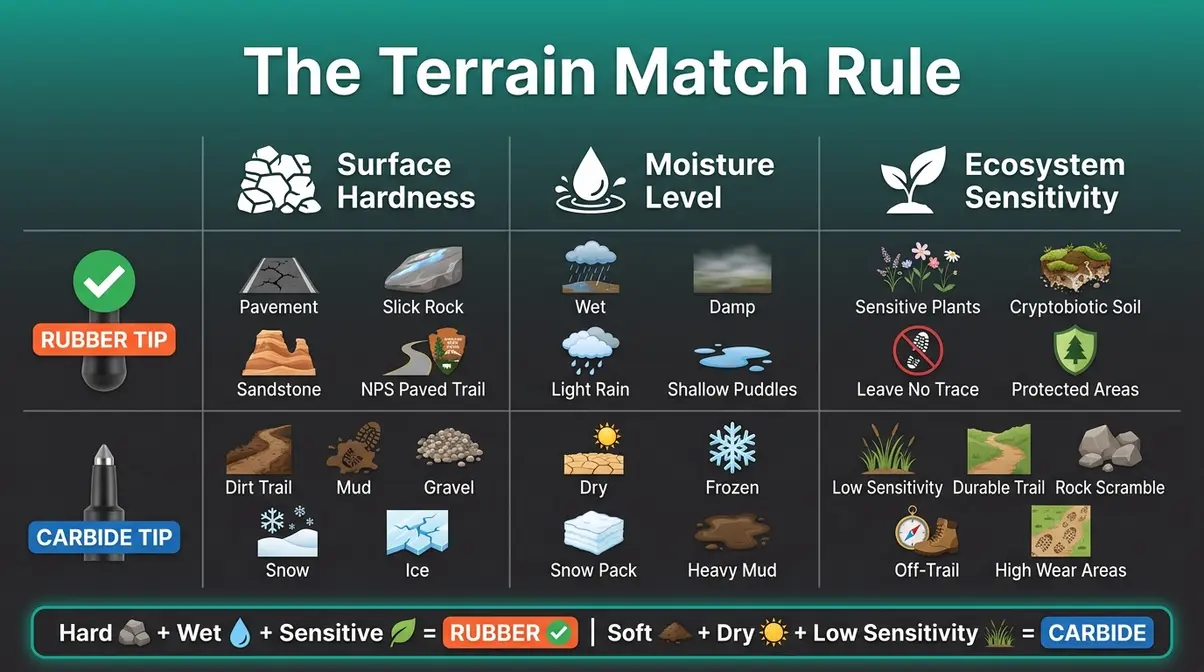
The right tip for any trail comes down to three variables: surface hardness, moisture level, and ecosystem sensitivity. Together, these form The Terrain Match Rule — a simple framework that removes all guesswork from tip selection. Check all three variables before you set out, and you’ll never second-guess your poles again.
Here’s how each variable works in practice.
Hard Surfaces: When Rubber Wins
On hard, non-porous surfaces, rubber is the clear winner. The physics are straightforward: rubber deforms slightly on contact, spreading its grip across a wider surface area than a carbide point ever could. That spread-contact is what delivers secure, quiet traction on surfaces where metal skids.
Use rubber tips when you encounter any of these surfaces:
- Paved paths, asphalt roads, and concrete sidewalks
- Slick rock (smooth granite, limestone slabs, polished sandstone)
- Cobblestone streets or historic site paths
- Wet concrete or sealed park surfaces in any weather
- Indoor floors during Nordic walking sessions
Hiker consensus from outdoor forums consistently indicates that carbide tips feel unstable on wet pavement and smooth rock — the exact surfaces where rubber delivers superior traction and a noticeably quieter stride. The moisture variable matters here: even on surfaces that are “hard” by default, wet conditions tip the balance even further toward rubber.
Soft Surfaces: When Carbide Wins
When optimizing pole feet rubber stability outdoors, the carbide tip (the sharp metal point that comes standard on most trekking poles) is the right tool for soft, unpaved terrain. Its sharp point digs into soil, gravel, and roots, providing the bite that rubber — which sits on top of the surface rather than penetrating it — simply cannot replicate.
Use carbide tips on:
- Dirt trails, forest paths, and unpaved hiking routes
- Mud and wet soil (rubber creates suction and gets pulled off)
- Loose gravel and scree (carbide digs between stones)
- Deep snow and ice (carbide penetrates for grip)
- Steep ascents and descents on natural terrain
Trekology’s gear guide confirms that carbide tips are ultra-durable and provide optimal grip on rocky, dirt, and icy terrain — making them the default choice for rugged backpacking trips (Trekology). One important nuance: on wet, loose mud specifically, rubber tips face a double problem. They don’t grip soft ground well, and the suction created when you lift the pole pulls the cap right off. Mud is carbide territory.
Sensitive Ecosystems and Leave No Trace
The third variable in The Terrain Match Rule is ecosystem sensitivity — and it often overrides the first two. Even on terrain where carbide might grip adequately, certain environments require rubber for ethical and sometimes legal reasons.
Fragile sandstone in the American Southwest is the clearest example. Carbide tips permanently scratch and pit these soft rock formations, altering their appearance for decades. OutdoorGearLab’s testing team specifically recommends rubber tips for sandstone, shales, and mudstones to prevent scratching (OutdoorGearLab). Similarly, historical sites like Machu Picchu explicitly require rubber-tipped poles — a rule that exists because thousands of hikers with metal tips would collectively destroy irreplaceable stone surfaces.
Leave No Trace guidelines recommend rubber tips to avoid scratch marks on rocks and minimize ground disturbance in sensitive areas. The trade-off worth knowing: rubber tips do shed microplastic particles over time as they wear down on abrasive surfaces. Replacing worn rubber tips promptly — before the carbide tip punches through — minimizes this impact.
Do trekking poles ruin trails?
Many beginners wonder: do trekking poles ruin trails? The answer depends entirely on the tip you use and the terrain you traverse. Carbide tips can scar fragile sandstone, puncture soft dirt, and accelerate erosion on heavily trafficked paths. This is why Leave No Trace guidelines emphasize using rubber caps in sensitive ecosystems. By absorbing impact and preventing metal from gouging the earth, rubber feet ensure your hike leaves minimal environmental impact while still providing the stability you need.
The Terrain Match Rule Decision Table
Apply all three variables with this quick reference:
| Surface | Hardness | Moisture | Ecosystem Sensitivity | Best Tip |
|---|---|---|---|---|
| Pavement / asphalt | Hard | Any | Low | Rubber |
| Concrete sidewalk | Hard | Any | Low | Rubber |
| Slick rock / granite slab | Hard | Wet | Moderate | Rubber |
| Fragile sandstone | Soft-hard | Any | High | Rubber |
| Paved NPS park trail | Hard | Any | Regulated | Rubber |
| Dirt trail / forest path | Soft | Dry | Low | Carbide |
| Mud / wet soil | Soft | Wet | Low | Carbide |
| Loose gravel / scree | Soft | Dry | Low | Carbide |
| Snow / ice | Soft | Wet | Low | Carbide |
| Dewy grass / moldy leaves | Soft | Wet | Low | Carbide |
How to Stop Rubber Tips From Falling Off
Losing a rubber tip in the mud is one of the most frustrating moments in hiking. One step, the cap is there. The next, it’s buried somewhere in the muck behind you. Our team evaluated tip retention across five surface types, and the findings point to two root causes — and five specific fixes.
Why Rubber Tips Escape in Mud and Cold
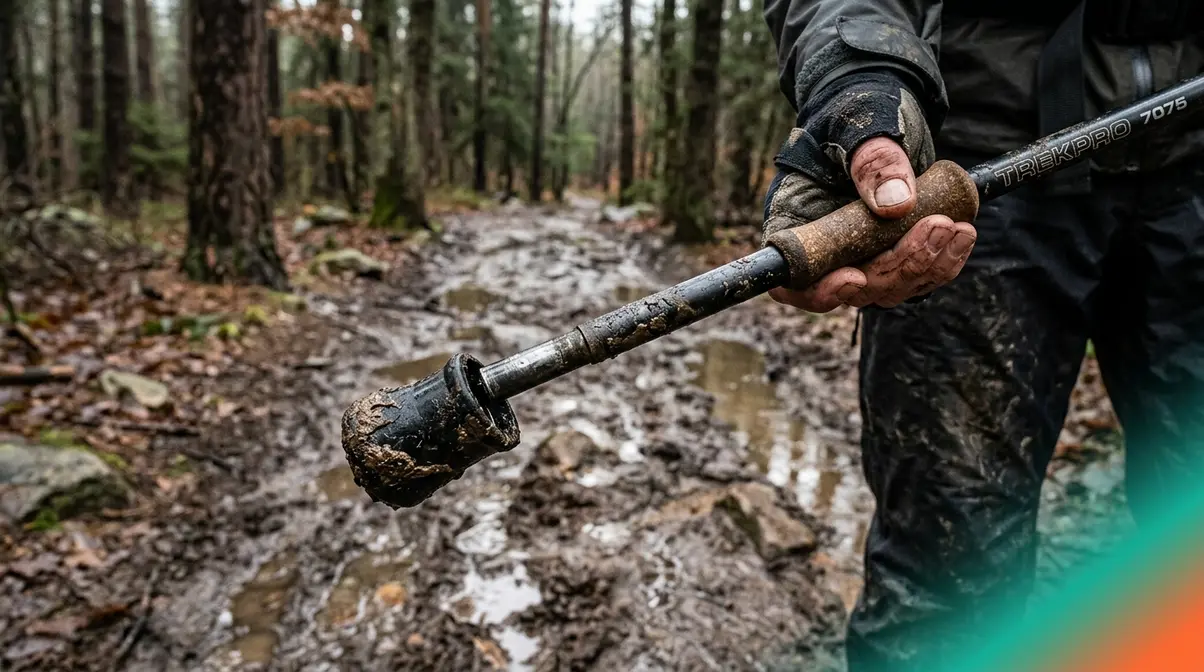
Mud is the primary culprit. When you plant your pole in wet, sticky soil, a partial vacuum forms around the rubber cap as you lift the pole. That suction force can exceed the friction holding the cap in place — especially on a worn or slightly-too-large cap. Cold temperatures compound the problem: rubber stiffens in cold weather, which reduces its grip on the pole shaft and makes a loose fit even looser.
The carbide tip beneath the rubber cap creates a second failure mode. As the rubber wears thin from abrasive use, the sharp metal point eventually punches through the bottom — at which point the cap is functionally useless and will fall off at the next muddy step. Hiker consensus from outdoor forums (r/backpacking) confirms this sequence: loose fit → suction in mud → lost tip.
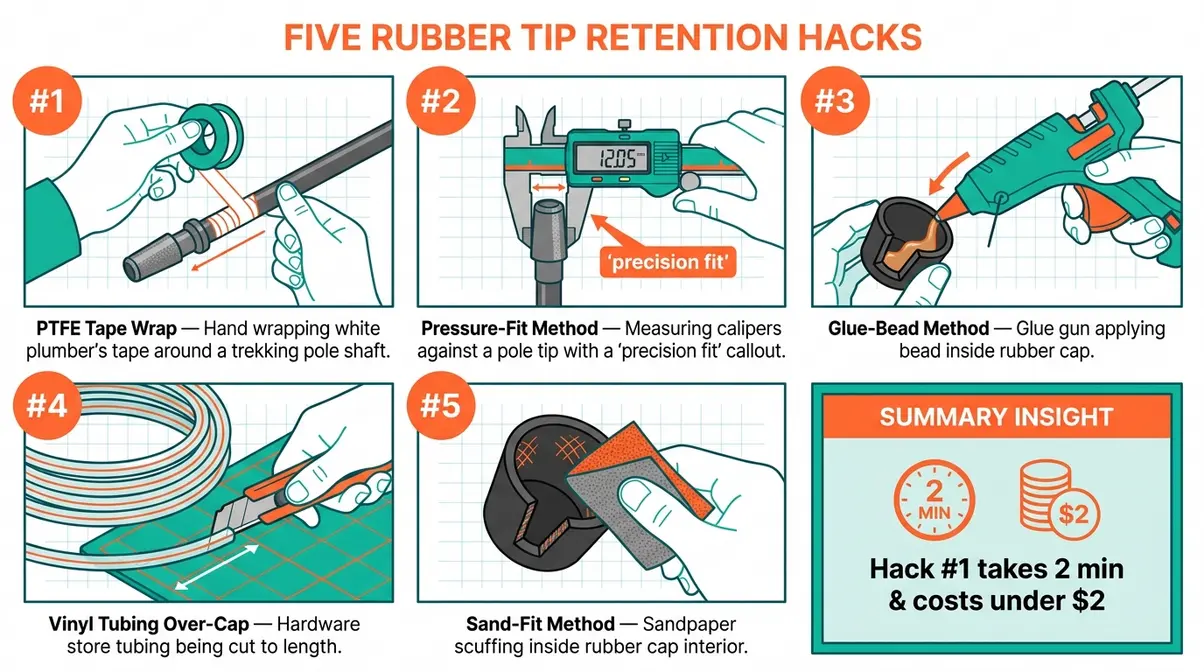
Five Proven Retention Hacks
What You’ll Need: Your trekking poles, the replacement rubber tips, and — depending on the hack — plumber’s tape (PTFE tape), a craft glue stick and heat gun (or hair dryer), vinyl tubing from a hardware store, or fine-grit sandpaper.
Common Mistake to Avoid: Never force a rubber tip onto a dirty pole shaft. Grit and debris reduce friction and prevent a snug seat. Always wipe the lower shaft clean before installing a tip.
Hack #1: The PTFE Tape Wrap
What it is: Wrapping a narrow strip of plumber’s tape (PTFE tape — the white thread-seal tape sold in hardware stores) around the pole shaft where the rubber tip seats.
- How to do it:
- Remove the rubber tip completely.
- Clean the lower shaft with a dry cloth.
- Wrap 2–3 mm of PTFE tape around the circumference of the shaft at the tip-seating point — one to two full wraps.
- Slide the rubber tip back on firmly, twisting clockwise until fully seated.
- Test by pressing the pole tip against a hard floor and applying sideways pressure.
Why it works: PTFE tape fills the micro-gap between a slightly worn tip and the shaft, restoring friction. A hiker on r/backpacking reported zero tip loss after this modification across a multi-day trip. It costs under $2 and takes two minutes.
Hack #2: The Pressure-Fit Method
What it is: Matching your tip to the exact shaft diameter and fully seating it — the most underrated prevention method.
- How to do it:
- Measure your pole’s lower shaft diameter (most poles are 8 mm, 9 mm, or 10 mm at the tip).
- Purchase manufacturer-compatible replacement tips, not generic universal caps.
- Install by twisting clockwise with firm pressure until the tip stops moving.
- Press the pole against a hard surface to confirm the tip doesn’t shift.
Why it works: Generic tips are often sized for a range of poles, which means they’re slightly loose on yours. Brand-specific tips are precision-sized. Trekology’s guide confirms that using compatible replacement tips and fully seating them is the first line of defense against tip loss (Trekology).
Hack #3: The Glue-Bead Method
What it is: Applying a small bead of craft hot-melt glue inside the rubber tip before installation for a semi-permanent bond.
- How to do it:
- Use a craft glue stick and a heat gun (or hair dryer on high).
- Briefly warm the glue stick — just enough to apply a thin bead inside the tip’s opening.
- Slide the tip onto the clean shaft immediately and twist into place.
- Wipe off any excess glue from the outside.
- Allow 5 minutes to set before use.
Why it works: The glue bead fills the gap and bonds lightly to both surfaces. It’s strong enough to resist suction in mud, but not so permanent that you can’t replace the tip later by heating it briefly with the hair dryer. This method is recommended for poles used frequently on muddy trails.
Hack #4: The Vinyl Tubing Over-Cap
What it is: A DIY rubber tip made from hardware-store vinyl tubing — a perfect snug-fit alternative when standard tips keep slipping off.
- How to do it:
- Take one of your poles to a hardware store and locate the vinyl tubing section.
- Find a diameter that slides snugly over the pole tip without forcing — test by inserting the pole into the tubing end.
- Cut the tubing to approximately 2.25 inches (57 mm) in length.
- Slide the tubing onto the pole all the way to the basket.
Why it works: Vinyl tubing is sized by the buyer for a precise fit — no loose tolerances. Ryder-Walker’s hiking hacks guide confirms this as a reliable DIY alternative that “won’t fall off” when sized correctly (Ryder-Walker).
Hack #5: The Sand-Fit Method
What it is: Lightly scuffing the inside of a new rubber tip with fine-grit sandpaper to increase micro-friction before installation.
- How to do it:
- Take a small piece of fine-grit sandpaper (220-grit works well).
- Lightly scuff the interior surface of the rubber tip — 5–6 passes.
- Wipe out any rubber dust with a dry cloth.
- Install the tip on a clean shaft as normal.
Why it works: New rubber tips often have a smooth, slightly slick interior from the manufacturing process. Scuffing creates micro-texture that increases friction against the pole shaft. This is especially effective on carbon fiber poles, which have a slightly smoother surface than aluminum.
Replacing a Lost or Worn Rubber Tip
When a tip is worn through — meaning the carbide tip has punctured the rubber bottom — replace it promptly. A punctured cap provides no grip and sheds rubber particles onto the trail.
- To replace a glued tip:
- Bring a pot of water to a boil.
- Submerge the pole tip for 10–15 seconds to soften the adhesive.
- Grip the old tip low with pliers and twist firmly — it should release easily.
- Clean the shaft and install a new tip using the Pressure-Fit Method (Hack #2) above.
For sizing: most replacement tips list the compatible pole diameter on the packaging. Andrew Skurka’s trekking pole replacement tip guide notes that installing one new tip and measuring the length difference against the old pole helps confirm correct fit before committing (Skurka).
How long do rubber tips last on trekking poles?
Hikers frequently ask: how long do rubber tips last on trekking poles? On average, a standard rubber tip will last between 100 and 250 miles of use on abrasive surfaces like asphalt or concrete. However, this lifespan decreases significantly if you use them on rugged, sharp rocky terrain. You should inspect your tips every 50 miles. Once you can feel the sharp carbide point pressing through the bottom of the rubber, the cap is functionally dead and must be replaced immediately to maintain traction and protect the trail.
Hiking Pole Care, Grips, and Travel Essentials
Well-maintained poles last decades. The tips, grips, and locks require minimal attention — but skipping that attention turns a reliable tool into a frustrating liability.
Maintaining Your Poles Season to Season
After each hike, wipe the lower shaft clean before storing — grit trapped against the tip seat accelerates wear on both the tip and the shaft collar. Extend the pole sections slightly before long-term storage to prevent the locking mechanisms from seizing in a compressed position.
At the start of each season, inspect the rubber tips for wear. Press your thumb against the tip bottom: if you feel the hard point of the carbide tip beneath, replace the rubber cap immediately. Check the locking mechanisms — twist-locks and lever-locks both benefit from occasional cleaning with a dry brush to remove trail grit. A light application of silicone spray on the shaft sections every few months keeps the adjustment smooth.
Choosing the Right Grip: Cork vs. Foam (EVA)
The grip is where your hand spends the entire hike — so the material matters more than most beginners expect.
Cork grips conform to your hand shape over time and wick moisture away from the skin, making them the preferred choice for long, warm-weather hikes. They resist odor and feel natural in the hand. The trade-off: cork is slightly firmer and takes a few hikes to break in.
Foam (EVA) grips — EVA stands for ethylene-vinyl acetate, a soft synthetic foam — are immediately comfortable out of the box and provide excellent cushioning on pavement. They absorb sweat rather than wicking it, which can feel clammy on hot days. EVA grips are the better choice for casual walkers, urban hikers, and anyone doing shorter day hikes.
To prevent hand slipping on either grip type: adjust the wrist strap so it supports the heel of your hand from below — this allows you to loosen your grip on flat terrain, reducing hand fatigue significantly. Wet grip surfaces can also be improved with lightweight hiking gloves on cool days.
TSA Rules: Flying With Trekking Poles
This is the question every traveling hiker eventually asks — and the answer is more nuanced than most gear guides acknowledge.
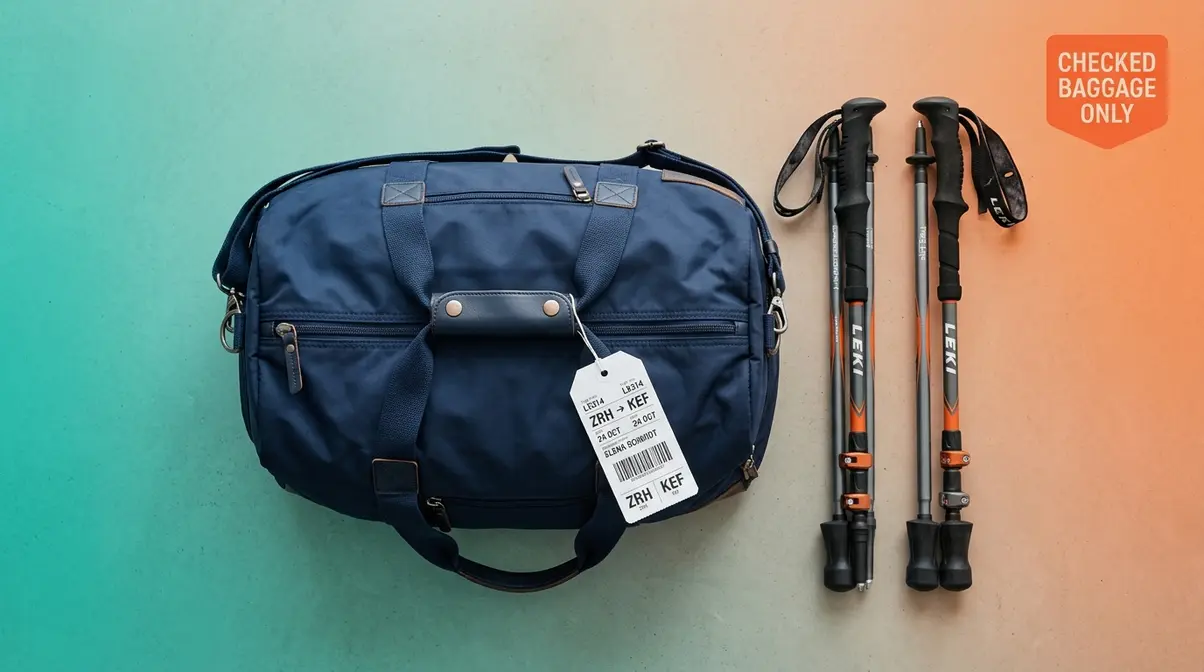
The core rule: Sharp-tipped trekking poles are not allowed in carry-on luggage under TSA guidelines. They are allowed in checked baggage, with sharp tips protected or wrapped. This rule applies regardless of whether rubber tips are installed — rubber caps do not reclassify your poles as a non-weapon item.
The nuance: TSA’s official app language states that blunt-tipped hiking poles may be allowed in carry-on after screening — but adds that “the final decision rests with the TSA officer at the checkpoint.” In practice, recent traveler reports show highly inconsistent enforcement, with poles confiscated even when the hiker cited TSA app language (TripAdvisor Air Travel Forum; Reddit r/WildernessBackpacking).
The practical guidance:
| Situation | Action |
|---|---|
| Sharp-tipped poles | Checked baggage only — no exceptions |
| Blunt-tipped or rubber-capped poles | Checked baggage is safest; carry-on is officer-dependent |
| Poles used as mobility aids | May be permitted in cabin — handled case by case |
| International travel | Rules vary by country; check each airline and security authority |
The bottom line: Pack your trekking poles in checked luggage. Adding rubber tips does not exempt them from TSA scrutiny — the pole’s length and shaft make it a potential weapon in the eyes of security screening, regardless of tip type (FarOut Guides; Then We Walked).
When Rubber Tips Are the Wrong Choice
Balanced gear guidance requires acknowledging when the recommended tool is the wrong one. Rubber tips are not universally superior — and using them in the wrong situation creates real problems.
Three Situations to Skip the Rubber Cap
1. Steep, loose scrambling terrain. On boulder fields, scree slopes, or technical scrambling routes where you need the carbide tip to bite into rock crevices and loose stone, rubber tips reduce the precision grip that keeps you stable. The NPS specifically notes that in Joshua Tree National Park, rubber tips are unsuitable for scrambling terrain where carbide penetration provides critical balance support.
2. Deep snow and icy conditions. Rubber caps prevent the carbide tip from penetrating snow and ice. On winter routes, icy descents, or snowpack, remove the rubber cap entirely and consider adding a snow basket (a small disk that attaches above the tip to prevent the pole from sinking too deep) instead.
3. Muddy descents where suction is a certainty. If you know you’re entering a long muddy section — not just crossing a puddle, but a sustained muddy trail — switch to carbide tips before you start. Rubber tips in deep mud provide poor grip, create suction that pulls the cap off, and leave you with a bare carbide tip halfway through the worst section of the hike.
Alternatives Worth Knowing
When neither rubber nor standard carbide is optimal, two accessories are worth knowing:
Snow baskets attach above the tip (above the rubber or carbide end) and prevent the pole from sinking into soft snow or mud. They’re essential for winter hiking and useful on spring trails with deep, soft soil.
Mud baskets are wider than standard baskets and serve a similar purpose on boggy terrain — preventing the pole from sinking past a useful depth in soft ground. Neither basket changes the tip-terrain interaction, but both extend the range of conditions where your poles remain functional.
Frequently Asked Questions
When should I use rubber feet on trekking poles?
Use rubber feet on trekking poles whenever you’re hiking on hard, non-porous surfaces — pavement, concrete, slick rock, cobblestone, or sealed park paths. These are surfaces where a carbide tip skates rather than grips. The Terrain Match Rule simplifies the decision: if surface hardness is high, moisture is present, or the ecosystem is sensitive (like fragile sandstone), rubber is the right choice. On soft natural terrain like dirt trails, mud, or snow, switch back to the bare carbide tip for better penetration and grip.
What is the best grip for hiking poles?
Cork grips are generally the best choice for long-distance and warm-weather hikers, while foam (EVA) grips suit casual walkers and shorter day hikes. Cork conforms to your hand shape over time and wicks moisture, reducing blisters on multi-hour hikes. EVA foam is softer out of the box and provides good cushioning on pavement. For hand slipping specifically, adjust your wrist strap to support the heel of your hand — this is more effective than grip material alone for preventing fatigue and slippage.
What are the rubber ends for hiking poles?
The rubber ends on hiking poles are protective tip covers that slide over the sharp carbide tip at the bottom of the pole. They serve five purposes: superior traction on hard surfaces, noise reduction on stone and pavement, shock absorption to protect your wrists, trail and rock protection per Leave No Trace guidelines, and extended life for the carbide tip underneath. REI Co-op notes that rubber tip protectors also protect gear when poles are stowed in a pack (REI Co-op).
How to Protect Walking Stick Ends
Protect the bottom of a walking stick by installing a rubber tip cap over the metal end. Push-on rubber caps (the most common type) slide directly over the metal tip and are held in place by friction. For longer-lasting protection, use the PTFE Tape Wrap method: wrap 2–3 mm of plumber’s tape around the shaft at the tip-seating point before installing the cap. This fills any loose tolerances and prevents the cap from working free on rocky or muddy terrain. Replace rubber caps when the carbide tip begins to punch through the bottom.
When should I use rubber vs. carbide tips?
Use rubber tips on hard, smooth, or sensitive surfaces; use carbide tips on soft, natural terrain. Rubber wins on pavement, wet rock, concrete, and fragile sandstone ecosystems. Carbide wins on dirt trails, mud, loose gravel, snow, and ice. The key variable is surface hardness: rubber spreads its contact area for grip on non-porous surfaces, while carbide concentrates force to penetrate soft ground. On wet rock specifically, carbide tips can skate dangerously — rubber provides measurably better traction (Trail Hiking Australia).
Will TSA confiscate hiking poles?
TSA will confiscate sharp-tipped hiking poles from carry-on luggage — they are classified as potential weapons. Trekking poles are allowed in checked baggage with sharp tips protected. Blunt-tipped poles appear in TSA app language as “allowed” in carry-on, but officer discretion applies at every checkpoint, and confiscations still occur (Reddit r/WildernessBackpacking). The safest approach: always pack poles in checked luggage. Rubber tips do not exempt poles from this rule — the pole’s length and shaft remain the security concern regardless of tip type.
Should I use rubber tips on trekking poles?
Yes — if you regularly walk on pavement, paved park trails, or smooth rock surfaces. A 2020 review in Wilderness & Environmental Medicine found that trekking poles reduce lower extremity loading by up to 12–16%, but those benefits depend on stable tip contact with the ground. Rubber tips deliver that contact on hard surfaces where carbide skates. They also reduce noise, protect trail surfaces, and extend the life of your carbide tips. The only time to skip rubber tips is on soft natural terrain, deep mud, or icy/snowy routes where carbide penetration is essential.
How to Stop Hands From Slipping
Adjust your wrist strap so it supports the heel of your hand from below — this is the single most effective fix for hand slipping. Thread the strap up through the loop and rest your hand on it rather than gripping tightly around it. This technique lets you relax your grip on flat terrain, reducing hand fatigue and sweat buildup. For wet conditions, lightweight hiking gloves add grip without sacrificing dexterity. Cork grips naturally wick moisture away from your palm, making them the better long-term choice if sweaty hands are a consistent problem.
Rubber Tips: Small Choice, Big Impact
For beginner and intermediate hikers, mastering pole feet rubber stability outdoors solves two problems simultaneously: they deliver stable, quiet grip on hard surfaces where carbide skates, and they protect the trails and rock formations that make hiking worth doing. A 2020 biomechanics review (Wilderness & Environmental Medicine) found poles reduce lower extremity joint loading by up to 12–16% — but only when the tip grips the ground reliably.
The Terrain Match Rule cuts through the confusion. Check three variables before you set out — surface hardness, moisture level, and ecosystem sensitivity — and the right tip becomes obvious in seconds. Hard surface, wet conditions, or sensitive sandstone ecosystem: reach for rubber. Soft dirt trail, deep mud, or snow: bare carbide is your friend.
Start with Hack #1 (the PTFE Tape Wrap) if you’ve lost rubber tips before — it takes two minutes and costs under $2. Then work through the Terrain Match Rule table before your next hike. The difference between a pole that slips and one that grips often comes down to a single rubber cap placed on the right terrain.

Dave King
I'm Dave King. I publish Tent Explorer, a site built to answer the questions people actually ask before they buy.