This blog post may contain affiliate links. As an Amazon Associate I earn from qualifying purchases.
📋 Table of Contents
- How to Choose the Right Spare Tent Pole Set
- What’s in a Standard Tent Pole Replacement Kit?
- Universal Tent Pole Replacement Kits vs. OEM Brand-Specific Replacements
- Fiberglass vs. Aluminum vs. Carbon Fiber: The Material Durability Matrix
- How to Measure Your Tent Pole for a Perfect Fit
- Where to Buy Spare Tent Pole Sets
- Major Online Retailers
- Brand-Specific Manufacturer Websites
- Specialty Custom Pole Fabricators
- How to Repair a Broken Tent Pole: Step-by-Step Guide
- Tools and Materials You’ll Need
- How to Replace a Broken Tent Pole Section
- How to Replace the Shock Cord
- Using a Repair Sleeve for a Quick Field Fix
- Troubleshooting: When Your Repair Isn’t Working
- Limitations and Safety: What to Know Before You Repair
- Common Pitfalls
- When to Choose Alternatives
- When to Seek Expert Help
- Frequently Asked Questions
- What is the difference between a universal repair kit and an OEM replacement?
- Should I choose fiberglass or aluminum tent poles?
- How do you replace the shock cord in a tent pole?
- Where can I buy a spare tent pole set?
- What does a standard tent pole replacement kit include?
- Conclusion
You’re packed, you’re ready, and then you hear the crack. A bent or snapped tent pole turns a camping trip from exciting to miserable in seconds — and if you’re already at the trailhead, it can feel like the whole trip is over.
“Just curious where y’all buy replacement tent poles? I have the REI Passage 2 and the poles are starting to bend where the top of…”
— Reddit, r/camping
That question shows up constantly in outdoor communities, and the answer is frustratingly hard to find in one place. A broken tent pole means sleeping exposed, fighting a sagging rainfly, or scrapping the trip entirely — none of which you should have to accept when the fix is genuinely simple.
By the end of this guide, you’ll know exactly which spare tent pole set to buy for your tent, where to get it, and how to install it yourself — even if you’ve never done a gear repair before. This guide covers choosing the right kit, finding it at the right retailer, and walking through the repair step by step.

- Fast, Field-Ready Fixes – Repair cracked or broken tent poles quickly with this simple, effective kit—perfect for backcountry or car camping emergencies.
- All-in-One Kit – Includes two heat-shrink sleeves, 4" aluminum splint, and 10 ft. of 2.5 mm shock cord—everything you need for a reliable fix.
- Heat-Activated Sleeves – Adhesive-lined sleeves shrink tight with heat, bonding fibers and sealing damage without tape or messy adhesives.
- Tough & Versatile – Works with aluminum and fiberglass tent poles; compact enough for any gear bag and durable enough for long-term use.
- Designed for Campers – Whether you’re a weekend warrior or a wilderness pro, this easy-to-use kit helps keep your shelter strong and your trip on track.
Last update on 2026-06-19 / Affiliate links / Images from Amazon Product Advertising API

- Fiberglass construction
- Shock corded for easy assembly
- Fits basic tent size: 90" x 66" x 44"
- Made for Stansport item #722-200/723-200
- Pole length: 185"
Last update on 2026-06-19 / Affiliate links / Images from Amazon Product Advertising API
- Fast, Field-Ready Fixes – Repair cracked or broken tent poles quickly with this simple, effective kit—perfect for backcountry or car camping emergencies.
- All-in-One Kit – Includes two heat-shrink sleeves, 4" aluminum splint, and 10 ft. of 2.5 mm shock cord—everything you need for a reliable fix.
- Heat-Activated Sleeves – Adhesive-lined sleeves shrink tight with heat, bonding fibers and sealing damage without tape or messy adhesives.
- Tough & Versatile – Works with aluminum and fiberglass tent poles; compact enough for any gear bag and durable enough for long-term use.
- Designed for Campers – Whether you’re a weekend warrior or a wilderness pro, this easy-to-use kit helps keep your shelter strong and your trip on track.
Last update on 2026-06-19 / Affiliate links / Images from Amazon Product Advertising API

- Coghlans Replacement Shock Cord
- 18 ft. x 3/32 inch
Last update on 2026-06-19 / Affiliate links / Images from Amazon Product Advertising API

- Don't let a broken tent pole ruin your trip
- The 13mm (0.51 inch ) sleeve repairs most standard size 1-3 person tents
- The 16mm (0.63 inch ) splint repairs larger poles and fits most 2-4 person tents
- Sleeves are easily applied in the field
- Center splint over the break and tape on both ends
Last update on 2026-06-19 / Affiliate links / Images from Amazon Product Advertising API
A spare tent pole set — whether a universal fiberglass kit or an OEM brand-specific replacement — can restore your tent in under 30 minutes with no special tools required.
- The Pole Triage Method: Ask 3 quick questions to decide whether to repair, buy universal, or order OEM — covered in detail below
- Materials matter: Aluminum poles outperform fiberglass in cold and wind — but cost more
- Universal kits (around $8–$20) work for most casual camping tents
- OEM parts (from Coleman, Big Agnes) guarantee a perfect fit for specific models
- Shock cord replacement is the most common repair — takes under 20 minutes with basic tools
How to Choose the Right Spare Tent Pole Set
Choosing the right kit comes down to two decisions: kit type (universal vs. OEM) and material (fiberglass vs. aluminum vs. carbon fiber). According to Frostburg State University’s shelter reference guide, durability of aluminum and fiberglass poles has been proven across decades of self-supporting tent designs — both materials are reliable, but they perform differently in different conditions. Picking the wrong type wastes money and leaves you with a kit that doesn’t fit your tent.
What’s in a Standard Tent Pole Replacement Kit?
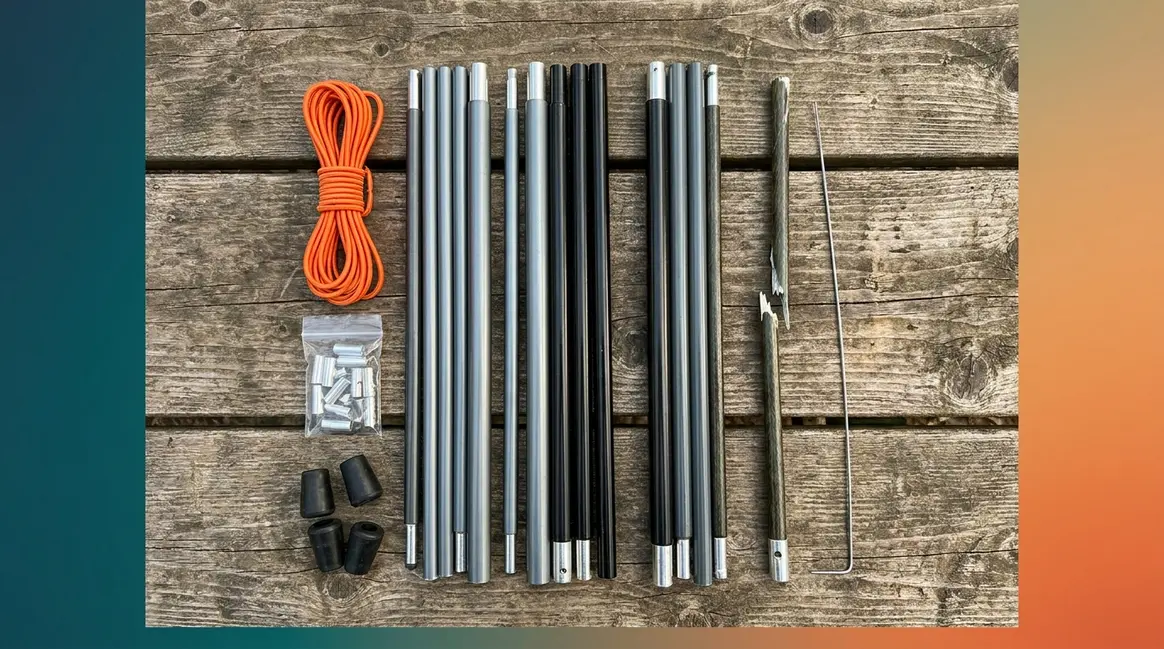
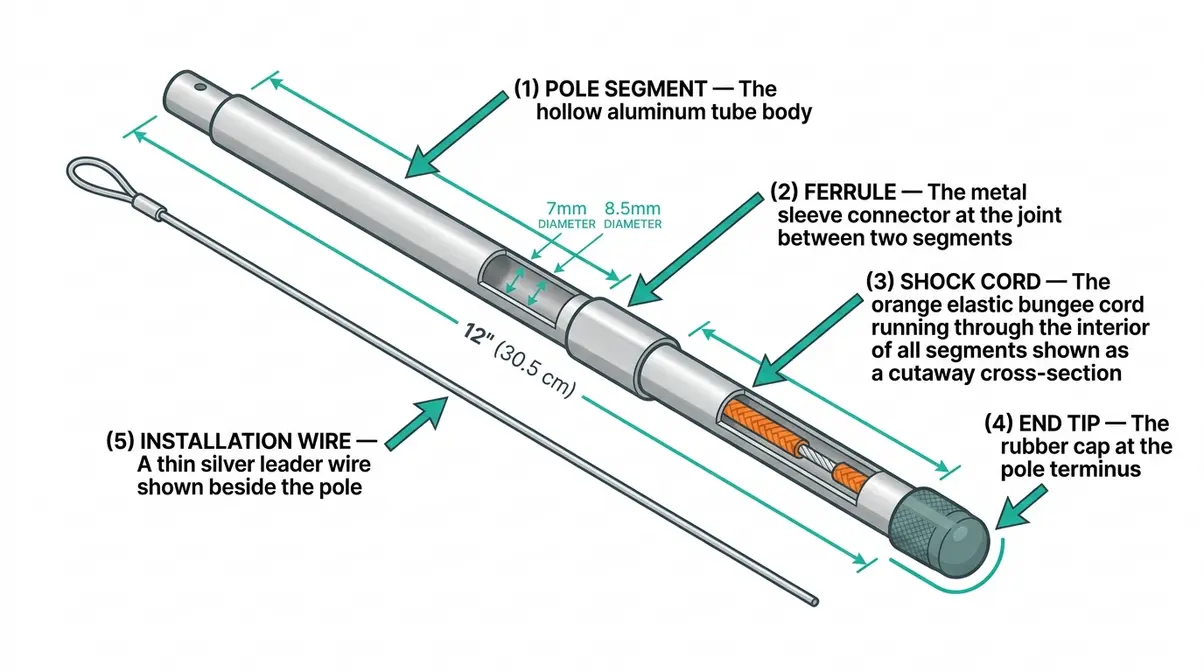
A typical universal repair kit looks like a small bundle of tubes and cord, but each piece has a specific job. Here’s every component you’ll find — and what it does:
- Pole segments — the individual hollow tubes (usually 7mm or 8.5mm in diameter) that snap together to form the full pole. These are what you’re replacing when a section cracks or splinters.
- Ferrules — the small metal or plastic sleeves that join two pole segments at their ends. Think of them as the connector pieces that keep the pole from pulling apart at the joints.
- Shock cord — the elastic bungee cord that runs through the inside of all the segments, holding them together so they don’t scatter when you pull the pole apart. If your pole feels loose or floppy, a worn-out shock cord is usually the cause.
- End tips — the plastic or rubber caps at the very ends of the assembled pole. They protect the pole ends and help seat the pole in the tent’s grommets.
- Installation wire (also called a leader wire) — a thin, stiff metal wire used to thread the new shock cord through the segments during repair. Without it, threading cord through a stack of narrow tubes is nearly impossible.
Some kits include all five components. Others are sold as “shock cord only” or “segments only.” The Stansport 7mm Fiberglass Replacement Kit, for example, is a widely available option that includes segments, ferrules, and shock cord — sold at Walmart and Bass Pro Shops for approximately $8–$12 (as of Q1 2026). Always check the kit’s contents list before buying. A “complete repair kit” label doesn’t always mean every component is included.
Now that you know what’s in the box, the next question is whether to buy a universal kit that fits many tents or an exact OEM part made for your specific model.
Universal Tent Pole Replacement Kits vs. OEM Brand-Specific Replacements
This is the single most important purchase decision you’ll make — and most campers get it wrong by defaulting to whatever they find first.
Universal kits are pre-cut or cut-to-size sections of fiberglass or aluminum designed to work across many different tent brands and models. Their biggest advantages are price ($8–$20) and availability — REI, Walmart, Bass Pro Shops, and Amazon all stock them. The trade-off is that they require cutting to size and may not perfectly match your original pole’s diameter or material. Coghlan’s, a popular outdoor repair brand, makes one of the most widely available universal tent pole kits, found at most major outdoor retailers.
OEM (Original Equipment Manufacturer) parts are exact-match replacements made for a specific tent model — for example, Coleman’s official tent parts page or Big Agnes replacement poles. The fit is perfect, no modification needed. The downsides: they cost more, may require ordering directly from the manufacturer, and can take longer to ship.
The Pole Triage Method — this guide’s 3-question decision framework — helps you pick the right option in under a minute:
The Pole Triage Method
1. Do you know your tent’s exact brand and model?
→ If NO — buy a universal kit. You don’t have enough information to order OEM.
2. Is your tent less than 5 years old and still sold by the manufacturer?
→ If YES — check the manufacturer’s website for OEM parts first. An exact match is likely available.
3. Is this a one-time emergency fix or a long-term replacement?
→ Emergency → universal kit (faster, cheaper, available locally).
→ Long-term → OEM or custom (better fit, longer lifespan).
For example: a camper with a Coleman Sundome whose pole snapped at the ferrule (the connector sleeve between sections) would find an exact OEM replacement on Coleman’s parts page for around $15–$25 — a better fit than cutting a universal segment to size. A camper with an older no-name family tent, on the other hand, has no OEM option and should reach for a universal kit without hesitation.
Once you know which type to buy, the next step is understanding which material will hold up best for your style of camping.
Fiberglass vs. Aluminum vs. Carbon Fiber: The Material Durability Matrix
Material choice affects weight, durability, cold-weather performance, repairability, and cost. No competitor page in this space provides a three-material comparison with specific performance criteria — this table exists nowhere else in the SERP.
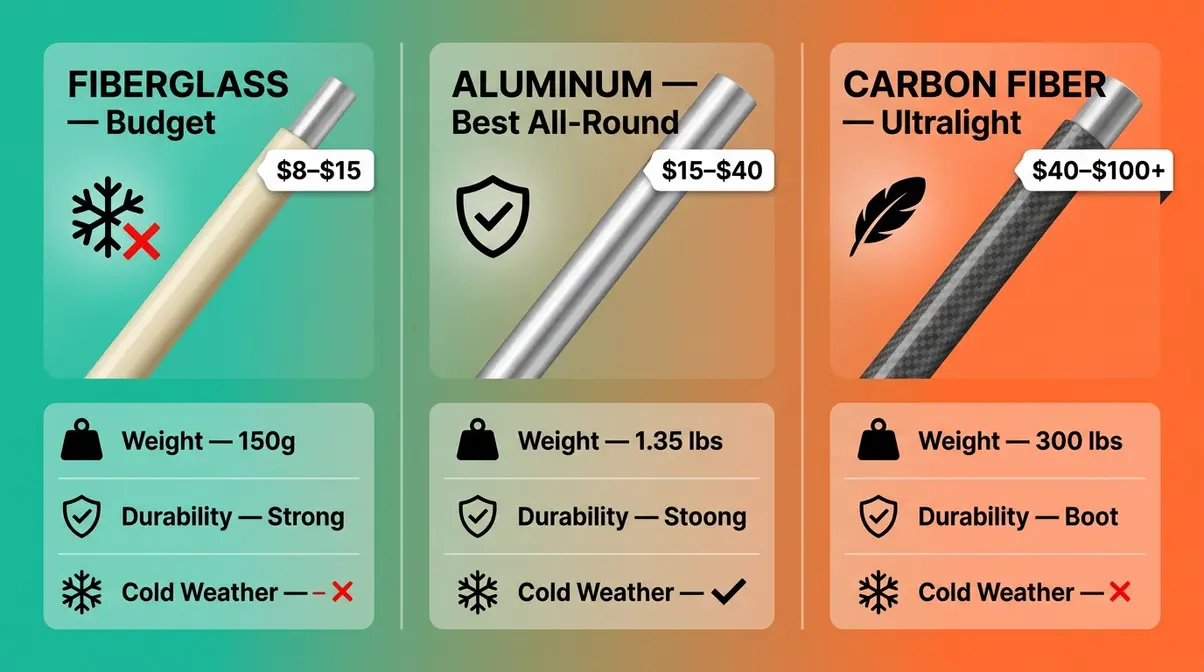
Modern tent poles come in three materials. Each performs differently depending on conditions:
| Criterion | Fiberglass | Aluminum (7000-series) | Carbon Fiber |
|---|---|---|---|
| Weight | Heavy | Light | Lightest |
| Durability | Moderate (splinters when broken) | High (bends before breaking) | High (shatters under extreme force) |
| Cold Weather Performance | Poor (becomes brittle below freezing) | Excellent | Good |
| Repairability | Moderate (splinters are hard to sleeve) | Easy (sleeves well with repair sleeve) | Difficult (shatters into fragments) |
| Typical Kit Cost | $8–$15 | $15–$40 | $40–$100+ |
| Best For | Casual/family camping, budget repairs | Backpacking, cold-weather, 3-season use | Ultralight backpacking only |
Editorial interpretation: For most campers buying a spare tent pole set, aluminum is the best all-around choice. It bends rather than shatters under stress, repairs easily with a standard sleeve, and handles cold temperatures without becoming brittle. Fiberglass works perfectly well for car camping and budget repairs. Carbon fiber is overkill for anyone who isn’t counting every gram on a multi-day backpacking trip.
7000-series aluminum (the grade used in MSR and Big Agnes poles) is worth calling out specifically. According to research on high-strength 7000-series aluminum alloys, these alloys are characterized as high-strength, low-weight metals capable of handling high mechanical stresses — making them ideal for durable applications (National Renewable Energy Laboratory, NREL). Stansport, another budget-friendly kit maker, offers a 7mm fiberglass kit sold at Walmart and Bass Pro Shops for those who prioritize cost over performance.
“Modern stand-alone tents use aluminum or fiberglass poles, both of which have proven highly durable for self-supporting structures” (Frostburg State University, Shelters chapter).
Now that you know which material fits your camping style, you need one more piece of information before buying: the exact size of your broken pole.
How to Measure Your Tent Pole for a Perfect Fit
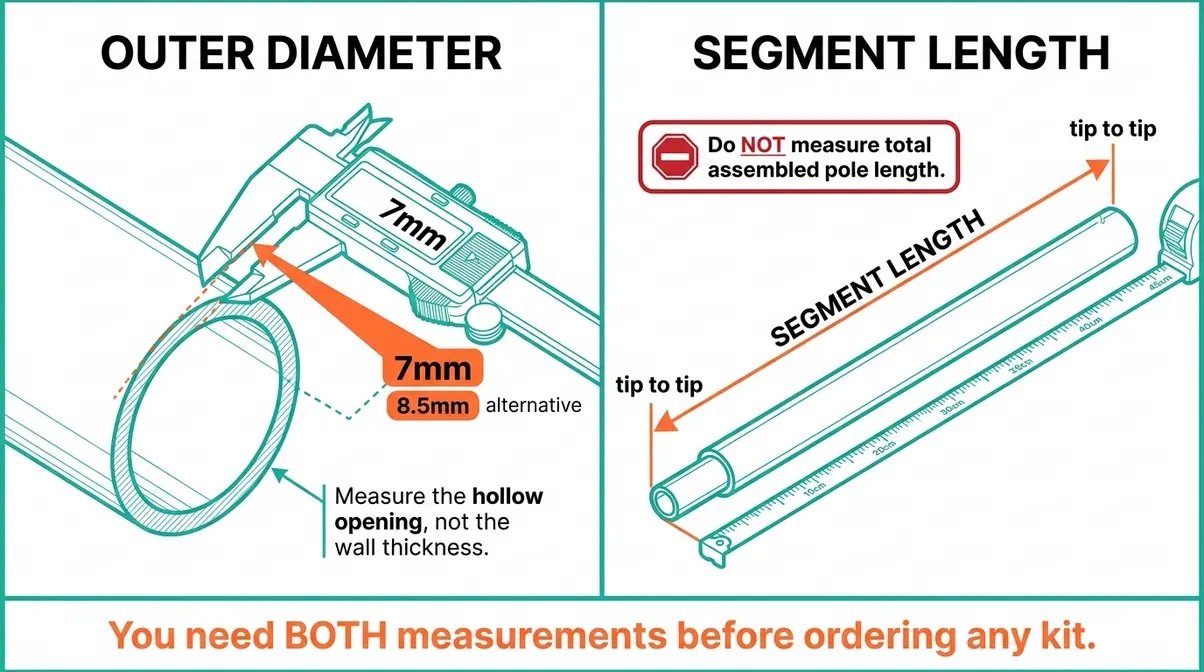
Before you order anything, you need two measurements: outer diameter and section length. Getting these wrong is the most common — and most avoidable — buying mistake.
Outer diameter is how thick the pole tube is, measured across the opening of the hollow tube. Common sizes are 7mm (most family and budget tents), 8.5mm (most backpacking tents), and 9.5mm (larger four-season or expedition tents). Use a caliper (a small measuring tool with two sliding jaws) to measure an unbroken segment. If you don’t own a caliper, take the broken segment to a hardware store and compare it against known sizes — most staff can help you match it in under a minute.
Section length is the length of one individual segment from tip to tip — not the total assembled pole length. Measure using a standard tape measure. If the segment is broken, measure the longest intact piece and note that your replacement must match that length exactly.
One critical warning: do not measure the total assembled pole length and use that number when shopping. Replacement kits are sold by individual segment length, not total pole length. A pole that assembles to 72 inches total might have 12 individual 6-inch segments — and you need to match the 6-inch segment, not the 72-inch assembled length.
Most backpacker tent poles use 8.5mm aluminum segments; most family camping tents use 7mm fiberglass segments. If your pole is 7mm in diameter and each segment is 12 inches long, you need a 7mm kit with 12-inch segments — or a cut-to-size kit you can trim down. Once you have these measurements, finding the best tent pole replacement kit for your tent is straightforward.
With your measurements in hand, you’re ready to shop. Here’s exactly where to find a spare tent pole set — from big-box retailers to custom fabricators.
Where to Buy Spare Tent Pole Sets
Finding a spare tent pole set is easier than most campers realize — but knowing which source to use for your situation saves time, money, and shipping delays. There are three main categories: major online and brick-and-mortar retailers for universal kits, manufacturer websites for OEM parts, and specialty fabricators for custom or discontinued poles.
“Just curious where y’all buy replacement tent poles? I have the REI Passage 2 and the poles are starting to bend…”
— Reddit, r/camping
Campers on r/camping consistently point to the same handful of sources — and they’re right. Here’s where to go, and when each option makes the most sense.
Major Online Retailers
For most campers buying a universal kit, these four retailers cover everything:
- REI — REI, the outdoor gear cooperative, stocks a range of universal repair kits in-store and online, including Coghlan’s and MSR repair components. REI’s advantage is knowledgeable staff who can help you match a kit to your tent in-store. Search “tent pole repair” on rei.com or visit your nearest store.
- Amazon — The widest selection of universal kits at the lowest prices. Coghlan’s 7mm fiberglass kit is typically $8–$12. Aluminum universal kits run $15–$35. Delivery is fast, but read product descriptions carefully — confirm the diameter and segment length match your measurements before ordering.
- Walmart — Carries Coghlan’s and Stansport kits in-store (camping section) and online, typically at prices matching or beating Amazon. Ideal if you need a kit today rather than waiting for shipping.
- Bass Pro Shops / Cabela’s — Good selection of mid-range kits, including some aluminum options that aren’t always stocked at Walmart. Worth checking if you’re looking for a slightly higher-quality universal kit without going full OEM.
Pricing overview for kit types (as of Q1 2026):
| Kit Type | Typical Price Range | Best Source | Notes |
|---|---|---|---|
| Universal fiberglass kit (7mm) | $8–$15 | Walmart, Amazon, Academy | Cut-to-size; check diameter |
| Universal aluminum kit | $15–$40 | REI, Amazon, Bass Pro | Lighter and stronger than fiberglass |
| OEM brand-specific replacement | $15–$50+ | Manufacturer website | Perfect fit; may require shipping |
| Custom fabricated pole set | $40–$100+ | Tent Pole Technologies | For older/discontinued/high-end tents |
Some OEM parts require ordering directly from the manufacturer and may add 5–10 business days to delivery. Factor that into your timeline before a trip.
Brand-Specific Manufacturer Websites
If The Pole Triage Method pointed you toward OEM parts, go directly to the manufacturer. These pages are not always easy to find through a standard Google search — bookmark them now:
- Coleman tent parts page — Coleman, one of the largest tent manufacturers in North America, sells genuine replacement poles and repair kits directly. Fiberglass OEM poles for common models like the Sundome are typically $15–$25. Enter your tent model in the search bar to find the exact part.
- Big Agnes — Big Agnes sells new and used replacement pole sets directly through their support page. They require your tent’s year, make, model, and the model code from the inner tag (e.g., THVCSO220) to ensure the correct part ships. Used parts are available at 50% off retail when in stock — a genuine bargain for expensive ultralight poles.
- MSR (Cascade Designs) — MSR offers tent pole repair splints, ferrule kits, and adjustable poles through their accessories store at cascadedesigns.com. For model-specific pole sections (like the Hubba Hubba NX), contact MSR’s warranty and support team directly — they ship replacement sections once a parts request is submitted.
These manufacturer pages are also the most reliable source for technical specifications if you’re trying to confirm a diameter or material type for an older tent.
Specialty Custom Pole Fabricators
This option is the one most campers never discover — and it’s the best solution for owners of older tents, discontinued models, or premium tents where a universal kit simply won’t do.
Tent Pole Technologies (tentpoletech.com) is the leading specialty fabricator in North America. They build and repair custom aluminum and fiberglass tent poles for all major manufacturers’ tents, using Easton aluminum and cross-woven fiberglass. Their services include:
- Repairs — Simple shock cord replacement and fiberglass repairs run $10–$15 per pole. Average repairs (most backpacking and family tents) run $20–$30 per pole. Specialty and custom repairs run $40–$100, excluding shipping.
- Custom-built poles — Built to your exact measurements, shipped in 3–5 business days. No published price list; pricing is by quote based on your specifications.
- DIY components — They also sell individual fiberglass sections and aluminum components for campers who want to do their own builds.
Note that shipping costs can be comparable to or exceed the repair cost for simple jobs — one camper reported paying $21 to ship a pole to their Vancouver location and $22 for the repair itself. For a broken $15 tent pole, weigh that carefully against buying a universal kit locally. However, for a $300 ultralight backpacking tent with a discontinued pole, custom fabrication is absolutely worth it.
How to Repair a Broken Tent Pole: Step-by-Step Guide

Repairing a tent pole is one of the most approachable gear fixes you can make. Most repairs require no power tools, no specialized skills, and less than 30 minutes. The three most common scenarios — replacing a broken segment, replacing the shock cord, and using a repair sleeve for a field fix — each follow a clear, numbered process.
Tools and Materials You’ll Need
Before starting any repair, gather these items. Having everything on the table before you begin saves frustration mid-repair.
- You’ll need:
- New shock cord (3/32″ / approximately 2.5–3mm diameter for most backpacking and family tents)
- Scissors or a sharp knife
- A lighter or matches (to seal cord ends and prevent fraying)
- Masking tape and a marker (to label pole segments so you reassemble in the correct order)
- Small needle-nose pliers or forceps (to hold tension while tying knots)
- A tape measure or ruler
- Optional: a repair sleeve (a short hollow tube slightly larger than your pole — included in most universal kits)
- Estimated time per repair:
- Shock cord replacement: 15–25 minutes
- Broken segment replacement: 10–20 minutes
- Field repair sleeve: 3–5 minutes
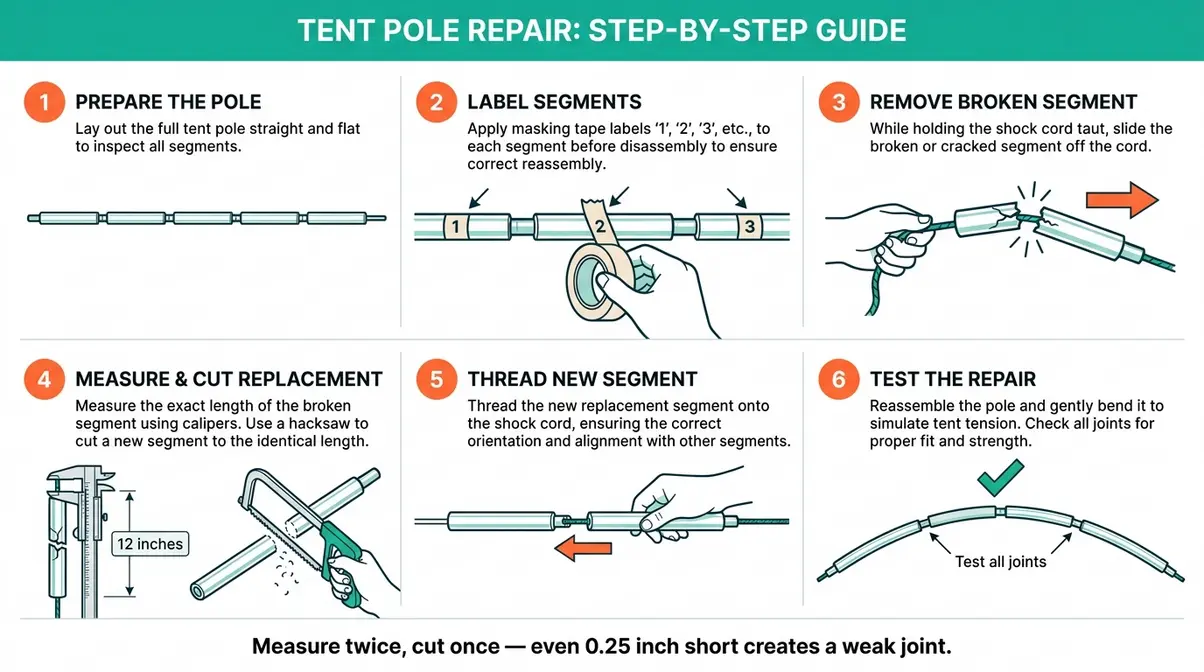
How to Replace a Broken Tent Pole Section
A cracked or shattered pole segment needs to be swapped out entirely. Here’s the process:
Step 1: Lay out the full pole. Pull the pole apart and lay all segments in a straight line in the order they came off the tent. This matters — some segments have male/female ends that only connect in one direction.
Step 2: Number each segment. Use masking tape and a marker to label each segment 1, 2, 3, and so on from one end to the other. This takes 60 seconds and prevents a confusing reassembly later.
Step 3: Remove the damaged segment. Slide the broken segment off the shock cord. If the shock cord is intact, hold it taut with one hand while you remove the segment — don’t let it retract through the other segments.
Step 4: Measure the damaged segment. Measure the original (broken) segment from end to end. Your replacement segment must match this length exactly. If you’re using a cut-to-size kit, mark your replacement segment at the correct length and cut with a hacksaw or metal-cutting scissors. Sand or file the cut end smooth.
Step 5: Slide the new segment onto the shock cord. Thread the replacement segment onto the existing shock cord in the same position as the old one. Make sure the orientation matches the surrounding segments.
Step 6: Reassemble and test. Reconnect all segments in numbered order and bend the pole into a gentle arc to test. All segments should snap together cleanly with no gaps. The pole should hold its arc without any one segment feeling loose.
Why this matters: A mismatched segment length — even by half an inch — creates a weak point at the joint. Always measure before cutting.
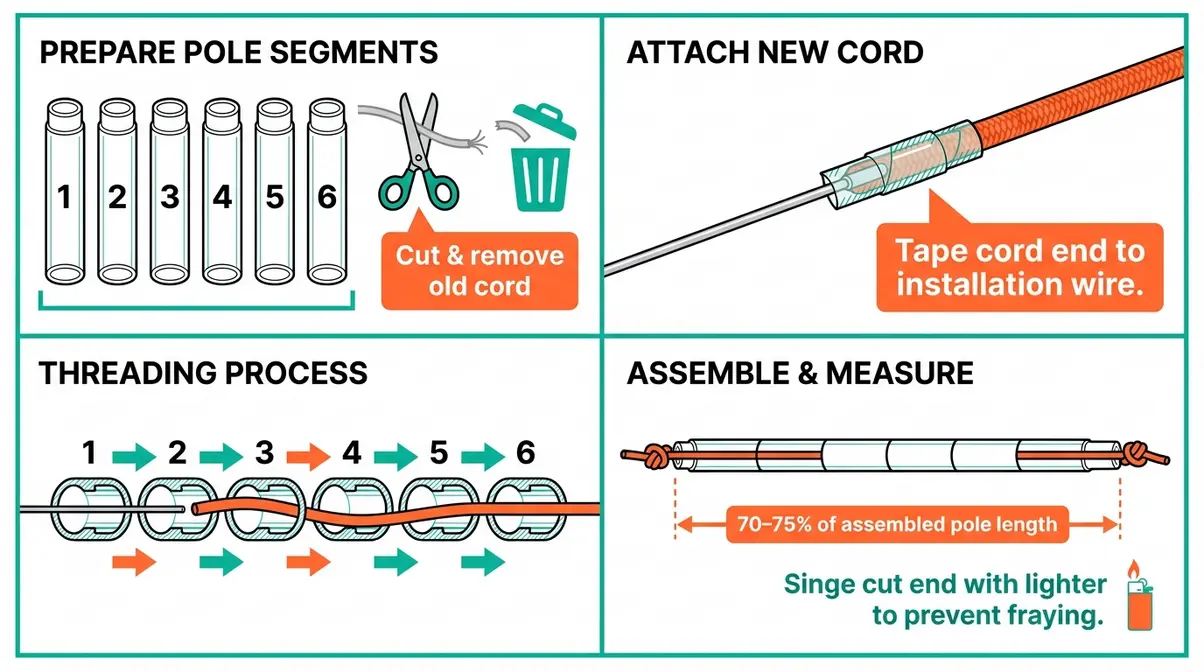
How to Replace the Shock Cord
The shock cord (the elastic bungee cord running through the inside of the pole) stretches out over time, leaving poles that flop apart instead of snapping together. Replacing it is the most common tent pole repair, and it’s easier than it looks.
Step 1: Disassemble the pole and remove the old cord. Pull two segments apart and cut the old shock cord between them. Remove the end tips — screw-off tips unscrew by hand; press-fit tips can be gently levered out with pliers. Pull the old cord out of all segments and discard it.
Step 2: Number the segments. Lay all segments in order and label them with tape and a marker, just as in the segment replacement above.
Step 3: Measure and cut the new cord. The correct shock cord length when relaxed (not stretched) should be 70–75% of the total assembled pole length. For example: if your assembled pole is 80 inches long, cut new cord to approximately 56–60 inches, plus an extra 4–5 inches for tying knots at each end. This tension level is widely confirmed across repair guides from NEMO Equipment, Big Agnes, and independent outdoor repair communities.
Step 4: Tie a knot at one end. Thread one end of the new cord through the first end tip’s hole. Tie a firm overhand knot about 2 inches from the end — pull it tight so it won’t slip through. Reinsert or screw the end tip back into the first segment.
Step 5: Thread the cord through all segments. Feed the free end of the cord through each numbered segment in order, sliding each segment down the cord as you go. Keep a firm grip on the cord so it doesn’t retract. An installation wire (the thin leader wire included in most kits) makes this significantly easier — tape the cord end to the wire and use it to pull the cord through.
Step 6: Tension and tie the far end. Assemble the pole fully. Pull the free cord end until the pole segments just snug together — no gaps, but not so tight the pole is hard to pull apart. Use needle-nose pliers or a clamp to hold the cord at that tension point. Tie a firm overhand knot, cut the excess cord leaving a 2-inch tail, and singe the cut end with a lighter to prevent fraying. Reinsert the second end tip.
Step 7: Test tension. Assemble the pole and bend it into the arc it takes when pitched. Segments should snap together cleanly. If the pole is too floppy, shorten the cord slightly by re-tying the far knot closer to the tip. If it’s too stiff to pull apart, lengthen it a little.
Using a Repair Sleeve for a Quick Field Fix
A repair sleeve (also called a splint) is a short hollow tube, slightly wider than your pole, that slides over a cracked or bent section to stabilize it temporarily. Most universal kits include one. This is the fastest field repair available — no cord work required.
Step 1: Identify the damaged section. Find the cracked, bent, or splintered segment on your assembled pole.
Step 2: Center the sleeve over the damage. Slide the repair sleeve over the damaged section so it covers the damaged area with equal overlap on each side — at least 2 inches of overlap on each end.
Step 3: Secure with tape. Wrap the sleeve with duct tape or tent repair tape to hold it in place. Two to three tight wraps at each end of the sleeve are sufficient.
Step 4: Test before pitching. Gently flex the repaired section before loading it into the tent. It should feel firm without sharp movement at the repair point.
A sleeve repair is a temporary fix — it gets you through a trip, but the damaged segment should be replaced properly when you get home. Campers consistently report that a sleeved pole holds for a full weekend of camping without issue, provided the underlying crack hasn’t fully separated the segment.
Troubleshooting: When Your Repair Isn’t Working
Even with the right kit and the right steps, repairs sometimes don’t go as planned. Here are the most common problems and their fixes:
Problem: Pole segments won’t snap together after shock cord replacement. Cause: The new cord is too long (not enough tension). Fix: Disassemble the far end tip, shorten the cord by 2–3 inches, and re-tie the knot. Re-test after each adjustment.
Problem: Pole is impossible to pull apart for tent takedown. Cause: The new cord is too short (too much tension). Fix: Disassemble the far end tip and lengthen the cord slightly by re-tying the knot further from the tip.
Problem: Repair sleeve keeps sliding off the damaged section. Cause: The sleeve is too large for the pole diameter, or not enough tape was used. Fix: Wrap the pole with a few layers of duct tape before sliding the sleeve on — this builds up the diameter and creates friction. Add more tape over the sleeve ends.
Problem: New replacement segment feels loose at the joint. Cause: The replacement segment is slightly shorter than the original, creating a gap at the ferrule. Fix: Measure again and cut a new segment to the exact original length. A gap at the ferrule is a structural weakness and should not be left unaddressed.
User communities on Reddit and outdoor repair forums confirm that shock cord tension is the most frequently misadjusted variable — getting it to 70–75% of assembled pole length almost always resolves floppy or overly stiff poles on the first adjustment.
Limitations and Safety: What to Know Before You Repair
Common Pitfalls
Pitfall 1: Buying the wrong diameter. A 7mm kit in an 8.5mm tent pole won’t work — the segments will rattle inside the ferrules and the pole will fail under load. Always measure your original pole with a caliper before ordering. Taking a broken segment to a hardware store for comparison is a reliable backup method.
Pitfall 2: Cutting segments too short. When trimming a cut-to-size kit, it’s easy to cut slightly short. Measure twice, cut once. A segment that’s even 1/4 inch too short creates a gap at the ferrule joint — a weak point that can fail mid-trip, especially in wind.
Pitfall 3: Skipping the tension test after shock cord replacement. A shock cord that’s too loose or too tight isn’t just inconvenient — it stresses the ferrule joints unevenly and can cause premature cracking. Always test tension by assembling the full pole and bending it into its pitched arc before heading out.
When to Choose Alternatives
Scenario 1: Your tent is more than 10 years old with multiple failed poles. A single spare tent pole set addresses one broken section, but an aging tent with multiple weakening poles is a safety concern in wind or rain. At this point, budgeting for a new tent is a more practical decision than repeatedly repairing individual sections. User consensus from outdoor communities indicates that tents with fiberglass poles showing widespread white stress-fracture lines are near end-of-life.
Scenario 2: You need four-season or winter performance. A universal fiberglass kit is not appropriate for winter camping. According to Princeton University Outdoor Action’s cold-weather camping guidelines, four-season tents require high-strength aluminum poles specifically rated for wind and snow loads. If you’re replacing poles for a winter tent, use OEM aluminum parts or contact a specialty fabricator like Tent Pole Technologies.
When to Seek Expert Help
If your tent pole damage involves a bent or cracked hub (the central junction piece on geodesic tents), do not attempt a DIY sleeve repair — hub failures are structural and require professional assessment. Similarly, if your tent is a high-end ultralight model with proprietary carbon fiber poles, contact the manufacturer directly before attempting any repair. Improper sleeve repairs on carbon fiber can cause the pole to shatter at the repair point under load.
Lightning safety note: Aluminum tent poles do conduct electricity. The Lightning Protection Institute recommends seeking shelter in a substantial building or hard-topped vehicle during lightning — do not remain in a tent, regardless of pole material, during an active electrical storm.
Frequently Asked Questions
What is the difference between a universal repair kit and an OEM replacement?
A universal repair kit contains generic pole segments and shock cord designed to fit many different tent models, while an OEM (Original Equipment Manufacturer) replacement is a factory-made part built for a specific tent brand and model. Universal kits cost $8–$20 and are available at Walmart, REI, and Amazon, but require cutting to size. OEM parts cost $15–$50 and ship from the manufacturer (Coleman, Big Agnes, MSR), but fit perfectly without modification. Use The Pole Triage Method to decide: if you know your exact tent model and it’s still in production, check for OEM parts first.
Should I choose fiberglass or aluminum tent poles?
Aluminum poles outperform fiberglass in almost every performance category except cost. Fiberglass poles become brittle below freezing and splinter when they break — making them difficult to repair with a standard sleeve. Aluminum poles bend before breaking, sleeve easily with a repair splint, and hold up well in cold and wind. According to Frostburg State University’s shelter research, both materials are proven durable for self-supporting tents, but aluminum is the better long-term investment for anyone camping in variable conditions. Fiberglass kits ($8–$15) are fine for warm-weather car camping on a budget.
How do you replace the shock cord in a tent pole?
Replacing shock cord takes about 15–25 minutes with basic tools. Disassemble the pole, remove old cord, and label each segment in order with tape. Cut new 3/32″ shock cord to 70–75% of the total assembled pole length — this is the key tension measurement. Thread the cord through each segment using the installation wire, tie knots at both end tips, and test by assembling the full pole. The cord should hold segments together firmly without making the pole hard to pull apart. Big Agnes and NEMO Equipment both publish shock cord repair guides confirming this 70–75% length ratio.
Where can I buy a spare tent pole set?
Universal kits are available at REI, Amazon, Walmart, and Bass Pro Shops for $8–$40 depending on material. For OEM brand-specific parts, go directly to Coleman’s tent parts page (coleman.com), Big Agnes’s support page, or MSR’s accessories store at cascadedesigns.com. For older or discontinued tents needing custom poles, Tent Pole Technologies (tentpoletech.com) fabricates custom aluminum and fiberglass poles built to your exact measurements, with repairs starting at $10–$15 per pole. Shipping costs are additional and vary by location.
What does a standard tent pole replacement kit include?
A standard kit includes five components: pole segments (the hollow tubes), ferrules (the metal or plastic sleeves joining segments), shock cord (the elastic bungee cord running through all segments), end tips (the rubber or plastic caps at each pole end), and installation wire (the thin leader wire used to thread new cord through the segments). Some kits — like Coghlan’s fiberglass kit sold at Academy Sports — include all five. Others are sold as shock cord only or segments only. Always read the kit’s contents list before purchasing to confirm you’re getting every component you need.
Conclusion
For beginner campers facing a broken tent pole, a spare tent pole set is one of the most cost-effective gear fixes available. Universal fiberglass kits start at around $8 at Walmart and Amazon, aluminum kits run $15–$40 at REI and Bass Pro Shops, and OEM parts from Coleman and Big Agnes provide an exact fit for around $15–$50. Most repairs — including shock cord replacement and broken segment swaps — take under 30 minutes with no special tools.
The Pole Triage Method — the 3-question framework introduced in this guide — removes the guesswork from the buying decision. Ask whether you know your tent’s model, whether OEM parts are still available, and whether this is an emergency fix or a long-term replacement. Those three answers point you directly to the right kit, every time. No more defaulting to whatever shows up first in a search.
Your next step: grab your broken pole, measure the outer diameter and one segment length, then run through The Pole Triage Method. If you land on “universal kit,” head to Walmart or Amazon today. If you land on “OEM,” open Coleman’s parts page or Big Agnes’s support page and search your tent model. Most campers can have the right kit in hand within 24–48 hours — and their tent back in working order the same afternoon it arrives.
