This blog post may contain affiliate links. As an Amazon Associate I earn from qualifying purchases.
📋 Table of Contents
- ⚠️ Before You Start: Important Safety Disclaimer
- Step 1: Prepare Your Campfire Site
- Check Local Regulations and Fire Permits First
- Choose a Safe Campfire Location
- Clear and Prepare the Fire Area
- Step 2: Build Your Campfire Safely
- Gather the Right Fuel
- Arrange Your Fire Layers Correctly
- What You Must Never Burn
- Step 3: Maintain Your Campfire
- Never Leave a Campfire Unattended
- Control Your Fire Size
- Watch the Wind and Weather
- Step 4: How to Extinguish a Campfire (Drown, Stir, Feel)
- Step 4a — Drown the Fire
- Step 4b — Stir the Ashes
- Step 4c — Feel for Heat
- How to Know Your Campfire Is Truly Out
- Campfire Safety for Kids and Scouts
- How to Teach Children Campfire Safety
- BSA Fire Safety Rules for Scout Leaders
- Safe Distances and Adult Supervision Protocols
- Navigating State Fire Permits and Burn Bans
- How to Check for Active Burn Bans
- California and High-Risk States
- Common Campfire Mistakes to Avoid
- Five Mistakes That Lead to Wildfires
- When Not to Build a Campfire
- Frequently Asked Questions About Campfire Safety
- How do you put out a campfire safely?
- What is the 10-foot rule for campfires?
- Is a campfire permit required in National Forests?
- What can you not burn in a campfire?
- What are the BSA fire safety rules for scouts?
- Your Campfire Safety Action Plan
Campfires cause thousands of acres of preventable wildfire damage every year in the United States — and the U.S. Fire Administration (USFA) consistently identifies human-caused outdoor fires as a leading source of wildland fire incidents. Most of those fires weren’t started by careless people. They were started by well-meaning campers who simply didn’t have a clear system to follow.
Without a structured process, even responsible campers miss critical steps — especially when putting out the fire after dark or rushing to pack up camp. A forgotten ember, a gust of wind, and the situation changes fast.
This campfire safety checklist covers everything from choosing your site to confirming the last ash is cold. We’ve organized it using the Campfire Lifecycle Method — a three-phase system (Prepare → Maintain → Extinguish) that guides you through every decision, start to finish, so nothing gets skipped.
Key Takeaways: Your Campfire Safety Checklist at a Glance
Campfire safety requires three non-negotiable phases — Prepare, Maintain, and Extinguish — known as the Campfire Lifecycle Method. Skipping any one phase significantly increases wildfire risk for your family and everyone around you.
- Always check local burn bans and fire permits before starting any fire
- Clear a 10-foot radius of debris around your fire site before lighting
- Never leave a fire unattended — not even for one minute
- Use the Drown, Stir, Feel method — a fire is only out when the ashes are cold to the touch
- Download the free PDF checklist below to print and bring on your next camping trip
⚠️ Before You Start: Important Safety Disclaimer
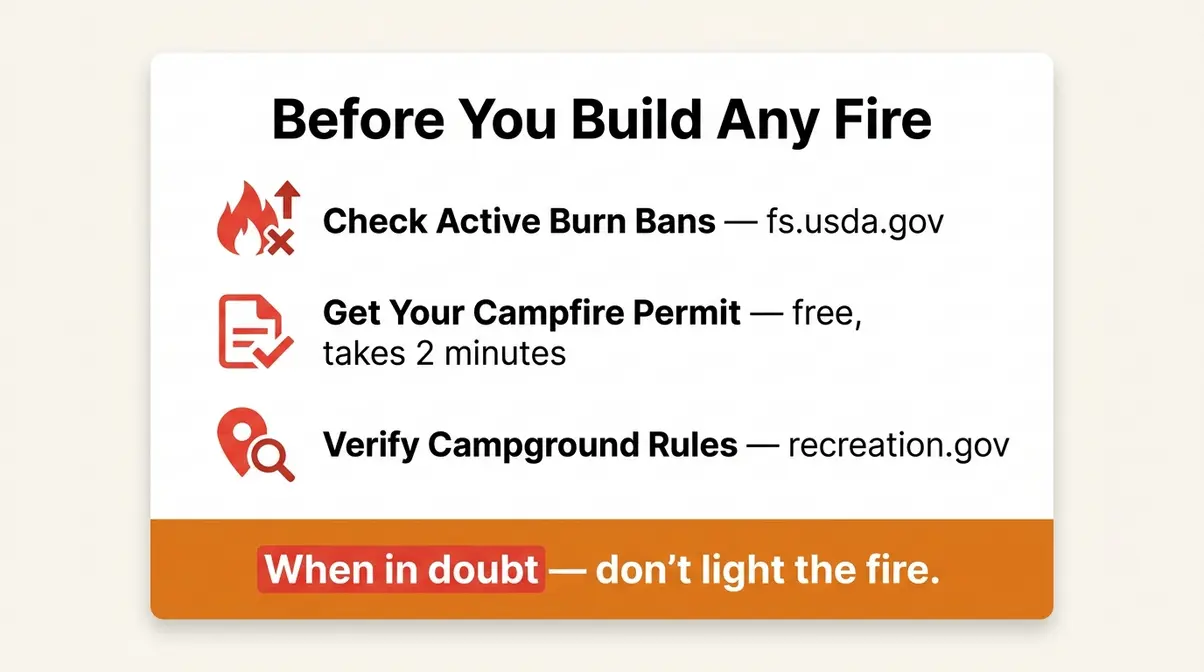
Safety Notice: The information in this guide is based on guidelines from the U.S. Forest Service, the National Park Service, and the National Fire Protection Association. Fire regulations vary significantly by state, county, campground, and season. Always verify current rules before you build any fire. When in doubt, don’t light the fire.
Fire laws are not uniform across the country. A campfire that’s perfectly legal at a campground in Tennessee may be banned that same weekend in a California National Forest due to a Red Flag Warning. Before your trip, check three things:
- Active burn bans: Contact your local ranger district, check the campground’s website, or visit the USFS “Know Before You Go” resource at US Forest Service fire safety guidelines. Burn bans can be issued with very little notice during high fire danger conditions.
- Campfire permits: Many National Forests require a free campfire permit year-round, even for dispersed camping. California, for example, requires a free California Campfire Permit for any fire built outside a designated campground.
- Campground-specific rules: Some designated sites prohibit open fires entirely, even when no county-wide ban is in place. Check the specific campground page on recreation.gov before you leave home.
Think of this as Phase 0 of the Campfire Lifecycle Method: Know Before You Go. With regulations confirmed, let’s walk through the full three-phase system — starting with Phase 1: Preparation.
Step 1: Prepare Your Campfire Site
Site preparation is the foundation of safe campfire management — and the phase most campers rush or skip entirely. The U.S. Forest Service (USFS), the federal agency responsible for managing national forests and grasslands, mandates clearing a 10-foot diameter area of all flammable materials around every campfire site. According to US Forest Service site preparation guidelines, inadequate site preparation is one of the most common factors in campfire-related wildfire incidents.
This is Phase 1 of the Campfire Lifecycle Method. Skipping it is the root cause of most preventable campfire accidents — not the fire itself.
Here are the three preparation steps in order:
- Check local regulations and fire permits
- Choose a safe campfire location
- Clear and prepare the fire area
Check Local Regulations and Fire Permits First
Before you gather a single piece of wood, confirm that you’re legally allowed to build a fire at your destination. This step takes less than five minutes and can save you from significant legal and financial consequences.
What is a campfire permit? A campfire permit is an authorization — often free — required in many National Forests and state lands before you can legally build a campfire outside of a designated campground with established fire grates. California’s free campfire permit program, for example, requires all campers to obtain a permit before building any fire on state responsibility lands outside a developed campground. You can get one online in minutes at the CAL FIRE website.
What is a burn ban? A burn ban is a temporary restriction issued by local fire or forestry authorities during periods of high fire danger — typically during dry, hot, or windy weather. Burn bans can apply to an entire county or just specific elevation zones.
- How to check before your trip:
- Visit fs.usda.gov, select your National Forest, and look for the “Fire Restrictions” tab — the process takes under two minutes
- Call the local ranger district directly (phone numbers are listed on each forest’s page)
- Search ” fire restrictions 2026″ for state-level resources
Why this matters: Violating a burn ban is not a minor infraction. Depending on the state, penalties can include fines of several thousand dollars, criminal misdemeanor charges, and personal financial liability for wildfire suppression costs — which can run into the millions.
Transition: Once you’ve confirmed there are no restrictions in place, the next step is choosing exactly where to set up your fire.
Choose a Safe Campfire Location
Always use an existing fire ring — a pre-built metal or stone circle designed to contain a campfire safely — when one is available at your campsite. Fire rings exist precisely because repeated fires in the same spot are far less damaging to the surrounding environment than new fire scars.
If no fire ring is present, build your fire on bare mineral soil — soil with no organic material, meaning no roots, grass, leaf matter, or decomposing plant debris underneath. Organic material can smolder underground long after the surface fire appears out, traveling to reignite hours or even days later.
Distance requirements matter more than most campers realize:
- Your fire must be at least 15 feet from tents, structures, shrubs, and overhanging branches — US Forest Service site preparation guidelines set this as the minimum safe clearance. Sparks travel farther than expected, especially in even a light breeze.
- Check overhead clearance. Look up before you light. A dry branch 12 feet above the fire is well within the danger zone for an active flame or flying embers.
Picture a circle with your fire at the center. Everything within 15 feet in every direction — including above — needs to be free of flammable material. This mental image is worth running through every single time you set up camp. For families following this campfire safety checklist, reviewing it together before lighting makes it a habit the whole group shares.
Transition: With your location confirmed, it’s time to prepare the ground itself — this is where the 10-foot rule comes in.
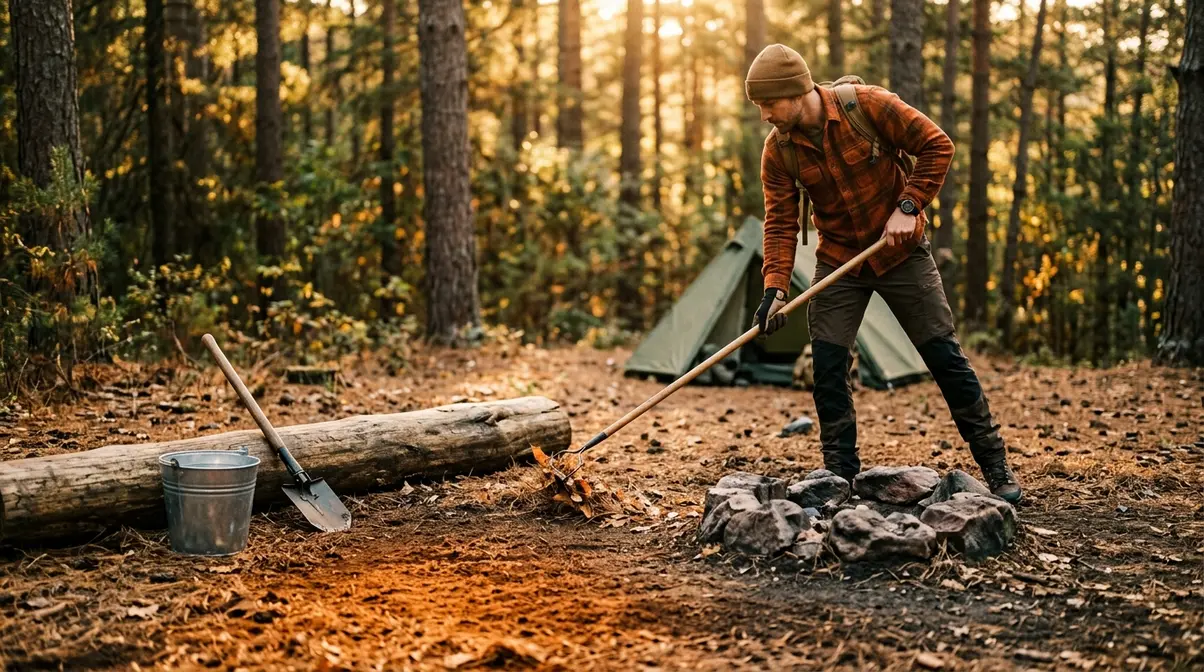
Clear and Prepare the Fire Area
“Clear the area: Clear a 10-foot radius.”
That phrase comes straight from the U.S. Forest Service’s campfire guidance — and it’s worth treating as a non-negotiable rule, not a suggestion. Here’s how to do it correctly:
- Measure your radius. Stand at the center of your intended fire location and take 10 adult-sized steps in each direction. Everything within that circle needs attention.
- Remove all combustible debris. Rake away dry leaves, pine needles, grass, twigs, and any other organic material. Move it well outside the cleared zone, not just to the edge.
- Expose mineral soil. If you’re not using an established fire ring, dig down to bare mineral soil (2–3 inches deep is typically sufficient). This prevents underground root systems from catching fire.
- Check for dry grass or brush nearby. Even a small patch of dry vegetation a few feet from your ring can carry a spark. Clear it now.
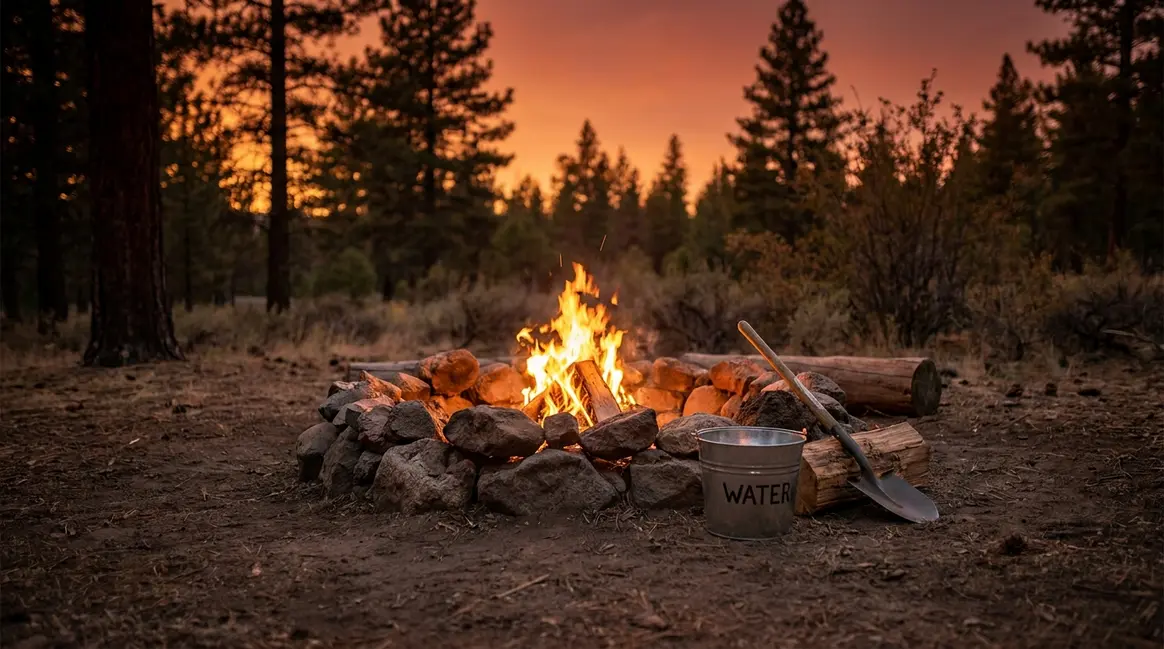
- Keep tools accessible. Before lighting, place a shovel, a bucket of water, and a bucket of dirt within arm’s reach. You’ll need them for both maintenance and extinguishing.

According to Leave No Trace principles for minimizing campfire impacts, Leave No Trace — the nonprofit organization that establishes ethical outdoor recreation principles — also advises burning all wood and coals completely to ash, and sourcing local, dry firewood to prevent the spread of invasive species. Buying firewood from more than 50 miles away from your campsite can inadvertently transport tree-killing insects and fungi into new ecosystems.
Download the free printable campfire safety checklist PDF — covers all three phases of the Campfire Lifecycle Method, including this preparation section, so you can review it at camp without needing a signal.
Step 2: Build Your Campfire Safely
Building a fire safely means using the right materials in the right order — and knowing exactly what should never go into the fire pit. Most campfire problems during the build phase come from one of two errors: using wet or treated wood, or overbuilding the fire from the start. The EPA cautions that burning the wrong materials releases toxic compounds that harm both people and the environment (Ready for Wildfire campfire safety guidance).
A well-built fire starts small, burns efficiently, and stays within the fire ring. Here’s how to do it right.
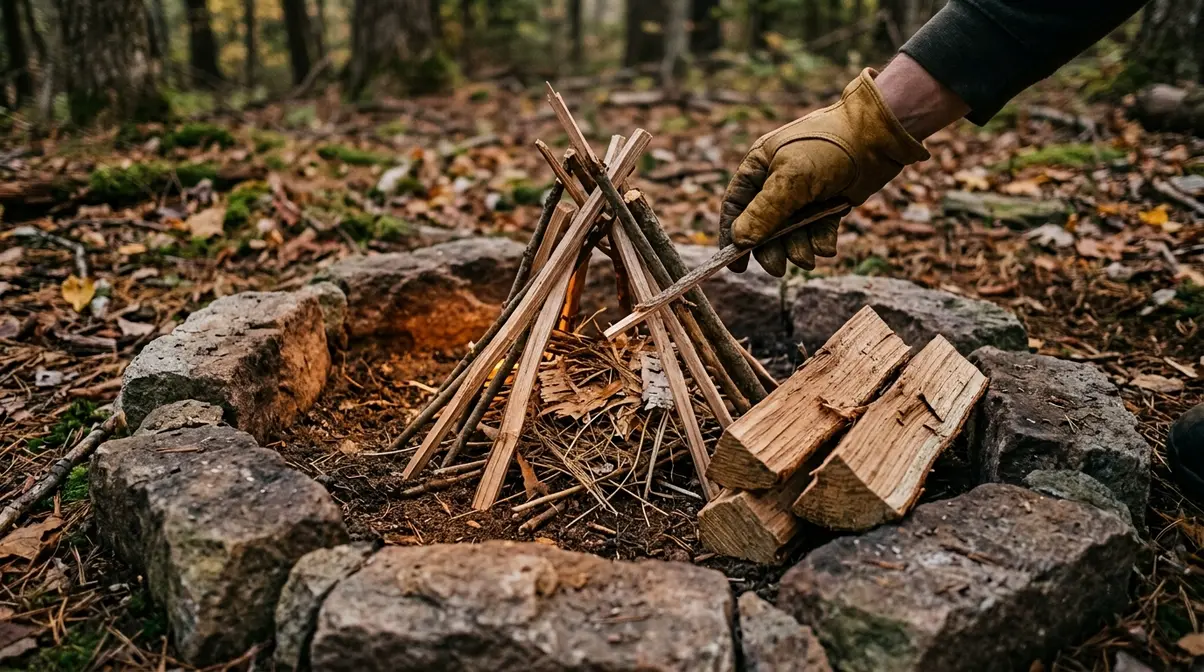
Gather the Right Fuel
Every campfire relies on three types of fuel, added in sequence. Using the right material at each stage is what makes a fire catch cleanly and burn safely.
- Tinder — dry leaves, grass, small wood shavings, or crumpled newspaper that catches a spark easily. Tinder is your ignition layer. It should be bone dry and loosely arranged to allow airflow.
- Kindling — small dry sticks, roughly pencil-to-thumb thickness. Kindling is your transition layer, converting the small tinder flame into enough heat to ignite larger logs.
- Fuel wood — larger logs that sustain the fire. Always use dry, seasoned wood (wood that has been cut and left to dry for at least six months). Wet or green wood produces excessive smoke, burns inefficiently, and throws more sparks.
Sourcing firewood: Purchase firewood locally — ideally from a vendor within 50 miles of your campsite. Never bring firewood from home if it means transporting it across state lines or long distances. This protects forests from invasive insects like the emerald ash borer, which has already devastated millions of trees across North America.
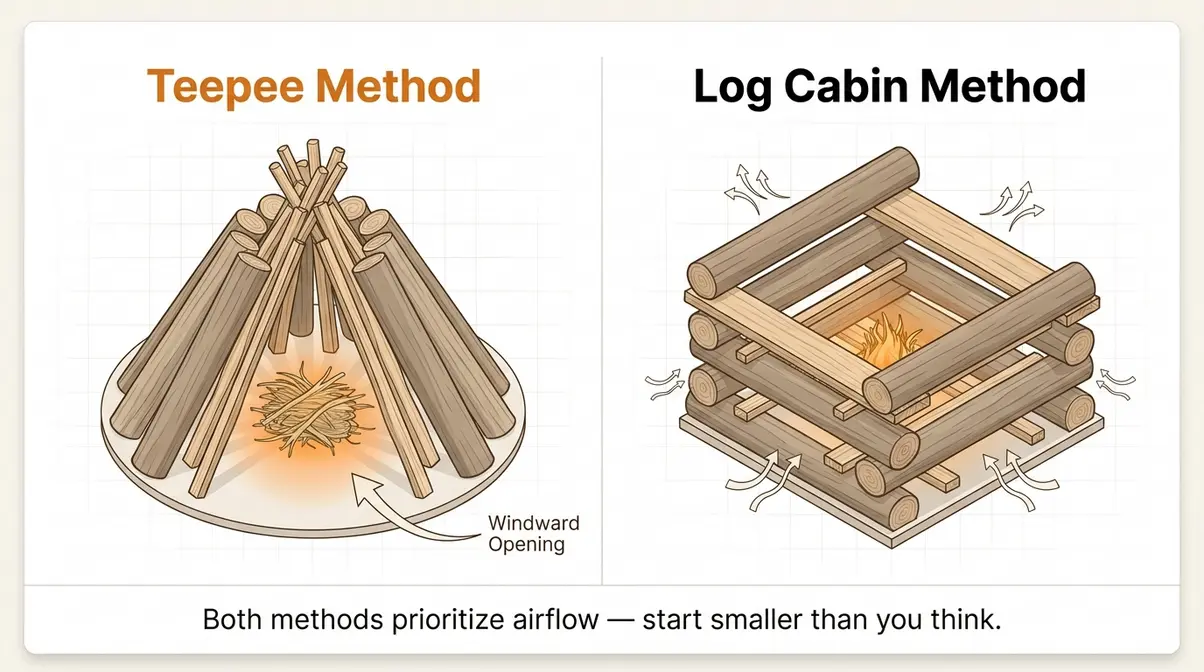
Arrange Your Fire Layers Correctly
There are two reliable fire-building arrangements for beginners. Both work — choose based on your conditions.
- The Teepee Method:
- Place a small bundle of tinder in the center of the fire ring
- Lean kindling sticks against each other over the tinder in a cone shape, leaving a small opening on the windward side for airflow
- Lean 2–3 small fuel logs against the kindling cone in the same teepee shape
- Light the tinder through the opening at the base
- The Log Cabin Method:
- Place tinder in the center
- Lay two parallel kindling sticks on either side of the tinder
- Place two more sticks perpendicular on top, creating a square frame
- Continue layering, alternating directions, for 2–3 layers
- Light the tinder at the center base
Both methods prioritize airflow — fire needs oxygen to burn, and a tightly packed pile starves the flame. Start smaller than you think you need to. A fire that’s 12 inches across is plenty for warmth and cooking.
What You Must Never Burn
This step protects your family’s health and prevents toxic air pollution — and it’s completely absent from most campfire guides. The EPA and state environmental agencies are explicit: burning the wrong materials is both dangerous and, in many places, illegal.
Never burn any of the following:
- Treated or painted wood — releases arsenic, chromium, and other toxic chemicals when burned
- Plywood or composite wood — contains adhesives and resins that produce harmful smoke
- Plastics, foam, or synthetic materials — releases carcinogenic compounds including dioxins
- Wet or green wood — produces dense smoke, incomplete combustion, and excessive sparks
- Leaves and yard waste — illegal to burn in many counties; produces dense, low-level smoke
- Garbage or food packaging — creates toxic smoke and attracts wildlife
Stick exclusively to dry, natural, untreated wood. If you’re unsure whether a piece of wood is safe to burn, don’t use it.
Step 3: Maintain Your Campfire
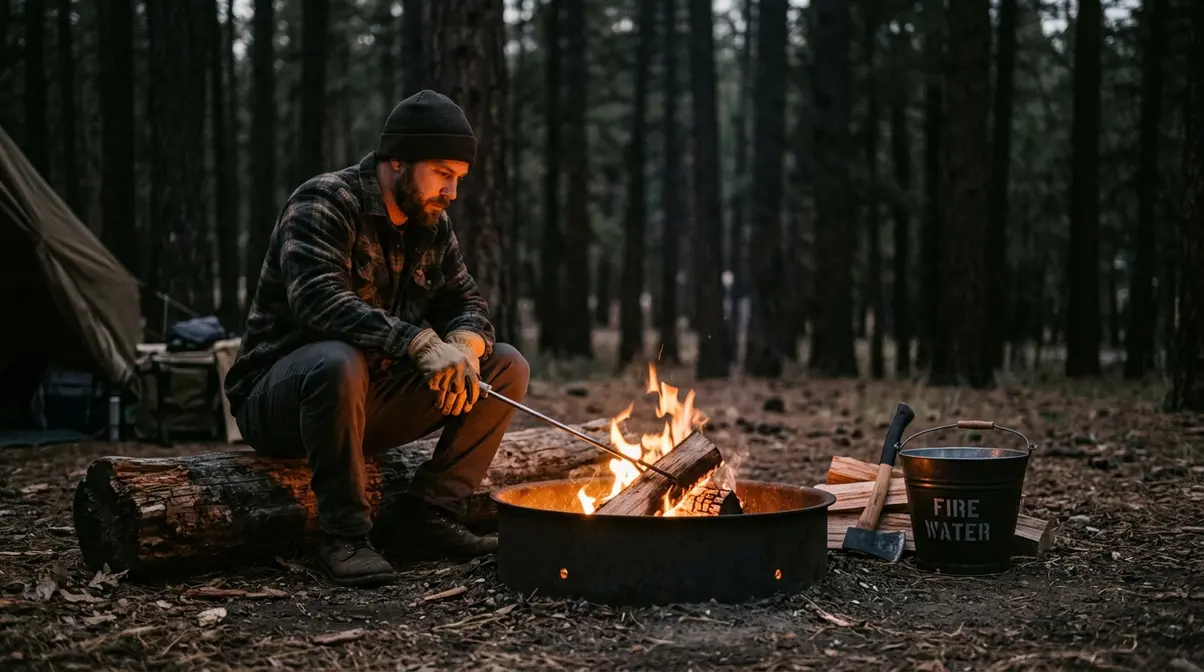
A campfire that’s been safely built still requires active management throughout the evening. Phase 2 of the Campfire Lifecycle Method — Maintain — is the phase where most accidents happen, simply because people stop paying attention once the fire is going. According to recreation.gov campfire safety guidelines, an unattended campfire is one of the most preventable causes of wildfire spread in recreational areas.
Here’s how to keep your fire safe from the moment it lights to the moment you’re ready to put it out.
Never Leave a Campfire Unattended
This is the single most important rule of campfire maintenance, and it bears repeating clearly: never leave a campfire unattended — not even for one minute.
A fire that looks stable can change rapidly. A sudden gust of wind can carry an ember 20 or 30 feet into dry grass. A log can shift and roll out of the fire ring. A child can wander closer while your back is turned. None of these scenarios require a large fire or extreme conditions. They happen at normal campfires, in normal weather, to attentive people who stepped away briefly.
The National Fire Protection Association (NFPA) is direct on this point: if you need to leave the campsite — even briefly — the fire must be fully extinguished first. “Fully extinguished” doesn’t mean flames are out. It means the ashes are cold to the touch. We’ll cover exactly how to get there in Step 4.
Designate one adult as the fire tender for any gathering. That person’s responsibility is to stay within arm’s reach of the fire while it’s burning. When the fire tender needs a break, someone else takes over before they step away.
Control Your Fire Size
Bigger is not better when it comes to campfire safety. A smaller fire is easier to control, easier to extinguish, and produces fewer flying embers. Safety agencies consistently recommend keeping campfires to a manageable size — roughly 2 feet in diameter and no taller than 2 feet in height for a typical recreational fire.
Practical rules for size control:
- Add wood gradually. Place one log at a time and wait for it to catch before adding another. Don’t load the fire ring with a large stack of wood all at once.
- Use shorter logs. Logs that extend beyond the fire ring are a hazard — they can carry flame outside the contained area as they burn down.
- Let the fire burn down before bed. Stop adding wood at least 30–45 minutes before you plan to extinguish the fire. Allow it to burn down to coals and ash naturally — this makes the extinguishing process faster and more thorough.
- Never use accelerants. Gasoline, lighter fluid, or any flammable liquid can cause an explosive flare-up that cannot be controlled. Use tinder and kindling instead.
Watch the Wind and Weather
Wind is the variable that turns a contained campfire into an emergency. This guidance is almost entirely absent from competitor campfire guides — and it’s one of the most practical things you can know.
Check the wind before you light. A sustained wind speed above 15 mph is generally considered unsafe for open campfires. Even at lower speeds, pay attention to direction:
- Position yourself upwind of the fire when possible, so smoke blows away from your group
- Watch for shifting wind — if the wind changes direction frequently, that’s a signal to reduce fire size or extinguish early
- Monitor the fire continuously during gusts — a brief strong gust is when embers travel farthest
Weather changes quickly at higher elevations and in open terrain. If conditions deteriorate — rising wind, incoming lightning, sudden drop in humidity — extinguish the fire immediately rather than waiting. No campfire experience is worth the risk of losing control in changing conditions.
Step 4: How to Extinguish a Campfire (Drown, Stir, Feel)
Extinguishing your campfire completely is the most critical step in the entire Campfire Lifecycle Method — and the most commonly done wrong. According to the National Park Service, a campfire is only considered fully extinguished when the ashes are cold to the touch. Not when the flames are out. Not when it looks like it’s done burning. Cold to the touch.
The method endorsed by the NPS and safety agencies across the country is three steps: Drown, Stir, Feel. Each step builds on the previous one. Skipping any step leaves the risk of reignition.
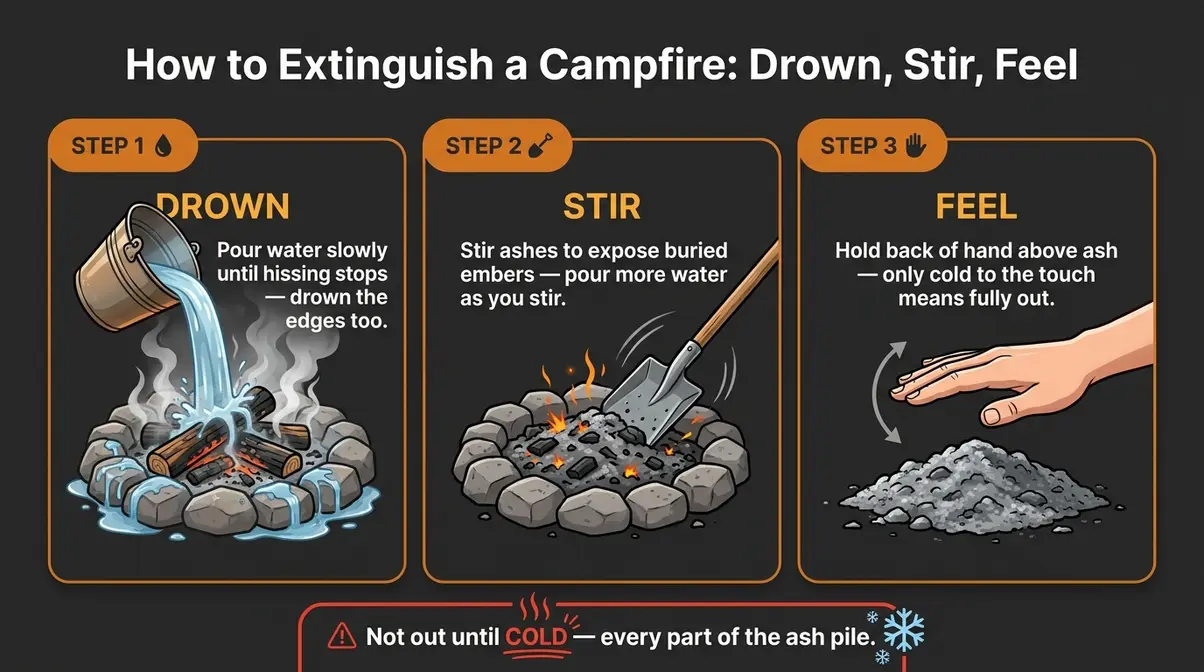
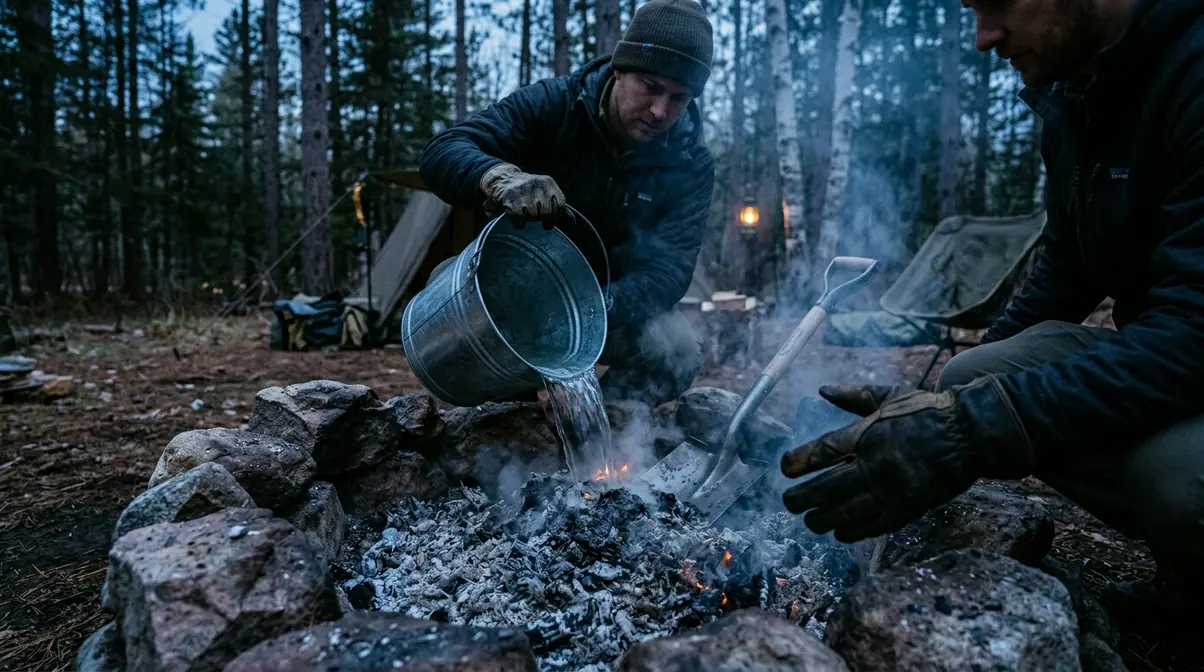
Step 4a — Drown the Fire
Start at least 20–30 minutes before you plan to leave camp or go to sleep. This gives you enough time to complete the full process without rushing.
- Stop adding wood well before you’re ready to extinguish. Let the fire burn down to coals.
- Pour water slowly and evenly over the entire fire — not just the visible flames. Use a camp bucket, a water bottle, or a water bladder. Pour until the hissing sound stops completely.
- Drown the edges of the fire ring, not just the center. Embers collect at the perimeter where ash accumulates.
- Use plenty of water. More is always better here. A good rule: use at least twice as much water as you think you need.
If you don’t have enough water, you can use dirt or sand as a secondary measure — but water is always preferred. Dirt smothers the fire but does not cool the coals as effectively as water does.
Step 4b — Stir the Ashes
Stirring is the step most people skip — and the one that matters most for catching hidden embers.
- Use a stick or shovel to mix the wet ashes thoroughly. Break apart any clumps of ash or partially burned wood.
- Expose buried embers. Coals can remain alive and hot deep within the ash pile even after the surface looks completely out. Stirring brings them to the surface where the water can reach them.
- Pour more water as you stir. Every time you expose a new layer of ash, add more water and listen for hissing. Hissing means heat is still present.
- Stir the edges. Work around the entire perimeter of the fire ring, not just the center.
The NFPA warns clearly: if ashes are too hot to touch, the fire is too hot to leave. Stirring is what reveals whether that’s the case.
Step 4c — Feel for Heat
This is your safety verification step. Do not skip it.
- Hold the back of your hand (never your palm — it’s more sensitive to heat) a few inches above the ash pile. Do not touch it yet.
- Feel for radiant heat. If you can feel warmth radiating upward, the coals are still active. Repeat the Drown and Stir steps.
- If no radiant heat is felt, carefully touch the outer edge of the ash with the back of your fingers.
- If it feels cool, move toward the center and repeat.
- Only when every part of the ash pile is cool to the touch can you consider the fire extinguished.
The back-of-hand test is a standard safety protocol used by fire agencies precisely because it catches residual heat that isn’t visible. Never assume a fire is out based on appearance alone.
How to Know Your Campfire Is Truly Out
Your campfire is fully extinguished when all of the following are true:
- No smoke is visible from the ash pile
- No hissing sound when you pour water
- No steam rising from the ashes
- No radiant heat felt when you hold your hand 6 inches above the ash
- The ash is cold to the touch — every part of it, not just the top layer
According to the National Park Service, this is the only reliable test. If any one of these conditions is not met, continue the Drown, Stir, Feel process. It typically takes 15–20 minutes done properly. Budget that time into your evening plan before it gets dark.
A campfire you aren’t 100% sure is out is a campfire you haven’t finished extinguishing yet.
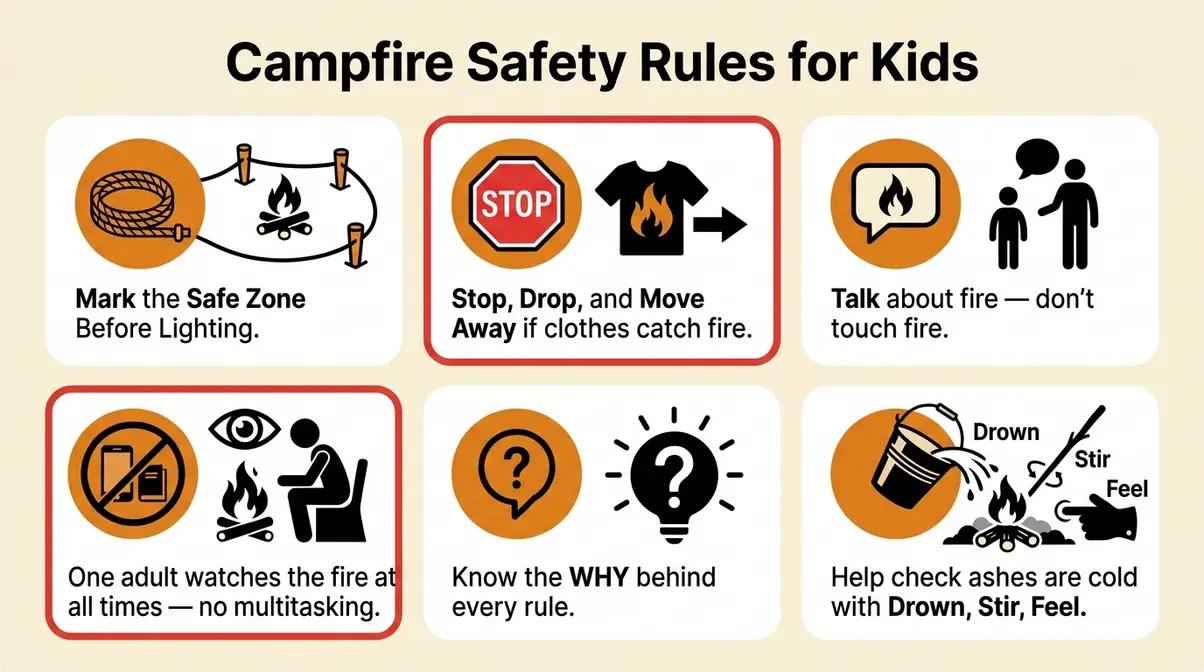
Campfire Safety for Kids and Scouts
Teaching children campfire safety is one of the most valuable outdoor skills a parent or scout leader can pass on — and it requires a different approach than adult instruction. Children learn best through clear rules, consistent repetition, and understanding why a rule exists, not just what it is. This section of your campfire safety checklist for kids gives you six specific, actionable strategies and the official BSA guidelines for scout leaders.
How to Teach Children Campfire Safety
Safety agencies consistently recommend introducing fire safety concepts before the camping trip — not at the campsite with a live fire in front of you. Here are six proven approaches:
- Establish the “safe zone” before lighting. Before the fire starts, walk the campsite with children and physically mark the boundary they should not cross. Use a rope, a line of rocks, or a visual landmark like a log. Children respond to concrete, visible boundaries far better than verbal instructions alone.
- Teach the “stop, drop, and move away” response. If clothing catches fire or a child gets too close, the instinct is to run — which fans the flames. Practice the correct response: stop moving, drop to the ground, and roll away from the fire. Practice this in a calm moment, not in an emergency.
- Use the “talk about fire, don’t touch fire” rule. Establish clearly that children may ask questions about the fire, point at it, and watch it — but touching, poking, or throwing anything into the fire is never permitted. Frame it as a privilege, not a prohibition: “You get to watch because you follow the rules.”
- Assign an adult fire watcher at all times. Children should never be near an active campfire without a designated adult whose sole responsibility is watching both the fire and the children near it. This adult should not be cooking, setting up gear, or on a phone.
- Explain the “why” behind every rule. “Don’t run near the fire” lands better when followed by “because it’s easy to trip, and falling into a fire can cause serious burns.” Children who understand the reason are significantly more likely to follow — and enforce — the rule.
- Practice the extinguishing check together. Let older children (supervised) participate in the Drown, Stir, Feel process. Letting them feel that the ashes are cold makes the lesson concrete and memorable.
BSA Fire Safety Rules for Scout Leaders
The Boy Scouts of America (BSA) has maintained one of the most comprehensive youth fire safety programs in the country for over a century. BSA fire safety rules, as outlined by BSA Scouting America fire safety guidance, follow a structured progression that aligns closely with the Campfire Lifecycle Method.
Key BSA fire safety principles for scout leaders:
- Firem’n Chit certification: Scouts must earn the Firem’n Chit — a BSA certification demonstrating knowledge of fire-building and fire safety — before they are permitted to use fire-starting tools independently. Leaders should verify certification before any fire activity.
- Two-deep leadership: BSA requires at least two registered adult leaders present at all times during fire activities. No single adult should be solely responsible for a group of scouts around an open fire.
- Fire triangle education: BSA curriculum teaches the fire triangle (fuel, heat, oxygen) as a foundational concept. Understanding what feeds a fire helps scouts understand what stops one.
- Tote ‘n Chip for tools: Any scout using an axe or knife for wood preparation must hold a current Tote ‘n Chip card. Proper tool use prevents injuries during firewood preparation.
- Leave No Trace integration: BSA fire activities explicitly incorporate Leave No Trace principles — burn wood to ash completely, restore the fire site to its natural state, and pack out all ash from non-established sites.
Scout leaders should download the BSA’s current Hazardous Weather training and review fire restriction policies for their camping area at least two weeks before any trip. Regulations can change quickly during fire season.
Safe Distances and Adult Supervision Protocols
The American Red Cross and USFS both provide guidance on safe distances for children around campfires. These protocols are worth establishing as household rules, not just campsite rules:
- Children under 5: Should remain at least 6 feet from any active fire at all times, held or directly supervised by a dedicated adult
- Children ages 5–12: Minimum 3-foot supervised boundary from the fire ring, with the safe zone rule in place
- Teenagers: May participate in fire-building and maintenance under direct adult supervision, following BSA or equivalent guidelines
Supervision protocol for families:
- Designate one adult as the fire tender — this person does not multitask
- Establish a physical boundary (rope, rocks, log) before lighting
- Conduct a “fire rules” verbal check with children before the fire is lit
- Never leave children unattended near any fire, regardless of size
- Keep a bucket of water within reach at all times during family campfire sessions
Navigating State Fire Permits and Burn Bans
State fire regulations are the most dynamic and most overlooked element of campfire safety — and they represent one of the biggest gaps in existing campfire guides. What was legal last weekend may be banned this weekend. Understanding how to check and how to comply protects you legally and protects the forest ecologically.
How to Check for Active Burn Bans
Burn bans are issued by state forestry agencies, county fire departments, or federal land management agencies. They can take effect within hours of a weather event and may apply to specific land types, elevations, or entire regions simultaneously.
Reliable ways to check before your trip:
- USFS Fire Restrictions: Visit US Forest Service fire safety guidelines and select your specific National Forest. Each forest page lists current fire restriction levels (Stage 1 or Stage 2) with specific prohibited activities.
- State forestry agency websites: Every state has a forestry or fire agency with a current fire restrictions map. Search ” fire restrictions” for the official agency page.
- InciWeb: The national incident information system (inciweb.nwcg.gov) tracks active wildfires and associated closures in real time.
- Recreation.gov campground pages: Individual campground pages on recreation.gov display current fire restrictions specific to that site.
- Call the ranger district: Phone numbers are listed on every USFS forest page. A two-minute call confirms current conditions directly.
Check again the day before you leave — conditions change quickly during fire season.
California and High-Risk States
California operates under some of the most comprehensive fire restriction frameworks in the country, managed by CAL FIRE and the USFS. According to Ready for Wildfire campfire safety resources, California’s fire season now effectively runs year-round in many parts of the state, and restrictions can be active even during winter months in Southern California.
High-risk states with robust permit and restriction systems:
| State | Key Resource | Notable Requirement |
|---|---|---|
| California | readyforwildfire.org / CAL FIRE | Free campfire permit required on state responsibility lands |
| Oregon | oregon.gov/ODF | Industrial fire precaution levels (I–IV) restrict campfires |
| Washington | dnr.wa.gov | Burn bans issued by county; check county emergency management |
| Colorado | csfs.colostate.edu | Fire restrictions vary by county and elevation zone |
| Arizona | azstateparks.com / USFS | Stage 1/2 restrictions common May–July; campfires often banned |
| Montana | dnrc.mt.gov | Seasonal restrictions; check both state and USFS separately |
Even if your state isn’t listed here, always verify. Dry conditions in any region can trigger restrictions with minimal warning. The five minutes you spend checking could prevent a fine, a criminal charge, or a wildfire.
Common Campfire Mistakes to Avoid
Even careful campers make predictable errors. These are the five most common — and the conditions under which to skip building a fire entirely.
Five Mistakes That Lead to Wildfires
1. Leaving the campfire before it’s fully extinguished. This is the number-one cause of campfire-related wildfire incidents. “The fire looks out” is not the same as “the fire is out.” A buried coal can reignite hours after you’ve left. Always complete the full Drown, Stir, Feel process — every time, without exception.
2. Building a fire during high wind or Red Flag conditions. Wind carries embers far beyond the fire ring. A Red Flag Warning (issued by the National Weather Service when conditions are most favorable for rapid wildfire spread) is a clear signal: do not build a campfire. Check weather.gov for active warnings before your trip.
3. Using too much wood, too fast. Overloading the fire ring creates a fire that’s harder to control and much harder to fully extinguish. A fire that’s two feet wide and fully contained is safer — and more enjoyable — than a bonfire that takes an hour to drown properly.
4. Failing to check local regulations. According to the USFA, many campfire-related incidents involve fires built during active burn bans. The camper often didn’t know — because they didn’t check. The legal system doesn’t distinguish between intentional and uninformed violations.
5. Burning prohibited materials. Treated wood, plastic, and garbage produce toxic smoke and unpredictable flames. They also tend to produce more embers. Burn only dry, natural, untreated wood — nothing else.
When Not to Build a Campfire
Sometimes the responsible choice is not to build a fire at all. This is a judgment call that experienced campers make regularly, and it’s worth naming explicitly:
- Active burn ban or fire restriction in place — no exceptions, regardless of conditions at your specific site
- Sustained winds above 15 mph or a Red Flag Warning is active
- Extremely dry conditions — if the grass crackles when you walk on it, conditions are dangerous
- You don’t have enough water to properly extinguish the fire (at least 2 gallons minimum)
- Children are present and no dedicated fire tender is available to supervise continuously
- You’re planning to leave camp within the next hour and won’t have time to complete full extinguishing
A portable camp stove handles cooking needs safely in all of these situations. The campfire can wait for a safer day.
Frequently Asked Questions About Campfire Safety
How do you put out a campfire safely?
Use the Drown, Stir, Feel method — the three-step process endorsed by the National Park Service. First, pour water slowly over the entire fire ring until hissing stops. Then stir the wet ashes with a stick or shovel, exposing buried embers, and pour more water as you stir. Finally, hold the back of your hand above the ash to feel for heat. Only when every part of the ash pile is cold to the touch is the fire fully out. This process typically takes 15–20 minutes done correctly.
What is the 10-foot rule for campfires?
The 10-foot rule requires clearing a 10-foot radius of all flammable material around your campfire site before lighting. This means removing dry leaves, pine needles, grass, twigs, and any other combustible debris from a 10-foot circle centered on your fire ring. The U.S. Forest Service establishes this as the minimum safe clearance for campfire site preparation. In addition to the ground clearance, your fire should be at least 15 feet from tents, structures, and overhanging branches.
Is a campfire permit required in National Forests?
Yes — many National Forests require a free campfire permit, even for dispersed camping. Requirements vary by forest and season. California’s campfire permit program, for example, requires a free permit for any fire on state responsibility lands outside a designated campground. The best way to check is to visit fs.usda.gov, select your specific forest, and look for current fire restrictions and permit requirements. Permits are typically obtained online in minutes at no cost.
What can you not burn in a campfire?
Never burn treated wood, painted wood, plywood, plastics, foam, garbage, or wet/green wood in a campfire. Treated and composite wood releases toxic compounds — including arsenic and dioxins — when burned. Wet wood produces excessive smoke and sparks. Burning garbage or food packaging attracts wildlife and creates hazardous smoke. The EPA and state environmental agencies classify burning many of these materials as illegal in residential and recreational settings. Stick exclusively to dry, natural, untreated firewood.
What are the BSA fire safety rules for scouts?
BSA fire safety rules require Firem’n Chit certification before any scout uses fire-starting tools independently, two-deep adult leadership during all fire activities, and adherence to Leave No Trace principles throughout. The Firem’n Chit program covers fire-building technique, campfire safety procedures, and proper extinguishing methods. Scout leaders should also verify that all fire tool users hold a current Tote ‘n Chip card, and must check local fire restrictions before any camping trip involving fire activities. Full current guidelines are available at scouting.org.
Your Campfire Safety Action Plan
Campfire safety isn’t a single rule — it’s a complete system. The Campfire Lifecycle Method structures every decision you make around a fire into three accountable phases: Prepare, Maintain, and Extinguish. When you follow all three, you dramatically reduce the risk of an accident for your family and for the forests and communities around you.
The Campfire Lifecycle Method works because it eliminates the most common failure mode in campfire safety: the assumption that any one step is “probably fine.” Probably fine is how wildfires start. The three-phase approach removes that assumption entirely — each phase has a clear start, a clear end, and a clear verification step.
Your next step is simple: download the free printable campfire safety checklist PDF and bring it on your next trip. Review it with your family or scout group before you leave home, walk through Phase 0 (Know Before You Go) together, and arrive at camp already prepared. For more guidance on staying safe at your campsite beyond the fire, explore our comprehensive campfire safety guidelines covering shelter setup, weather awareness, and emergency preparation.
