This blog post may contain affiliate links. As an Amazon Associate I earn from qualifying purchases.
📋 Table of Contents
- Why Your Tent Gets Wet Inside (The Science)
- What Is Tent Condensation?
- 3 Moisture Sources You’re Ignoring
- How the Dew Point Affects Your Tent
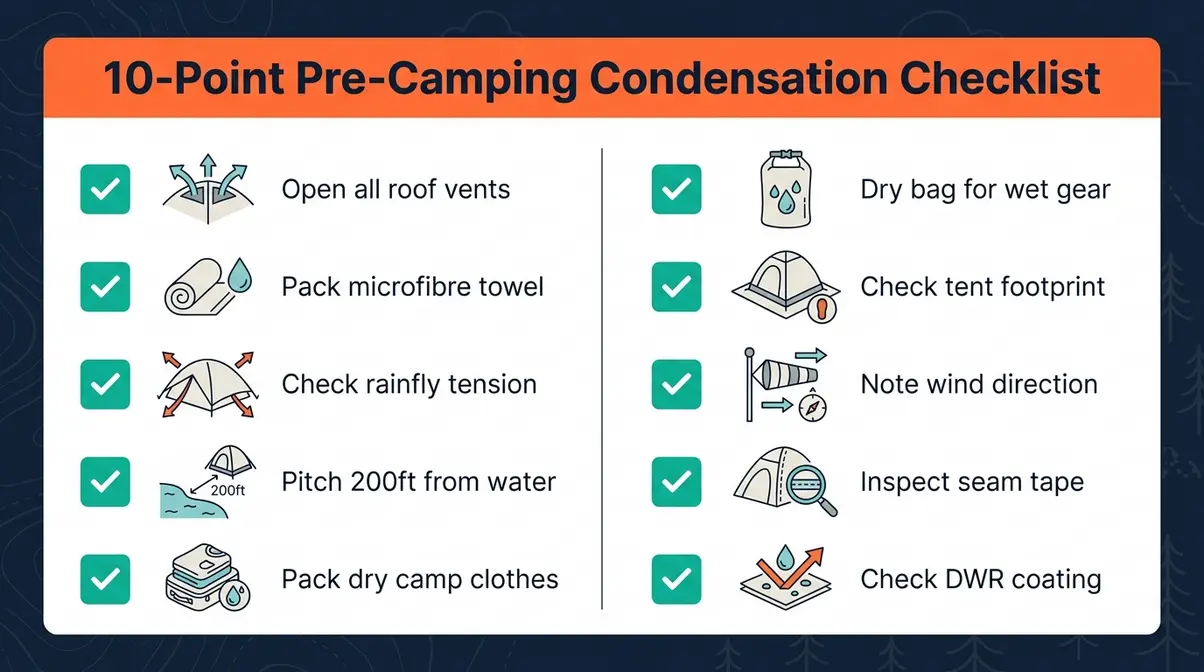
- 7 Core Strategies to Stop Condensation
- Strategy 1: Open Every Vent
- What Is the 200-Foot Rule? (Strategy 2)
- Strategy 3: Manage Moisture Sources
- Strategy 4: Tension Your Rainfly
- Strategy 5: Pitch Facing the Breeze
- Strategy 6: Use a Tent Footprint
- Strategy 7: Morning Wipe Downs
- Stopping Condensation in Winter & Rain
- Why Cold Weather Makes It Worse
- Winter-Specific Tent Tips
- Stopping Condensation When Raining
- How to Dry a Tent Quickly
- Drying at the Campsite
- Drying at Home
- Preventing and Removing Tent Mould
- How to Prevent Mold Growth
- Removing Mold from Canvas Tents
- Tent Cleaning and Maintenance Tips
- Cleaning Mud, Sand, and Tree Sap
- How to Lubricate Tent Zippers
- Long-Term Storage Tips
- Limitations and Tent Alternatives
- Common Mistakes to Avoid
- Will a Dehumidifier Stop Condensation?
- When to Change Tent Types
- Frequently Asked Questions
- Why is my tent wet on the inside in the morning?
- Is tent condensation worse in summer or winter?
- Should you open your tent vents to avoid condensation?
- How do I stop condensation inside my tent?
- How do I avoid condensation in my tent?
- How to prevent tent condensation overnight?
- Conclusion
“The inside of the tent got very damp, to the point my sleeping bag got wet and there was drops of water at the foot of the tent.”
If that sounds familiar, you’re dealing with tent condensation — and you’re not alone. You checked for leaks. The rain fly was on. Nothing seemed wrong. Yet somehow, everything inside was soaking wet. Most guides just tell you to “open a vent” — but that’s only one piece of the puzzle.
In this guide, you’ll learn exactly how to prevent tent condensation using a simple three-part framework called The Dry Tent Triangle, so you can wake up dry on every trip — even in winter. We’ll cover the science behind condensation, 7 core prevention strategies, seasonal tips for winter and rain, and how to care for your tent long-term.
Learning how to prevent tent condensation starts with understanding that moisture forms when warm breath hits cold fabric — but you can stop it. Multiple outdoor manufacturers including Sea to Summit and NEMO Equipment confirm that a sleeping adult exhales roughly 0.5–1 litre of water vapour per night, constantly adding moisture to your tent.
- The Dry Tent Triangle: Every condensation fix falls into one of three pillars — Airflow, Site Selection, or Moisture Management
- Ventilation is #1: Open ALL vents, even in cold weather — this single step reduces condensation more than any other action
- The 200-Foot Rule: Pitch your tent at least 200 feet from water sources to avoid damp, moisture-heavy air
- Winter wildcard: A small gap in your tent’s snow skirt can reduce condensation by around 80% compared to a tightly sealed skirt (Seek Outside)
- When prevention fails: A camp towel or bandana for morning wipe-downs is your fastest field fix
Why Your Tent Gets Wet Inside (The Science)
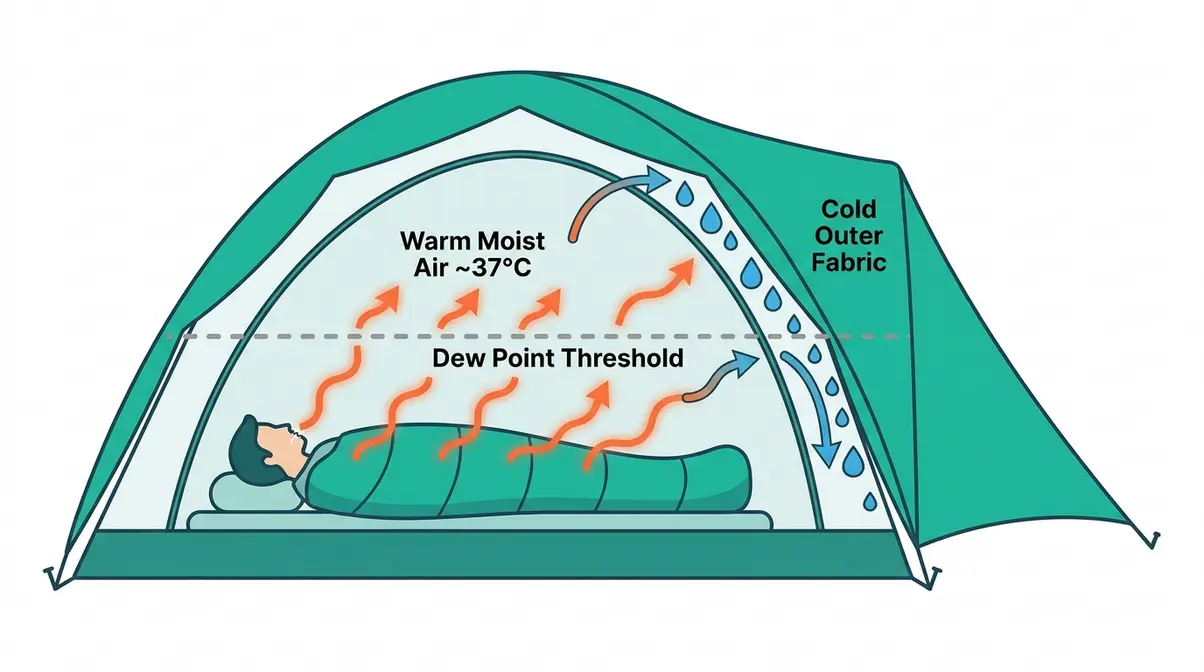
Tent condensation forms when warm, moist air from your breath and body meets the cooler surface of your tent fabric and turns into liquid water. Multiple outdoor gear manufacturers — including Sea to Summit, NEMO Equipment, and Redverz — consistently report that a sleeping adult exhales roughly 0.5–1 litre (about 1–2 pints) of water vapour over a full night of sleep. Research from the National Institutes of Health (2021) found that a resting adult exhales approximately 500 mL of air per breath, with relative humidity exceeding 85%. Over eight hours, that adds up to a significant pool of moisture trapped inside your shelter.
This is not a leak. Your tent is doing exactly what it’s designed to do. The moisture is coming from inside — from you.
What Is Tent Condensation?
Tent condensation is the buildup of water droplets on the interior fabric of your shelter. Think of it like a cold glass of water on a hot day — the moisture in the surrounding air turns to liquid when it touches the cold surface. The same thing happens inside your tent at night.
The key concept here is the dew point — the temperature at which moisture in the air turns into liquid water. As night temperatures drop, the air inside your tent cools. When that air reaches the dew point, any moisture it’s carrying has nowhere to go except onto your tent walls. This is why you wake up to a wet interior even on a night with no rain.
Why does it matter? Because understanding the dew point tells you that condensation is a temperature and moisture problem, not a gear defect. You can solve it — once you know the three levers to pull.
3 Moisture Sources You’re Ignoring
Most campers blame condensation on one thing: their breath. But there are actually three sources of moisture building up inside your tent each night, and missing any one of them makes the others worse.
1. Breath and body heat. This is the biggest contributor. According to Sea to Summit, we exhale upwards of one litre of moisture while we sleep. Multiply that by two people, and you’re adding nearly two litres of water vapour to a sealed space overnight. Every exhaled breath raises the humidity inside your tent.
2. Wet gear, wet clothes, and wet dogs brought inside. A damp jacket draped over your sleeping bag, soggy boots left inside the inner tent, or a wet pet curled up next to you — all of these release moisture into the enclosed air. Campers consistently report that bringing wet gear inside is one of the fastest ways to create “massive condensation issues” even in mild conditions.
3. Ground evaporation rising through the tent floor. Moisture trapped between damp ground and your tent floor can evaporate upward, especially if you’re camping on wet grass or near a body of water. This is a less obvious source, but it quietly adds to the overall humidity inside your tent throughout the night.
If you don’t know where the moisture is coming from, you can’t stop it. Identifying your biggest source is the first step toward a dry tent.
How the Dew Point Affects Your Tent
Here’s where tent design matters. A double-wall tent — which has a separate inner mesh layer and an outer rain fly — handles condensation better because the two layers create a buffer zone. Condensation forms on the outer fly, not on the inner layer where you’re sleeping. The mesh inner keeps the warm, moist air slightly separated from the cold outer fabric.
A single-wall tent, or single-skin tent, where one layer of fabric serves as both shelter and barrier, has no such buffer. Condensation forms directly on the inner surface — the one you’re touching. This doesn’t mean single-wall tents are bad; it means you need to be more aggressive about ventilation and moisture management when using one.
No matter what type of tent you have, every fix for condensation falls into one of three categories. We call this The Dry Tent Triangle: Airflow, Site Selection, and Moisture Management. The rest of this guide is built entirely around those three pillars.
7 Core Strategies to Stop Condensation
When figuring out how to prevent tent condensation, it isn’t about luck or having an expensive tent — it’s about applying the right techniques consistently. The 7 strategies below map directly onto The Dry Tent Triangle framework. Master all three pillars and you’ll eliminate the soggy outer quilt problem for good.

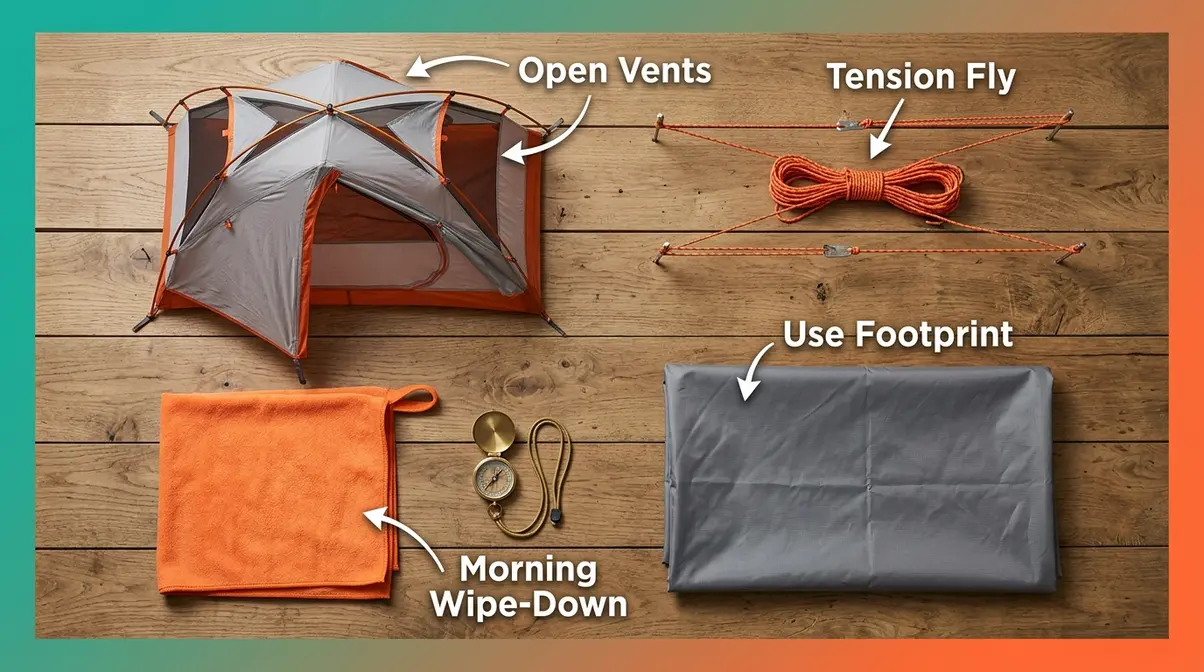
Strategy 1: Open Every Vent
Ventilation is the single most effective way to prevent tent condensation — and it’s also the most commonly skipped step. Many beginners close all their vents in cold weather to stay warm. This traps moist air inside and accelerates condensation dramatically.
Open every vent your tent has — top vents, side vents, door mesh panels — before you go to sleep. Yes, even in cold weather. The goal is to create airflow that carries moist air outside before it can settle on your tent walls. According to REI’s expert advice, ventilation is consistently the top recommendation from experienced campers and outdoor professionals for reducing interior moisture. For more advanced airflow techniques, check out our tent ventilation guide.
Why does it work? Moving air carries water vapour away from tent surfaces. When air stagnates inside a sealed tent, humidity builds until condensation is inevitable. Even a small amount of airflow dramatically lowers the moisture concentration inside.
- What to do:
- Before bed, open all roof vents and any upper-door mesh panels fully.
- If your tent has two doors, crack both slightly — this creates cross-ventilation (air enters one side and exits the other).
- Leave vents open all night, even if temperatures drop.
- In the morning, open the tent fully to air it out before packing.
If you’re cold, add a layer to your sleeping system rather than closing vents. A closed tent with a warmer sleeping bag beats an open tent with a lighter bag — but always keep the vents open.
What Is the 200-Foot Rule? (Strategy 2)
The 200-foot rule is a Leave No Trace guideline that recommends pitching your tent at least 200 feet (approximately 70–80 adult steps, or 60 metres) from any water source — lakes, rivers, streams, and ponds (Washington Trails Association). Where you pitch your tent matters as much as how you set it up. This is the Site Selection pillar of The Dry Tent Triangle.
From a condensation standpoint, this distance matters because air near water is significantly more humid. Camping right next to a lake or stream puts your tent in a zone of moisture-saturated air all night, making condensation nearly unavoidable regardless of other precautions. The rule also protects water quality and wildlife access to riparian zones.

- Beyond distance from water, look for:
- Higher ground. Cold, dense air (and the moisture it carries) sinks into low-lying areas and valleys overnight. A slightly elevated spot is naturally drier.
- Light tree cover. Trees act as a natural windbreak and can moderate temperature swings, reducing the rate at which your tent fabric cools. Avoid pitching directly under heavy canopy, which drips condensation.
- Good airflow. Avoid enclosed hollows or dense brush that trap still, humid air around your tent.
- Avoid frost pockets. Low spots between hills collect cold air and experience heavier dew and frost — both of which accelerate condensation.
Strategy 3: Manage Moisture Sources
This is the Moisture Management pillar. Even with perfect ventilation and a great campsite, bringing moisture sources inside your tent will overwhelm your other efforts.
Keep wet gear outside or in the vestibule. Wet boots, damp jackets, soggy socks, and wet towels all release moisture into the air. Your vestibule (the covered porch area between the inner tent and the outer fly) is designed exactly for this. Use it. If you don’t have a vestibule, keep wet gear in a dry bag outside.
Don’t cook inside your tent. Boiling water releases enormous amounts of steam. Even a single pot of pasta can raise the humidity inside a small tent significantly. Cook outside, or at the tent door with vents open if weather forces you inside.
Change into dry clothes before sleeping. The damp clothes you hiked in all day are carrying moisture. Changing into dry camp clothes before bed reduces the amount of evaporation happening inside your sleeping bag all night. Your sleeping bag got wet? This is often why.
Keep pets dry. A wet dog inside a tent is a significant moisture source. Towel-dry your dog before letting them in, or have them sleep in the vestibule.
Strategy 4: Tension Your Rainfly
A loose, sagging rainfly is a condensation trap. When the fly sags inward and touches the inner tent, it creates a bridge that transfers moisture directly to the inner layer — exactly what the double-wall design is meant to prevent.
Tension your rainfly tightly so there’s a clear air gap between the fly and the inner tent on all sides. Use all the guy lines your tent came with, not just the four corner ones. A properly tensioned fly also sheds rain more efficiently, reducing the amount of water sitting on the outer surface.
According to Section Hiker’s condensation guide, proper fly tensioning is one of the most overlooked setup steps for beginners — and one of the most impactful for keeping the inner tent dry.
- How to check your fly tension:
- Set up your tent and stand back to look at it from the side.
- The fly should slope away from the inner tent on all sides with no sagging contact points.
- Push lightly on the fly — it should spring back firmly, not flop inward.
- Adjust all guy lines until the fly is drum-tight.
Strategy 5: Pitch Facing the Breeze
Airflow doesn’t just happen through vents — it also flows through your tent’s orientation. Pitching your tent with the main door or largest vent facing into the prevailing breeze creates natural cross-ventilation that moves moist air through and out of your tent all night.
Before you stake out your tent, wet your finger and hold it up, or watch nearby grass and leaves. Note the wind direction. Then orient your tent so the breeze enters through the door or a vent on the windward side and exits through a vent on the leeward side.
Why this matters: Even a gentle breeze creates measurable airflow through a tent. That airflow carries water vapour with it. Pitching perpendicular to the breeze, or with your door facing away from the wind, means you’re losing most of this natural ventilation benefit.
Strategy 6: Use a Tent Footprint
A tent footprint (a ground sheet cut to match the exact shape of your tent floor) creates a physical barrier between damp soil and your tent’s fabric floor. According to environmental research from the University of Chicago, moisture trapped between damp soil and your tent floor can easily evaporate upward. Without a footprint, this moisture can wick upward through the tent floor material, especially on wet grass or near water.
Footprints also protect your tent floor from abrasion, extending the life of your tent significantly. Many tent manufacturers sell footprints designed specifically for their models, but a cheap polycryo sheet or tarp cut to size works just as well.
- How to use it correctly:
- Lay the footprint on the ground where you plan to pitch.
- Make sure the footprint does not extend beyond the tent floor edges — if it sticks out, it channels rainwater underneath your tent.
- Pitch your tent on top, with the floor sitting flat on the footprint.
Strategy 7: Morning Wipe Downs
Even when you do everything right, some condensation is normal — especially in humid conditions or during cold nights. Accepting this and having a plan is part of smart moisture management.
Keep a small microfibre camp towel or even a cotton bandana inside your tent. Each morning before packing, take 60 seconds to wipe down the inner walls, paying attention to the lower sections and any corners where moisture pools. This removes the condensation before it soaks into your sleeping bag or gear.
Why bother if you’re packing up anyway? Because a wet tent packed into a stuff sack becomes a mould factory within 24–48 hours. Wiping down the interior before packing is the fastest way to prevent the mould problem covered later in this guide.
Stopping Condensation in Winter & Rain
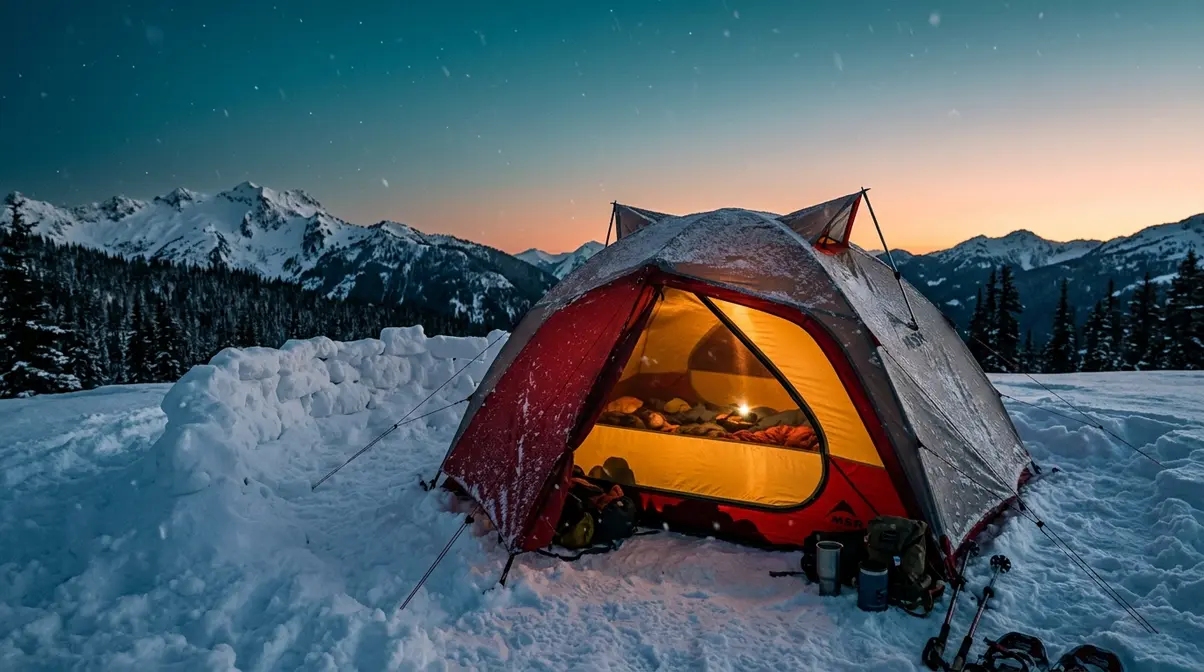
Cold and wet conditions are the hardest test for The Dry Tent Triangle. The same physics that cause condensation on mild nights become dramatically more intense when temperatures drop below freezing or when rain keeps you tent-bound for hours. Understanding why — and knowing the winter-specific fixes — can cut your condensation problem by more than half.
Why Cold Weather Makes It Worse
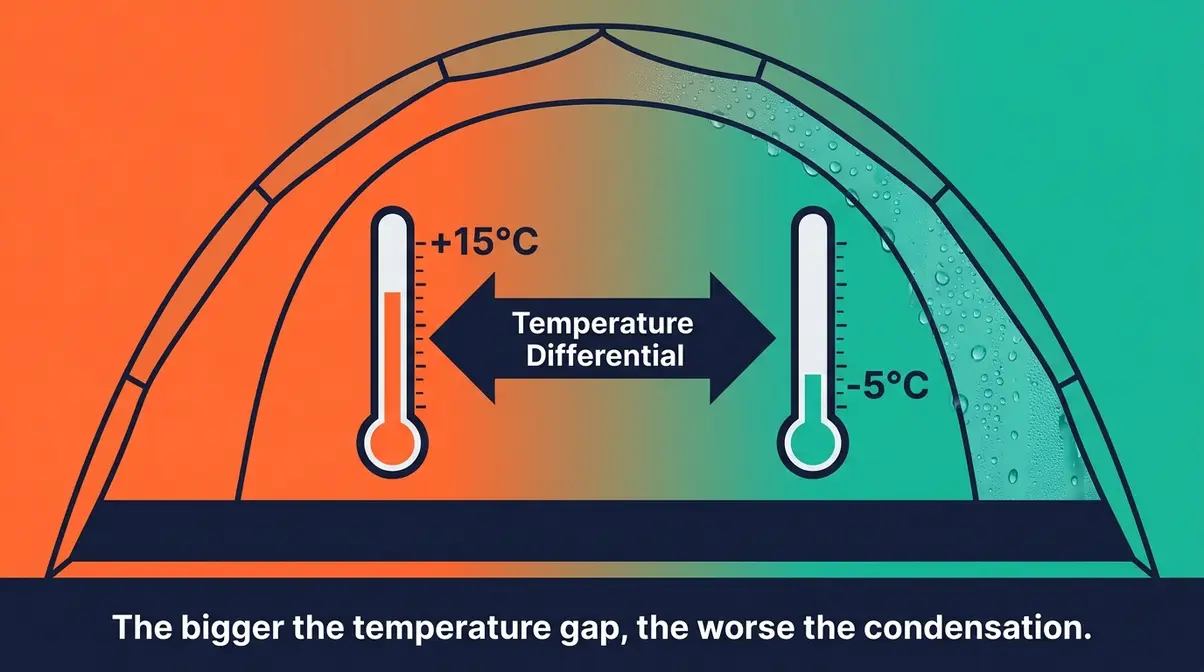
Tent condensation is worse in cold weather than in summer, and the physics explain why clearly. Cold air holds far less water vapour than warm air. When the temperature inside your tent drops overnight, the air rapidly approaches its dew point — the point at which moisture must condense onto surfaces. Even a modest amount of exhaled breath can push the interior past that threshold.
Additionally, the temperature difference between inside and outside the tent is much greater in winter. That steep gradient means tent fabric cools down faster, and condensation forms more aggressively on those cold surfaces. Seek Outside’s condensation research confirms that the temperature differential between inside and outside air is the primary driver of condensation intensity — the bigger the gap, the worse the problem.
In summer, warmer nights mean a smaller temperature differential and a higher dew point threshold. This is why condensation feels like a seasonal problem to many campers, even though the same physics apply year-round.
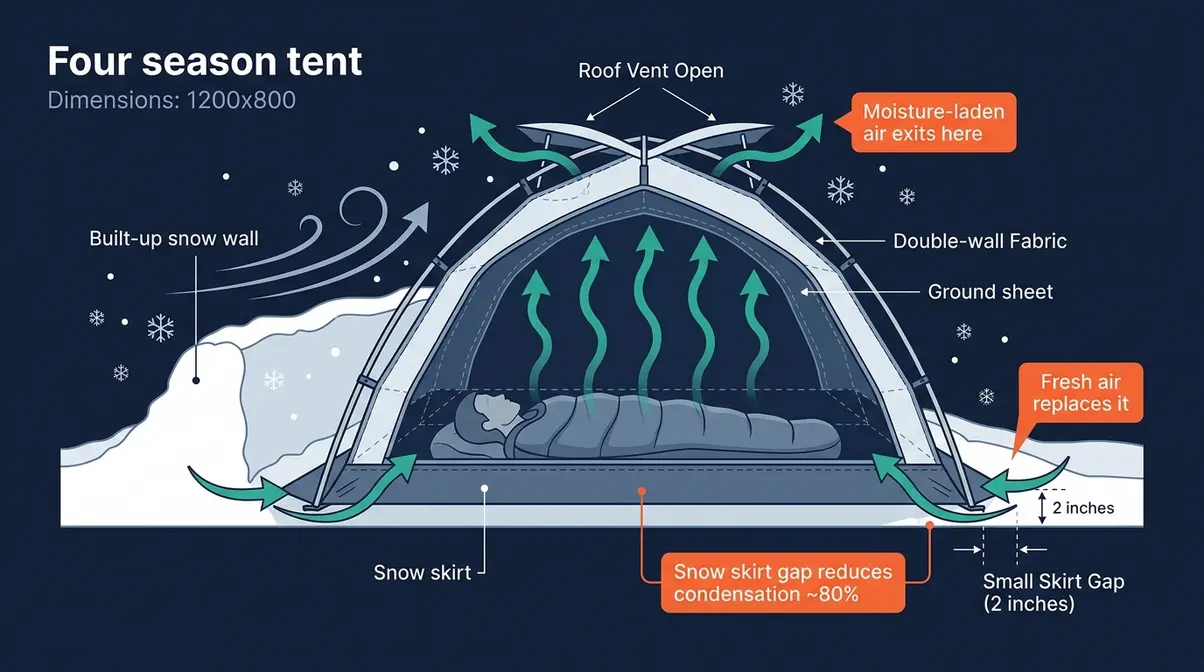
Winter-Specific Tent Tips
The standard tips still apply in winter — open vents, manage moisture sources, choose a good site — but cold conditions require a few additional tactics. For extreme cold, using one of the best hot tents for winter camping changes the dynamic entirely by introducing a dry heat source.
The skirt gap technique. Many cold-weather and four-season tents have a snow skirt — a fabric flap around the base designed to be sealed with snow to block wind and cold air. Counterintuitively, Seek Outside’s field testing found that leaving a couple of inches of gap at the base (rather than sealing it completely) reduces condensation by around 80% compared to a tightly sealed skirt. The small gap allows moist air to escape from the bottom of the tent, preventing it from building up. The trade-off is a slight increase in draft — which you can offset with a warmer sleeping bag.
Build a snow wall. If wind is a concern, build a low snow wall a metre or two upwind of your tent rather than sealing the skirt. This blocks the worst of the wind while allowing airflow underneath the tent. Additionally, brushing snow off your clothes before entering significantly reduces interior moisture, according to Princeton University’s Outdoor Action.
Ventilate aggressively. The instinct to seal everything shut in cold weather is the single biggest mistake winter campers make. Keep roof vents open. If condensation is forming despite open vents, crack the door slightly on the leeward side (the side away from the wind) to increase airflow without letting in a blast of cold air.
Keep your sleeping bag inside a dry bag or stuff sack when not in use. In winter, condensation can soak a down sleeping bag in a single night if the bag is left exposed while you cook or move around the tent. A wet down bag loses most of its insulating power, which is a serious safety concern in freezing temperatures.
Stopping Condensation When Raining
Rain creates a unique challenge. You’re likely to keep vents partially closed to prevent water ingress, and you may be spending more time inside the tent — both of which accelerate condensation. If you frequently camp in storms, consider upgrading to the best tent for wind and rain to ensure maximum protection while maintaining ventilation. Here’s how to manage it.
Keep at least the top vents open. Most tent rain vents are designed with a hood or baffle that keeps rain out while allowing airflow. Trust the design and keep them open. Closing top vents during rain is one of the most common mistakes campers make — it eliminates your primary moisture escape route.
Use the vestibule aggressively. During rain, your vestibule becomes your best friend. Cook there. Store wet gear there. Remove wet rain gear before entering the inner tent. Every item of wet gear that stays outside the inner tent is moisture that never enters your sleeping space.
Dry yourself before entering. Shake off your rain jacket, wipe your face, and remove wet shoes before crossing into the inner tent. It takes 30 seconds and makes a measurable difference in interior humidity over a long rainy day.
According to Sea to Summit’s condensation management guide, combining active ventilation with disciplined gear management is the most effective two-step approach for wet-weather camping.
How to Dry a Tent Quickly

Even a perfectly managed tent will absorb some moisture over a camping trip. Packing away a damp tent is one of the fastest ways to ruin it — mould can begin growing within 24–48 hours in a sealed, damp stuff sack. As noted by New York Times Wirecutter, proper drying extends the life of your tent significantly. Drying your tent properly, both at the campsite and at home, is the final step in long-term condensation management.
Drying at the Campsite
The morning dry-out is the most important habit you can build as a camper. Before you pack up, give your tent 20–30 minutes to air out. Here’s the most efficient approach:
- Open all doors and vents fully immediately after waking.
- Wipe down interior walls with a microfibre towel to remove pooled condensation.
- Remove the inner tent from the poles and lay it flat or drape it over a low branch or clothesline in a breezy spot.
- Separate the rain fly and spread it on the opposite side — or over the tent poles — in direct sunlight if available.
- Flip the inner tent after 10 minutes to dry the underside.
- Wipe the tent poles dry before packing — metal poles can corrode if packed wet.
If you’re breaking camp in rain and can’t dry the tent fully, pack it in a separate dry bag from the rest of your gear, and prioritise drying it as soon as you’re home.
Drying at Home
You don’t need a garden or a large space to dry a tent properly. Campers consistently report success with these approaches even in small apartments:
Drape it over furniture. Set up the tent poles in your living room or lay the fly over a sofa, dining chairs, or a clothes rack. The goal is to get air circulating around all surfaces. Leave it for 12–24 hours.
Use a shower rod. The rain fly and inner tent can be draped over a shower curtain rod or hung over a door with the fly spread wide. A small fan directed at the tent speeds up the process significantly.
Never use a tumble dryer. Heat destroys the waterproof coatings (DWR — Durable Water Repellent) on modern tent fabrics. Machine washing on a high setting has the same effect. Always air dry at room temperature.
Check the seams and corners. These are the last areas to dry and the first places mould takes hold. Run your hand along all seam tape and corner joints before packing to confirm they’re completely dry.
Preventing and Removing Tent Mould
Mould is what happens when condensation management fails. A single damp storage session can be enough to start mould growth on tent fabric — and once established, mould weakens fibres, creates an unpleasant smell, and can permanently stain your tent. The good news is that both prevention and removal are straightforward.
How to Prevent Mold Growth
The golden rule: never pack a wet tent. This single habit prevents the vast majority of tent mould problems. Mould needs three things to grow: moisture, warmth, and organic material (like the fabric of your tent). Remove the moisture, and you remove the problem. The University of Missouri Extension recommends addressing dampness immediately to prevent spores from taking root.
- Prevention checklist:
- Always dry your tent fully before storage — both the inner tent and the outer fly.
- Store your tent loosely in a mesh or cotton bag, not compressed in its stuff sack. Compression retains moisture and heat.
- Store in a cool, dry place away from direct sunlight. UV light degrades tent fabric over time.
- After every trip, inspect seams and corners for any damp spots or early mould signs — small grey or black specks.
- If you notice a musty smell, air the tent out immediately. Don’t wait until the next trip.
Across camping communities, the consistent feedback is that the most expensive tents still develop mould when stored damp — gear cost doesn’t protect against poor habits.
Removing Mold from Canvas Tents
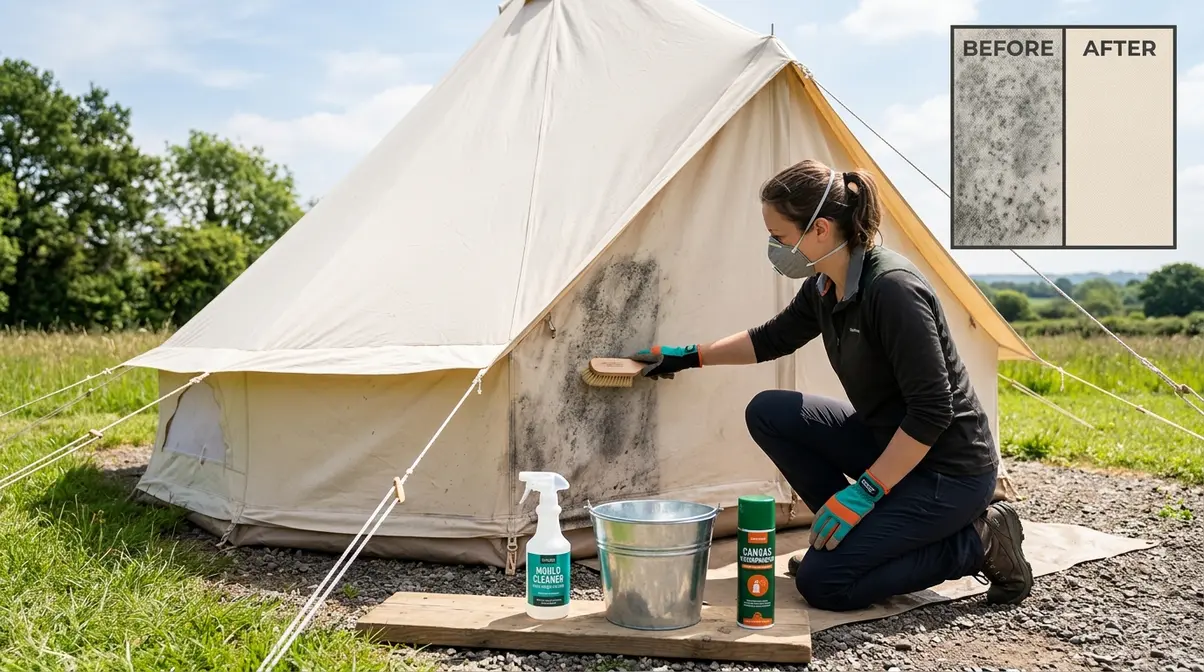
Canvas tents are particularly prone to mould because the natural fibres hold moisture more readily than synthetic fabrics. However, canvas mould is treatable if caught early.
What you’ll need: Soft-bristle brush, white vinegar, water, spray bottle, mild canvas-specific cleaner, canvas waterproofing treatment.
Step-by-step removal process:
- Pitch the tent outdoors on a dry, breezy day. Work outside — mould spores are not something you want indoors.
- Dry-brush the affected areas with a soft-bristle brush to remove loose spores. Wear gloves and a dust mask.
- Mix your cleaning solution: RMEF (Rocky Mountain Elk Foundation) recommends ½ cup of cleaning vinegar per gallon of water as a canvas-safe option that is less abrasive than bleach. For a gentler mix, Life inTents suggests 1 part white vinegar to 3 parts water.
Once your solution is mixed and ready, proceed with the active cleaning steps:
- Spray the solution onto the mouldy areas and let it sit for 10–15 minutes.
- Scrub gently with the soft brush — do not scrub aggressively, as this can damage canvas fibres.
- Rinse thoroughly with clean water and allow the tent to dry completely in the open air.
- Re-waterproof the canvas once fully dry. Cleaning strips the original waterproofing treatment, so re-application is essential. Use a canvas-specific waterproofing spray or treatment.
Important: High-pressure washing is not recommended for canvas tents — it can damage fibres and coatings (RMEF). Avoid chlorine bleach where possible; vinegar is equally effective at killing mould spores and is far gentler on canvas fibres.
Tent Cleaning and Maintenance Tips
A well-maintained tent lasts many more seasons than a neglected one. Beyond condensation management, regular cleaning and maintenance protect your investment and ensure your shelter performs when you need it most.
Cleaning Mud, Sand, and Tree Sap
Mud, sand, and tree sap are the three most common post-trip cleaning challenges, and each requires a slightly different approach.
- For mud:
- Let the mud dry completely before attempting to remove it. Wet mud smears and pushes deeper into fabric.
- Brush off dried mud with a soft brush.
- Rinse with cool water and a sponge — no detergent needed for light mud.
- For stubborn mud, use a small amount of mild, non-detergent soap (like Nikwax Tech Wash) on a sponge, then rinse thoroughly.
For sand: Sand works its way into seams and zippers and is abrasive to coatings. Shake the tent vigorously with the doors open to dislodge loose sand, then rinse with a gentle hose. For stubborn sand in zippers, use a soft toothbrush.
For tree sap: Sap is the trickiest. Apply a small amount of isopropyl alcohol (rubbing alcohol) to a cloth and dab — do not rub — the sap spot. Work from the edges inward to avoid spreading. Once the sap is dissolved, rinse the area with clean water. Test on a small hidden area first to confirm the alcohol doesn’t affect your tent’s coating.
- General rules for tent cleaning:
- Never machine wash a tent — it destroys waterproof coatings and seam tape.
- Never use household detergents, bleach, or fabric softener.
- Always air dry fully before storage.
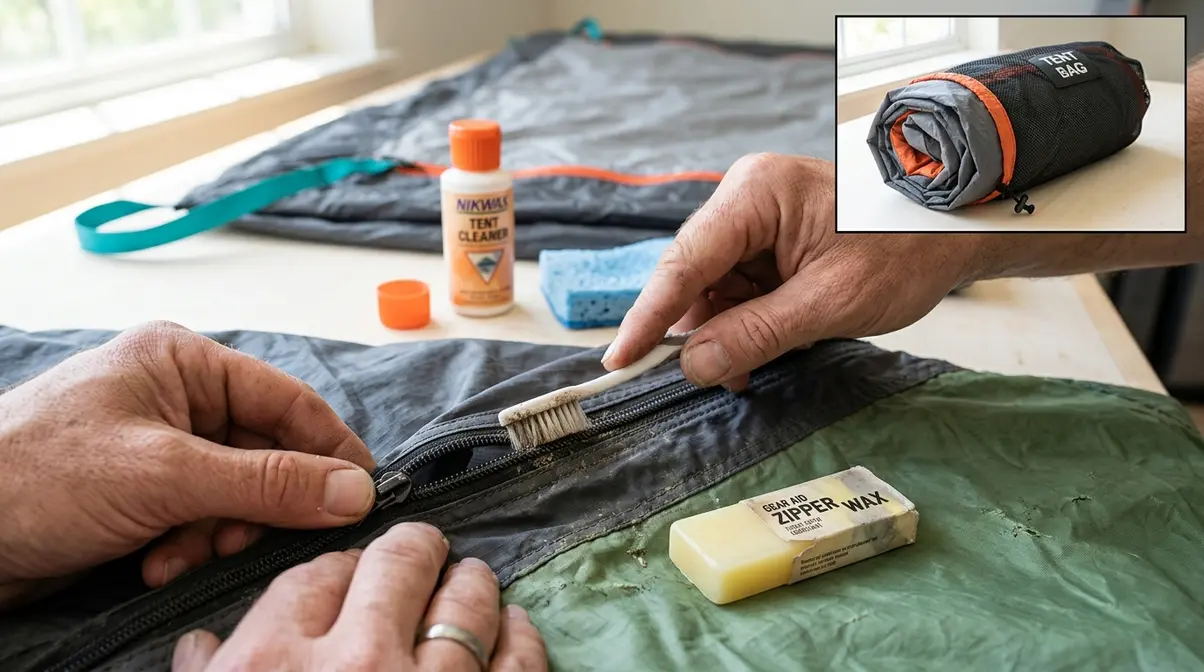
How to Lubricate Tent Zippers
Tent zippers are the most failure-prone component of any tent, and the most commonly neglected. A sticky or snagging zipper is almost always a lubrication problem — not a defect. YKK, the world’s largest zipper manufacturer, advises keeping teeth clear of grit to prevent premature failure.
The best lubricant for tent zippers is a wax-based product specifically designed for outdoor zippers, such as McNett Zipper Lubricant or a simple beeswax bar. These products coat the zipper teeth without attracting dirt.
What NOT to use: WD-40, petroleum-based oils, or cooking spray. These attract grit, which accelerates wear and can permanently damage zipper teeth.
- How to lubricate your tent zippers:
- Brush any visible dirt or grit off the zipper teeth with a soft toothbrush.
- Run the wax lubricant along both sides of the zipper teeth.
- Work the zipper back and forth several times to distribute the wax evenly.
- Wipe away any excess with a dry cloth.
Do this after every trip, and before your first trip of each season. It takes two minutes and can extend zipper life by years.
Long-Term Storage Tips
How you store your tent between seasons has a direct impact on how long it lasts and how well it performs. Campers who store tents correctly report using the same tent for 10–15 seasons without significant degradation.
| Storage Factor | Right Approach | Common Mistake |
|---|---|---|
| Moisture | Fully dry before storage | Packing damp after a trip |
| Compression | Store loose in mesh/cotton bag | Leaving compressed in stuff sack |
| Temperature | Cool, dry indoor location | Garage or car boot (temperature extremes) |
| UV exposure | Away from windows and sunlight | Near a sunny window |
| Poles | Stored disassembled, loosely | Left assembled under tension |
| Seam tape | Inspect and re-seal if peeling | Ignored until leaks develop |
Over time, the factory seam tape on your tent can begin to peel, allowing moisture to seep in and masquerade as condensation. Learning how to properly seal tent seams is a vital maintenance skill. You’ll want to carefully remove any flaking tape with a soft brush, clean the area with rubbing alcohol, and apply a dedicated seam sealer designed for your tent’s specific fabric (silicone-based for silnylon, or polyurethane-based for standard polyester). Allow it to cure for a full 24 hours in a dry, well-ventilated space before packing the tent away.
Similarly, the Durable Water Repellent (DWR) coating on your rainfly will eventually wear off from UV exposure and abrasion. When water stops beading up and instead soaks into the fabric (a process called ‘wetting out’), breathability plummets, which traps condensation inside. You should re-apply one of the best tent waterproofing sprays annually. Simply pitch the tent, wash it gently, spray the treatment evenly over the wet rainfly, and let it air dry completely.
One habit that makes a big difference: Before storing for winter, set your tent up in the garden or living room one final time, inspect every seam and zipper, apply a fresh coat of DWR spray to the fly, and then pack it loosely in a breathable bag. This 30-minute annual ritual keeps your tent performing like new for years.
Limitations and Tent Alternatives
The strategies in this guide are effective for the vast majority of camping situations — but they’re not magic. Some conditions push condensation beyond what any ventilation strategy can fully prevent. Knowing the limits helps you make smarter gear decisions and set realistic expectations.
Common Mistakes to Avoid
Even experienced campers make these errors. Across camping forums and communities, the consistent feedback is that these five mistakes account for most “I did everything right but still got wet” complaints.
1. Closing vents to stay warm. This is the number one mistake. It feels logical — seal out the cold — but it traps moist air inside and guarantees condensation. Always keep vents open; add a layer to your sleep system instead.
2. Pitching in a hollow or low-lying area. Cold, moist air sinks. Hollows and valley floors collect it overnight. Even a gentle slope upward makes a noticeable difference.
3. Bringing too many moisture sources inside. One wet jacket, two wet boots, and a damp dog add up to litres of extra moisture. The vestibule exists for this reason — use it ruthlessly.
4. Not tensioning the rainfly. A sagging fly that contacts the inner tent transfers condensation directly to the layer you’re sleeping against. Check fly tension before bed, not just at setup.
5. Packing a wet tent and hoping it dries in the car. It won’t. A sealed, damp tent in a warm car boot is ideal conditions for mould. Always dry before storage.
Will a Dehumidifier Stop Condensation?
A portable camping dehumidifier can help reduce condensation, but it won’t eliminate it entirely on its own. Small electric or rechargeable dehumidifiers are available for tent use, and they can meaningfully lower interior humidity — particularly useful in a large canvas tent or bell tent where other ventilation is limited. However, they use battery power, add weight, and work best as a supplement to good ventilation, not a replacement for it. For most backpackers, the weight trade-off isn’t worth it. For car campers or glampers with power access, a small dehumidifier can be a useful addition.
When to Change Tent Types
Sometimes the issue isn’t technique — it’s the tent itself. Here’s when upgrading or switching makes sense.
Single-wall tents in humid conditions. A single-skin tent is inherently more prone to interior condensation because there’s no air gap between the moisture-producing inner layer and the cold outer surface. If you frequently camp in humid or wet environments and own a single-wall tent, switching to a double-wall design will make a significant difference — no technique fully compensates for the physics.
Ultralight tents with minimal ventilation. Some ultralight tents sacrifice vent area to reduce weight. If your tent has very small or poorly positioned vents, condensation will be a persistent problem regardless of campsite selection or moisture management. Look for tents with large mesh panels, multiple vent positions, and good fly-to-inner clearance.
Older tents with degraded coatings. A tent whose DWR and polyurethane coatings have broken down may absorb moisture into the fabric rather than shedding it. If your tent feels damp to the touch on the outer fly even without rain, the coating has likely failed. Re-coating with a product like Nikwax Tent & Gear Solarproof can restore performance.
According to Outside Online’s condensation guide, choosing the right tent for your typical camping environment is ultimately more impactful than any in-field technique — and it’s worth considering when repeated condensation problems persist despite following all the standard advice.
Frequently Asked Questions
Why is my tent wet on the inside in the morning?
Your tent is wet inside because of condensation, not a leak. Warm, moist air from your breath and body heat rises and hits the cooler surface of your tent fabric overnight. When that warm air cools to the dew point — the temperature at which moisture turns to liquid — water droplets form on the inner walls. A sleeping adult exhales roughly 0.5–1 litre of water vapour per night (Sea to Summit). The fix is better ventilation, smarter campsite selection, and keeping wet gear outside the inner tent.
Is tent condensation worse in summer or winter?
Tent condensation is typically worse in winter and cold conditions. Cold air holds less water vapour, so it reaches its dew point faster — meaning condensation forms more quickly and more heavily. The larger the temperature gap between inside and outside your tent, the worse the condensation. In summer, warmer nights mean a smaller temperature differential and a higher dew point threshold, so the same amount of exhaled breath causes less condensation. However, camping near water in summer humidity can still produce significant condensation.
Should you open your tent vents to avoid condensation?
Yes — open all your tent vents, even in cold weather. This is the single most effective condensation prevention step. Open vents allow moist air to escape before it reaches the dew point and settles on tent surfaces. Many beginners close vents to stay warm, but this traps moisture inside and guarantees condensation. If you’re cold, add a warmer layer to your sleep system rather than closing vents. Most tent vent designs include rain baffles, so rain ingress is minimal with vents open.
How do I stop condensation inside my tent?
Stopping condensation inside your tent requires addressing all three pillars of The Dry Tent Triangle: Airflow, Site Selection, and Moisture Management. Open all vents before sleeping. Pitch at least 200 feet from water sources on slightly elevated ground. Keep wet gear in the vestibule, not the inner tent. Tension your rainfly tightly to maintain the air gap between layers. In the morning, wipe down interior walls with a microfibre towel before packing. Applying all three pillars together is far more effective than any single tip in isolation.
How do I avoid condensation in my tent?
Avoiding condensation in your tent comes down to consistent application of a few key habits. Before bed: open all vents, change into dry clothes, and move wet gear to the vestibule. When choosing your site: pitch at least 200 feet from water, on elevated ground with good airflow. During setup: tension your rainfly tightly and orient the door toward the prevailing breeze for natural cross-ventilation. In winter: leave a small gap at the base of your snow skirt rather than sealing it completely — Seek Outside’s field testing found this reduces condensation by around 80%. In the morning: wipe down interior walls before packing.
How to prevent tent condensation overnight?
To prevent tent condensation overnight, combine active ventilation with moisture source control before you go to sleep. Open every vent fully. Keep wet gear, wet boots, and damp clothing in the vestibule or outside the inner tent. If camping with a partner, both of you exhaling into a sealed space doubles the moisture load — so ventilation is even more critical for two-person tents. In cold conditions, resist the urge to close vents; instead, use a warmer sleeping bag rated for the temperature. A small microfibre towel kept inside the tent lets you do a quick wipe-down if you wake and notice condensation building on the walls.
Conclusion
For beginner campers dealing with a damp sleeping bag and walls getting so wet they drip, tent condensation is one of the most frustrating problems to solve — because it looks like a leak but isn’t. The solution is understanding the physics: warm moist breath meets cold tent fabric, and water forms. Multiple outdoor gear experts confirm that a single sleeper adds 0.5–1 litre of water vapour to a tent per night. That moisture has to go somewhere — and the goal is to make sure it goes outside, not onto your gear.
The Dry Tent Triangle — Airflow, Site Selection, and Moisture Management — is the framework that ties every strategy in this guide together. No single tip works in isolation. Open vents, pick a smart campsite 200 feet from water, keep wet gear out of the inner tent, tension your rainfly, and wipe down condensation in the morning. Apply all three pillars consistently, and dry mornings become the norm rather than the exception.
Now that you know how to prevent tent condensation, your next camping trip is the best place to start. Pick one section of this guide — the ventilation strategies or the 200-foot campsite rule — and apply it deliberately. Notice the difference. Then layer in the moisture management habits. Within two or three trips, these steps will feel like second nature, and the soggy outer quilt problem will be a memory.