This blog post may contain affiliate links. As an Amazon Associate I earn from qualifying purchases.
📋 Table of Contents
- Before You Arrive: What to Prepare
- Organize and Pre-Pack Gear
- Research Your Campsite Rules
- Step-by-Step Guide: How to Set Up Your Campsite
- Step 1: Choose the Right Spot
- Step 2: Map Out Your Campsite Zones
- Step 3: Pitch Your Tent Correctly
- Step 4: Set Up Your Camp Kitchen
- Step 5: Arrange Sleeping Areas
- Step 6: Set Up Lighting & Campfire
- Campsite Setup Hacks and Common Mistakes to Avoid
- Pro Hacks to Cut Setup Time
- Most forgotten camping items?
- What to avoid when camping?
- Weather-Proofing: Rain and Wind Tips
- How to Set Up Camp in the Rain
- Wind and Lightning Safety
- Using Tarps and Tent Covers
- Campground Rules and Jargon: A Beginner’s Guide
- What Is the 3-3-3 Rule for Camping?
- What Does FF Mean at a Campground?
- The 200-Foot Rule and LNT
- The 444 Rule and 10-Year Rule
- Frequently Asked Questions
- What is the 444 rule for camping?
- How do you properly set up a campsite?
- What is the 10-year rule?
- What does FF mean at a campground?
- What is the 3-3-3 rule for camping?
- What is the 200-foot rule for camping?
- How long does it take to set up?
- Where should you store camp food?
- Limitations and Common Pitfalls
- Common Pitfalls
- When to Choose Alternatives
- When to Seek Expert Help
- Putting It All Together: First Campsite Setup
You pull into the campground after a long drive, the sun is dropping fast, and your gear is in a heap in the trunk. Two hours later, you’re still fumbling with tent poles in the dark, wondering why setup is this hard. Sound familiar? You’re not alone — and the problem isn’t your gear.
Most beginners waste those two-plus hours because nobody ever showed them the right sequence. Every hour spent searching for the can opener or re-pitching a lopsided tent is an hour you’re not around the fire, exploring the trail, or actually relaxing. The good news: the fix is a system, not better equipment.
By the end of this guide, you’ll have a complete set of campsite setup tips that gets any campsite organized in under an hour — safe, efficient, and ready to enjoy. You’ll learn what to prepare before you leave home, how to use the zone-based Camp Architect Method to map your site like a floor plan, pro hacks for faster setup and tear down, weather-proofing strategies, and all the campground rules and jargon decoded.
The best campsite setup tips follow a single principle: treat your site like a floor plan. Designate zones before you unpack — sleeping, cooking, and living — and setup time drops dramatically.
- Start with zones: Map sleeping, kitchen, and relaxation areas before pitching anything
- Tent first: Always pitch your tent before organizing any other gear
- The Camp Architect Method: Orienting zones by wind and sun cuts both setup time and safety risks
- 200-foot rule: Keep your kitchen and waste area at least 200 feet from water sources (Leave No Trace)
- Forgotten items derail trips: Pack a checklist — can opener, trash bags, and extra batteries top the list
Before You Arrive: What to Prepare
The most overlooked campsite setup tip happens before you leave your driveway. Campers who pre-organize gear at home by zone — sleeping, kitchen, living — dramatically reduce on-site setup time. Arriving at camp with a pre-planned system means zero time wasted searching through a chaotic car trunk.
Across camping communities, the consensus is clear: pre-trip organization is the single biggest lever for faster camp setup. Campers who pack by zone consistently report setup times under one hour, compared to two-plus hours for those who pack randomly (r/camping community consensus, 2026). This is the first stage of The Camp Architect Method — you design your floor plan before you ever leave the driveway.
Organize and Pre-Pack Gear
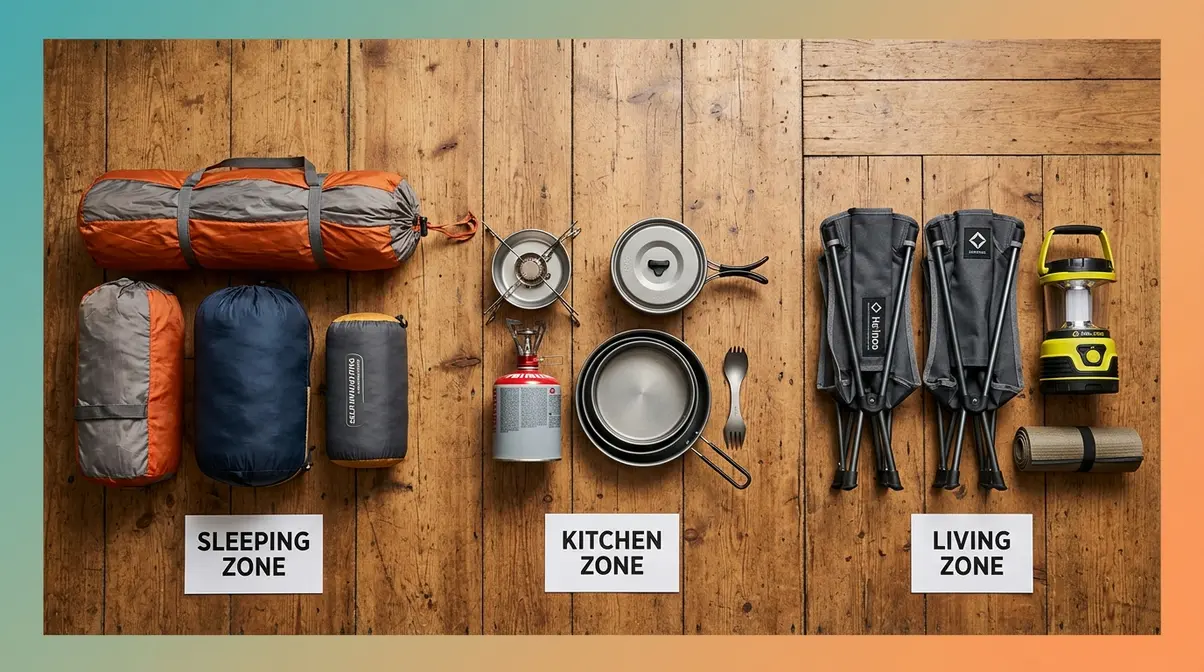
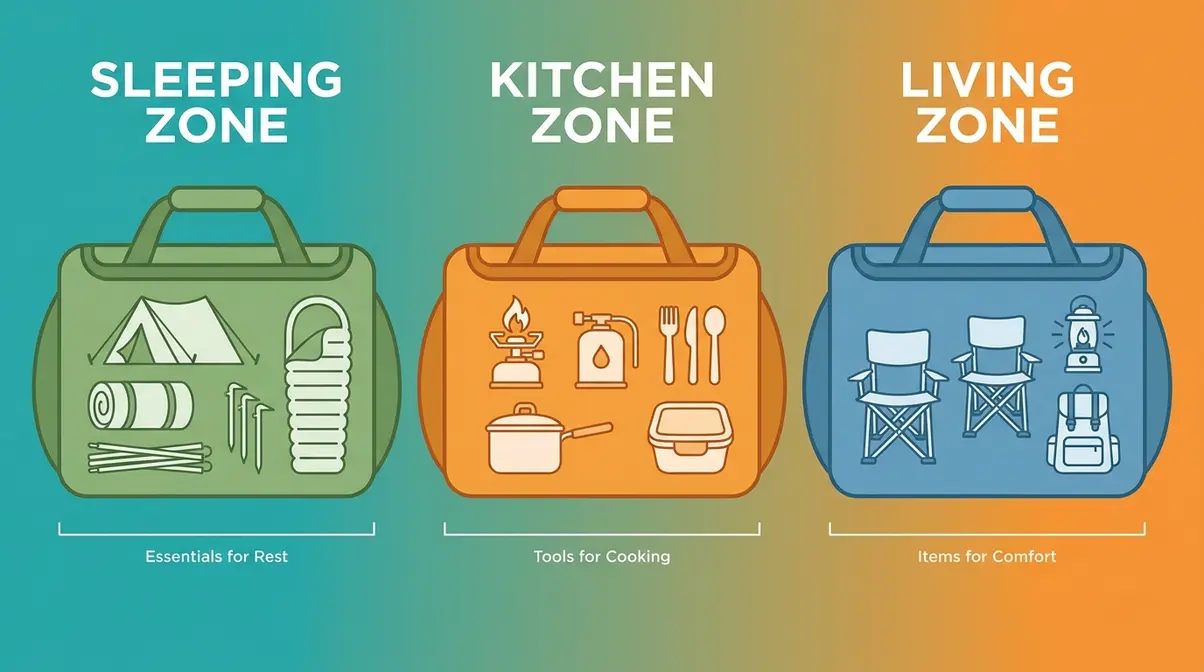
Pack your gear in labeled bags or bins grouped by campsite zone, not by item type. Your sleeping zone bag holds the tent, poles, stakes, sleeping bag, and sleeping pad — everything goes in together. Your kitchen bag holds the stove, fuel, cookware, utensils, and food. Your living-area bag holds camp chairs, a lantern, and your day pack.
Why this matters: when you arrive at camp, you carry each bag to its designated zone and unpack in place. No more dragging items back and forth across the site.
- Pre-departure checklist:
- Group gear into three labeled bags: sleeping, kitchen, living
- Check tent poles and stakes are in the tent bag (not loose in the trunk)
- Verify stove fuel is full and a lighter is in the kitchen bag
- Pack a physical or downloaded packing checklist
- Confirm your campground reservation confirmation and site number
Research Your Campsite Rules
Before you leave home, look up your specific campground on its reservation website or on Recreation.gov. Campgrounds post quiet hours (the designated time period — usually 10 p.m. to 6 a.m. — when noise must be kept to a minimum), fire restrictions (seasonal bans on open flames, often in effect during dry summer months), and any site-specific rules about pets or generator use.
If you plan to camp outside a designated campground on federal land, check the regulations for dispersed camping (camping in undeveloped areas outside formal campgrounds) on the U.S. Forest Service website. Rules vary by forest and can include distance requirements from roads, water, and other campers.
Why this matters: breaking a campground rule — even accidentally — can result in fines or being asked to leave. Knowing the rules before you arrive removes one more source of on-site stress.
Step-by-Step Guide: How to Set Up Your Campsite
Estimated Time: 45-60 minutes
- Tools Needed:
- Tent with footprint, poles, and stakes
- Camp stove and fuel
- Bear-resistant food container or bear bag
- Lantern and headlamps
- Printed packing checklist
Setting up a campsite properly comes down to sequence. Do things in the wrong order and you’ll be moving gear, re-pitching stakes, and backtracking the entire time. Follow these six steps in order and your camp setup becomes fast, logical, and repeatable.
Step 1: Choose the Right Spot
Before unpacking a single item, walk the site. Look for level ground for your tent footprint (the area where your tent will sit). Avoid low spots where rainwater collects. Look up — you want to avoid pitching directly under dead branches (called “widow makers” by experienced campers). Check that the area is free of roots and rocks that would make sleeping uncomfortable.
If your campground offers multiple site options, choose one with natural windbreak — trees or a slope to your back. This matters when you get to tent pitching and tarp setup.
According to REI’s campsite organization guide, choosing a pre-existing, established campsite rather than creating a new one is also a core Leave No Trace principle — it protects surrounding vegetation and soil.
Step 2: Map Out Your Campsite Zones
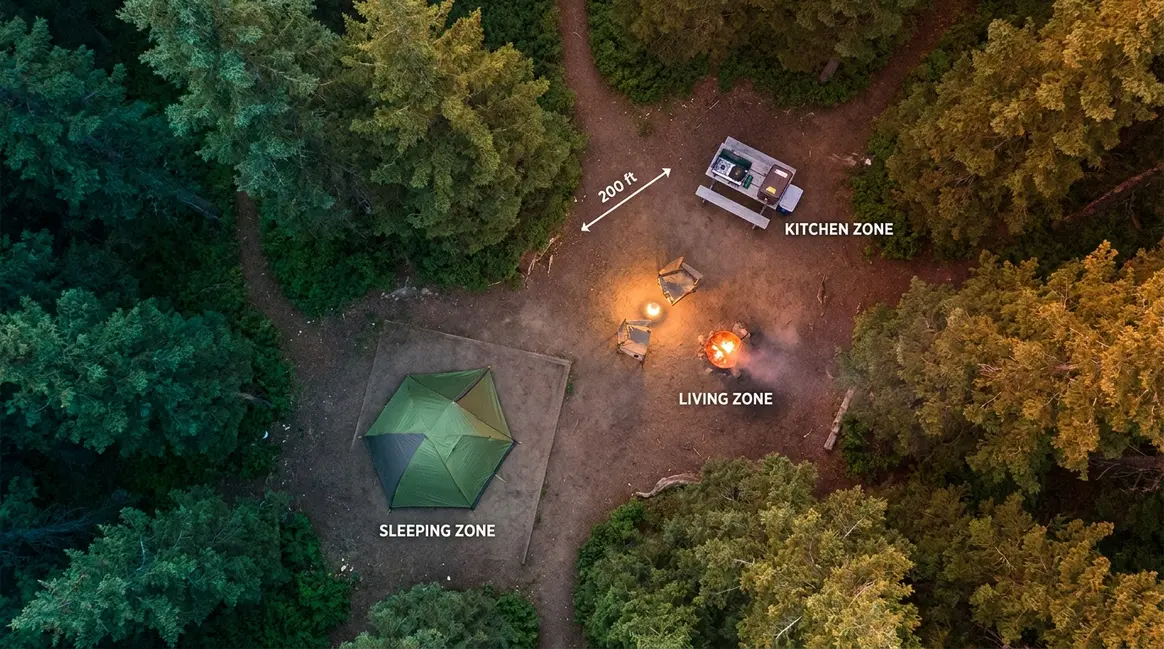
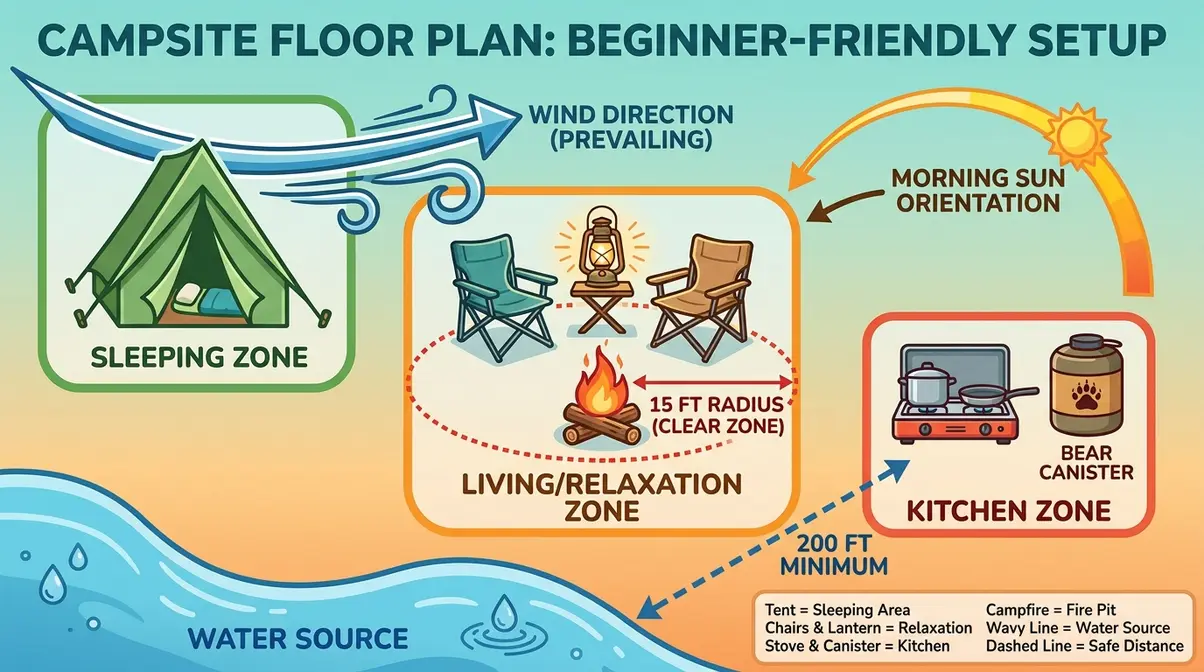
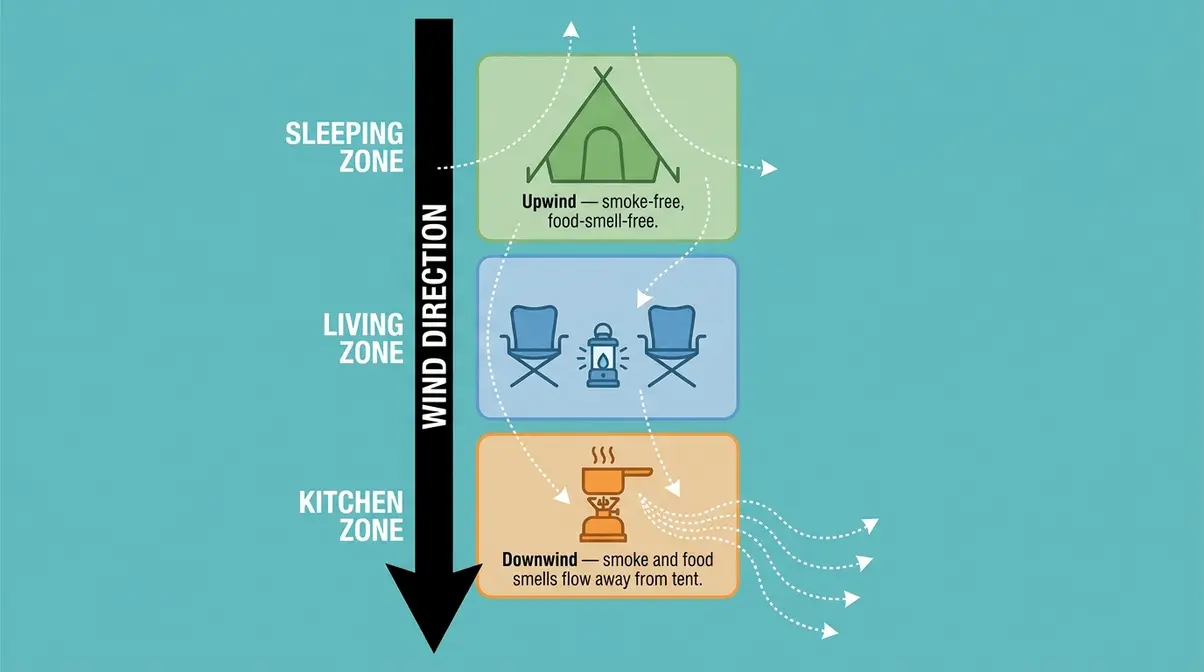
This is the heart of The Camp Architect Method. Before you unpack anything, stand at the center of your site and mentally — or physically with a stick in the dirt — draw three zones:
- Sleeping Zone: Your tent location. Position it upwind of the kitchen zone so cooking smoke doesn’t blow into your tent. Face the tent door away from the prevailing wind.
- Kitchen Zone: At least 200 feet (about 70 adult paces) from any water source and downwind from the sleeping zone. Keep it away from the tent to reduce food smells near where you sleep — a key bear safety principle.
- Living/Relaxation Zone: The social hub — camp chairs, table, lantern. Position it between the sleeping and kitchen zones for easy access to both.
Why this matters: orienting zones by wind direction means smoke goes away from your tent, food smells stay away from your sleeping area, and your whole camp flows logically. Experienced campers consistently report that this single step — zoning before unpacking — cuts setup time more than any gear upgrade.
Step 3: Pitch Your Tent Correctly
Pitch your tent first, always. This is the non-negotiable rule of camp setup. If weather rolls in while you’re still organizing, you need shelter ready.
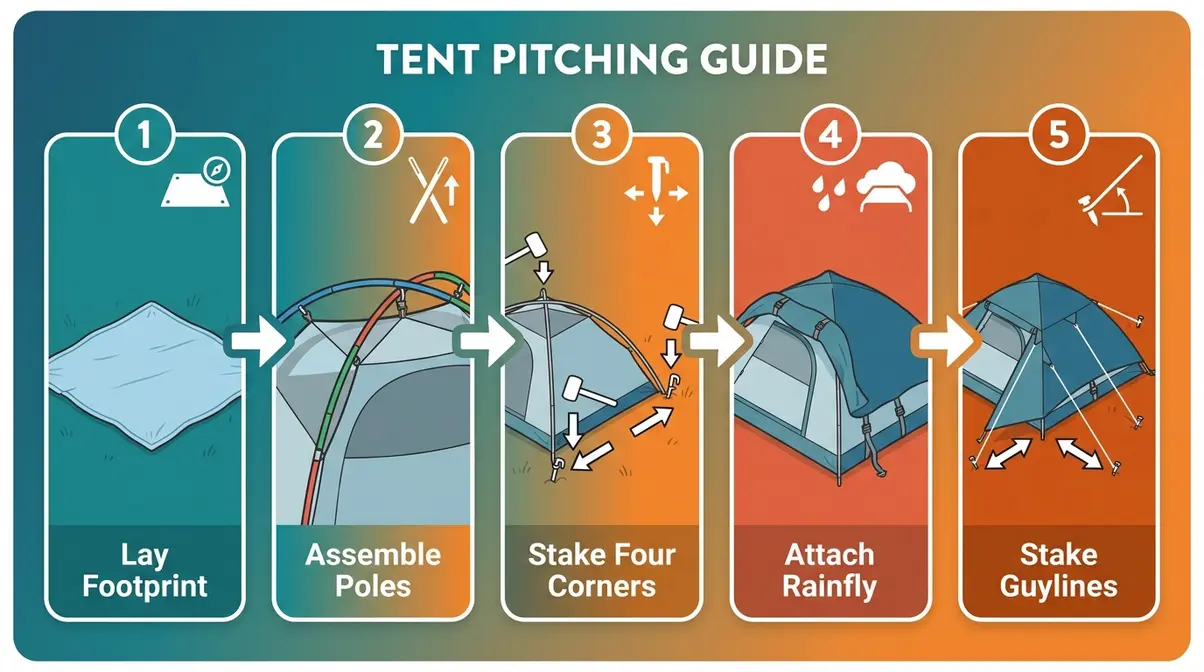
- Lay out your footprint (a ground cloth or tarp slightly smaller than your tent floor) on the level spot you selected.
- Assemble tent poles and thread them through the tent sleeves or attach to clips — follow your tent’s specific instructions.
- Stake out the four corners before raising the tent body. This keeps the tent from blowing away while you work.
- Attach the rainfly (the waterproof outer layer) even if skies look clear. Weather changes fast.
- Stake out the rainfly guylines (the cord attachments that stabilize the fly) at 45-degree angles for maximum stability.
Why this matters: a properly staked tent with a taut rainfly handles rain and wind far better than a tent that was staked loosely and “adjusted later.” For more foundational advice, review these top 10 tent camping tips for beginners before your trip.
Step 4: Set Up Your Camp Kitchen
Set up your kitchen zone next. Place your camp stove on a flat, stable surface — a camp table or a large flat rock — away from any flammable material. Connect your fuel canister and test the ignition before you need it for a meal.
Food storage is where beginners most often make costly mistakes. According to the Leave No Trace Center for Outdoor Ethics, all food, trash, and scented items must be stored at least 200 feet (approximately 70 adult paces) from water sources, and in bear-resistant containers or hung in a bear bag in areas with bear activity. The CDC also advises keeping a clean camp kitchen — wash hands and cooking surfaces after handling raw food to prevent illness in the field.
Why this matters: improper food storage is the leading cause of wildlife encounters at campsites, and it’s entirely preventable.
Step 5: Arrange Sleeping Areas
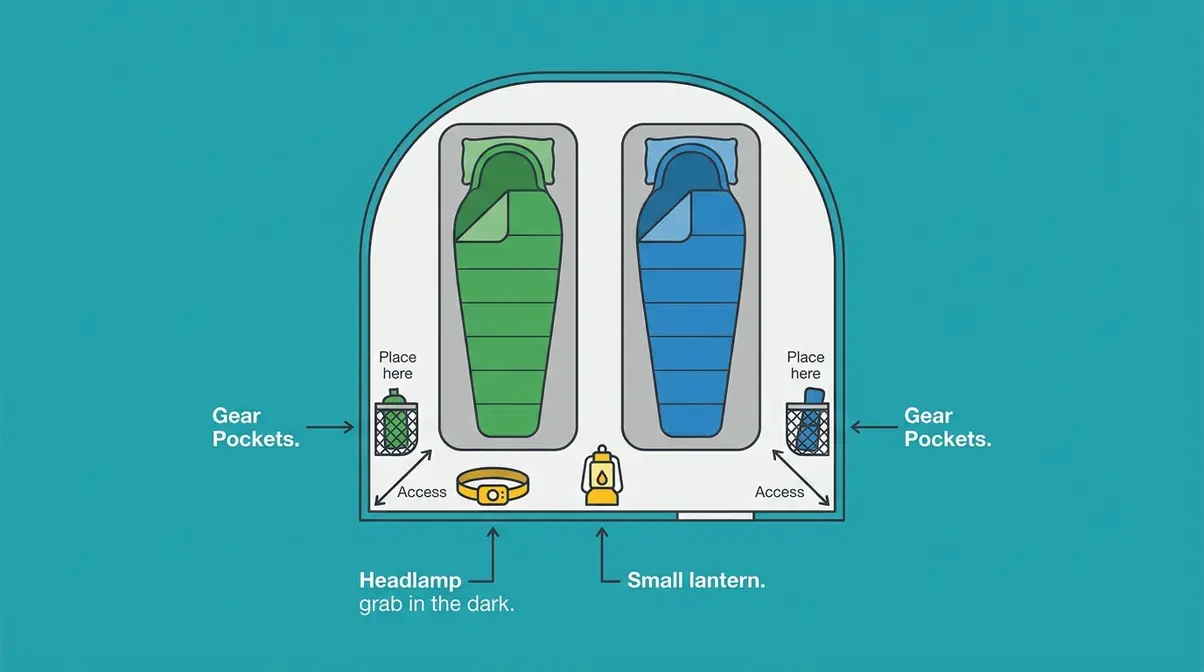
Once the tent is pitched, set up the interior. Lay down your sleeping pad first (it provides insulation from the cold ground), then unroll your sleeping bag on top. Place your headlamp or small lantern near the tent door where you can grab it in the dark.
In your living zone, set up camp chairs facing away from direct wind. Position your main lantern centrally — between the chairs and the kitchen area — so it illuminates both spaces. Hang a small gear organizer or use a folding table to keep everyday items (sunscreen, insect repellent, water bottles) off the ground and easy to find.
Step 6: Set Up Lighting & Campfire
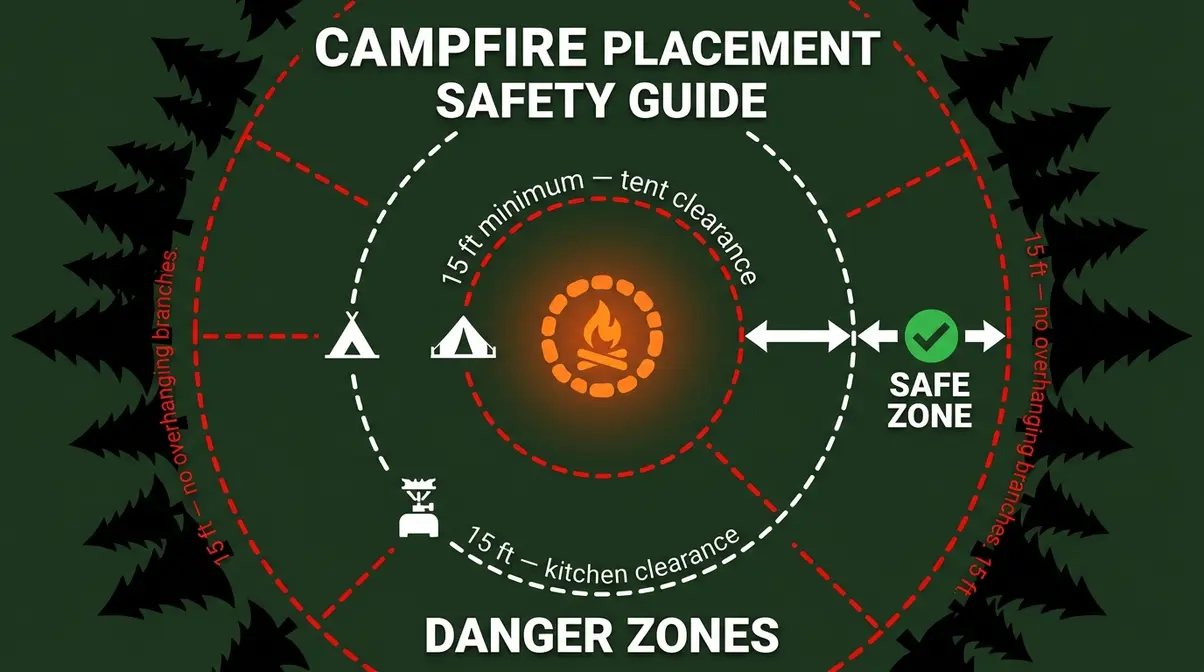
Set up your campfire area last — after shelter, kitchen, and sleeping areas are ready. Most campgrounds have a designated fire ring; use it. Never build a new fire ring or move an existing one.
The standard safe distance for a campfire is at least 15 feet from your tent, any structure, and overhanging branches. Check your campground’s current fire restrictions before lighting anything — fire bans are common in summer and fall and carry real fines.
Hang a lantern from a tree branch or use a tripod lantern stand at the center of your living zone. Place a headlamp inside the tent door and a spare flashlight in your kitchen bag. Experienced campers consistently report that having three light sources — overhead lantern, headlamp, and backup flashlight — eliminates the fumbling that slows down camp cooking and late-night tent navigation.
Campsite Setup Hacks and Common Mistakes to Avoid
Even with the right sequence, small habits separate a one-hour setup from a two-hour ordeal. This section covers the pro hacks that experienced campers use, the most-forgotten items that derail trips, and the rookie mistakes that are easy to avoid once you know what they are.
Pro Hacks to Cut Setup Time
“I’m wondering, what are your best tips and tricks for faster and more efficient set up and tear down of a camp site? It’s taking us over 2 hours on average to get it all ready and I’d love to cut that back.”
That question — shared across camping communities constantly — has a clear answer: the time is lost to searching and backtracking, not to the actual tasks. Here’s how to cut that back:
The 5 hacks experienced campers swear by:
- Pre-assemble what you can at home. Tent poles can be connected (accordion-folded) and left connected. Stakes can go in a dedicated pouch clipped to the tent bag. Arriving with pre-organized gear saves 20-30 minutes alone.
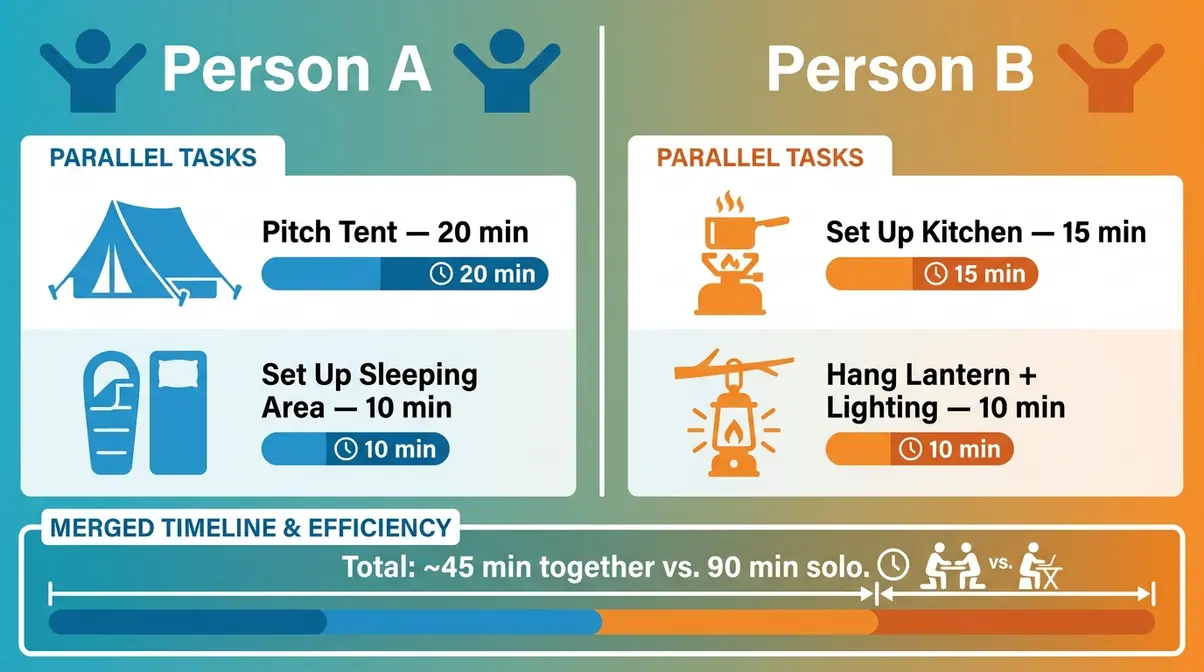
- Assign roles if you’re with a group. One person pitches the tent, one sets up the kitchen, one handles lighting. Parallel tasks cut total time by roughly half.
- Use a camp setup checklist on your phone. A simple numbered list — site walk, zones marked, tent pitched, kitchen up, sleeping area set, fire area set — keeps everyone on the same page.
- Pack a “first night bag” separately. Put the items you’ll need in the first 30 minutes (tent, headlamp, sleeping bag, stove, one pot, snacks) in a single bag that comes out of the car first. Everything else can wait.
- Reverse-engineer your teardown while you set up. Notice where you put each item so that breaking camp is simply the reverse sequence. Faster tear down of a camp site starts during setup.
If you want to bypass pole assembly entirely, consider upgrading to one of the best instant tents for a rapid shelter solution.
Most forgotten camping items?
Across camping forums and community surveys, the same items appear repeatedly on “forgot to pack” lists. These aren’t luxury items — they’re basics that derail meals, hygiene, and comfort.
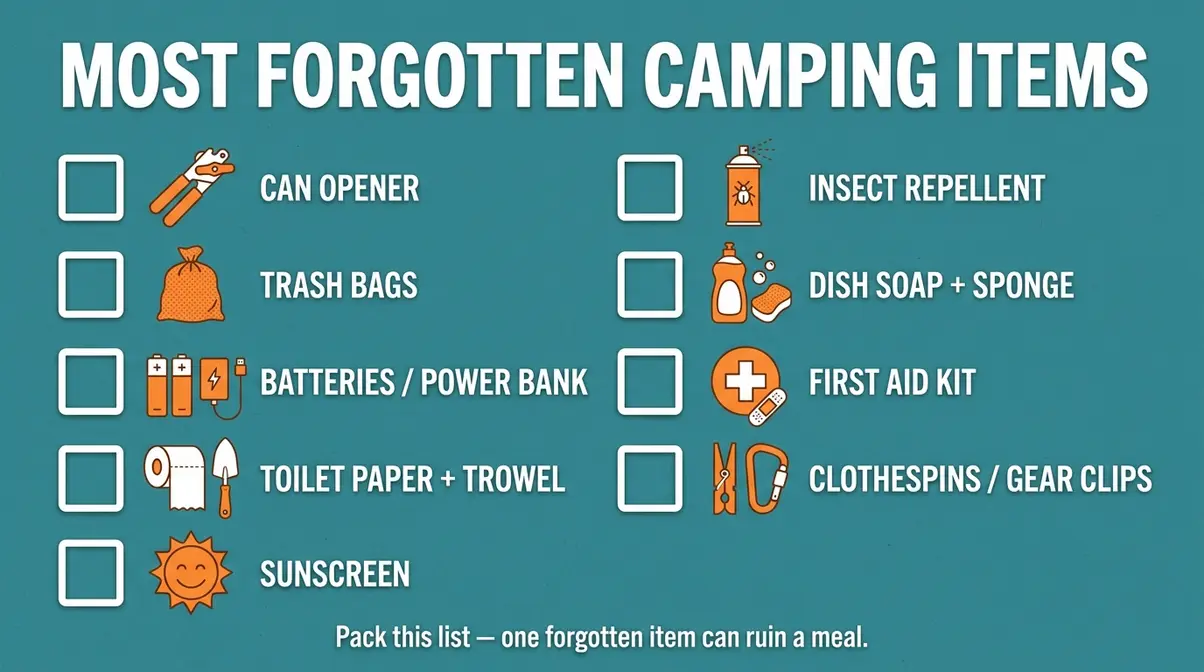
Most frequently forgotten camping items:
- Can opener — essential if you bring canned food; often left on the kitchen counter at home
- Trash bags — campgrounds require you to pack out your waste; most beginners forget extras
- Extra batteries or a power bank — headlamps and lanterns drain fast; dead batteries on night one are common
- Toilet paper and trowel — critical for backcountry camping where facilities aren’t available
- Sunscreen and insect repellent — easy to grab at home, easy to forget in the packing rush
- Dish soap and a small sponge — camp kitchens need cleaning too
- First aid kit — often assumed to be in someone else’s bag
- Clothespins or gear clips — for hanging wet towels, rainfly guylines, and drying food bags
The pattern is predictable: items that live in kitchen drawers at home are easy to overlook when packing. Using a camping checklist for first time campers before every trip eliminates most of these omissions.
What to avoid when camping?
Mistake 1: Pitching the tent in a low spot. Low ground collects rainwater. Fix: always choose a slightly elevated, flat spot and clear away any debris before laying down your footprint.
Mistake 2: Skipping the rainfly “because it looks clear.” Weather at campsites changes quickly — especially at elevation. Fix: always attach the rainfly. It takes three minutes and protects against dew, condensation, and unexpected rain.
Mistake 3: Setting up the kitchen too close to the tent. Food smells attract wildlife. Fix: use The Camp Architect Method — kitchen zone downwind and at least 200 feet from water, with food stored in a bear canister or hung at night.
Mistake 4: Not staking the tent fully. A tent with loose stakes can collapse or blow in wind. Fix: stake all four corners plus the rainfly guylines before raising the tent body.
Mistake 5: Leaving gear on the ground overnight. Rain, condensation, and wildlife make ground-level gear a problem. Fix: use hanging gear organizers inside the tent and keep kitchen items in sealed containers. Reviewing comprehensive tent camping safety tips can help you identify other common hazards.
Weather-Proofing: Rain and Wind Tips
Weather is the variable that separates a good camping trip from a miserable one — but it’s largely manageable with the right setup approach. According to the National Weather Service, weather conditions at campground elevations can change significantly within a few hours, making pre-trip forecasting and on-site preparation both essential.
How to Set Up Camp in the Rain
Setting up camp in rain is one of the most common anxieties beginners express — and it’s manageable with a clear sequence.
- Deploy your tarp first. Before the tent comes out of the bag, string a tarp (a waterproof sheet of material used as a shelter or ground cover) between two trees over your tent footprint area. This gives you a dry workspace.
- Lay the footprint under the tarp. Keep it dry while you assemble poles.
- Assemble poles under the tarp, then slide the tent body onto the poles. Move the assembled tent out from under the tarp and stake it quickly.
- Attach the rainfly immediately — don’t wait to “get everything else set up first.”
- Tuck gear bags under the tarp while you finish setup. Wet gear inside a tent creates condensation and discomfort all night.
Why this matters: the tarp-first sequence keeps your sleeping area dry from the first minute. Campers who skip the tarp and pitch directly in rain often end up with a wet tent interior before they even get inside. Investing in the best tent for wind and rain provides an essential baseline of protection against severe weather.
Wind and Lightning Safety
High winds change your campsite setup priorities. Stake tent corners into the ground before assembling the pole structure — a half-assembled tent in a gust becomes a sail. Use all available guylines, not just the corner stakes.
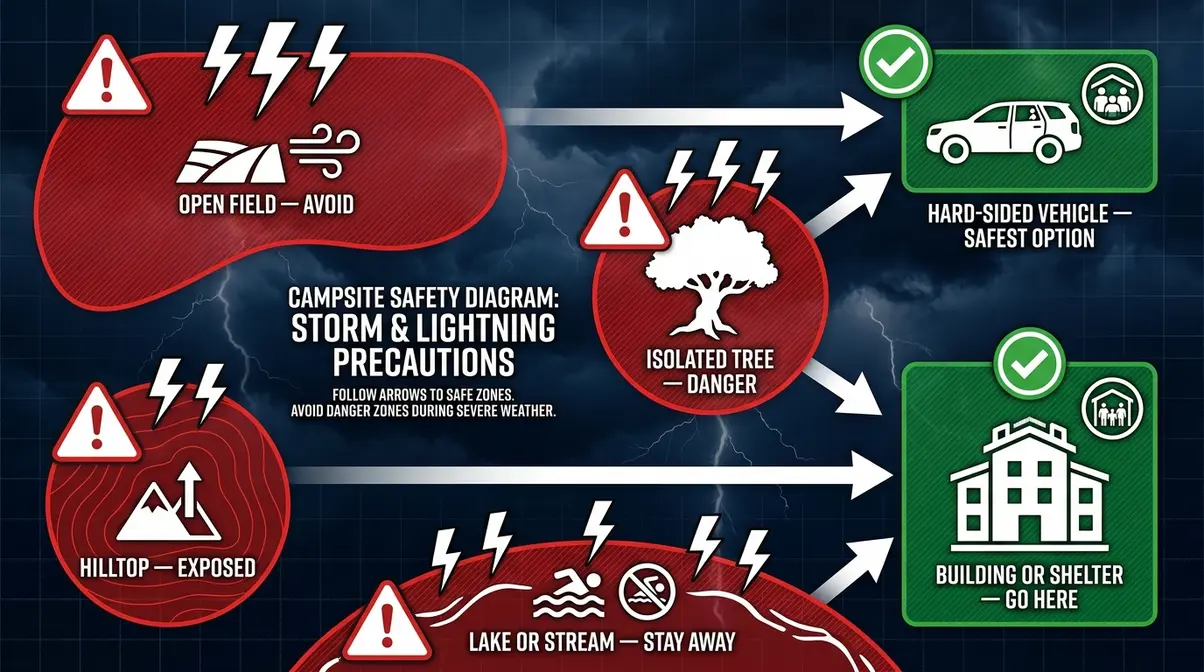
For lightning, the National Weather Service recommends avoiding open fields, hilltops, isolated trees, and bodies of water during a storm. If lightning is in the area, your tent is not a safe shelter. Move to a hard-sided vehicle or a substantial building. Never shelter under a lone tree.
FEMA advises campers to monitor weather forecasts for their camping area 24-48 hours before arrival and to have a pre-planned evacuation route from their campsite in the event of flash flooding or severe storms (FEMA, Ready.gov, 2026). A campsite in a dry creek bed or low-lying valley is at high risk.
Using Tarps and Tent Covers
The “tarps situation” confuses many beginners — and with good reason. There are three distinct tarp uses in camping, and each serves a different purpose:
| Tarp Use | Purpose | Setup Notes |
|---|---|---|
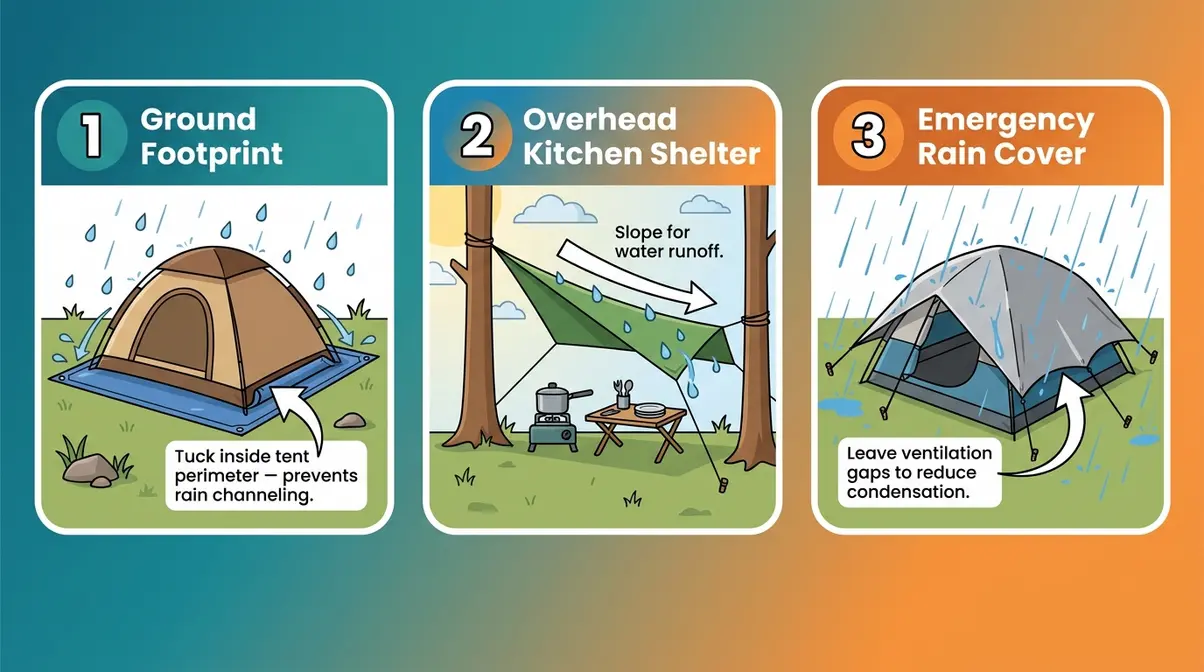
| Ground tarp (footprint) | Protects tent floor from moisture and abrasion | Slightly smaller than tent floor — if it sticks out, rain channels under the tent |
| Overhead tarp (fly tarp) | Creates a dry outdoor kitchen or living area | String between trees with a slight slope for water runoff |
| Emergency rain cover | Covers a tent without a rainfly, or adds extra weather protection | Drape over tent and stake out at the corners; leave ventilation gaps to reduce condensation |
For tent covers specifically: a quality rainfly is almost always preferable to draping a separate tarp over your tent — it’s designed to fit and ventilate properly. However, in a pinch, a tarp secured with guylines over the tent and angled to shed water does the job.
Campground Rules and Jargon: A Beginner’s Guide
Campground websites and reservation platforms use shorthand that leaves beginners baffled. Understanding this jargon before you arrive prevents confusion, wasted trips, and accidental rule-breaking. This section decodes the terms that show up repeatedly in camping forums and PAA searches — but that no mainstream guide bothers to explain.
What Is the 3-3-3 Rule for Camping?
The 3-3-3 rule is a travel-pacing guideline popular among RV campers and long-trip campers. It means: drive no more than 300 miles per day, arrive at your campsite by 3 p.m., and stay at least 3 nights at each location.
Why this matters for beginners: arriving by 3 p.m. gives you 3-4 hours of daylight to set up camp properly — without rushing in the dark. The 3-3-3 rule is widely referenced in the KOA Campgrounds beginner camping guide and across RV community forums as a pacing framework that reduces fatigue and prevents poor setup decisions made under time pressure.
It is not an official campground regulation — it’s a community-developed best practice. However, the “arrive by 3 p.m.” element aligns directly with most campground quiet hour policies that begin at 10 p.m., giving you a full evening to settle in.
What Does FF Mean at a Campground?
FF stands for “first come, first served” — a campground reservation policy. At FF sites, you cannot reserve a specific campsite in advance. Instead, you arrive and claim any available, unoccupied site.
According to the National Park Service, many backcountry campsites and some frontcountry sites in national parks operate on an FF basis. This means arriving early — ideally before noon on weekends — is critical. Sites fill fast at popular parks, especially in peak season (Memorial Day through Labor Day).
Beginner tip: call the campground the day before to ask about current availability. The FF system rewards flexibility and early arrival — not advance planning.
The 200-Foot Rule and LNT
The 200-foot rule comes directly from Leave No Trace (LNT), the nonprofit organization that defines outdoor ethics standards for camping and hiking. It states that you should camp, cook, and dispose of waste at least 200 feet (approximately 70 adult paces) from lakes, streams, and other water sources.
According to the Leave No Trace Center for Outdoor Ethics, this distance protects water quality, prevents contamination from food waste and human waste, and reduces the impact of campfire smoke and ash on aquatic ecosystems. The U.S. Forest Service, which manages dispersed camping on federal land, enforces the same 200-foot standard as a minimum distance for campsite placement from water.
For practical application: when you map your campsite zones using The Camp Architect Method, your kitchen zone and waste disposal area must both be at least 200 feet from any creek, lake, or stream. This applies even at designated campgrounds with established fire rings.
The 444 Rule and 10-Year Rule
The 444 rule is a temperature-based sleeping safety guideline for cold-weather camping. It advises avoiding camping when temperatures are forecast to drop below 4°C (40°F) unless you have a sleeping bag rated to at least 4°C and have at least 4 hours of experience camping in similar conditions. It is a community-developed safety heuristic — not an official regulation — but it’s widely cited as a sensible threshold for beginner cold-weather camping.
The 10-year rule refers to a general recommendation that camping equipment — particularly tents and sleeping bags — should be replaced or inspected after approximately 10 years of use. Tent seams, poles, and waterproof coatings degrade over time. A 10-year-old tent that hasn’t been re-seam-sealed may leak significantly. This is a manufacturer and retailer guideline, not a campground regulation.
- Other terms beginners encounter:
- Quiet hours: Typically 10 p.m. to 6 a.m. — no generators, loud music, or disruptive noise
- Check-out time: Usually 11 a.m. to 1 p.m. — breaking camp by this time is required at reserved sites
- Dry camping / boondocking: Camping without hookups (no water, electricity, or sewer connections at the site)
For a deeper look at campground organization and setup principles, Fleet Farm’s campsite setup guide covers additional site-specific logistics worth reviewing before your first trip.
Frequently Asked Questions
What is the 444 rule for camping?
The 444 rule is a cold-weather camping safety guideline, not an official regulation. It suggests avoiding camping when temperatures will drop below 4°C (40°F) unless your sleeping bag is rated to at least 4°C and you have at least 4 hours of experience in similar conditions, aligning with National Weather Service winter safety recommendations. It is a community heuristic designed to help beginners assess whether their gear and experience level are adequate for cold-night camping. If any of the three “4s” don’t apply to your situation, consider a warmer-season trip first.
How do you properly set up a campsite?
Proper campsite setup follows a six-step sequence. First, walk the site and choose level ground away from low spots and dead branches. Second, map your three zones — sleeping, kitchen, and living — before unpacking. Third, pitch your tent with all stakes and the rainfly attached. Fourth, set up your kitchen at least 200 feet from water and store food in sealed containers. Fifth, arrange your sleeping area and living zone. Sixth, establish your fire area last, using the designated fire ring and maintaining a 15-foot clearance from your tent.
What is the 10-year rule?
The 10-year rule is a general equipment maintenance guideline, not a campground regulation. It recommends inspecting or replacing camping gear — especially tents and sleeping bags — after approximately 10 years of use. Tent seam sealant, waterproof coatings, and pole elastics degrade over time. A 10-year-old tent that hasn’t undergone proper tent seam sealing may leak significantly. Manufacturers and outdoor retailers widely recommend this threshold as a practical guide for gear retirement.
What does FF mean at a campground?
FF stands for “first come, first served,” a campground policy where sites cannot be reserved in advance. You arrive and claim any available unoccupied site. According to the National Park Service, many backcountry sites and some frontcountry sites in national parks operate on an FF basis. On popular weekends, FF sites at well-known parks can fill by mid-morning. Calling ahead the day before to check availability and arriving early — before noon — are the two most effective strategies for securing an FF site.
What is the 3-3-3 rule for camping?
The 3-3-3 rule is a pacing guideline for RV and long-trip campers. It means driving no more than 300 miles per day, arriving at your campsite by 3 p.m., and staying at least 3 nights per location. It is not an official regulation but a community best practice. For beginners, the “arrive by 3 p.m.” element is the most valuable part — it gives you 3-4 hours of daylight to set up camp at a comfortable pace, without rushing in fading light.
What is the 200-foot rule for camping?
The 200-foot rule requires campers to stay at least 200 feet — roughly 70 adult paces — from lakes, streams, and other water sources when camping, cooking, or disposing of waste. This standard comes from the Leave No Trace Center for Outdoor Ethics and is enforced by the U.S. Forest Service for dispersed camping on federal land. The rule protects water quality from food waste, human waste, and campfire ash. In practice, your kitchen zone and any waste disposal area should always be measured and placed at this minimum distance from water.
How long does it take to set up?
Setting up a campsite typically takes 45 to 60 minutes if you follow a systematic approach like The Camp Architect Method. Beginners who pack randomly and lack a clear sequence often spend over two hours on setup. Pre-organizing your gear by zone at home is the most effective way to reduce this time.
Where should you store camp food?
All food must be stored in bear-resistant containers or locked inside a hard-sided vehicle, depending on local campground regulations. Never store food, trash, or scented items inside your tent. Additionally, ensure your food storage and cooking areas are located at least 200 feet away from your sleeping zone and any water sources.
Limitations and Common Pitfalls
Common Pitfalls
Even with a solid system, these specific situations trip up beginners:
Pitfall 1: Applying The Camp Architect Method to sites with no layout flexibility. Some designated campgrounds have fixed fire rings, pre-built tables, and narrow site boundaries that limit zone placement. In these cases, use the zone framework as a mental guide — prioritize food storage distance and tent-to-fire clearance even when the overall layout is constrained.
Pitfall 2: Over-packing the “first night bag.” The first-night bag concept is powerful, but beginners sometimes pack half their gear into it, defeating the purpose. Limit it to five to seven items you’ll need in the first 30 minutes.
Pitfall 3: Ignoring local wildlife storage requirements. The 200-foot rule covers water distance, but many national parks and forests require bear canisters or designated food lockers regardless of distance from water. Always check site-specific wildlife regulations — not just general LNT guidelines.
When to Choose Alternatives
If you’re car camping at a fully developed campground with electrical hookups and permanent structures, the full zone-mapping approach is still valuable but less critical — your food storage, lighting, and weather protection infrastructure already exists. Focus your energy on the sleeping zone setup and kitchen organization.
If you’re backpacking rather than car camping, the Camp Architect Method scales down directly — the same three-zone logic applies at a smaller footprint, and the 200-foot rule becomes even more important in undeveloped wilderness areas.
When to Seek Expert Help
If you’re planning a trip that involves winter camping, high-altitude camping (above 10,000 feet), or camping in bear country for the first time, consider a guided intro trip or a skills clinic offered by organizations like REI Co-op or your local outfitter. These environments introduce variables — hypothermia risk, altitude sickness, aggressive wildlife — that go beyond what a beginner should navigate alone from a guide article.
Putting It All Together: First Campsite Setup
For any first-time or novice camper, the best campsite setup tips share a single underlying logic: sequence and zones beat speed and improvisation every time. The Camp Architect Method — map your floor plan before you unpack, orient zones by wind and sun, tent first, kitchen 200 feet from water — turns a chaotic two-hour ordeal into a confident, repeatable 45-minute system. Experienced campers consistently report that this zone-first approach is the single biggest shift in their early camping experience (r/camping community consensus, 2026).
The method also scales. Whether you’re at a developed KOA campground with hookups or dispersed camping on U.S. Forest Service land, the three-zone logic and the safety principles — fire distance, food storage, weather orientation — apply everywhere. The Camp Architect Method isn’t a rigid formula; it’s a mental model that adapts to any site.
Your next step: before your first trip, print the pre-departure checklist from this guide, pre-pack your three zone bags, and check your campground’s rules on Recreation.gov. Arrive by 3 p.m. — the 3-3-3 rule’s most useful single piece of advice. Give yourself that first evening of daylight, follow the six-step sequence, and you’ll be around the fire — relaxed, organized, and wondering why you ever thought camping setup was hard.
