Camping Sleep System Guide: Build the Perfect Setup
 David King
Updated June 30, 2026
28 min read
David King
Updated June 30, 2026
28 min read
Table of Contents
- What Is a Camping Sleep System?
- Choosing Your Sleeping Bag, Pad, and Liner
- Building Your Sleep System for Every Season
- Pro Tips: How to Stay Warm Camping
- Common Pitfalls and Limitations
- Frequently Asked Questions
- Final Conclusion
You’ve spent hundreds of dollars on a premium sleeping bag, carefully checked the weather forecast, and set up your tent perfectly, only to wake up shivering uncontrollably at 3 a.m. The problem isn’t your sleeping bag, and it isn’t your cold tolerance. The issue is that no one explained the other half of the thermal equation to you.
A single bad night’s sleep outdoors doesn’t just ruin your mood for the next day. It can cut an expensive trip short, turn a beginner off camping forever, or in severe winter conditions, become genuinely dangerous. The outdoor gear industry is always happy to sell you a thicker, heavier, and more expensive sleeping bag to solve the problem. However, what you actually need isn’t just a warmer bag—you need a comprehensive system that addresses all avenues of heat loss.
By the end of this comprehensive camping sleep system guide, you will know exactly how to combine a sleeping bag, an insulating sleeping pad, and a thermal liner into a calibrated setup that keeps you warm, comfortable, and well-rested—whatever the season or weather conditions. We will start by exploring the foundational science of what a sleep system actually is and how your body loses heat to the ground. Then, we will walk step-by-step through choosing each individual component, adapting your specific setup for different climates and altitudes, and mastering the pre-sleep pro tips that experienced campers rarely share with beginners.
A camping sleep system combines three insulating layers — sleeping bag, sleeping pad, and liner — that work together to keep your body temperature stable overnight. The ASTM F3340-18 standard now measures pad insulation (R-value) on a universal scale, making gear comparison straightforward.
- The Sleep System Formula: Bag temperature rating + pad R-value + conditions modifier = warm sleep
- Your pad is half the equation: Up to 80% of body heat can be lost through the ground without adequate insulation (Princeton Outdoor Action)
- R-value 3+ for most campers: A pad rated R-3 or higher handles 3-season conditions reliably
- Down vs. synthetic: Down is lighter and compresses smaller; synthetic stays warm when wet — your climate decides
- Women sleep colder: Women’s-specific bags typically run 10°F warmer than men’s equivalents to account for physiological differences
What Is a Camping Sleep System?
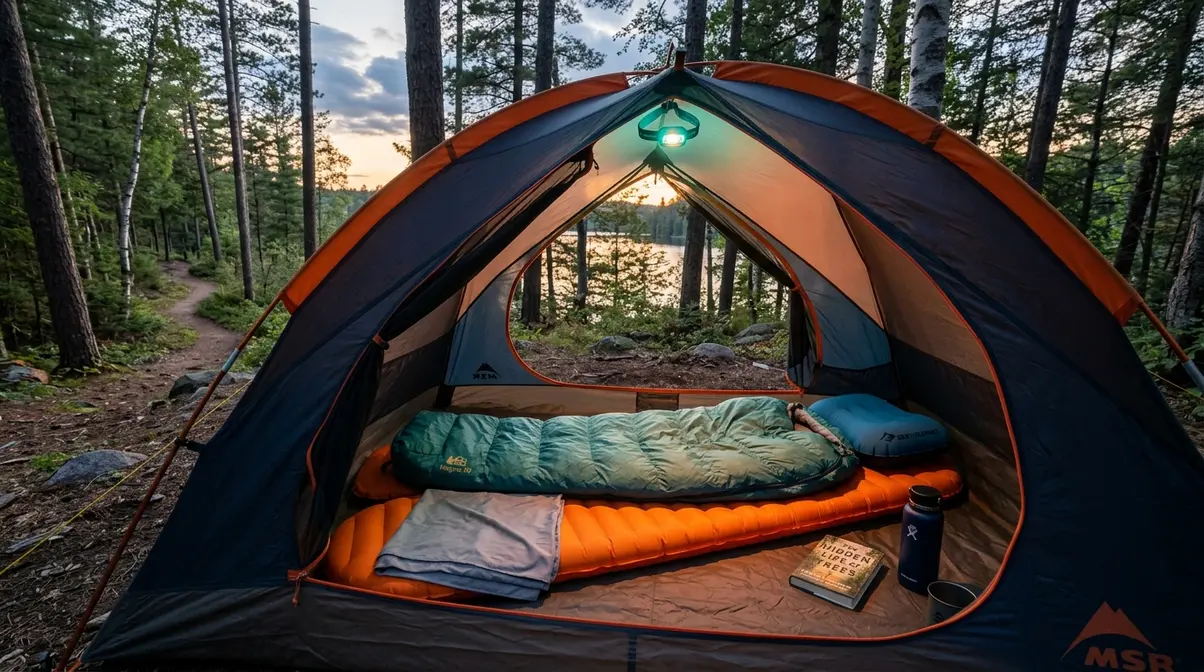
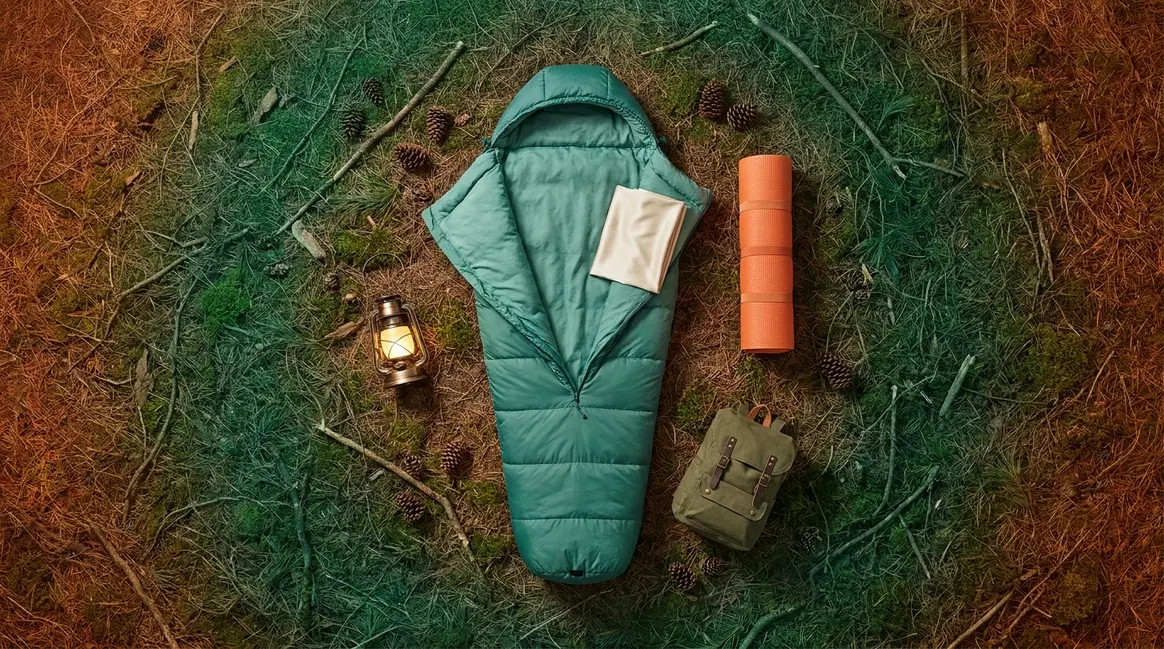
A camping sleep system is the coordinated combination of a sleeping bag (or quilt), a sleeping pad, a liner, and your shelter — all working together to maintain your core body temperature through the night. No single item does the job alone. Think of it as a chain: one weak link and the whole system fails.
The reason this matters is counterintuitive. Most beginners assume their sleeping bag is doing all the work. It isn’t. The ground beneath you conducts heat away from your body far faster than cold air does. According to National Park Service recommendations for sleep systems, selecting a bag rated below the coldest expected temperature AND using an insulating pad are both critical — the pad isn’t optional comfort, it’s thermal protection (NPS, 2026).
Understanding this shifts everything. Once you think in systems, every gear decision becomes clearer, cheaper, and more effective.
What Is a Camping Sleep System?
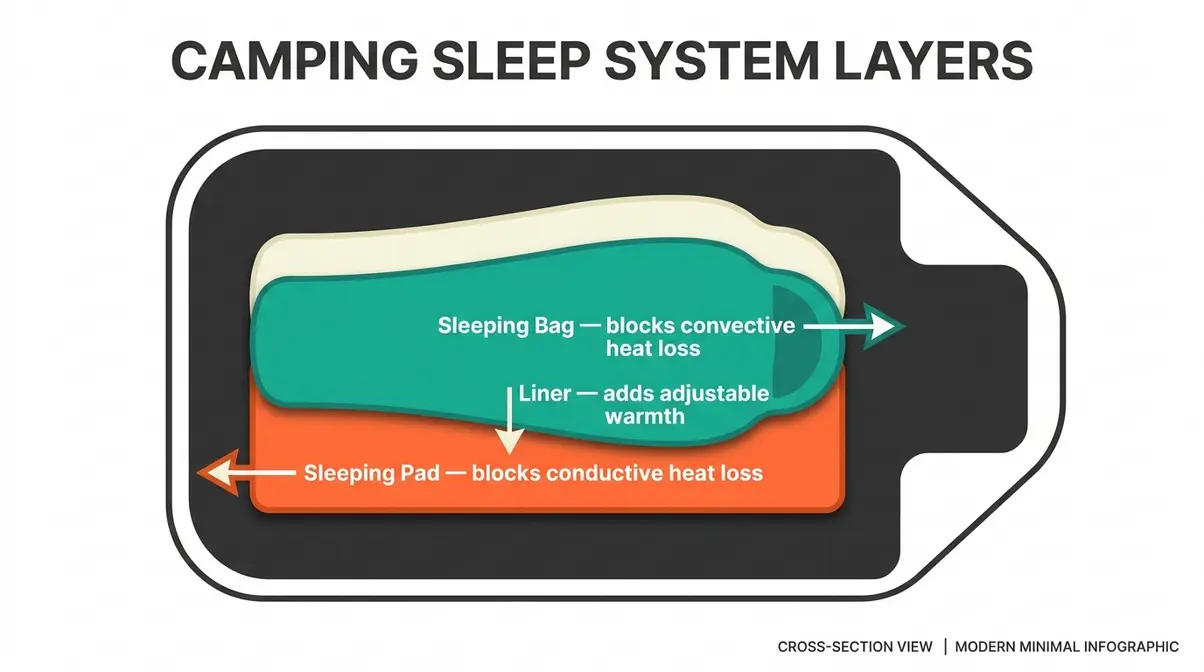
A camping sleep system is the combination of insulating and cushioning layers you use to maintain core body temperature while sleeping outdoors. It typically includes a sleeping bag or quilt, a sleeping pad, and an optional liner, all working inside your shelter as a unified thermal unit. Removing any one component doesn’t just reduce comfort — it can compromise the entire system’s warmth output.
The “system” framing is not marketing language. It reflects how heat actually works. Imagine wearing a thick winter jacket while standing barefoot on a frozen tile floor. The jacket is doing everything right — but the cold is winning through your feet. That’s exactly what happens when a camper pairs a high-quality sleeping bag with no pad, or a thin, low-rated pad. The bag fights hard; the ground wins anyway.
“Sleeping pad (full body support and comfort). Sleeping bag (body temperature management). Pillow (skeletal alignment and comfort). Shelter (weather protection).”
— How experienced campers describe their complete kit
This is The Sleep System Formula in plain language: your warmth at night is the product of your bag’s temperature rating, your pad’s R-value (a measure of how well a material resists heat flow — the higher the number, the warmer the pad), and the conditions you’re camping in. No single number tells the whole story. All three variables matter, and this framework will guide every decision in this essential elements of a comfortable camp setup article.
The 4 Core Components Explained
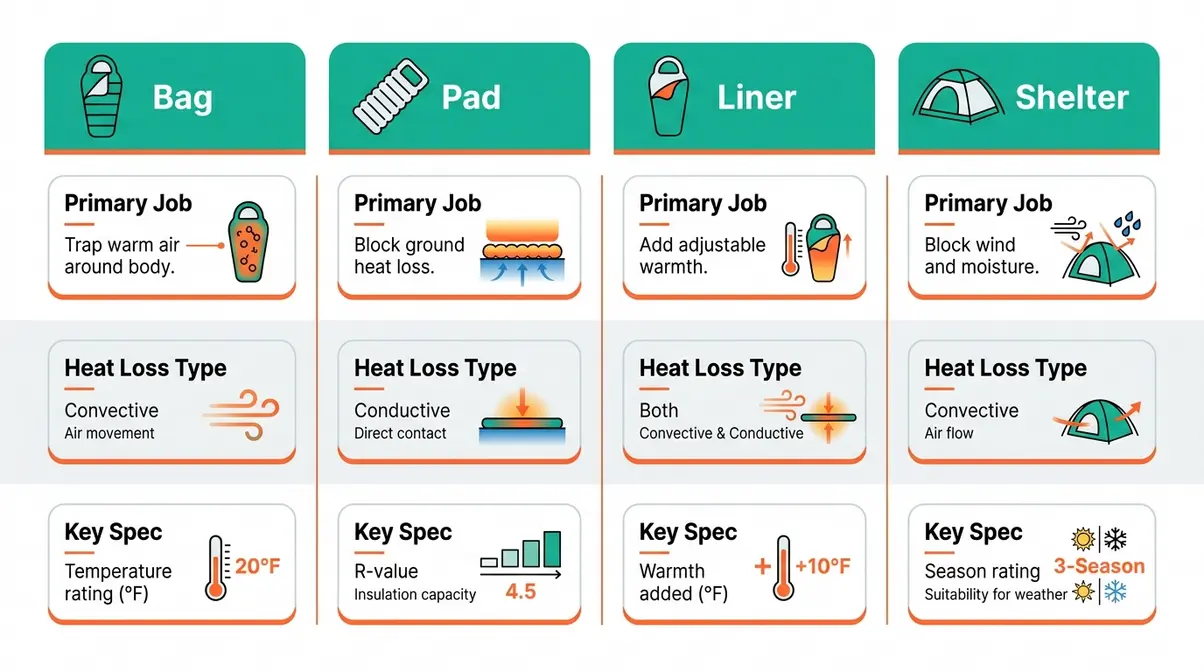
Each component in a camping sleep system has a specific job. Here’s what each one does — and why skipping it costs you sleep.
Component 1 — Sleeping Bag or Quilt
A sleeping bag is the primary insulation layer that wraps your body, trapping warm air close to your skin. It comes in three main shapes: mummy bags (tapered, efficient, best for cold weather), rectangular bags (roomy, better for warm nights or restless sleepers), and quilts. A sleeping quilt is a topless alternative to a sleeping bag — it’s lighter and packs smaller because it removes the insulation underneath you (where your pad handles that job anyway). The key number to know is the temperature rating on the tag. Why this matters: choosing a bag rated 10°F colder than your expected overnight low gives you a meaningful safety buffer.
Component 2 — Sleeping Pad
A sleeping pad is the insulating and cushioning layer between you and the ground. It does two things: it protects your body from conductive heat loss (heat draining directly into the cold earth) and it provides full body support for sleep quality. The key number here is R-value. Pads come in three types: closed-cell foam (lightweight, durable, always ready), self-inflating (foam core that opens automatically when the valve is released), and inflatable air pads (lightest and most packable, but require inflation). Why this matters: the ground is almost always colder than the air, often by 20°F or more — your pad is your primary defense.
Component 3 — Sleeping Bag Liner
A sleeping bag liner is a thin inner layer that slides inside your sleeping bag. It adds warmth (typically 5–15°F depending on material), protects your bag from body oils and dirt, and extends the life of your insulation. Common materials include silk (lightest, adds ~5°F), cotton (comfortable but heavy), and fleece (warmest, adds up to 15°F). Why this matters: a liner lets you use a single bag across multiple seasons by adjusting the warmth level without buying a new bag.
Component 4 — Shelter
Your shelter (tent, bivy, or tarp) is the outermost layer of your sleep system. It blocks wind, deflects precipitation, and creates a microclimate that your bag and pad can work within. A tent with poor ventilation creates condensation that can wet your insulation from the inside — which dramatically reduces warmth. Why this matters: even a perfect bag-and-pad combination underperforms if your shelter is trapping moisture against your gear.
The Science of Heat Loss
Your body loses heat in two primary ways while you sleep outdoors, and your gear must address both.
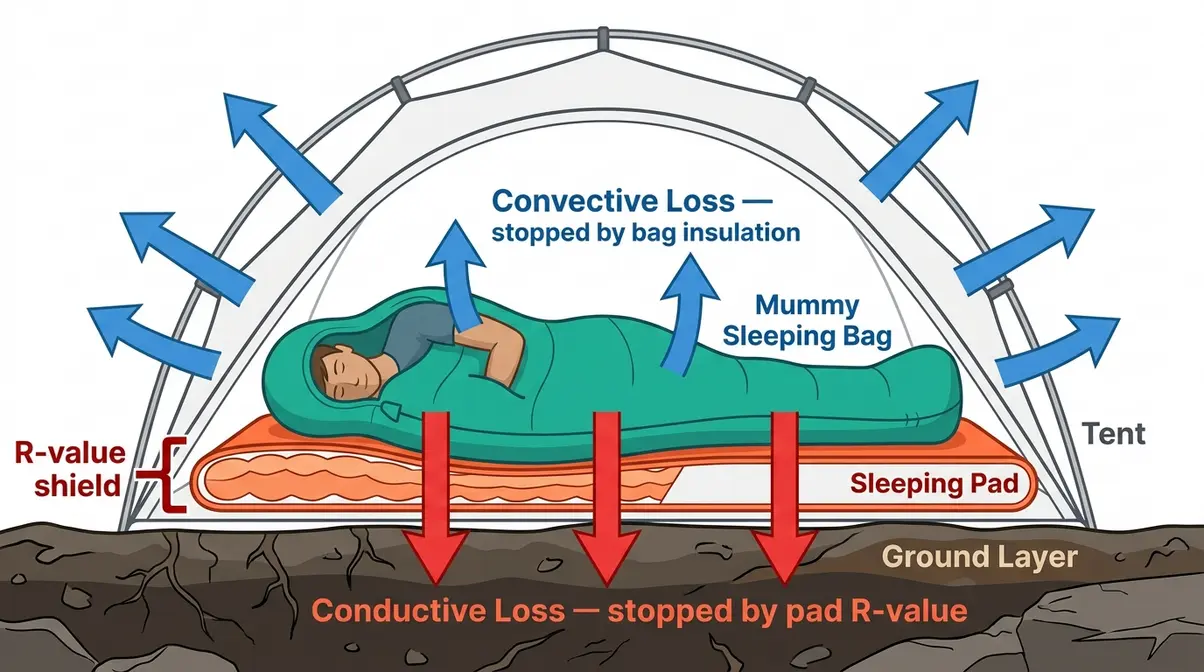
Conductive heat loss is heat flowing directly from your warm body into the cold ground beneath you. This is the faster, more dangerous mechanism. Cold objects — soil, rock, snow — are excellent conductors. Without adequate insulation between you and the ground, your body temperature drops continuously throughout the night regardless of how warm your sleeping bag is. Research from Princeton Outdoor Action’s wilderness safety program notes that ground contact can account for up to 80% of overnight heat loss in cold camping conditions — a figure that explains why experienced mountaineers treat their sleeping pad as a non-negotiable piece of safety equipment, not a comfort upgrade.
Convective heat loss is heat carried away by moving air. This is what your sleeping bag addresses. It traps a layer of still, warm air around your body. Wind that enters through a poor tent seal or a loose bag hood accelerates this process significantly.
Why both matter together: A sleeping bag rated to 20°F placed directly on cold ground will not keep you warm at 20°F. The bag handles convection beautifully — but does nothing to stop conduction. Your pad handles conduction — but offers no protection from cold air. Together, they cover both mechanisms. Separately, neither one is enough.
“A sleeping pad is not just a comfort item — it is the primary defense against conductive heat loss, which accounts for a significant portion of overnight heat loss for campers sleeping on cold ground.”
Now that you understand what a sleep system is, the next step is choosing the right gear for yours.
Choosing Your Sleeping Bag, Pad, and Liner
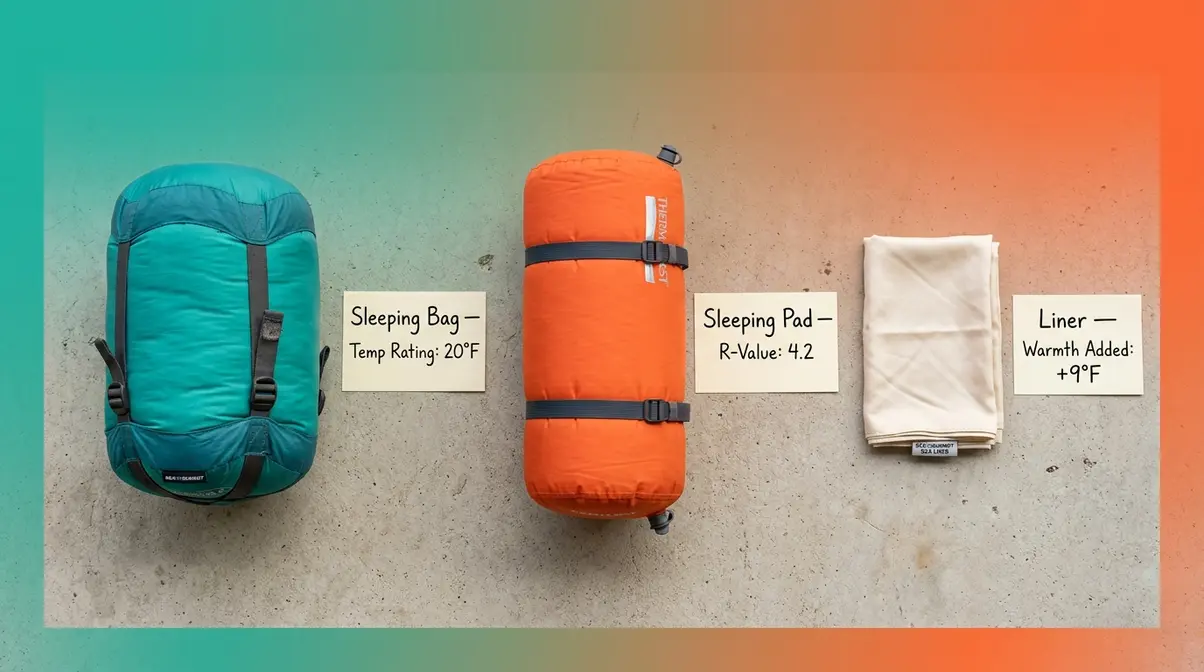
As you navigate this camping sleep system guide, remember that choosing the right components comes down to matching three numbers to your specific conditions: your bag’s temperature rating, your pad’s R-value, and the expected overnight low at your campsite. Get these three aligned and you’ll sleep warm. Miss any one of them and you’re back to shivering at 3 a.m.
After evaluating gear combinations across multiple camping seasons and reviewing specifications against ASTM F3340-18 and ISO 23537-1:2016 standards, a clear pattern emerges: most beginners underbuy on pad R-value while overbuying on sleeping bag temperature rating. This section will fix that.
Reading Sleeping Bag Temp Ratings
Every sleeping bag sold in the U.S. and Europe carries a temperature rating, but not all ratings are created equal. Since 2017, reputable manufacturers have adopted the ISO 23537-1:2016 standard (also called the EN 13537 standard in Europe) — a laboratory test that measures how warm a bag keeps a sleeping person at a specific temperature. This replaced the old manufacturer-claimed ratings, which were inconsistent and often optimistic.
The ISO standard produces three numbers:
| Rating | What It Means | Who It’s For |
|---|---|---|
| Comfort Rating | Temperature at which a “standard woman” sleeps comfortably | Conservative buyers; women |
| Lower Limit Rating | Temperature at which a “standard man” sleeps comfortably | Most male campers |
| Extreme Rating | Survival threshold only — not comfortable | Emergency reference only |
The most important rule: Always match your bag to the Comfort Rating, not the Lower Limit. The Lower Limit is often the number marketed on the bag’s label. If a bag says “rated to 20°F,” that is typically its Lower Limit — a fit male in good health in a well-insulated system may be comfortable, but many campers will be cold. Buy a bag rated 10°F below your expected overnight low to give yourself a genuine buffer.
Example pairings using The Sleep System Formula:
- 60°F summer night: 45°F comfort-rated bag + R-2 pad = comfortable
- 35°F spring/fall night: 20°F comfort-rated bag + R-3 pad = comfortable
- 15°F alpine night: 0°F comfort-rated bag + R-5+ pad = appropriate minimum
Why this matters: ISO-rated bags are directly comparable across brands. A non-ISO-rated bag’s temperature claim is essentially a marketing number — treat it with skepticism.
Down or synthetic insulation?
The insulation inside your sleeping bag is either down (clusters from waterfowl feathers) or synthetic (polyester fibers engineered to mimic down’s loft). Both trap warm air effectively, but they behave very differently in the field.
Down insulation is measured in fill power — the number of cubic inches one ounce of down occupies. Higher fill power means lighter weight for the same warmth. A 700-fill-power down bag is meaningfully lighter and more compressible than a 500-fill-power bag of the same temperature rating. Down bags also last longer with proper care — well-maintained down insulation can retain its loft for 20+ years.
The critical limitation: down loses nearly all insulating ability when wet. A soaked down bag in a cold rainstorm is a genuine safety risk. Research on insulation thermal performance confirms that wet down retains only 10–20% of its dry loft, while wet synthetic retains approximately 60–80% of its dry insulating value (outdoor gear thermal testing data, multiple manufacturers, 2026).
Synthetic insulation is heavier and bulkier than equivalent-warmth down, but it performs reliably in wet conditions. It also dries faster, is hypoallergenic, and typically costs 30–50% less than a comparable down bag.
| Factor | Down | Synthetic |
|---|---|---|
| Warmth-to-weight | ✅ Excellent | ⚠️ Heavier |
| Wet performance | ❌ Poor | ✅ Good |
| Packability | ✅ Excellent | ⚠️ Bulkier |
| Longevity | ✅ 20+ years | ⚠️ 5–10 years |
| Cost | ❌ Higher | ✅ Lower |
| Best for | Dry climates, backpacking | Wet climates, car camping |
The practical rule: If you camp in the Pacific Northwest, the UK, or any region where rain is likely overnight, choose synthetic or a water-resistant down (hydrophobic-treated). If you camp in dry mountain environments or need to minimize pack weight, down is the superior choice.
Understanding Sleeping Pad R-Value
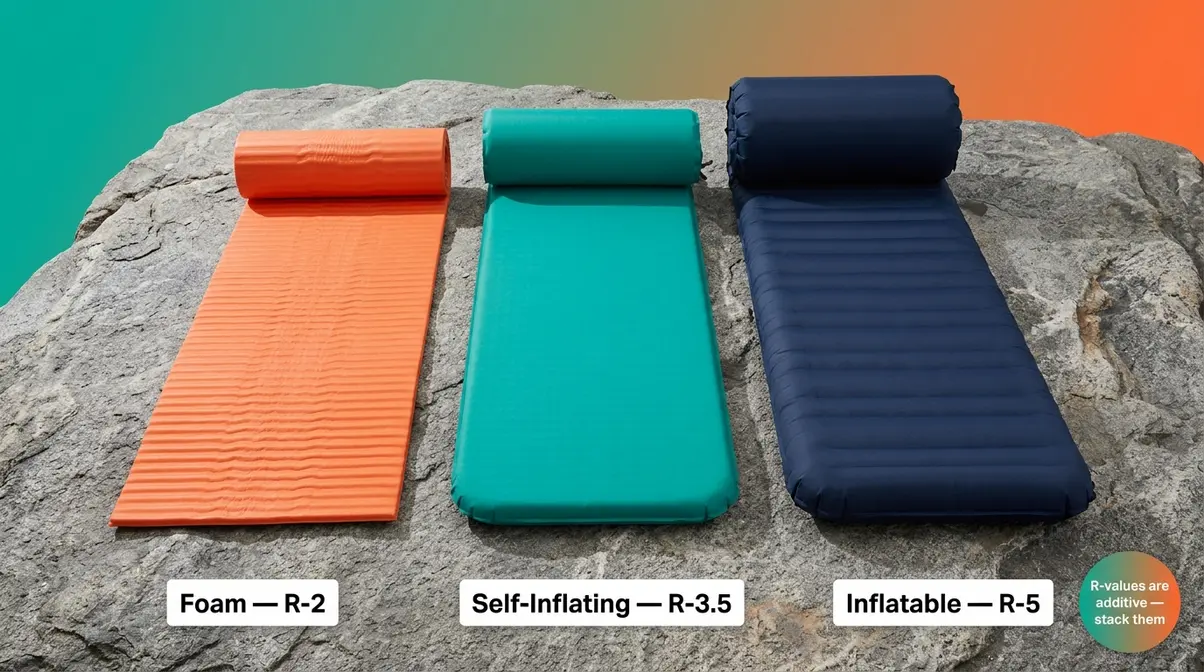
R-value (a standardized measure of how well a material resists heat flow — the higher the number, the warmer the pad) is the most underestimated number in camping gear. Since 2020, the ASTM F3340-18 standard has required all sleeping pads sold in the U.S. to be tested using the same laboratory method, making R-value numbers directly comparable across brands for the first time. Before this standard, manufacturers used their own testing methods, and a “R-4” pad from one brand might perform like an “R-2” from another.
Here’s what the numbers mean in practice:
| R-Value | Season | Conditions | Recommended For |
|---|---|---|---|
| R-1 to R-2 | Summer only | Above 50°F nights | Car camping, warm climates |
| R-3 to R-4 | 3-season | 20°F–50°F nights | Most campers, most conditions |
| R-5 to R-6 | Cold weather | 0°F–20°F nights | Late fall, early spring, high altitude |
| R-6+ | Winter/alpine | Below 0°F | Winter camping, snow camping |
Key insight from The Sleep System Formula: R-value is additive. If you place a closed-cell foam pad (R-2) underneath an inflatable air pad (R-3.5), your combined R-value is approximately R-5.5. Many experienced winter campers use this stacking technique to reach high R-values without buying a single ultra-heavy pad.
Recommended pairings by condition (The Sleep System Formula in practice):
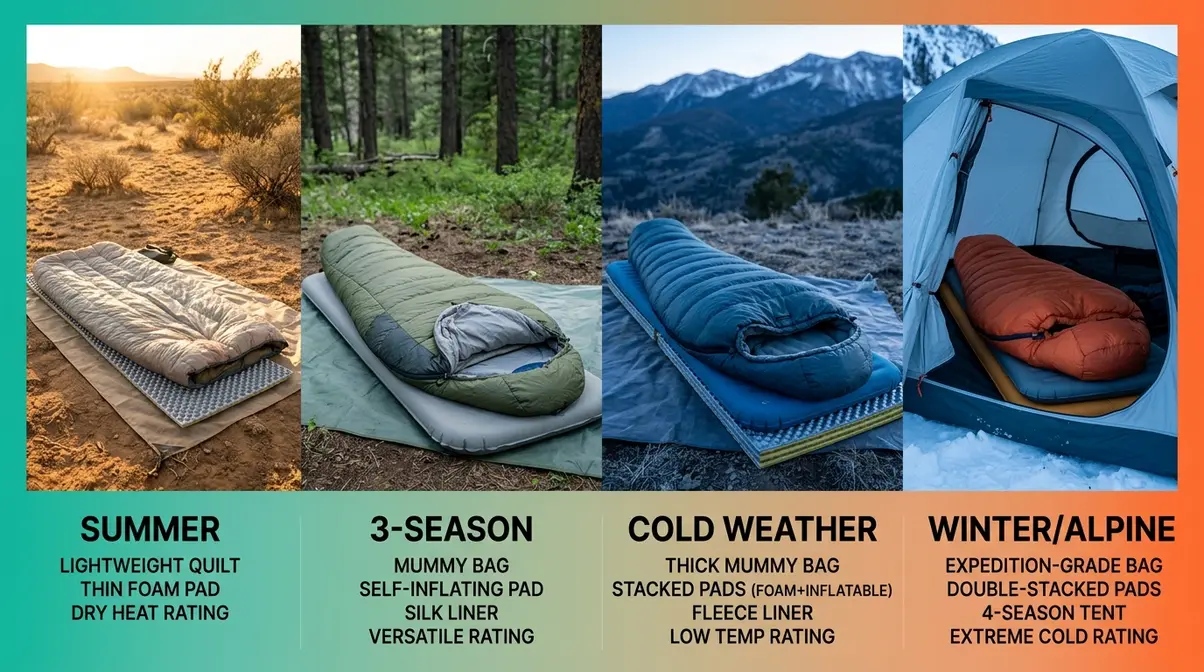
- Summer car camping (60°F+): R-2 pad + 40°F bag + no liner needed
- 3-season backpacking (30–50°F): R-3.5 pad + 20°F bag + silk liner
- Cold-weather camping (15–30°F): R-5 pad + 0°F bag + fleece liner
- Alpine winter (below 15°F): R-4 foam + R-3.5 air stacked (R-7.5 total) + 0°F bag + fleece liner
For a deeper look at how pad selection fits into your overall outdoor kit, see our guide on choosing the right sleeping pad for backpacking.
Women’s Sleep Systems & Thermal Mapping
Women’s-specific sleep systems are one of the most overlooked topics in camping gear guides — and one of the most practically important. The physiological reality is that women, on average, have a lower resting metabolic rate than men, less skeletal muscle mass, and different fat distribution patterns. These factors combine to produce a measurably lower heat generation rate during sleep.
The practical consequence: women typically feel comfortable at temperatures 10–15°F warmer than men in equivalent sleeping bags. This is why ISO 23537 uses a “standard woman” (5’2″, 132 lbs) and a “standard man” (5’8″, 176 lbs) as separate test subjects — their Comfort Ratings are genuinely different for the same bag.
What this means for gear selection:
- A bag labeled “rated to 20°F” using the Lower Limit may be appropriate for a male camper in those conditions — but many women will be cold in the same bag at 30°F
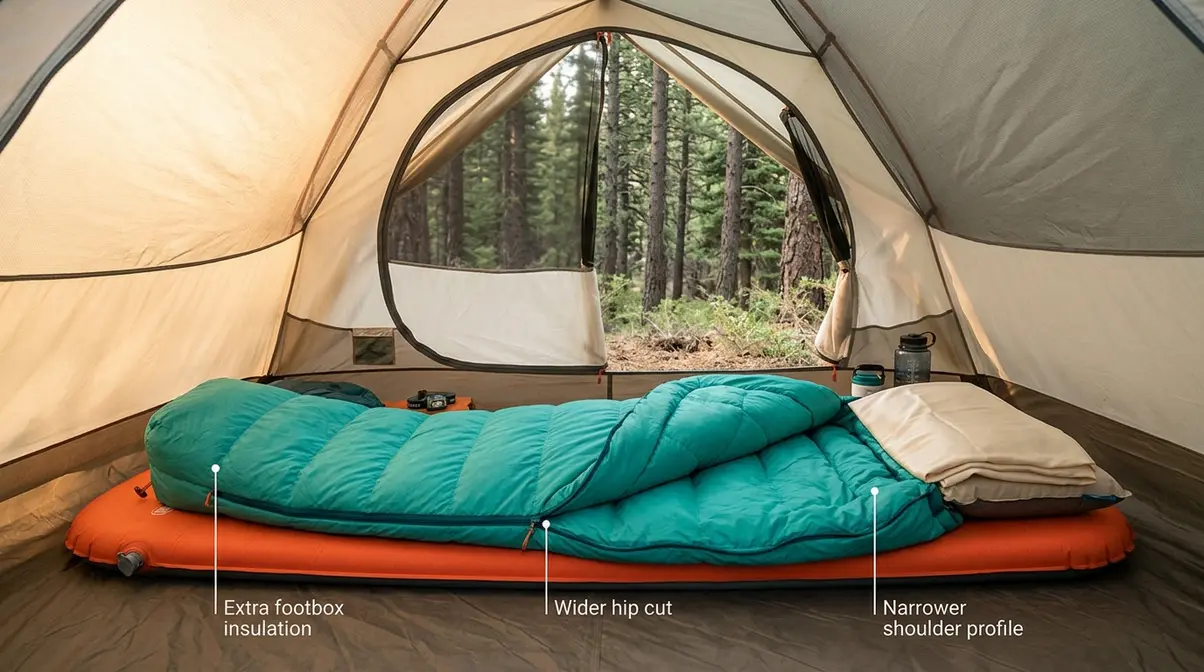
- Women’s-specific bags are cut narrower through the shoulders and wider through the hips, reducing dead air space that your body must heat
- Women’s bags often include extra insulation in the footbox and lower torso — areas where thermal mapping studies show women lose heat fastest
- Alternatively, women can use a unisex bag rated 10–15°F colder than their expected overnight low to compensate
Women’s Sleep System Formula example:
Camping at 35°F overnight → Male camper needs a 20°F Lower Limit bag → Female camper should target a 10°F Lower Limit bag (or a women’s-specific bag rated to 20°F Comfort, not Lower Limit).
Recommended women’s gear formula by season:
| Season | Bag Rating (Comfort) | Pad R-Value | Liner |
|---|---|---|---|
| Summer (55°F+) | 45°F | R-2 | Optional |
| 3-season (30–50°F) | 15°F | R-3.5 | Silk (+5°F) |
| Cold weather (15–30°F) | 0°F | R-5 | Fleece (+15°F) |
| Winter (below 15°F) | -10°F | R-7+ (stacked) | Fleece (+15°F) |
Note: These are starting recommendations. Individual cold sensitivity varies — some women run warm, some men run cold. Adjust based on your personal experience.
Building Your Sleep System for Every Season
Adapting your camping sleep system to specific conditions is where The Sleep System Formula moves from theory to practice. The core variables — bag rating, pad R-value, and conditions modifier — shift with every season, and understanding how to adjust them is what separates campers who sleep well from those who don’t.
What do I need for winter camping?
⚠️ Safety Disclaimer: Winter camping below 20°F carries genuine hypothermia risk. Before attempting overnight camping in freezing conditions, read the Princeton Outdoor Action cold-weather camping safety guidelines. Never camp in winter conditions alone, always inform someone of your location and expected return, and carry emergency signaling equipment. If you feel persistently cold despite proper gear, get warm immediately.
Winter camping sleep systems are not simply “3-season gear plus a warmer bag.” Cold-weather camping below 20°F requires a fundamentally different approach to every layer of your system.
- The Winter Sleep System Formula:
- Bag: 0°F comfort-rated bag (not Lower Limit — Comfort) for temperatures down to 15°F. For temperatures below 0°F, a -20°F bag is appropriate.
- Pad: Minimum R-5. Many experienced winter campers use stacked pads: a closed-cell foam pad (R-2 to R-2.5) underneath an inflatable pad (R-3.5 to R-4) to reach R-5.5 to R-6.5 total.
- Liner: Fleece liner adds 10–15°F and is highly recommended for any night below 20°F.
- Shelter: A four-season tent or a mountaineering tent with a full rain fly that reaches the ground. A three-season tent in snow conditions allows cold air infiltration at the base.
Winter camping gear checklist:
- Sleeping bag: 0°F Comfort-rated (ISO 23537-compliant) — check for women’s-specific sizing if applicable
- Sleeping pad: R-5 minimum; R-6.5+ for sub-zero nights (stacked pads are acceptable)
- Liner: Fleece (not silk — you need the extra warmth)
- Vapor barrier liner (advanced technique): a thin waterproof layer inside your bag prevents your insulation from absorbing sweat moisture during long cold nights
- Insulated sleeping bag hood: essential for retaining heat at the head, which accounts for significant heat loss
- Four-season tent or winter-rated shelter
“For sub-zero camping, experienced mountaineers treat the sleeping pad as primary safety equipment — a pad failure (deflation, inadequate R-value) can become a medical emergency within hours.”
According to Sea to Summit’s sleep system guidance, layering your sleep system components thoughtfully — rather than relying on any single ultra-warm item — is the approach used by expedition mountaineers worldwide (Sea to Summit, 2026).
3-Season Sleep System
The 3-season sleep system handles the widest range of conditions and is the most practical starting point for most campers. It covers spring through fall — roughly 30°F to 60°F overnight temperatures — and with minor adjustments, it can stretch toward both winter and summer.
- The 3-Season Sleep System Formula:
- Bag: 20°F comfort-rated bag (ISO 23537)
- Pad: R-3 to R-4 (self-inflating or inflatable air pad)
- Liner: Optional for warmer nights; silk liner recommended when temperatures drop below 35°F
Adapting your 3-season system for edge conditions:
| Condition | Adjustment | Effect |
|---|---|---|
| Unexpected cold snap (near 30°F) | Add fleece liner | +10–15°F warmth |
| Warm spring night (55°F+) | Unzip bag partially, skip liner | Reduces overheating |
| Wet conditions | Switch to synthetic or hydrophobic down bag | Maintains warmth when damp |
| High altitude (adds ~10°F perceived cold) | Upgrade pad to R-4, add liner | Compensates for altitude chill |
A well-chosen 3-season system — a 20°F ISO-rated bag, an R-3.5 pad, and a silk liner — can handle 80% of camping scenarios most recreational campers will encounter. It’s the most cost-efficient starting point for beginners. For guidance on the broader gear choices that complement your sleep setup, our complete camping gear checklist for beginners walks through every category.
Hot Weather Camping
Hot weather camping presents the opposite challenge: you need to sleep without overheating, while still having enough insulation for the pre-dawn temperature drop (which can be 20–30°F lower than the afternoon high, even in summer).
- The Hot Weather Sleep System Formula:
- Bag: 45°F–55°F comfort-rated bag, or a lightweight quilt
- Pad: R-1 to R-2 is sufficient; prioritize a pad with good ventilation channels to reduce sweating
- Liner: Skip entirely, or use a moisture-wicking liner for comfort on humid nights
- Shelter: Prioritize ventilation — a tent with large mesh panels and a removable rain fly for clear nights
Ventilation is the key variable in hot weather. A sleeping quilt — which leaves the sides open — is significantly more comfortable than a mummy bag at temperatures above 60°F. Many experienced warm-weather campers use a quilt on top with just a sleeping pad beneath, essentially recreating their home bed setup in the field.
- Common hot-weather mistakes:
- Using a 20°F bag in 70°F temperatures “because I already own it” — you’ll overheat, sweat, and sleep poorly
- Choosing a closed, non-ventilated tent on warm nights — condensation and heat buildup defeat even the lightest sleep system
- Skipping the pad — even at 70°F, sleeping on bare ground can cause discomfort and mild cooling by the early morning hours
Ultralight Backpacking Sleep System
An ultralight sleep system prioritizes minimum weight and pack volume without compromising warmth. The target for most ultralight backpackers is a complete sleep system (bag/quilt + pad + liner) under 2 lbs (900g), with aggressive ultralight setups reaching under 1.5 lbs.
- The Ultralight Sleep System Formula:
- Quilt vs. bag: A down quilt at equivalent temperature rating typically weighs 20–30% less than a mummy bag. For a 20°F rating, a top quilt might weigh 14–16 oz vs. 22–28 oz for a mummy bag.
- Pad: A closed-cell foam pad (e.g., Therm-a-Rest Z Lite) weighs 14 oz and provides R-2 — acceptable for 3-season conditions. For cold-weather ultralight, a thin inflatable pad (e.g., Therm-a-Rest NeoAir XLite at R-4.5, 12 oz) is the gold standard.
- Liner: Silk liner (3–4 oz) adds 5°F warmth at minimal weight penalty.
Ultralight trade-offs to know:
| Choice | Weight Saving | Trade-off |
|---|---|---|
| Quilt vs. mummy bag | 8–14 oz | Less forgiving of cold; requires draft collar technique |
| Inflatable vs. foam pad | 4–8 oz | Puncture risk; requires inflation time |
| Down vs. synthetic | 8–16 oz | Wet performance risk; higher cost |
| Silk vs. fleece liner | 4–6 oz | Less warmth added (5°F vs. 15°F) |
For detailed guidance on reducing your total pack weight, REI’s expert advice on camp sleeping systems covers ultralight strategies used by thru-hikers and minimalist backpackers (REI, 2026).
Pro Tips: How to Stay Warm Camping
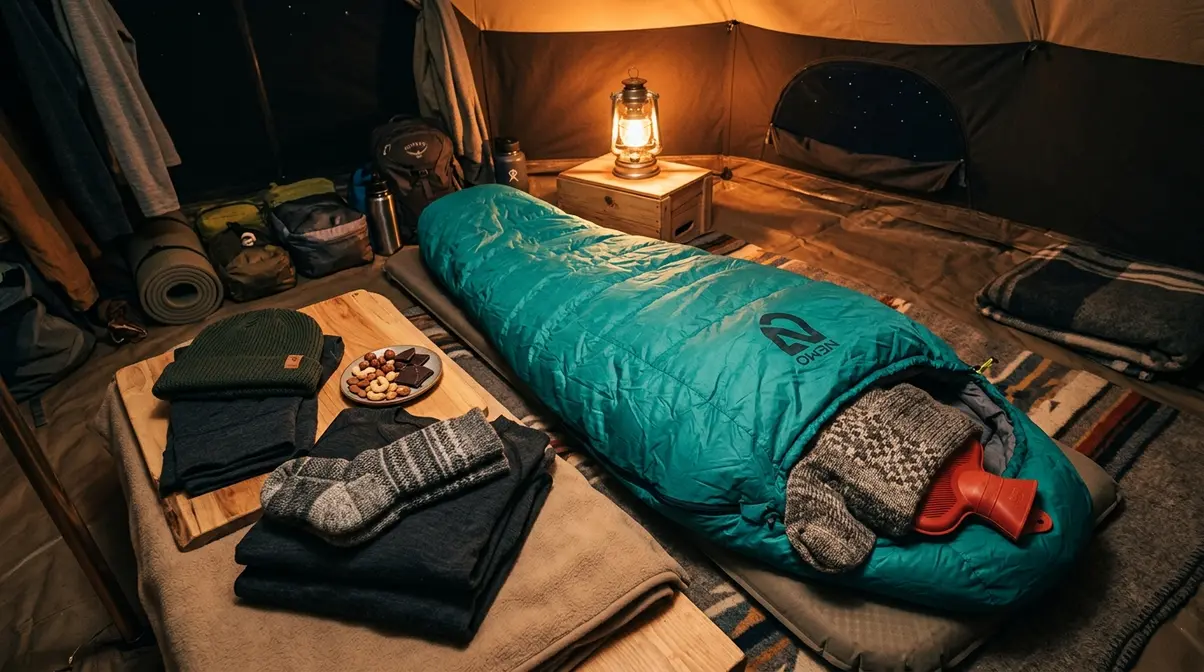
The best gear recommended in this camping sleep system guide underperforms if your pre-sleep habits are working against it. Experienced campers know that warmth at night starts hours before you get into your bag. These pro tips work with any gear — budget or premium.
Pre-Sleep Warmth Habits
Your body generates heat through metabolic activity. Several habits in the hour before sleep directly affect how warm you’ll be through the night.
Eat a substantial snack before bed. Your body burns calories to generate heat overnight. A high-fat, high-calorie snack (nuts, cheese, chocolate, peanut butter) gives your metabolism fuel to work with. This is especially important on cold nights — common wisdom in wilderness medicine suggests eating before sleep genuinely helps maintain core temperature, though individual results vary.
Do light exercise before getting in your bag. 10–15 minutes of jumping jacks, a brisk walk, or even vigorous tent setup warms your muscles and raises your core temperature. Getting into a cold bag already warm is dramatically more effective than trying to warm a cold bag with a cold body. The bag doesn’t generate heat — it only retains what you bring to it.
Use a hot water bottle. Fill a sturdy water bottle (not a thin plastic one) with hot water, wrap it in a sock, and place it at your feet or in the core of your bag 20 minutes before you get in. This pre-warms the insulation and creates a warm zone at your feet — the area most campers report getting cold first.
Stay dry. Moisture — from sweat, rain, or condensation — is the enemy of all insulation. Change out of any damp base layers before sleeping. A dry set of sleeping clothes is worth carrying even if it adds weight.
Hydrate adequately. Mild dehydration reduces your body’s ability to regulate temperature. Drink water through the day and have a small amount before bed (not so much you wake up needing the bathroom repeatedly).
What to wear inside a sleeping bag?
The goal inside your sleeping bag is a single, clean, dry insulating layer — not multiple bulky layers that compress your bag’s loft and actually reduce its warmth.
The optimal sleeping kit:
- Base layer top and bottom (merino wool or synthetic, not cotton — cotton holds moisture and chills you): This is your primary sleeping clothing.
- Wool or synthetic socks: Cold feet are the most common complaint. Dry, clean socks make a noticeable difference.
- Lightweight beanie or hat: Your head is outside your bag’s main insulation zone. A simple knit hat can add several degrees of perceived warmth.
- Light gloves (for cold nights below 30°F): Hands lose heat quickly. Thin liner gloves are worth the minimal weight.
What NOT to wear:
- Heavy fleece jackets or puffy down jackets inside the bag. These compress the bag’s loft, reducing its insulating air space. If you’re cold enough to need a puffy inside, you need a warmer bag.
- Cotton anything. Cotton absorbs sweat and stays wet, pulling heat from your body throughout the night.
- Too many layers. More layers ≠ more warmth inside a sleeping bag. The bag needs loft space to trap warm air — overstuffing it defeats the design.
5 Common Sleep System Mistakes
After reviewing common pain points reported by campers across outdoor communities and evaluating gear setups over multiple seasons, these five mistakes appear most frequently — and most reliably ruin a night’s sleep.
Mistake 1: Buying a bag by the label temperature, not the Comfort rating.
The fix: Always check whether a bag is ISO 23537-rated and shop by the Comfort rating, not the Lower Limit. If a bag isn’t ISO-rated, assume the labeled temperature is optimistic by 10–15°F.
Mistake 2: Using a low R-value pad in cold conditions.
The fix: Match your pad R-value to your expected overnight low using the table in H2 #2. R-3 is a reasonable minimum for any camping below 50°F. For nights below 30°F, R-5 is the starting point.
Mistake 3: Letting your sleeping bag get damp.
The fix: Store your bag in a compression sack inside your pack, inside a waterproof liner. After a wet night, air your bag out fully before repacking — never store a damp bag compressed.
Mistake 4: Getting into a cold bag cold.
The fix: Do light exercise before bed and use a pre-warmed hot water bottle in the bag. Remember: the bag retains heat, it doesn’t create it. You must bring warmth to the equation.
Mistake 5: Ignoring tent condensation.
The fix: Leave tent vents slightly open even on cold nights. Condensation from your breathing accumulates on the tent walls and can drip onto your bag, wetting the insulation. Proper ventilation prevents this without meaningfully reducing warmth inside the tent.
Campsite Setup: Noise, Light, Cold Air
Your campsite location and tent setup affect your sleep quality as much as your gear does. According to US Forest Service campsite selection guidance, choosing sheltered camping locations that reduce wind exposure is a key safety recommendation for cold-weather camping (USFS, 2026).
Cold air management:
- Avoid valley bottoms and low-lying areas. Cold air is denser than warm air and settles into low spots overnight. A campsite 20–30 feet up a hillside can be 5–10°F warmer than a valley floor.
- Use natural windbreaks. A tent pitched in the lee of a rock outcropping, a dense stand of trees, or a hillside experiences significantly less convective heat loss than an exposed campsite.
- Orient your tent door away from the prevailing wind. This reduces cold air infiltration when you open and close the tent during the night.
- Noise and light:
- Use earplugs for camping near water (rushing streams are louder than expected) or in campgrounds with other groups.
- Bring a sleep mask. Summer camping at high latitudes or in open terrain can mean sunrise at 4:30 a.m. — earlier than you want to wake up.
- Place your tent door facing east if you want natural light to help you wake up, or facing away from east if you prefer to sleep later.
For more on optimizing your full outdoor experience, our guide to camping comfortably for beginners covers campsite selection in detail.
Common Pitfalls and Limitations
Common Pitfalls to Avoid
Even a well-designed camping sleep system has failure points that no amount of expensive gear can fully prevent. These are the situations where the system breaks down — and how to avoid them.
Pitfall 1: Overconfidence in your temperature rating.
A 0°F sleeping bag in a wet, uninsulated tent without a proper pad will not keep you warm at 0°F. Temperature ratings assume you’re using a complete, dry system. Missing any component degrades the whole. Mitigation: Always verify your full system — bag, pad, liner, and shelter — before any trip where temperatures will drop significantly.
Pitfall 2: Gear that works at home doesn’t work at altitude.
At altitude above 8,000 feet, temperatures drop faster than expected after sunset, humidity is often lower (accelerating moisture loss and dehydration), and wind exposure is greater. Many campers underestimate the conditions modifier in The Sleep System Formula for high-altitude trips. Mitigation: Add 10°F to your safety buffer for any camping above 8,000 feet.
Pitfall 3: Liner warmth ratings are not additive with bag ratings.
Adding a fleece liner that claims to add 15°F to a 20°F bag does not reliably produce a 5°F system. The liner’s warmth addition depends on your body’s heat output, the liner’s fit inside the bag, and the bag’s remaining loft space. Mitigation: Treat liner warmth additions as approximations — useful for fine-tuning, not for replacing a warmer bag in genuinely cold conditions.
When to Choose Alternatives
If you’re a strictly fair-weather, summer-only camper: A budget sleeping quilt and an R-2 foam pad may genuinely be all you need. Don’t over-invest in a cold-weather system you’ll never use. A 45°F comfort-rated quilt and a basic foam pad handles most summer car camping at lower cost and lower weight than a full 3-season system.
If you’re a dedicated winter mountaineer: Consumer camping sleep systems — even high-end ones — are not designed for multi-day expeditions below -20°F. Mountaineering-grade systems from expedition-focused brands use different construction methods and materials. Consumer guides like this one are the starting point; professional guiding organizations and mountaineering courses are the appropriate next step.
If you have specific health conditions: Campers with circulatory conditions, Raynaud’s phenomenon, or other conditions affecting thermoregulation should consult a physician before cold-weather camping and should apply more conservative safety margins than the standard recommendations here.
When to Seek Expert Help
For winter camping below 0°F, multi-day snow camping, or any expedition-style trip in remote terrain, the gear choices in this guide are a foundation — not a complete answer. Seek guidance from a certified wilderness medicine instructor (NOLS Wilderness Medicine or equivalent), consult with experienced local guides, or take a structured wilderness skills course before attempting extreme conditions camping independently.
Frequently Asked Questions
What is a camping sleep system?
A camping sleep system is the combination of a sleeping bag (or quilt), sleeping pad, liner, and shelter that work together to maintain your core body temperature overnight. No single component does the job alone — the system works because each layer addresses a different heat loss mechanism. The pad stops conductive heat loss through the ground; the bag stops convective heat loss through the air; the liner adds adjustable warmth and protects the bag’s insulation. According to the National Park Service, both a properly rated bag and an insulating pad are essential — not optional — for safe outdoor sleep (NPS, 2026).
What sleeping bag temperature rating do I need?
Match your sleeping bag temperature rating to 10°F below your expected overnight low, using the ISO 23537 Comfort rating (not the Lower Limit). If your campsite expects a 30°F overnight low, choose a bag rated to 20°F Comfort. This 10°F buffer accounts for unexpected temperature drops, wind chill, and individual cold sensitivity. Women should apply an additional 10–15°F buffer, or choose a women’s-specific bag, since ISO Comfort ratings for women’s bags reflect physiological differences in heat generation. A bag labeled “20°F” without ISO certification should be treated as approximately 30–35°F in real-world conditions.
What is R-value and what sleeping pad R-value do I need?
R-value measures how well a sleeping pad resists heat flow — the higher the number, the more thermal protection the pad provides. Since 2020, the ASTM F3340-18 standard requires all U.S. sleeping pads to use the same test method, making R-values directly comparable across brands. For 3-season camping (roughly 30°F–55°F overnight), an R-3 to R-4 pad is the standard recommendation. For cold-weather camping below 30°F, R-5 is the minimum. For sub-zero winter camping, R-6 or higher is recommended — achievable by stacking a closed-cell foam pad (R-2) under an inflatable pad (R-4). Summer camping above 50°F can use an R-1 to R-2 pad.
Should I get a down or synthetic sleeping bag?
Choose down if you camp in dry conditions and want the lightest, most packable option; choose synthetic if you camp in wet climates or need a lower-cost bag. Down insulation provides superior warmth-to-weight ratio and lasts 20+ years with proper care, but loses most of its insulating ability when wet. Synthetic insulation retains approximately 60–80% of its dry insulating value when damp, dries faster, and typically costs 30–50% less. For most beginners camping in variable conditions, a synthetic bag or a hydrophobic-treated down bag offers the best balance of performance, durability, and value. For ultralight backpacking in dry mountain environments, high-fill-power down (700+) is the preferred choice.
How do I stay warm in my sleeping bag?
Warmth in your sleeping bag starts before you get in. Do 10–15 minutes of light exercise before bed to raise your core temperature — the bag retains heat but does not generate it. Eat a high-calorie snack (nuts, cheese, chocolate) to give your metabolism fuel for overnight heat generation. Wear a clean, dry merino wool or synthetic base layer, wool socks, and a light beanie — avoid cotton and avoid overstuffing the bag with bulky layers that compress its loft. Place a hot water bottle at your feet 20 minutes before bed to pre-warm the insulation. If you’re still cold, add a fleece liner (adds 10–15°F) before assuming you need a new bag. For more guidance, Outside Online’s outdoor sleep system guide covers advanced warmth strategies used by experienced expedition campers (Outside Online, 2026).
Conclusion
Building a reliable camping sleep system isn’t about buying the most expensive bag — it’s about understanding how your bag, pad, and liner work together as a calibrated unit. This camping sleep system guide has walked you through the core framework: The Sleep System Formula (bag temperature rating + pad R-value + conditions modifier), the science of heat loss, the gear choices for every season, and the pre-sleep habits that make any system perform better. Match these three numbers to your specific conditions and you’ve solved the cold-night problem permanently.
The Sleep System Formula is the mental model that makes all of this repeatable. Once you understand that your pad addresses conductive heat loss from the ground while your bag addresses convective loss from the air, every gear decision becomes logical rather than overwhelming. You’re no longer guessing — you’re applying a system.
Your next step: identify your most common camping conditions (season, expected overnight low, wet or dry climate), then use the gear combination formulas in H2 #2 to build your specific system. If you’re starting from scratch, a 20°F ISO-rated bag, an R-3.5 pad, and a silk liner covers 80% of 3-season camping scenarios at a reasonable budget. Try your system at home or on a short overnight trip before committing to a longer expedition — and adjust from there. For more help planning your complete outdoor kit, explore our beginner camping guide to build on the foundation you’ve established here.

David King
Field gear tester at Tent Explorer.