10 Camping Meal Prep Tips for Stress-Free Campsite Cooking
 David King
Updated June 30, 2026
18 min read
David King
Updated June 30, 2026
18 min read
“Does anyone have any good ideas for a make ahead dinner for camping? I’m running out of ideas and need something I can make ahead and won’t be a lot of work to throw together.”
You’re not alone. That’s the most common frustration in every camping group chat — and the answer is simpler than you think.
Most campers arrive at the campsite and realise they forgot to prep. So they spend the first evening cooking from scratch, washing up in the dark, and wondering why they didn’t just stay home. It doesn’t have to be that way.
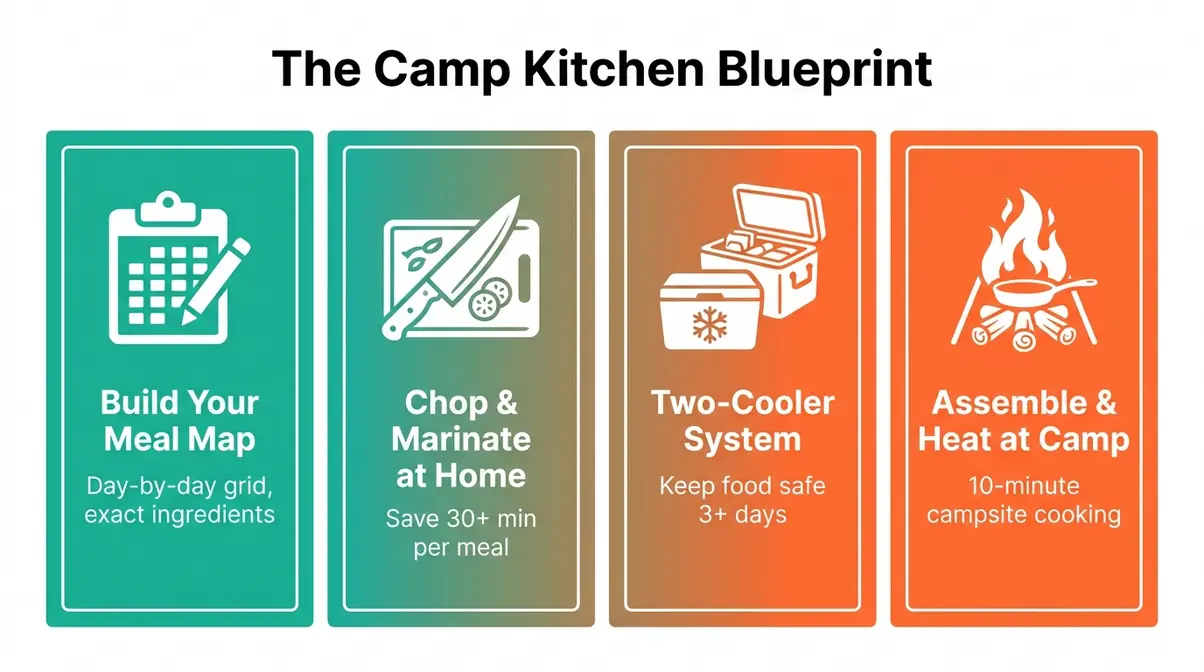
In this guide, you’ll get 10 proven camping meal prep tips — covering planning, cooler management, easy make-ahead meals, and mess-free campsite cooking — so your next trip feels like a holiday, not a kitchen shift. Everything is organised around The Camp Kitchen Blueprint, a simple Plan → Prep → Pack → Execute framework that moves all the hard work to your home kitchen, where it belongs.
- What You’ll Need:
- A cooler (or two — more on that in Tip #4)
- Resealable freezer bags and airtight containers
- A permanent marker for labelling
- A simple printed or digital meal plan (template in Tip #1)
The best camping meal prep tips follow a simple framework — Plan, Prep, Pack, Execute — doing the hard work at home so the campsite feels completely effortless.
- Plan ahead: A day-by-day meal map prevents overpacking and forgotten ingredients
- Prep at home: Pre-chopping and pre-marinating saves 30+ minutes of campsite cooking per meal
- Use the Two-Cooler System: Separating food from drinks keeps perishables safe for 3+ days
- Go make-ahead: Foil packets and freezer bag meals mean zero cooking from scratch at the campsite
- The Camp Kitchen Blueprint turns camping cooking from a stressful chore into a 10-minute assembly job
Plan Camping Meals Before Leaving Home
The less you do at the campsite, the more you enjoy it — every great camping meal starts at home, not in the field. The Camp Kitchen Blueprint — our 4-step framework for stress-free camping cooking — begins here, with the Plan and Prep stages. These first three tips are where most of the magic happens before you even zip up your tent bag.
Experienced campers consistently report that a few focused hours in your home kitchen eliminates nearly all the chaos of campsite cooking. The goal is simple: arrive at your site with everything chopped, marinated, portioned, and labelled — so “cooking” is really just assembling and heating.
Plan meals without overpacking?
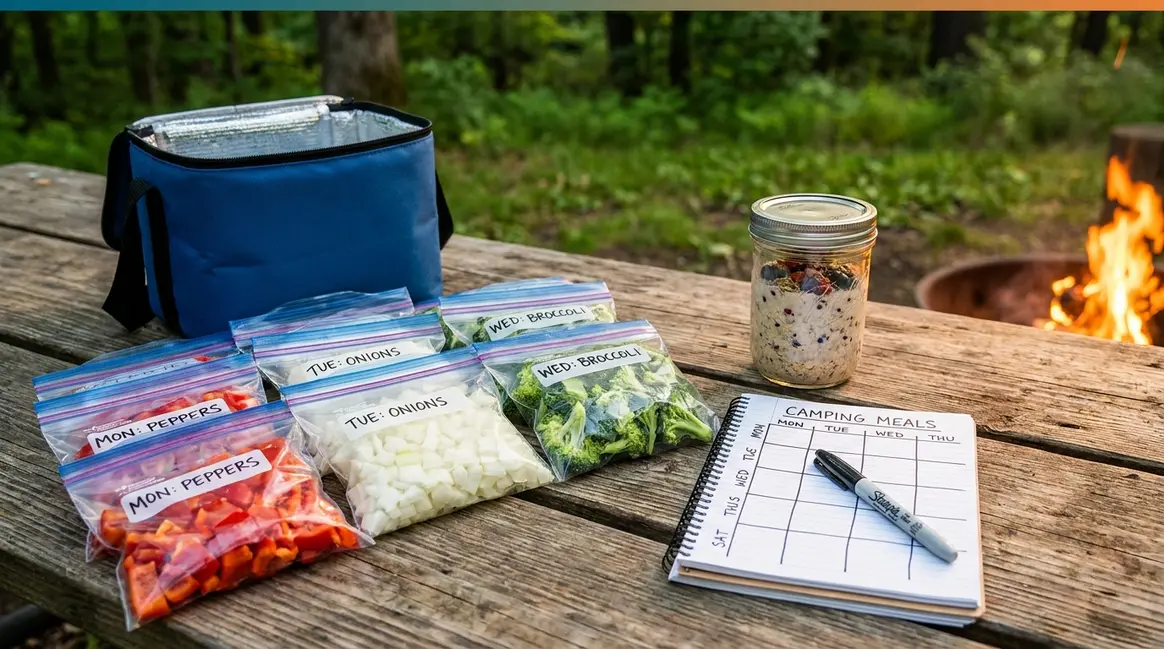
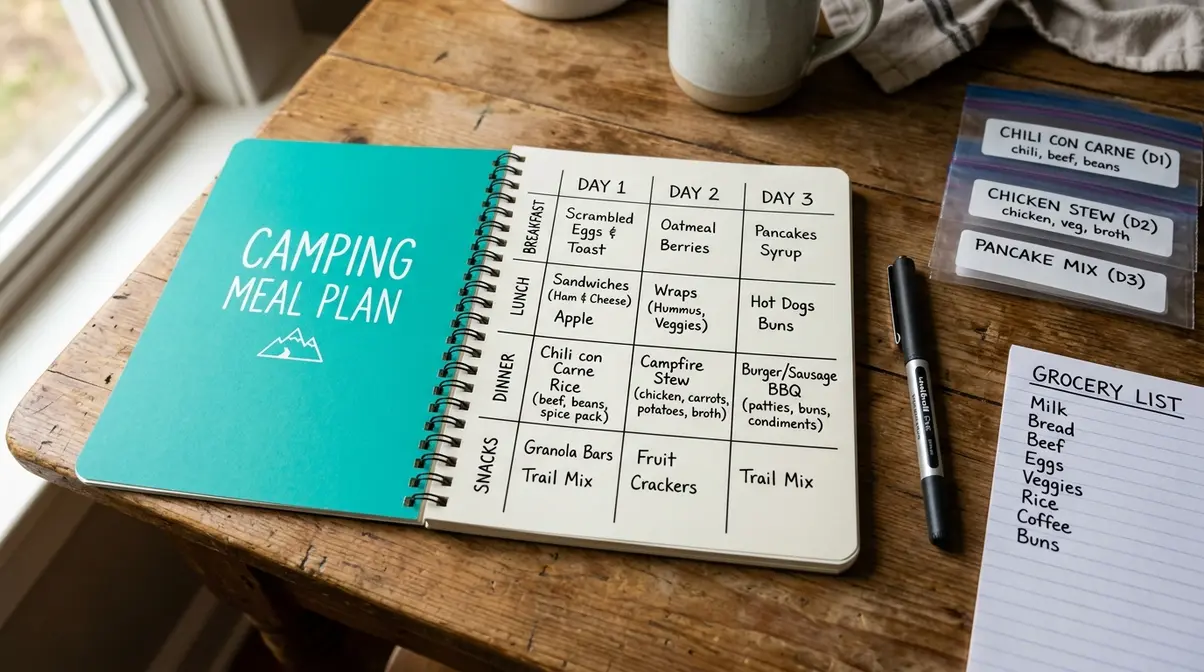
Tip #1: Build a Day-by-Day Meal Map before you shop for a single ingredient.
A Meal Map is a simple grid. Columns are your trip days (Day 1, Day 2, Day 3). Rows are your meals (Breakfast, Lunch, Dinner, Snacks). Each cell holds one specific meal — with every ingredient listed. That’s it.
Here’s why it works: you shop exactly once, you know precisely what to prep, and nothing gets forgotten. REI, the outdoor equipment retailer and camping authority, recommends planning meals by trip length as your starting point — so your map scales naturally from a weekend trip to a full week.
A concrete example for Day 1:
| Meal | What You’re Making | Key Ingredients to Prep at Home |
|---|---|---|
| Breakfast | Overnight oats in a jar | Oats, chia seeds, almond milk — mix and seal night before |
| Lunch | Wraps with pre-cooked chicken | Tortillas, shredded chicken, salsa — chicken cooked and shredded |
| Dinner | Chicken fajita foil packets | Pre-marinated chicken strips, sliced peppers, onion — all in a bag |
| Snacks | Trail mix and apple slices | Portioned into zip bags at home |
Counter-narrative worth knowing: most campers overpack food on their first trip. Bringing more than you need adds weight, wastes money, and fills your cooler with food you won’t eat. A Meal Map solves this — you bring exactly what you need, nothing more.
Pre-Chop and Pre-Marinate at Home
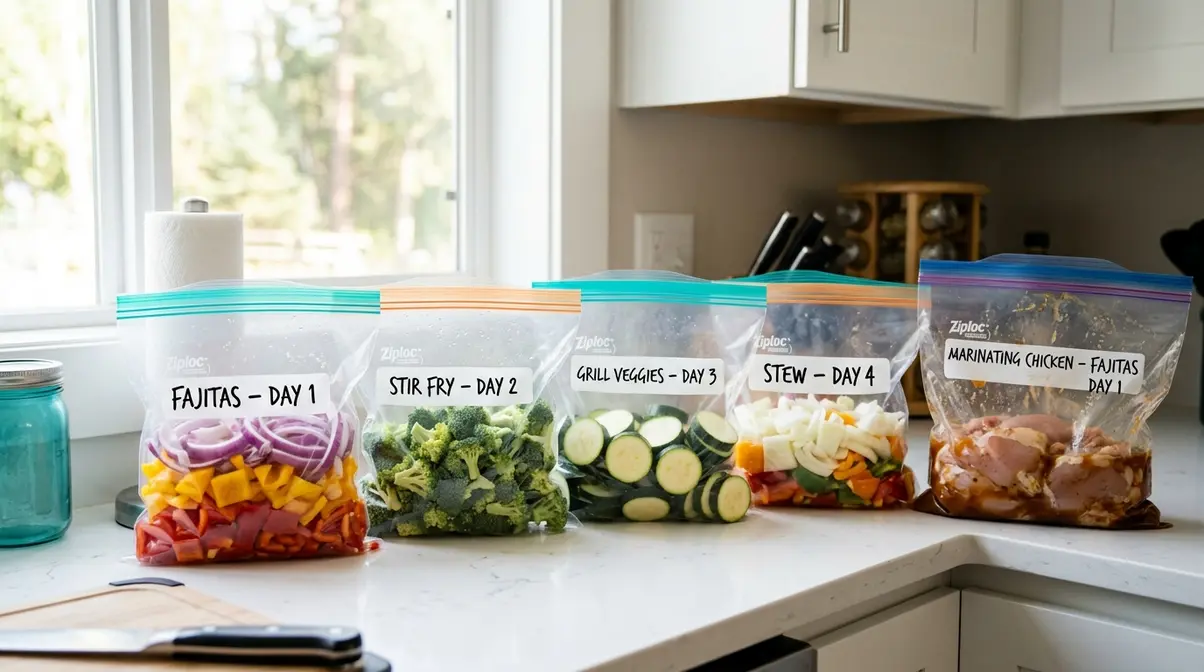
Tip #2: Do all your knife work at home. Every vegetable you chop at the campsite is time stolen from the fire.
Here’s what to prep before you leave:
- Vegetables: Chop onions, peppers, zucchini, and broccoli into meal-sized portions. Seal in labelled freezer bags. These stay cold in your cooler and go straight into the pan.
- Meat: Marinate chicken thighs or steak strips overnight in your chosen sauce. Seal the bag, freeze it, and it doubles as an ice block in your cooler.
- Dry mixes: Pre-mix your pancake dry ingredients (flour, baking powder, sugar, salt) in a zip bag. At camp, just add water and an egg.
- Eggs: Crack your eggs at home, beat them lightly, and store in a sealed water bottle or jar. No shells to deal with, no cracked eggs in your bag.
Experienced campers report that this approach saves an average of 30 minutes of active campsite cooking per meal — time you could spend around the fire instead. For a 3-day trip with 3 cooked meals per day, that’s 90 minutes of your holiday back.
Check out our guide on strategic camping meal planning for even more ways to streamline your prep process.
Scaling Meals for Families and Groups
Tip #3: Use a simple multiplier formula when cooking for a group.
Camping meal prep tips for large groups come down to one rule: plan per person, then multiply. Start with a single-serving recipe, then scale it up.
A basic formula: Ingredients × Number of Adults + (Number of Kids × 0.6). So for 2 adults and 3 children eating pasta: if one adult portion needs 80g of pasta, you’d need (2 × 80g) + (3 × 0.6 × 80g) = 160g + 144g = 304g total.
For camping meal prep tips for families of 4–8 people, batch cooking works best:
- Chili or stew: Make a double batch at home, freeze in a large zip bag, reheat in one pot at camp.
- Taco filling: Pre-cook seasoned ground beef or turkey, portion into bags by meal. Each bag = one dinner.
- Pancake batter: Pre-mix dry ingredients in bulk. At camp, divide into small bags for each morning.
Washington State University Extension notes that dehydrating meals at home lets campers create lightweight, nutritious dinners that need only boiling water to rehydrate — drastically reducing campsite cleanup. For a 3-day trip, this approach can mean carrying up to 40% less weight in your food bag. That’s a meaningful difference when you’re hiking to your site.
🎒 Action: Before your next trip, spend 20 minutes filling out a Day-by-Day Meal Map. List every meal, the ingredients you need, and which day you’ll eat it. This single step eliminates most campsite food stress — and prevents the classic “we forgot the pasta” moment.
How to Pack and Manage Your Cooler
Good cooler management is the backbone of the Pack step in The Camp Kitchen Blueprint. Get this right and your food stays safe, cold, and organised for the entire trip. Get it wrong and you’re eating warm sandwiches by Day 2.
The Two-Cooler System Explained
Tip #4: Use two coolers — one for food, one for drinks.
This is the single most effective camping food prep upgrade you can make. Here’s the logic: every time someone opens the drinks cooler for a cold beer, the temperature inside spikes. If your food is in the same cooler, that repeated warming puts your perishables at risk.
The Two-Cooler System works like this:
- Cooler 1 (Food Cooler): Perishable items only — meat, dairy, pre-prepped meals. This cooler stays closed as much as possible. It opens for cooking, not snacking.
- Cooler 2 (Drinks Cooler): Beverages, snacks, condiments, and anything you need frequent access to. This one gets opened constantly, and that’s fine — it’s meant to.
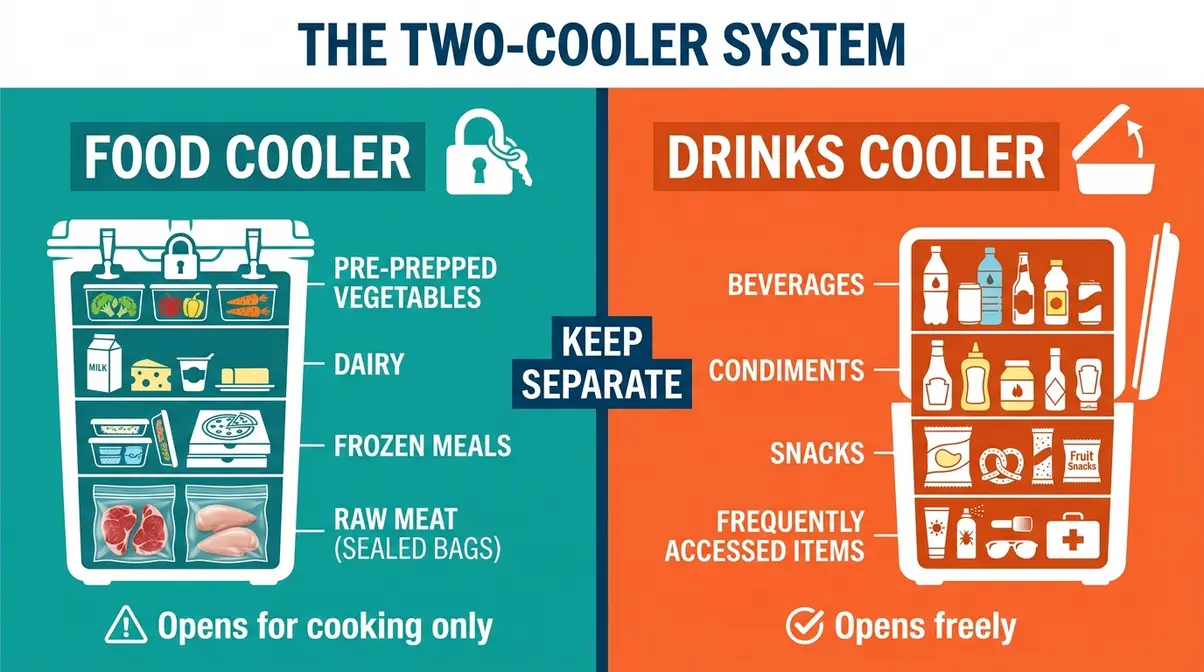
Fresh Off The Grid, a widely respected camping food resource, recommends this exact separation for any trip lasting more than one night — and across camping communities, the consensus is that it’s the most impactful single change beginners can make.
Layer Your Cooler for Maximum Cold
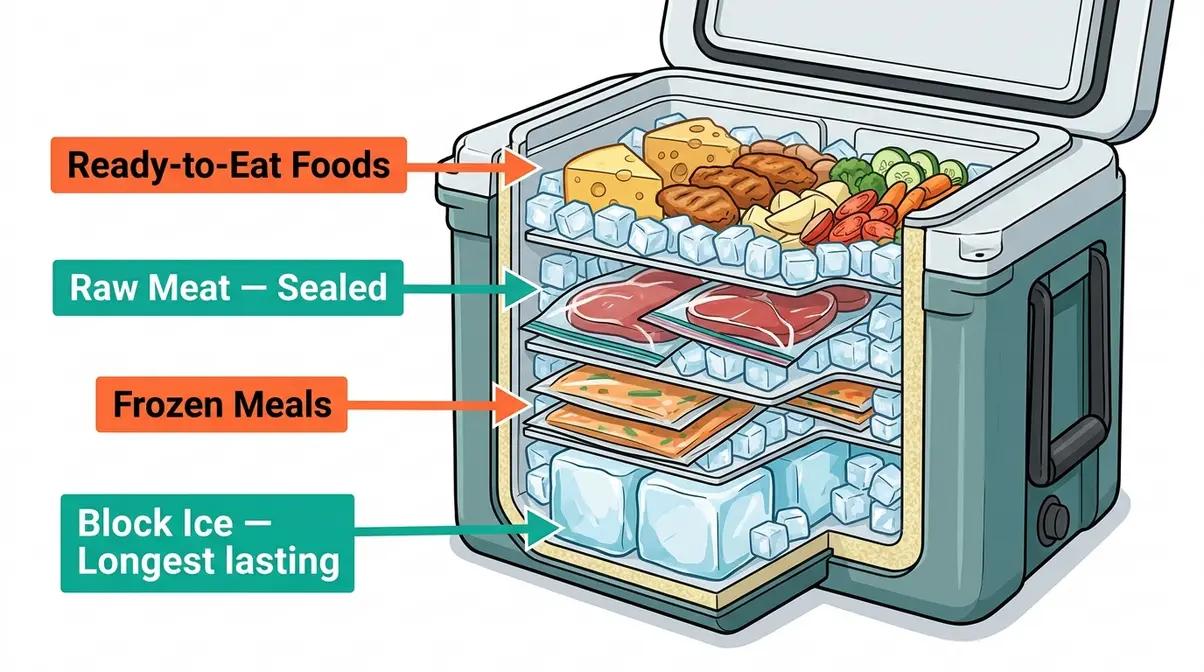
Tip #5: Layer your food cooler strategically — it’s not just about throwing everything in.
Follow this layering order from bottom to top:
- Bottom layer — block ice: Block ice (large solid ice blocks that melt slower than cubed ice) goes in first. It forms a cold base that lasts 2–3 times longer than crushed ice.
- Second layer — frozen meals: Your pre-frozen freezer bag meals sit directly on the ice. They stay frozen longer and help keep the rest of the cooler cold.
- Third layer — raw meat: Raw meat goes in sealed bags above the frozen meals. Keeping it sealed prevents cross-contamination (when bacteria from raw meat spreads to other foods).
- Top layer — ready-to-eat foods: Cheese, cooked items, and pre-prepped vegetables go on top. They’re accessed most often and stay furthest from the melt water.
- Fill gaps with cubed ice: Pack any remaining air pockets with cubed ice to maintain temperature.
One important rule: drain melt water regularly. Sitting water speeds up the melting of remaining ice and can flood your sealed bags.
Keep food cold for 3+ days?
Tip #6: Plan your ice strategy before you leave home — not when you arrive.
For trips longer than two days, use this approach:
- Day 1: Start with a mix of block ice (bottom) and cubed ice (top). Your cooler is coldest on Day 1 — this is when you store the most perishable items.
- Day 2: Add a fresh bag of cubed ice if available. Consume raw meat and dairy items first.
- Day 3+: Switch to shelf-stable and dry goods. Plan meals so your most perishable items are eaten early in the trip.
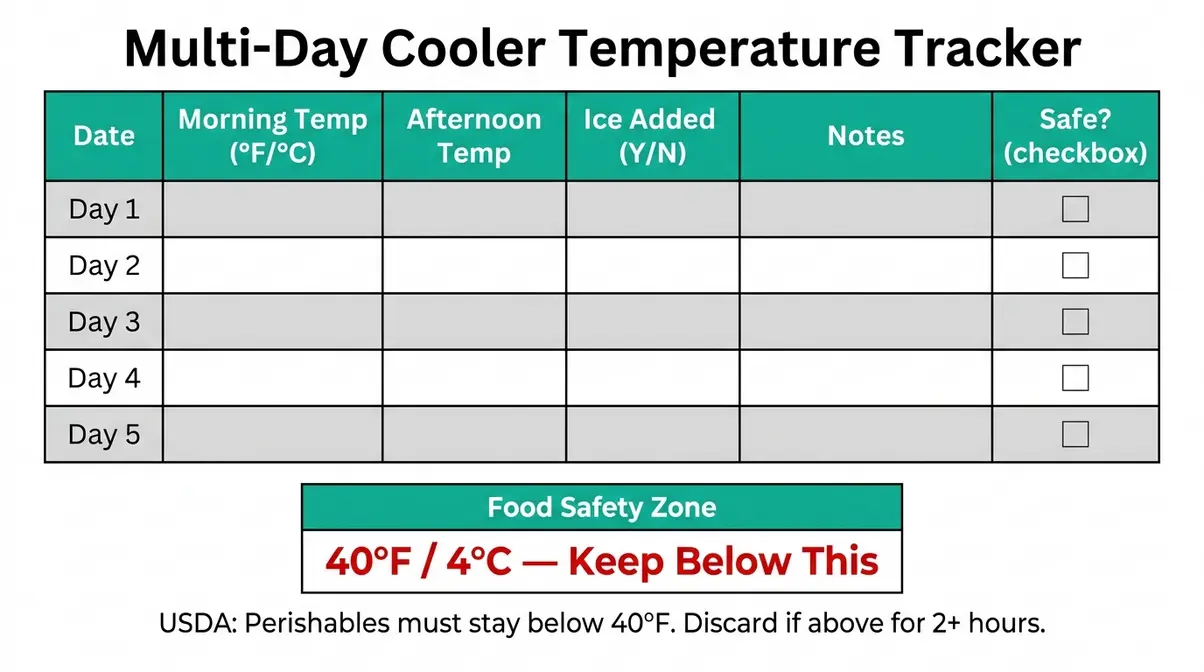
Pre-chill your cooler before packing it. Place a bag of ice inside for 30 minutes before loading food. A pre-chilled cooler maintains temperature significantly longer than one packed at room temperature. Remember, according to the USDA, perishable food must stay below 40°F (4°C) to remain safe (USDA, 2026).
Easy Make-Ahead Camping Meals
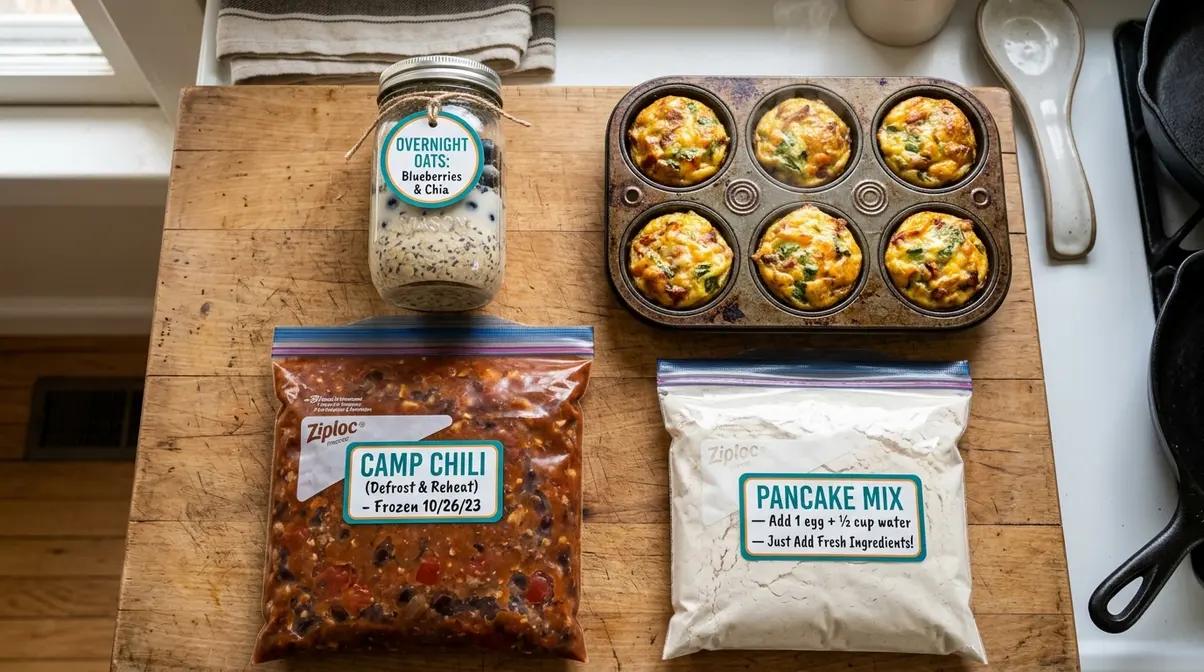
This is where the Prep step of The Camp Kitchen Blueprint really pays off. Make-ahead camping meals — meals you fully or partially cook at home before your trip — are the difference between a BREEZE of a campsite and a stressful cooking session. These aren’t complicated recipes. They’re simple, tested ideas that work for beginners.
Make-Ahead Breakfast Ideas
Tip #7: Prep your breakfasts the night before you leave — not the morning of.
Here are four make-ahead breakfasts that require zero campsite cooking from scratch:
- Overnight oats in a jar: Combine rolled oats, chia seeds, milk (or plant milk), and a spoonful of honey in a sealed mason jar. Refrigerate overnight. Eat cold at camp — no cooking required. Make one jar per person.
- Egg muffins: Beat eggs with cheese, diced peppers, and spinach. Pour into a muffin tin. Bake at 180°C (350°F) for 18 minutes. Cool, wrap individually, and store in your food cooler. Reheat in foil over the camp stove in 5 minutes.
- Banana oat pancake mix: Combine flour, oats, baking powder, salt, and a pinch of cinnamon in a zip bag at home. Label it “Add 1 egg + ½ cup water.” At camp, just shake, pour, and cook.
- Granola and dried fruit bags: Portion granola into individual bags at home. Add dried mango, raisins, or cranberries. Eat with a travel-size yogurt pouch or dry as a snack.
According to Allrecipes’ camping meal prep guidance, make-ahead breakfasts are the most impactful category for beginner campers — mornings at camp are when people are hungriest, least organised, and most likely to reach for junk food if nothing is ready.
No-Cook Lunch Options
Tip #8: Plan at least two no-cook lunches per trip. Lunch doesn’t need heat.
No-cook camping lunches are the unsung heroes of mess-free camping. Here are four solid options:
- Wraps with hummus and veg: Pack pre-sliced cucumber, carrot sticks, and spinach in a bag. Bring a small tub of hummus and a pack of tortillas. Assembly time: 3 minutes.
- Peanut butter and banana tortillas: Spread peanut butter on a tortilla, add banana slices, roll and go. High in calories and energy — great for hiking days.
- Tuna or chicken pouches: Single-serve tuna or chicken pouches (shelf-stable, no refrigeration needed) paired with crackers and pre-sliced cheese.
- Antipasto box: Olives, salami slices, crackers, hard cheese, and cherry tomatoes in a divided container. No prep at camp — just open and eat.
These options mean zero cooking in a field at lunchtime — and barely any washing up. Fresh Off The Grid’s make-ahead camping meals guide notes that no-cook lunches dramatically reduce fuel consumption and washing-up time, making them ideal for families and groups.
Make-Ahead Dinner Ideas
Tip #9: Make your dinners at home — fully or 80% of the way — so campsite “cooking” is just heating and eating.
Here are four make-ahead dinner ideas that experienced campers rely on:
- Freezer bag chili: Cook a full batch of beef and bean chili at home. Cool completely. Pour into a large zip bag and freeze flat. At camp, place the bag in boiling water for 10 minutes or reheat in a pot. Serve with pre-packed tortilla chips.
- Pasta sauce in a bag: Make your favourite tomato or bolognese sauce at home. Freeze in a bag. At camp, boil pasta (takes 10 minutes), pour over sauce. Done.
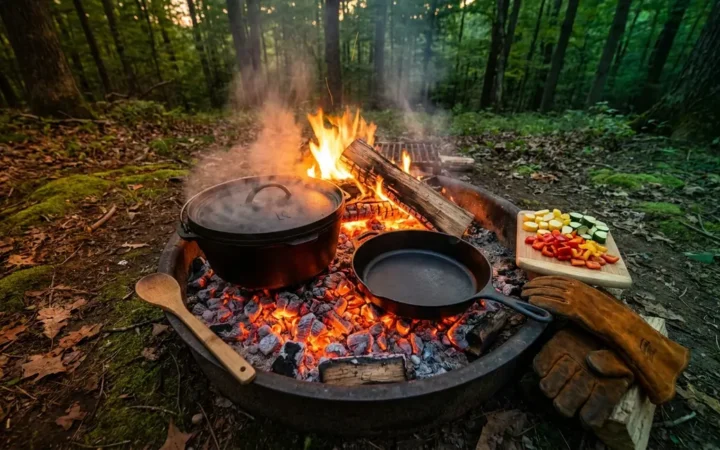
- Chicken fajita foil packets: Pre-marinate chicken strips in fajita seasoning and lime juice. Store with sliced peppers and onions in a sealed bag. At camp, dump the bag contents onto a foil sheet, seal, and cook on the grill or fire for 15 minutes. Zero washing up.
- Lentil and vegetable soup: Make a large pot at home. Freeze in portions. This is particularly good for cool evenings — it reheats in one pot in under 10 minutes.
As Amanda Outside’s camping food hacks guide highlights, the key to make-ahead camping dinners is choosing meals with a sauce or liquid base — these reheat evenly and are far more forgiving than dry dishes when you’re working over an unpredictable camp stove flame. If you prefer cooking over the fire rather than just reheating, check out these easy one-pot camping recipes for simple meals that still keep washing up to a minimum.
Campsite Cooking Hacks for Less Mess
The Execute step of The Camp Kitchen Blueprint is about making the actual campsite experience as smooth and mess-free as possible. These three tips are quick wins that experienced campers swear by.
Prep Spices and Dry Ingredients Early
Tip #10 (Part A): Pre-mix your spices and dry ingredients at home. Never bring full spice jars to the campsite.
Here’s how to do it:
- Identify your meals. For each recipe that needs spices, write down the exact quantities needed.
- Mix and seal. Combine the spices for each meal into a small zip bag or mini container. Label it with the meal name (e.g., “Fajita Mix — Day 1 Dinner”).
- Pack together. Keep all spice bags in one small pouch so you can find them instantly.
This approach saves space, prevents broken spice jars, and means you’re not rummaging through your pack at 7pm trying to find the cumin. It also forces you to commit to specific meals — reinforcing the Meal Map from Tip #1.
Foil Packets: Mess-Free Cooking
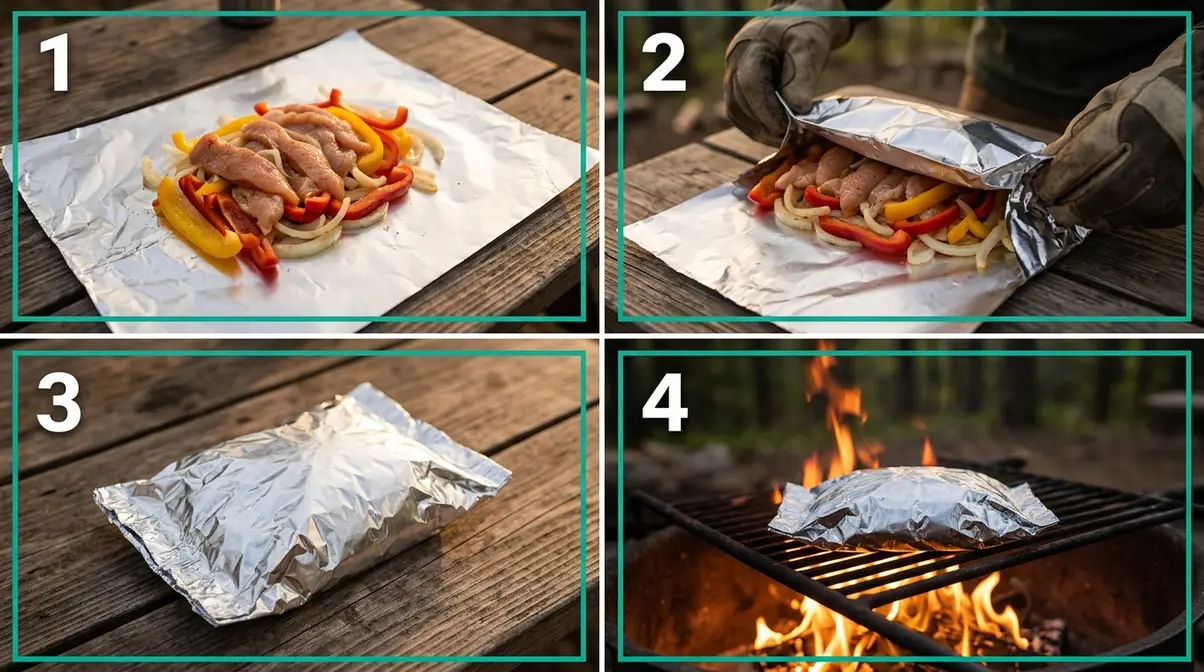
Tip #10 (Part B): Use foil packets for any meal you’d normally cook in a pan.
Foil packet cooking (cooking food sealed inside heavy-duty aluminium foil, directly on a grill or fire) is the closest thing to zero washing up that camping offers. Here’s a simple method:
- Lay a large sheet of heavy-duty foil flat.
- Place your pre-prepped ingredients in the centre (meat, veg, a drizzle of oil, your pre-mixed spice bag).
- Fold the foil over and crimp the edges tightly to seal — you want steam to stay inside.
- Cook on a grill rack or directly in campfire coals for 12–20 minutes depending on the protein.
- Let it cool for 2 minutes, then eat directly from the packet. No plates, no pans, no scrubbing.
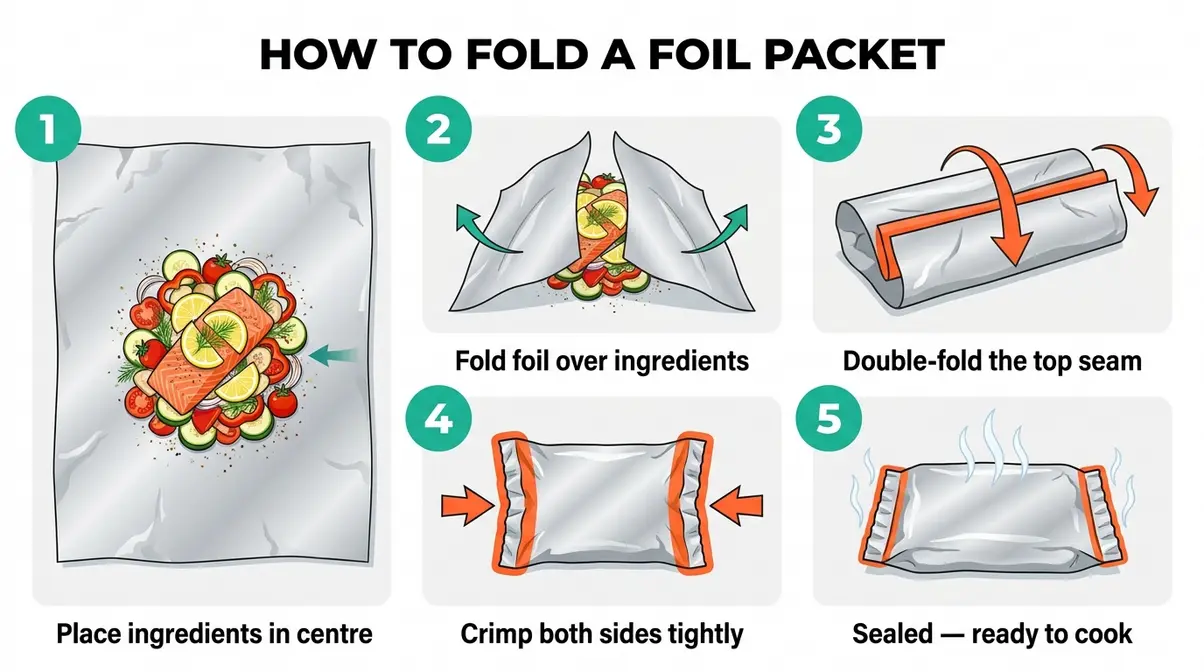
Foil packets work brilliantly with the pre-marinated chicken from Tip #2, the fajita filling from Tip #9, and even desserts — try banana, chocolate chips, and marshmallow sealed in foil for a 10-minute campfire dessert.
Easy Campsite Cleanup Rules
Tip #10 (Part C): Clean as you go — and follow Leave No Trace principles for washing up outdoors.
Three rules that make cleanup a BREEZE:
- Use biodegradable soap only. Conventional dish soap harms waterways and soil. Carry a small bottle of biodegradable camp soap (available at any outdoor retailer).
- Wash at least 60 metres (200 feet) from any water source. This is the Leave No Trace standard — it prevents soap and food particles from entering streams and lakes.
- Use a two-basin system: one basin with warm soapy water for washing, one with clean water for rinsing. Scatter grey water (used wash water) widely over soil, away from your camp and water sources.
Using foil packets and pre-portioned freezer bags throughout your trip means you’ll have far less to wash up in the first place. Most experienced campers find their washing-up pile is down to one pot and a couple of utensils per meal when they follow the Blueprint.
Food Safety Rules Every Camper Needs
Even the best camping meal prep tips can go wrong if you ignore food safety. This section covers the most important rules — and the most common mistakes beginners make.
Common Food Safety Mistakes to Avoid
The single most dangerous mistake: letting perishable food sit in the temperature danger zone for too long.
According to the USDA, perishable food should never sit between 40°F and 140°F (4°C–60°C) for more than 2 hours — or 1 hour if the air temperature is above 90°F (32°C) (USDA Food Safety and Inspection Service, 2026). This range is called the “danger zone” — where bacteria multiply rapidly.
Here are the most common food safety mistakes to avoid:
- Not pre-chilling your cooler. A warm cooler raises the temperature of everything inside it. Pre-chill for 30 minutes before loading.
- Storing raw meat above ready-to-eat food. Raw meat juices drip down and contaminate everything below. Always store raw meat at the bottom in sealed bags.
- Opening the food cooler too often. Every opening adds warm air. Keep it closed unless you’re actively cooking.
- Relying on “it smells fine.” Bacteria that cause food poisoning often produce no smell. When in doubt, throw it out.
- Forgetting cross-contamination rules. Use separate utensils for raw and cooked food. Label your bags clearly.
When to Skip the Cooler Altogether
Not every camping trip needs a cooler. If you’re backpacking, hiking to a remote site, or want to travel lighter, shelf-stable and dehydrated food is your answer.
Shelf-stable options that need zero refrigeration:
- Instant oats, nut butter sachets, dried fruit
- Instant noodles, couscous, dehydrated camping meals
- Hard cheeses (parmesan, aged cheddar) and salami
- Crackers, energy bars, dark chocolate
Dehydrated camping meals (pre-packaged or home-made) are particularly useful for multi-day hikes. They’re lightweight, have long shelf lives, and require only boiling water. The trade-off is cost — commercial dehydrated meals can be expensive, and home dehydration requires equipment and time.
Frequently Asked Questions
Easiest make-ahead camping meal?
Freezer bag chili is the easiest make-ahead camping meal for beginners. Cook a batch of beef and bean chili at home, cool it completely, and freeze it flat in a zip bag. At camp, reheat it in boiling water or a pot in under 10 minutes. It requires zero campsite prep, feeds 4 people from one bag, and tastes better the next day. Other strong options include overnight oats and egg muffins — both require no campsite cooking at all.
What to prep for easier cooking?
You can prep almost everything at home — and the more you do, the easier your trip will be. Chop all vegetables and store in labelled bags. Marinate meat overnight and freeze it. Pre-mix pancake dry ingredients in a zip bag. Pre-cook chili, pasta sauce, or soups and freeze them flat. Crack eggs into a sealed bottle. Pre-mix spice blends for each meal. Experienced campers report that doing all prep at home reduces active campsite cooking time by 30+ minutes per meal — turning dinner into a simple assembly and heating job.
Can I camp without a fridge?
Yes — many campers rely entirely on shelf-stable and dehydrated food, with no cooler needed. Instant oats, nut butter, dried fruit, hard cheeses, salami, crackers, couscous, and commercial dehydrated meals all travel without refrigeration. This approach is particularly popular with backpackers and hikers who need to keep pack weight low. The trade-off is less variety and higher cost for pre-packaged dehydrated meals. For car camping or family trips, a cooler is worth the effort — but it’s not a requirement for every type of camping.
Best vegetables to pre-chop for camp?
Hard vegetables like onions, bell peppers, carrots, and broccoli are the best vegetables to pre-chop for camping. They hold up exceptionally well in a cooler environment and won’t get mushy over a few days like softer produce. Store them in airtight freezer bags to save valuable cooler space and keep them crisp until you’re ready to cook.
How to pack eggs for a camping trip?
The safest and most space-efficient way to pack eggs is to crack them at home, beat them lightly, and store them in a sealed water bottle or mason jar. This eliminates the risk of broken shells leaking in your cooler. It also makes pouring scrambled eggs directly into the pan incredibly easy, reducing campsite cleanup.
Make Your Next Trip’s Cooking Effortless
The Camp Kitchen Blueprint — Plan, Prep, Pack, Execute — works because it shifts the effort to where it belongs: your home kitchen, not a windy campsite. Experienced campers who follow this framework consistently report that campsite “cooking” becomes a 10-minute assembly job. Pre-chopping and pre-marinating saves 30+ minutes per meal. The Two-Cooler System keeps food safe for 3+ days without stress. And make-ahead meals like freezer bag chili and foil packets mean you spend more time around the fire and less time scrubbing pans in the dark.
The Blueprint isn’t complicated. It’s four steps that any beginner can follow: spend 20 minutes on a Meal Map, do your knife work at home, pack your cooler in the right order, and execute at camp with pre-prepped ingredients. Each step in The Camp Kitchen Blueprint builds on the last — and by the time you arrive at your site, the hardest part is already done.
Start with just one tip from this guide — build your first Day-by-Day Meal Map for your next trip. Spend 20 minutes on it this week. You’ll arrive at the campsite with everything ready, and for the first time, campsite cooking will feel exactly like it should: simple, quick, and actually enjoyable.

David King
Field gear tester at Tent Explorer.