Home/Tent Troubleshooting and Maintenance
Tent Troubleshooting and MaintenanceTent Waterproofing Explained: Ratings, DWR & Repair Guide
 David King
Updated June 21, 2026
27 min read
David King
Updated June 21, 2026
27 min read
“I went camping this weekend and when it started raining during the night my tent immediately began to leak.”
— A frustrated camper on a popular outdoor forum
That single sentence captures what thousands of campers experience every year — and almost none of them know why it happened.
Here’s the frustrating part: most tents don’t fail all at once. They fail in one specific layer. And if you grab the wrong waterproofing product to fix it, you waste money and wake up soaked again on your next trip. Tent waterproofing explained properly means understanding that there are three distinct systems at work inside your tent — and diagnosing which one failed changes everything about how you fix it.
By the end of this guide, you’ll understand how hydrostatic head ratings work, what DWR and PU coatings actually do, and how to restore your tent’s waterproofing with confidence. This guide covers ratings terminology, advanced comparisons, a step-by-step re-waterproofing tutorial, and the most common mistakes to avoid.
Key Takeaways: Tent Waterproofing Explained
Every tent uses The Three-Layer Waterproof System — DWR finish, PU coating, and seam sealing — and each layer fails differently, requiring a different fix.
- HH ratings measure fabric water resistance: 2,000mm suits light rain; 5,000mm handles heavy storms
- DWR is the outer finish that makes water bead; it degrades with use and washing
- Seams are the #1 source of leaks in tents rated over 3,000mm
- Re-waterproofing costs under $20 and takes less than an hour when you target the right layer
Tentexplorer.com is a participant in the Amazon Services LLC Associates Program, an affiliate advertising program designed to provide a means for sites to earn advertising fees by linking to Amazon.com. If you click a link and make a purchase, we earn a small commission at no extra cost to you. This does not influence which products we recommend — our goal is always to help you make the best decision for your camping needs.
Recommended Products
| # | Image | Product | Best For | Buy |
|---|---|---|---|---|
| 1 |  |
FanttikOutdoor Instant Cabin Tent | Family instant setup | Buy on Amazon |
| 2 |  |
Forceatt 2-3 Person Tent | 3-season backpacking | Buy on Amazon |
| 3 |  |
Pop Up Tent PU4500mm | High-rating quick setup | Buy on Amazon |
| 4 |  |
EchoSmile Dome Tent 3-4 Person | Groups needing space | Buy on Amazon |
| 5 |  |
CAMPROS Double Layer Dome Tent | Double-layer protection | Buy on Amazon |
| 6 |  |
UNP 8 Person Tunnel Tent | Large family camping | Buy on Amazon |
| 7 |  |
FanttikOutdoor Cabin Tent 12 Person | Extra-large groups | Buy on Amazon |
| 8 |  |
Underwood 4-Season Winter Tent | Winter solo camping | Buy on Amazon |
| 9 |  |
EchoSmile Lightweight 2 Person Tent | Lightweight backpacking | Buy on Amazon |
| 10 |  |
Portable 1-2 Person Camping Tent | Solo budget travel | Buy on Amazon |
Now that you’ve seen the options available, let’s make sure you understand what those waterproof ratings actually mean — so you can choose and maintain any tent with confidence.
Understanding Tent Waterproof Ratings
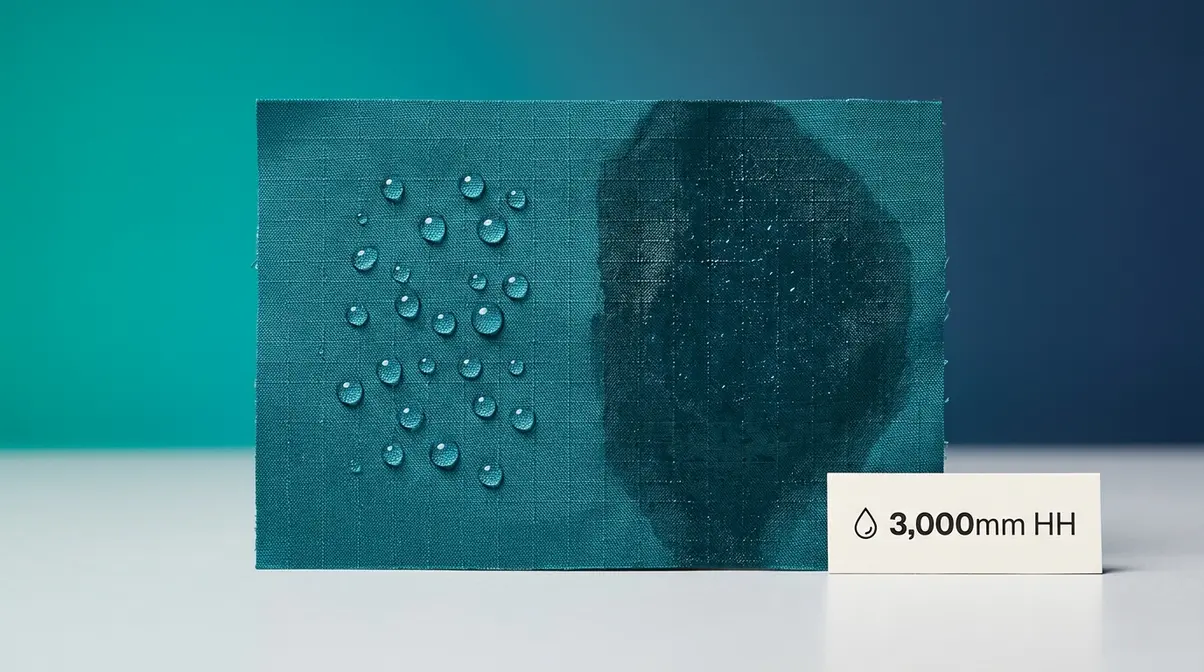
Tent waterproofing explained starts with one number: the Hydrostatic Head (HH) rating, which tells you how much water pressure the fabric can resist before leaking. This rating is tested under ISO 811 standards, which measure the exact millimetres of water column a fabric can withstand before moisture penetrates (Testex Textile). But the HH number on the label is only part of the story — seams, coatings, and construction quality determine whether your tent actually stays dry.
The critical misconception that trips up most campers: a high HH rating on the fabric label does not guarantee a dry tent. The rating tests fabric only — not seams, zippers, or construction. A tent with a 3,000mm fabric rating but unsealed seams will leak in light rain. Understanding this is the first step toward truly understanding tent fabric waterproofing.
What Is Tent Waterproofing, Really?
Tent waterproofing explained in plain English comes down to The Three-Layer Waterproof System. Every tent — from a budget festival shelter to an expedition-grade mountaineering tent — relies on three distinct layers working together. When your soggy gear situation strikes, one of these three layers has failed:
- DWR (Durable Water Repellent) — the outer chemical finish applied to tent fabric that causes water to bead and roll off the surface
- PU coating (polyurethane) — the inner laminated barrier bonded to the inside of the rainfly or floor that actually blocks water from passing through the fabric
- Seam sealing — the tape, sealant, or both that closes the stitching holes where needle and thread puncture the waterproof fabric
Think of your tent like a waterproof jacket. It has an outer water-resistant shell (DWR), an inner waterproof membrane (PU coating), and sealed stitching (seam tape). If any one of these three layers fails, water gets in — even if the other two are working perfectly.
Most leaks come from just ONE of these three layers failing. This is why randomly applying a waterproofing spray often doesn’t work. You might be spraying DWR onto a tent whose real problem is a cracked PU coating underneath — and wondering why your tent still leaks.
It’s also important to understand what the HH rating actually measures. It only tests the PU coating layer — layer two in the system. It tells you nothing about whether the DWR (layer one) has degraded or whether the seams (layer three) are properly sealed. By the end of this guide, you’ll know exactly how to diagnose which layer failed in your tent.
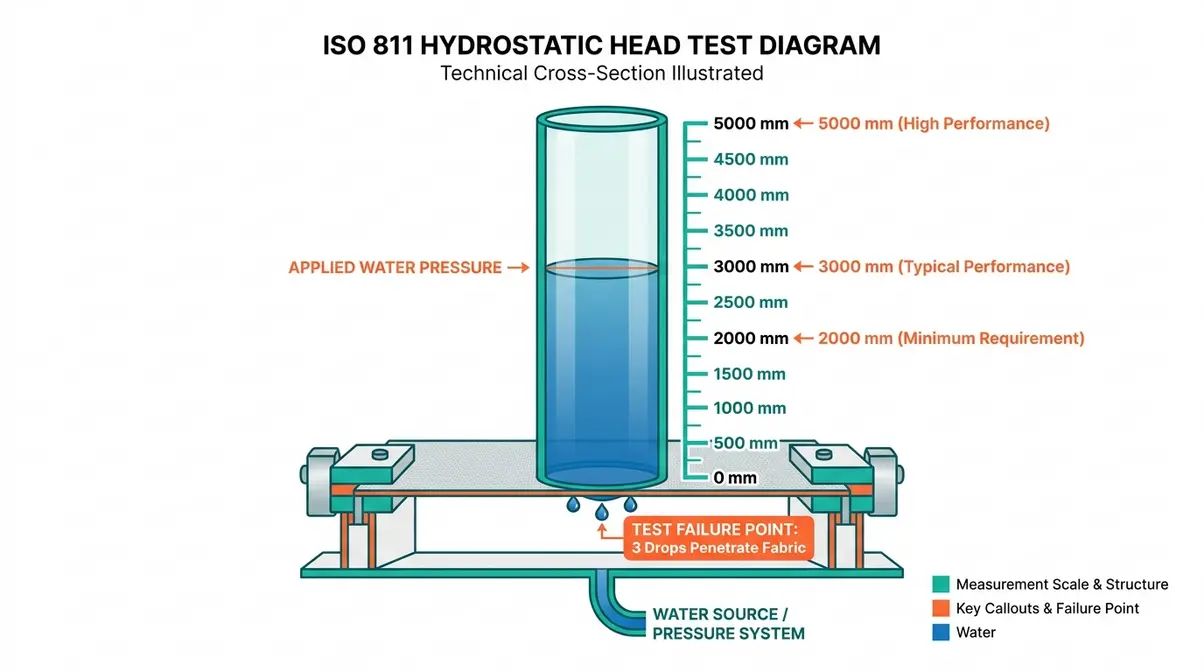
The ISO 811 hydrostatic head testing standards confirm that this lab process measures fabric alone — not the complete tent structure (Testex Textile).
How the Hydrostatic Head (HH) Test Works
The HH test is simpler than it sounds. A small sample of tent fabric is clamped flat under a sealed tube. Water fills the tube slowly, and technicians measure the height of the water column at the exact moment three drops appear on the underside of the fabric. If the fabric holds until the water column reaches 5,000mm (five metres tall), it earns a 5,000mm rating.
Here’s a concrete way to picture it: imagine standing a five-metre garden hose upright over a piece of tent fabric. If no water seeps through, the fabric earns a 5,000mm rating.
Now here’s the number that no competitor has published — and it changes how you think about tent floors forever. One psi of pressure equals approximately 700mm H₂O. A person kneeling on a tent floor concentrates their body weight onto a small area, applying roughly 6 psi of pressure. That equals approximately 4,200mm of water pressure — just from kneeling. This is why tent floors need ratings of 3,000mm or higher, and why you should never kneel on a tent floor with a low-rated groundsheet. The HH rating isn’t just about rain falling from the sky; it’s about the pressure your own body creates from the inside.
The test’s critical limitation: it measures a flat fabric swatch under controlled lab conditions. It does not test seams, zippers, pole stress points, or the tent as an assembled structure. A tent can have a 10,000mm HH rating on the label and still leak through an unsealed seam during its very first rain shower. This limitation is why The Three-Layer Waterproof System matters so much — the HH rating only tells you about one of the three layers.
What Different mm Ratings Actually Mean
Waterproofing explained in real-world terms means translating those mm numbers into actual weather conditions you’ll camp in. The table below answers the five most common questions about ratings — what 2,000mm means, what 5,000mm means, whether 5,000mm is good, whether 10,000mm is enough, and what a good level looks like for most campers.
| HH Rating | Weather Conditions | Best For | Floor/Fly? |
|---|---|---|---|
| 1,500mm | Light summer drizzle | Fair-weather camping | Fly only |
| 2,000mm | Moderate rain (1–2 hours) | Summer festivals, short trips | Fly only |
| 3,000mm | Heavy rain, sustained storms | 3-season camping | Fly minimum |
| 5,000mm | Prolonged heavy rain, wind-driven | All-season, exposed sites | Floor minimum |
| 10,000mm+ | Extreme weather, alpine conditions | Mountaineering, winter camping | Both |
| 20,000mm+ | Expedition-grade conditions | High-altitude, multi-day storms | Both |
For most 3-season campers in moderate climates, 3,000mm on the rainfly and 5,000mm on the floor is the practical baseline. The floor needs a higher rating because of that kneeling pressure calculation — your body creates far more force than rain alone.
One important note on weight: higher HH ratings typically come from thicker coatings or heavier fabrics. Ultralight backpacking tents often use 1,500–2,000mm fly ratings because every gram counts. That’s a deliberate design trade-off, not a flaw.
A tent rated 5,000mm can withstand the pressure of a five-metre column of water — enough for sustained heavy rain — but only if its seams are sealed (ISO 811 standard, Testex Textile).
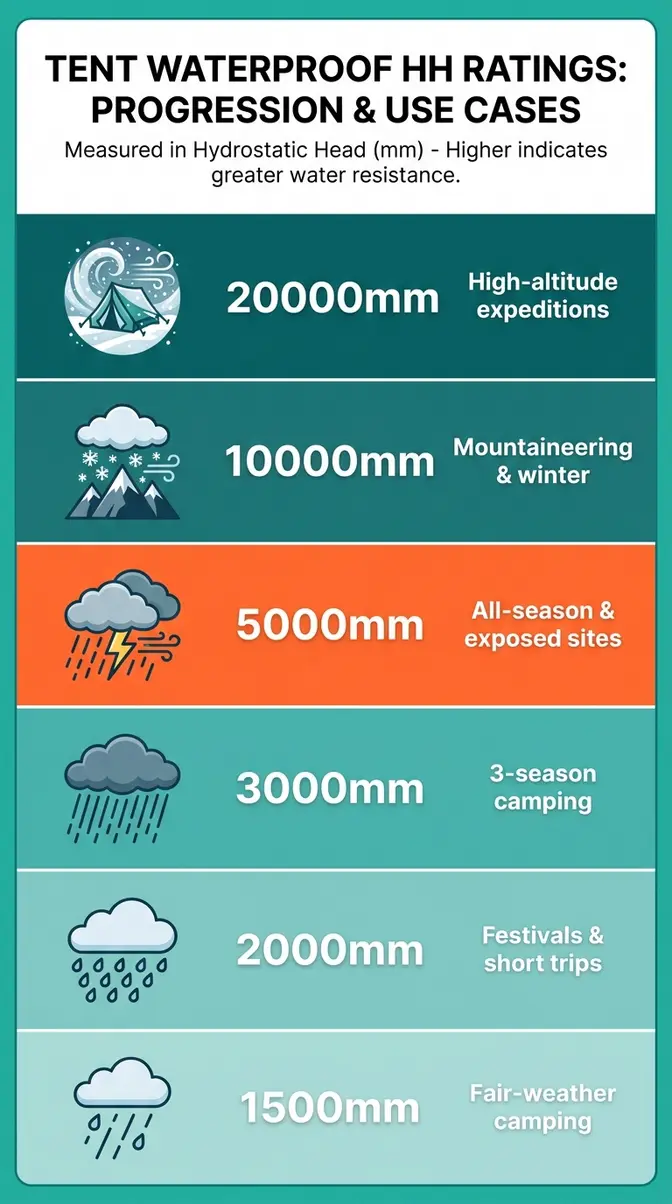
Research from a quantitative assessment of water-repellent properties confirms significant changes in surface water-repellent performance following repeated exposure to moisture and friction (NIH, 2026) — a reminder that even a high-rated tent degrades over time without proper maintenance.
DWR vs PU Coating — Your Tent’s Two Shields
Now that you understand what the HH number measures, it’s time to meet the two coating layers of The Three-Layer Waterproof System: DWR and PU coating. They sound similar, but they do completely different jobs — and they fail in completely different ways.
DWR (Durable Water Repellent) is the outer chemical finish applied to tent fabric. When it’s working, water beads up into tight droplets and rolls off the surface before it can soak in. Think of DWR like the wax on a freshly polished car. When the wax is fresh, water beads up and runs off instantly. When the wax wears off, the paint surface gets wet and dull — but water isn’t actually getting through the metal yet.
That distinction is crucial. A tent with degraded DWR will look wet on the outside — the fabric darkens and seems to soak up rain. This is called “wetting out.” It feels alarming, but water isn’t necessarily coming through. However, a wet-out outer layer adds weight and can cause condensation to drip from the inside, making it feel like a leak when it isn’t.
PU coating (polyurethane) is a completely different story. This is the inner laminated barrier bonded to the inside of the rainfly or tent floor. It’s the layer that actually blocks water from passing through the fabric. When the PU coating starts flaking or peeling, water genuinely does penetrate — and no amount of DWR spray on the outside will fix it.
Research on PFAS fate in DWR-treated textiles confirms that aging and washing significantly alter the performance of fluorinated DWR coatings (NIH/PMC, 2026). Most DWR treatments show measurable performance loss after 20 to 30 wash cycles (Smartex Yarn, 2026). For tents, this matters because even hand-washing and folding creates abrasion that wears the DWR finish over time.
The key diagnostic question: is your tent wet on the outside (DWR failure) or actually leaking through the fabric (PU failure)? The fix is entirely different for each.
Why Your Rainfly and Floor Need Different Ratings
Here’s something most tent shoppers don’t realize: the rainfly and the tent floor face completely different waterproofing challenges — and they need different ratings to match.
Your rainfly faces rain falling from above. That’s relatively low pressure — raindrops hit the fabric and run off. A 2,000–3,000mm rating handles most rain scenarios for the fly.
Your tent floor faces pressure from below and from you. Water in saturated ground pushes upward. Your body weight pressing down through the sleeping pad creates lateral pressure. As calculated earlier, kneeling on the floor applies roughly 4,200mm of pressure. This is why floor ratings of 5,000mm or higher are standard — and why a cheap tent with a 1,500mm floor is going to feel damp even in a light rain on wet ground.
Never assume that a single HH number on a product listing applies to both surfaces equally. Many tents advertise one rating (typically the higher floor rating) without clarifying that the fly is rated lower. Always check both.
Advanced Waterproofing: Comparing Ratings
Understanding the numbers on the label is one thing. Knowing how to compare them across different rating systems — and against branded technologies like Gore-Tex — is where most guides fall short. This section directly answers the most common advanced questions campers ask.
10k vs 20k Waterproof — Is the Upgrade Worth It?
The “10k vs 20k” comparison is most common in ski jackets and mountaineering gear, but the same logic applies to tent fabrics at the high end. A 10,000mm rating handles sustained heavy rain and wind-driven precipitation — it’s considered “serious waterproofing” for most outdoor activities (Snow+Rock, 2026). A 20,000mm rating adds a meaningful margin for extreme conditions: multi-day storms, high-altitude snowfall, and scenarios where the fabric is under sustained pressure from a heavy snow load.
For most 3-season tent campers, the honest answer is: 10,000mm is more than enough. The jump from 10k to 20k adds weight, cost, and often stiffness to the fabric — trade-offs that matter most if you’re carrying the tent on your back. Across camping communities, the consistent advice is that beyond 5,000mm on the fly, you’re buying peace of mind rather than practical protection for typical conditions.
Where 20,000mm genuinely earns its place: winter mountaineering, extended expeditions in wet climates, and situations where the tent fabric bears sustained snow weight. For a car-camping family tent, 20k is overkill. For a solo alpine climb in Scotland in November, it makes sense.
The weight trade-off is real. Higher HH ratings typically require thicker coatings or heavier base fabrics. A tent fly rated 20,000mm will generally weigh more than an equivalent 3,000mm fly — sometimes significantly more. If you’re backpacking, that weight penalty matters far more than the extra rain protection you’re unlikely to ever need.
10,000mm waterproofing handles the vast majority of camping conditions, including sustained heavy rain — the upgrade to 20,000mm is only justified for extreme alpine or expedition use.
Is 10,000mm Waterproof Enough for Rain?
Yes — 10,000mm is more than enough for virtually all rain conditions, including sustained storms and wind-driven rain. The limiting factor in tent waterproofing is almost never the fabric’s HH rating at 10,000mm. It’s the seams, the construction quality, and whether The Three-Layer Waterproof System is intact.
A 10,000mm tent with unsealed seams will leak in light rain. Conversely, a 3,000mm tent with factory-sealed seams and excellent construction will handle heavy storms comfortably. When exploring tent materials and choosing the best for a camping adventure, remember that a balanced approach to overall construction often outweighs a singular focus on an ultra-high HH rating.
Is 5,000mm Waterproof Good for a Tent?
5,000mm is an excellent waterproof rating for a tent — it’s the recommended minimum for tent floors and a strong rating for rainflies in 3-season use. At this level, the fabric can easily handle prolonged heavy rain, wind-driven conditions, and the localized pressure created by body weight on the floor.
For most campers who aren’t mountaineering or camping in extreme alpine conditions, 5,000mm on both the fly and floor provides reliable protection season after season. This rating ensures you have a substantial buffer against unexpected downpours without carrying the excessive weight penalty associated with expedition-grade fabrics.
Is 20k Waterproof as Good as Gore-Tex?
This is one of the most searched questions in outdoor gear — and the answer requires separating two different things: waterproofing and breathability.
Gore-Tex carries a waterproof rating of approximately 28,000mm (Sierra, 2026). So in raw waterproofing terms, a 20,000mm tent fabric is genuinely close — both ratings far exceed what any normal rainstorm can produce. The practical waterproofing difference between 20k and 28k is negligible for camping.
Where Gore-Tex is genuinely different: breathability. Standard tent fly fabrics — whether rated 2,000mm or 20,000mm — are essentially non-breathable. Moisture vapor cannot pass through them. Ventilation inside a tent comes from mesh panels, vents, and tent design — not the fabric itself. Gore-Tex membranes, by contrast, are engineered to let moisture vapor escape while blocking liquid water. Classic Gore-Tex achieves breathability ratings of approximately 17,000 g/m²/24h (Roxy, 2026) — meaning sweat vapor passes through while rain cannot.
For a tent, this breathability advantage is largely irrelevant. Tents manage condensation through ventilation design, not through breathable fabric. For a rain jacket that you’re hiking and sweating in, Gore-Tex’s breathability is worth its significant price premium. For a tent fly, a well-designed 3,000mm PU-coated fabric with good ventilation performs comparably in the field.
The verdict: 20,000mm waterproof fabric is close to Gore-Tex in rain protection. Gore-Tex’s real advantage — breathability — matters for active wear, not for tent shelters.
How to Re-Waterproof Your Tent — Step by Step
After evaluating multiple re-waterproofing methods and reviewing guidance from REI, Gear Aid, NEMO Equipment, and MSR, the outdoor community consistently agrees on one thing: targeting the right layer of The Three-Layer Waterproof System is the difference between a fix that works and one that doesn’t. Here’s exactly how to do it.
What You’ll Need (Materials Checklist)
Before you start, gather everything. Having to stop mid-process because you’re missing a product wastes time and can compromise adhesion.
- You’ll need:
- Mild gear-safe cleaner (e.g., Gear Aid Revivex Pro Cleaner or equivalent)
- Isopropyl (rubbing) alcohol
- Clean sponge or soft cloth
- Gear Aid Seam Grip +WP (for PU-coated tents) OR Gear Aid Seam Grip +SIL/Silnet (for silicone-coated tents)
- Nikwax Tent & Gear SolarProof (or equivalent DWR spray)
- Disposable gloves
- Small brush or popsicle stick (for spreading seam sealer)
- Talc-free powder (e.g., Gold Bond) — optional, for de-tacking sealer
- A well-ventilated workspace or outdoor area
Total estimated time: 45–90 minutes active work, plus 8–24 hours curing time. Total cost: Under $20 for most repair products.
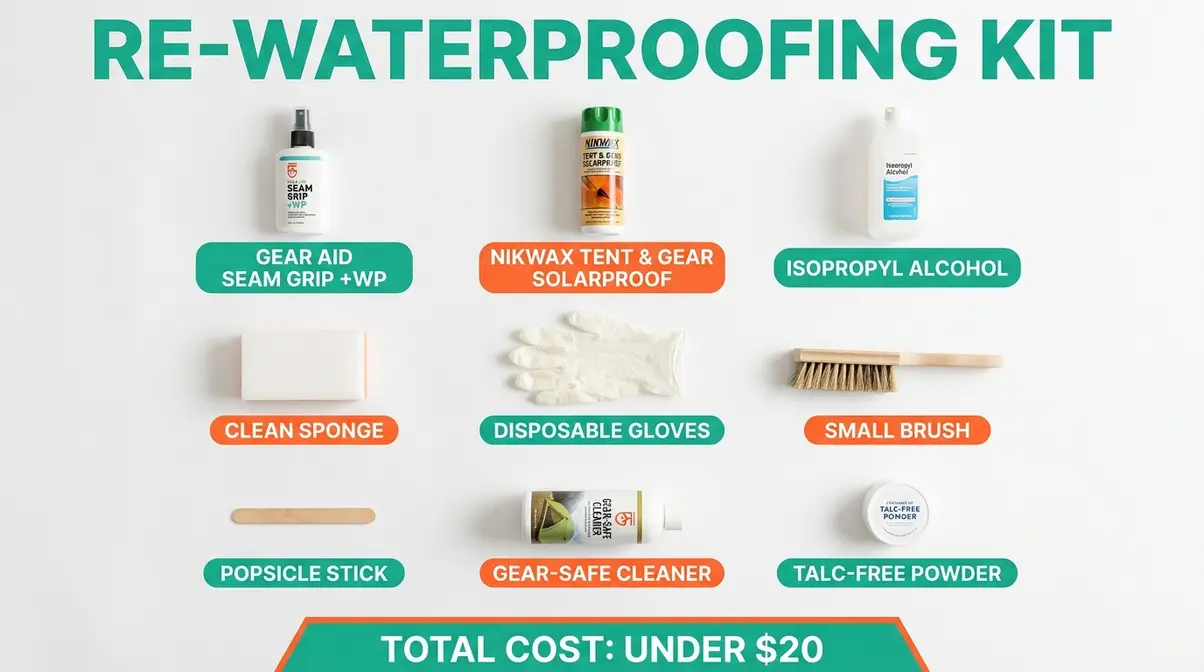
Step 1-2: Clean and Inspect Your Tent
Estimated time: 20–30 minutes. Tools needed: Gear cleaner, sponge, clean water.
1. Set up your tent fully
Pitch your tent in the backyard or a large indoor space. Working on a pitched tent (rather than a flat fabric pile) makes it far easier to spot problem areas.
2. Flip the rainfly inside-out
Ensure the coated interior faces upward. This exposes the seams and PU coating where most problems originate.
3. Mix cold water with gear-safe cleaner
Wipe down all surfaces — interior and exterior — with a sponge, removing dirt, oils, and residue. Dirt physically blocks DWR from working and prevents seam sealer from bonding properly.
4. Wipe all seams with isopropyl alcohol
This removes stubborn residue and improves adhesion for seam sealer. It’s a step many campers skip — and it’s why their seam repair fails.
5. Inspect while cleaning
Run your fingers along every seam. Feel for lifting seam tape, crinkly or sticky spots (signs of PU coating breakdown), or areas where the tape has separated entirely.
- What to look for:
- Lifting or peeling seam tape → seam repair needed (Step 3)
- Flaking, sticky, or crinkly inner coating → PU coating repair needed (Step 4)
- Water no longer beading on outer fabric → DWR refresh needed (Step 5)
- Combination of the above → work through Steps 3, 4, and 5 in order
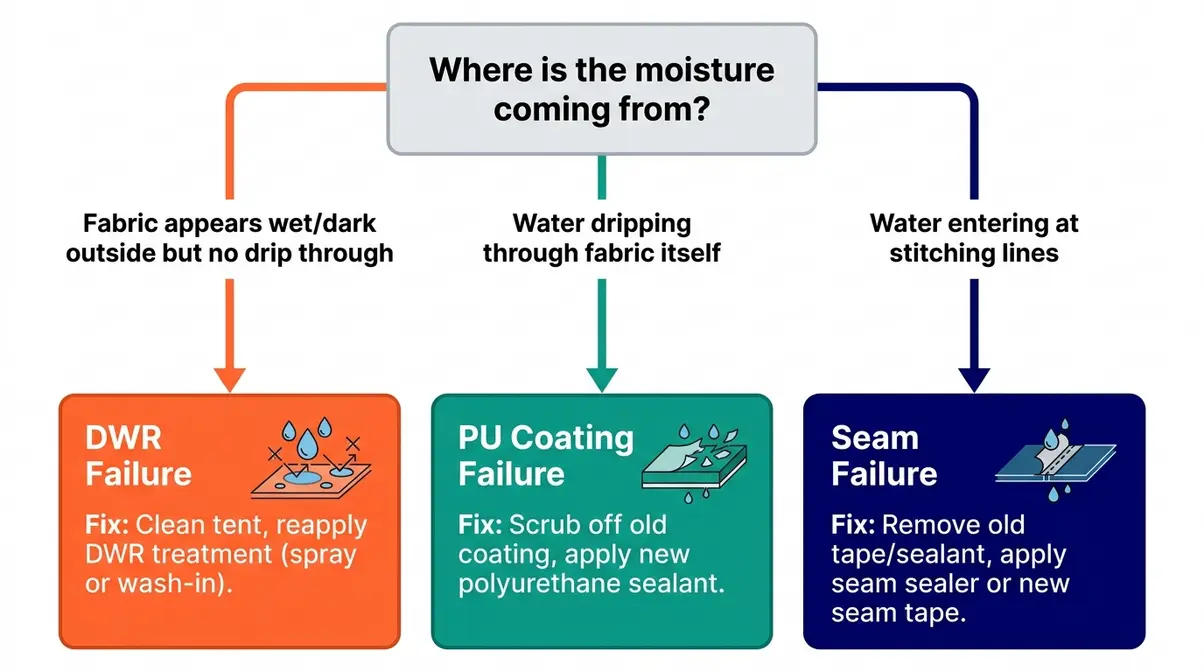
According to REI’s expert guidance on tent waterproofing, there are three distinct repair approaches — seam sealing, urethane coating refresh, and DWR treatment — and each targets a different failure mode (REI, 2026).
Step 3: Seal the Seams
Estimated time: 20–30 minutes active, plus 8–24 hours curing. Tools needed: Seam Grip +WP or +SIL, brush, gloves.
Leaking seams are the number one source of tent leaks in tents rated over 3,000mm. The fabric holds — the stitching doesn’t.
1. Keep the rainfly inside-out
Keep the rainfly inside-out with seams facing up. Put on your disposable gloves to protect your hands from the adhesive.
2. Choose the right product
For PU-coated nylon or polyester tents (most tents), use Gear Aid Seam Grip +WP. For silicone-coated tents (silnylon or silpoly), use Gear Aid Seam Grip +SIL (Silnet).
3. Apply a thin, continuous bead
Apply a thin, continuous bead of seam sealer along the entire length of each seam. Use the included brush or a small popsicle stick to spread it to about 1mm thickness — roughly as thick as butter on toast.
4. Push the sealer under any lifting seam tape
Push the sealer firmly under any lifting seam tape. Press the tape back down firmly and smooth the sealer over the top to create a watertight bond.
5. Cover all seams
Cover all seams, not just the one that’s visibly leaking. If one seam is failing, others are close behind. Focus heavily on corner reinforcements, pole attachment points, door seams, and the ridge line.
6. Allow to cure
Allow to cure for 8–24 hours in a well-ventilated area. Keep the fabric flat and undisturbed. If the cured sealer feels tacky, dust lightly with talc-free powder and wipe off the excess.
Pro tip from outdoor community consensus: If you only seal the one seam that leaked and skip the rest, you’ll be back doing this repair again within a season.
Step 4: Repair or Replace the PU Coating
Estimated time: 30–45 minutes active, plus 24 hours curing. Tools needed: Rubbing alcohol, sponge, Gear Aid Seam Grip +WP or tent-specific PU sealant.
A flaking or peeling inner coating is the most frustrating tent problem — and the one most campers don’t know how to fix. Here’s the process:
1. Identify the affected area
Look for coating that is peeling, sticky, or has a crinkly texture. This is most common on the underside of the rainfly and the interior of the tent floor.
2. Remove the degraded coating
Using a sponge dampened with rubbing alcohol, gently scrub off as much of the flaking PU as possible. Work methodically across the entire surface, not just the worst spots.
3. Wipe away all loosened flakes
Wipe away all loosened flakes and let the fabric dry completely. This step is critical — applying new coating over loose flakes means it won’t bond properly.
4. Apply a thin, consistent coat
Apply a thin, consistent coat of Gear Aid Seam Grip +WP (or a tent-specific PU sealant) across the entire underside of the affected fabric. Work the product into seams and stitching as you go. Avoid pooling — thin and even is the goal.
5. Cure for at least 24 hours
Cure for at least 24 hours before folding or packing the tent (MSR, 2026).
| Setting | Recommended | Why |
|---|---|---|
| Cure time | 24 hours minimum | Shorter curing causes the coating to bond to itself when folded |
| Coverage | Entire interior surface | Spot repairs fail at the edges; full coverage lasts longer |
| Application thickness | ~1mm (thin coat) | Thick coats crack under flex; thin coats remain flexible |
| Ventilation | Required | Solvent fumes are significant in enclosed spaces |
Step 5: Refresh the DWR Finish
Estimated time: 15–20 minutes active, plus air-drying time. Tools needed: Nikwax Tent & Gear SolarProof (or equivalent), sponge, clean cloth.
This is the easiest step — and the one most campers do first when they should often do it last. DWR refresh only makes sense once seams and PU coating are in good shape. When selecting the best waterproofing spray for tents, ensure it is specifically designed for synthetic fabrics like nylon or polyester.
1. Apply while the fabric is slightly damp
Apply the treatment while the fabric is still slightly damp from cleaning. Nikwax SolarProof bonds best to clean, damp fabric.
2. Keep the tent set up
Keep the tent fully set up with the outer surface facing up to ensure easy access to all panels.
3. Spray or sponge the DWR treatment
Spray or sponge the DWR treatment evenly across all outer surfaces. Work in sections to ensure full, overlapping coverage.
4. Spread the product
Use a clean sponge to spread the product and ensure even coverage, especially on high-exposure areas like the fly roof and upper walls.
5. Wipe away any excess
Wipe away any excess with a clean cloth after a few minutes to prevent streaking or sticky patches from forming as it dries.
6. Air-dry completely
Air-dry completely — ideally in direct sunlight, which helps the treatment set and activate (NEMO Equipment, 2026).
After drying, do a quick bead test: pour a cup of water on the outer fabric. If it beads up and rolls off, the DWR is working. If it soaks in and darkens the fabric, apply a second coat.
Common Waterproofing Mistakes
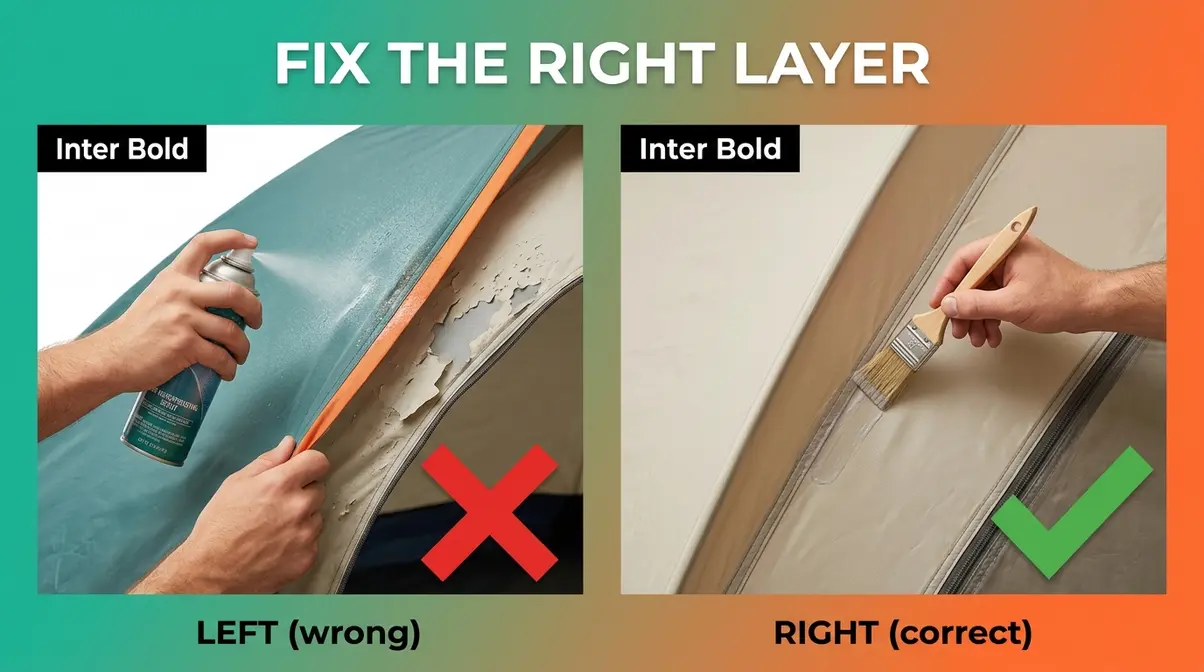
Even with the best products, campers consistently make the same errors when trying to fix a leaking tent. After reviewing outdoor community forums and gear repair guides, these five mistakes come up again and again.
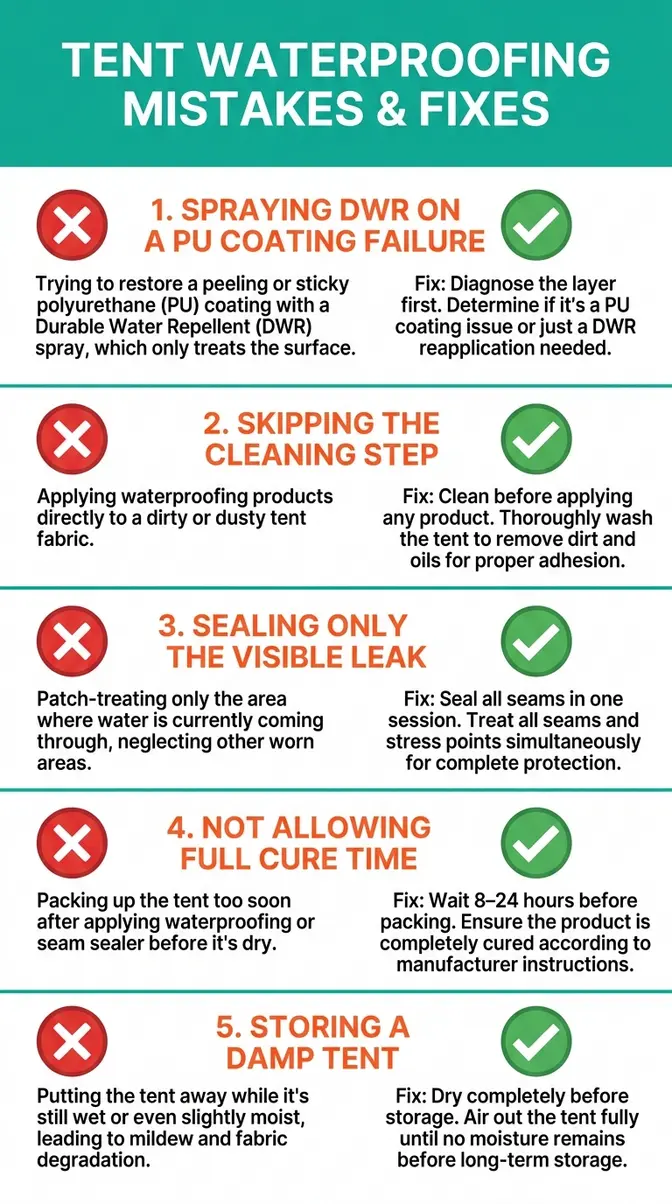
5 Mistakes That Make Your Tent Leak Worse
Mistake 1: Applying DWR spray to a PU coating failure
This is the most common and most costly mistake. If your inner PU coating is flaking, spraying DWR on the outside achieves absolutely nothing — the two products address different layers entirely. Before buying any product, diagnose which layer has failed (use the flowchart in Step 1–2). Applying the wrong product wastes money and gives you false confidence before your next trip.
Mistake 2: Skipping the cleaning step
Seam sealer and DWR treatments need clean fabric to bond properly. Dirt, sunscreen, insect repellent, and oils all prevent adhesion. Campers who skip the cleaning step and apply sealer directly to dirty seams often find the repair peels away within weeks. Spend the extra 20 minutes — it doubles the lifespan of the repair.
Mistake 3: Only sealing the seam that visibly leaked
If one seam has failed, the others are made from the same materials and have aged the same amount. Spot-sealing one seam while leaving the rest untouched means you’ll be doing this again after your very next camping trip. Seal all seams in one session.
Mistake 4: Not allowing full cure time
Rushing the cure time is extremely common — campers apply seam sealer the night before a trip and pack the tent while it’s still tacky. When you fold tacky sealer onto itself, it bonds the fabric together and tears when you open the tent. Give seam sealer a full 8–24 hours, and PU coating repairs a full 24 hours, before folding or packing.
Mistake 5: Storing a damp tent
This one doesn’t cause leaks immediately — it causes them six months later. Storing a tent while it’s even slightly damp accelerates hydrolysis (the chemical breakdown of PU coatings) and promotes mildew growth that eats through seam tape. Always dry your tent completely before storage, even if it means setting it up in the living room for a few hours.
When to Replace Instead of Repair
Not every tent can be saved — and knowing when to stop repairing is as important as knowing how to fix things. Across outdoor community forums, the consistent advice is that repair makes sense when the problem is isolated to one or two layers. Replacement makes sense when the tent has structurally deteriorated beyond what products can address.
Replace instead of repair if:
- The PU coating is flaking across more than 50% of the rainfly or floor — full recoating is possible but the coating will fail again quickly if the fabric itself has degraded
- The seam tape has separated across multiple seam lines simultaneously — this indicates the adhesive has chemically broken down throughout the tent, not just in one spot
- The tent fabric itself shows UV damage (thin, papery, tears easily under light tension) — no waterproofing product can restore structural integrity to degraded nylon or polyester
- You’ve re-waterproofed the tent twice in the same season and it still leaks
A tent that’s been well-maintained can last a decade or more. A tent that’s been stored damp, left in UV exposure for extended periods, or repeatedly soaked without treatment may be beyond saving after just a few seasons. Be honest about the condition of your gear before investing in products.
Limitations of Tent Waterproofing
Common Pitfalls
Pitfall 1: Expecting a single HH rating to define the whole tent. The rating describes the coated fabric only. Seams, zippers, pole stress points, and ventilation design all affect real-world performance. A tent with a 10,000mm HH rating and poor seam construction will leak faster than a tent with a 3,000mm rating and factory-sealed seams.
Pitfall 2: Assuming re-waterproofing restores original performance. DIY seam sealing and DWR refresh extend a tent’s life, but they rarely fully restore factory performance. A tent that has been re-waterproofed multiple times will still perform worse than a new tent in extreme conditions. Manage your expectations accordingly.
Pitfall 3: Ignoring condensation as a leak source. On cold nights, warm moist air inside the tent condenses on the inner walls and drips — feeling exactly like a leak. Before assuming your waterproofing has failed, check whether the moisture is on the inside of the inner tent wall (condensation) or coming through the fabric (genuine leak). The fix for condensation is better ventilation, not waterproofing products.
When to Choose Alternatives
- If you camp in consistently extreme wet conditions (Pacific Northwest, Scottish Highlands, monsoon regions): consider a tent with a silicone-coated (silnylon/silpoly) fly rather than PU-coated. Silicone coatings don’t hydrolyze, last significantly longer, and maintain higher HH performance over time — though they cannot use iron-on seam tape, requiring liquid seam sealer instead.
- If tent weight is your priority: Accept a lower HH rating (1,500–2,000mm) on the fly and compensate with a quality footprint under the floor and careful campsite selection (avoid low-lying areas where water pools).
- If your tent floor is beyond repair: A quality aftermarket footprint cut to size can add a 5,000mm+ barrier beneath your existing tent floor — an inexpensive solution that buys another season or two.
When to Seek Expert Help
If your tent has significant structural damage — bent or broken poles, torn fabric panels, or zipper failure — waterproofing repairs won’t solve the underlying problem. Contact the tent manufacturer’s warranty department first. MSR, REI, and most major brands offer repair services or warranty replacements for manufacturing defects. For older tents, specialist outdoor gear repair shops can assess whether a tent is worth repairing before you invest in products.
Frequently Asked Questions
What is a good level of waterproofing for a tent?
For most 3-season campers, 3,000mm on the rainfly and 5,000mm on the floor is the practical baseline. The fly needs enough rating to handle sustained rain; the floor needs a higher rating because body weight creates additional pressure — roughly 4,200mm of pressure from kneeling alone (based on standard ISO 811 psi equivalents). Fair-weather campers can get away with 2,000mm on the fly for light drizzle. Campers in reliably wet climates should aim for 5,000mm on the fly.
Is 10k or 20k waterproof better?
10,000mm is sufficient for the vast majority of camping conditions, including sustained heavy rain and wind-driven precipitation. The jump to 20,000mm adds meaningful protection only in extreme alpine scenarios — multi-day storms, heavy snow loads, or high-altitude mountaineering. For most campers, 20k adds weight and cost without practical benefit. Snow+Rock (2026) notes that 10,000mm or higher is considered a good general waterproof rating for serious outdoor activities.
What does 2,000mm waterproof mean for tents?
A 2,000mm waterproof rating means the fabric can withstand a two-metre column of water before moisture penetrates — enough for moderate rain lasting one to two hours. It’s a solid rating for a rainfly in fair-weather camping and summer festivals. However, 2,000mm is generally considered too low for tent floors, where body pressure adds significant force. In sustained heavy rain or wind-driven conditions, a 2,000mm fly will eventually allow moisture through.
What does 5,000mm waterproof mean for a tent?
A 5,000mm rating means the fabric can withstand a five-metre column of water pressure — the equivalent of prolonged heavy rain and wind-driven conditions. It’s an excellent rating for rainflies in serious 3-season use and is the recommended minimum for tent floors. At 5,000mm, you have meaningful protection against the kneeling pressure calculation (roughly 4,200mm). For most campers outside of alpine or expedition use, 5,000mm represents the top of the practical range.
What are common waterproofing mistakes?
The most common mistake is applying DWR spray to a PU coating failure — targeting the wrong layer of The Three-Layer Waterproof System. Other frequent errors include skipping the cleaning step before applying seam sealer, sealing only the visible leak rather than all seams, rushing the cure time before packing the tent, and storing a damp tent that accelerates coating breakdown. Diagnose which layer failed before buying any product.
Is 20K waterproof as good as Gore-Tex?
In raw waterproofing, 20,000mm fabric is close to Gore-Tex’s 28,000mm rating — both far exceed what normal rain can produce (Sierra, 2026). The meaningful difference is breathability: Gore-Tex achieves approximately 17,000–25,000 g/m²/24h of moisture vapor transmission (Roxy, 2026), while standard tent PU-coated fabrics are essentially non-breathable regardless of their HH rating. For tent shelters, this breathability gap matters little — tents manage condensation through design and ventilation, not through the fabric itself.
Staying Dry Starts With the Right Diagnosis
For frustrated campers dealing with a leaking tent, The Three-Layer Waterproof System provides the clearest path to a real fix. Every tent relies on DWR finish, PU coating, and seam sealing working together — and a 5,000mm HH rating only tells you about one of those three layers. Research confirms that DWR performance degrades measurably after 20–30 wash cycles (Smartex Yarn, 2026), while PU coatings break down through hydrolysis over time. The best approach combines proper diagnosis, targeted repair, and regular maintenance before each camping season.
The power of understanding The Three-Layer Waterproof System is that it turns a confusing problem into a solvable one. Instead of guessing which spray to buy, you inspect your tent, identify which layer has failed, and apply exactly the right fix. That’s the difference between waking up dry and waking up in a puddle again.
Before your next trip, spend 45 minutes on a proper tent inspection. Check your seams for lifting tape, run your hand along the inner coating for flaking, and do a bead test on the outer fabric. If any layer of the system has degraded, you now have everything you need to fix it — for under $20 and less than an hour of work. Your next camping trip depends on it.

David King
Field gear tester at Tent Explorer.