Tent Mesh Guide: How to Fix Any Tear in 10 Minutes
 Dave King
Updated July 1, 2026
21 min read
Dave King
Updated July 1, 2026
21 min read
You unzip your tent to find a gaping hole in the mesh — and suddenly every mosquito within a mile has an open invitation. It’s one of the most frustrating moments in camping, and it almost always happens at the worst possible time.
“Any recommendations on how to fix it? Should I buy more mesh and sow it on? Are there tape-like solutions that work? Should I just suture it and accept that it…”
That question comes up constantly in camping communities — and it’s a completely fair one. A torn tent mesh means bug-filled nights, broken sleep, and real exposure to mosquito-borne illness. One bad trip can put people off camping for years. The good news is that most tent mesh repairs take under 10 minutes and cost less than $10 in supplies. By the end of this comprehensive tent mesh guide, you’ll know exactly how to assess your tent mesh damage, pick the right repair method, and fix it — whether you’re at home or already on the trail. This guide covers mesh materials, step-by-step repair, sewing versus patching, and preventative care.
Recommended Products
| # | Image | Product | Best For | Buy |
|---|---|---|---|---|
| 1 |  |
Coghlan’s Mesh Repair Patches | Quick mesh repairs | Buy on Amazon |
| 2 |  |
10×10 Canopy Mosquito Netting | Canopy bug protection | Buy on Amazon |
| 3 |  |
WildFinder 10×10 Screen House Tent | Family patio camping | Buy on Amazon |
| 4 |  |
ALPHA CAMP 13×9 Screen Tent | Large group camping | Buy on Amazon |
| 5 |  |
CROWN SHADES Canopy Mosquito Net | Existing pop-up canopies | Buy on Amazon |
| 6 |  |
Pop Up Single Person Mosquito Tent | Solo campers, travelers | Buy on Amazon |
| 7 |  |
Large Pop-Up Foldable Mosquito Net | Backpackers, beach use | Buy on Amazon |
Fixing tent mesh is easier than most campers expect — and this tent mesh guide will show you how the right peel-and-stick patch applied to both sides of a tear takes under 10 minutes and lasts through multiple camping seasons.
- Assess first: Use the Mesh Damage Triage to identify a run, hole, or tear before buying supplies
- Patches work for most repairs: Self-adhesive mesh patches fix 90% of damage without sewing
- Sewing is for large tears: Tears longer than 2 inches near a seam need needle and thread
- Prevention saves money: Regular inspection and proper storage prevent most mesh damage
- Never use dish soap: Household detergents degrade your tent’s waterproof coating
Understanding Tent Mesh: Materials and Types
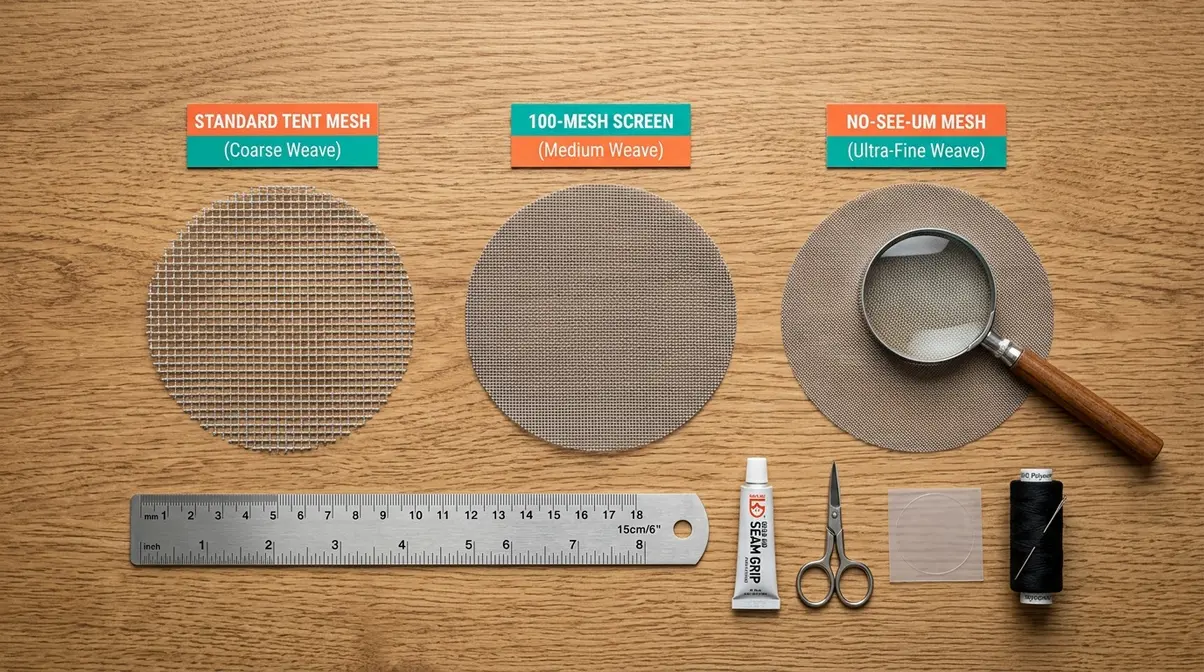
Tent screens are made from woven polyester or nylon mesh — and the type you have directly affects which repair approach will work. No-see-um mesh (a tightly woven polyester or nylon fabric designed to block insects as small as 0.6mm) demands a more delicate repair than standard mesh. Using the wrong technique on fine mesh can actually make the hole larger, so identifying your mesh type is the smartest first step before you touch any repair kit.
The three most common types of tent mesh damage are:
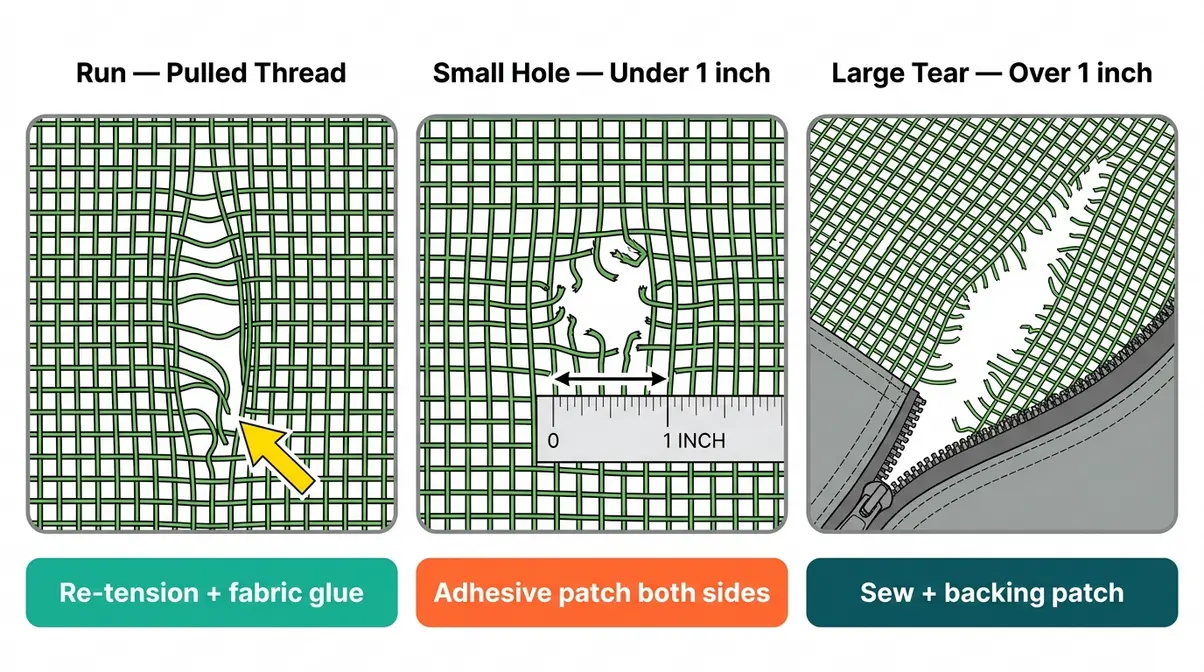
- Mesh run: A pulled thread that distorts the weave — no hole yet, but will worsen
- Small hole: A puncture under 1 inch — bugs can enter, needs a patch
- Large tear: A rip longer than 1–2 inches — needs sewing plus a backing patch
Understanding differences between no-see-um and standard tent mesh helps you choose the right repair material before you spend money at the gear shop. No-see-um mesh features a tighter weave designed to keep out the smallest biting insects, whereas standard mesh prioritizes maximum airflow (Wirecutter, 2026). You can also explore no-see-um tent mesh specifications and tent fabric types and their properties for deeper background before starting your repair.
What Is Tent Mesh and Why Does It Matter?
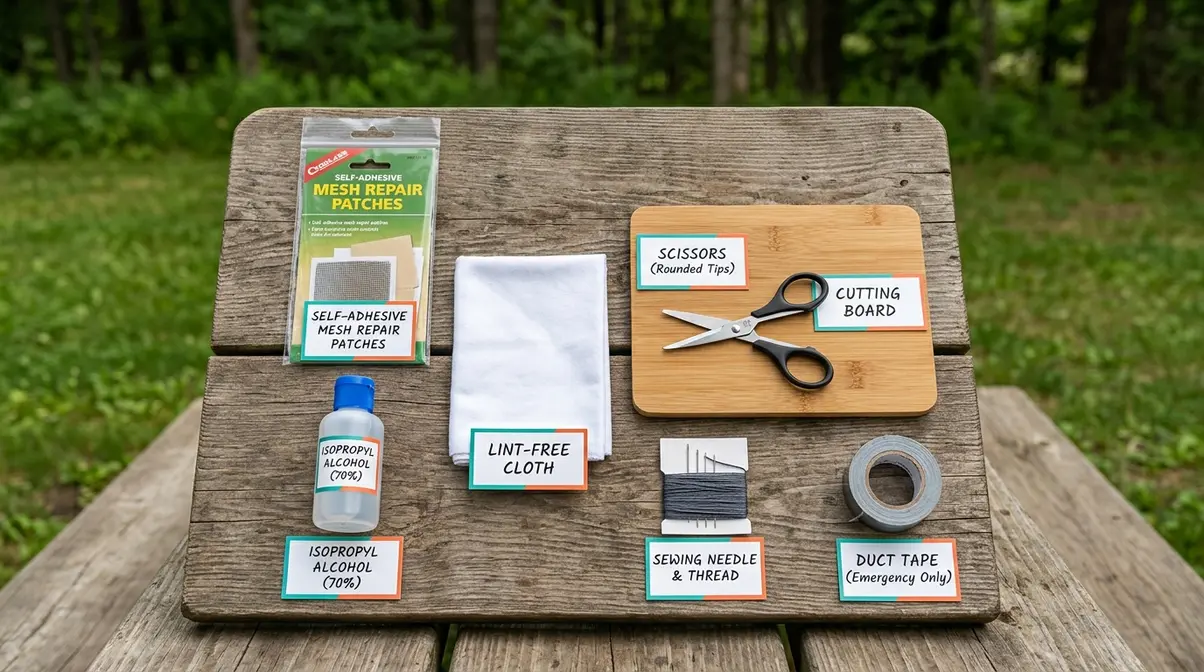
Tent mesh is a woven fabric panel built into tent doors, windows, and inner canopies. Its job is to allow airflow while blocking insects — and it does that job well until something snags, burns, or tears it.
The two most common mesh materials are polyester (more UV-resistant, holds color longer) and nylon (lighter, slightly more flexible). Both respond to the same repair methods, but fine weaves require extra care. A camper with a coarser standard mesh panel can press on a heavy-duty adhesive patch with confidence. A camper with fine no-see-um mesh needs to use a thinner, more flexible patch — pressing too hard with a rigid material can pull surrounding threads and widen the damage.
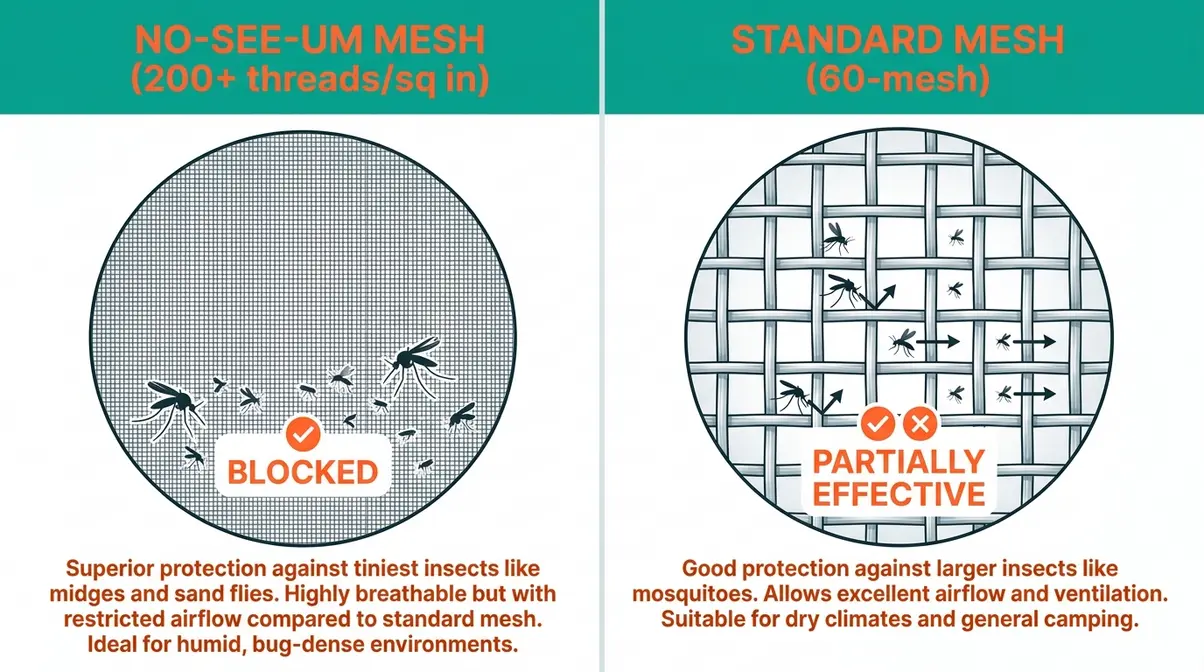
Why does this matter for your repair? Because a fine no-see-um mesh panel requires a finer needle if you’re sewing, and a self-adhesive patch rather than iron-on tape, to avoid worsening the damage.
Mesh Ratings: 60 vs. 100 vs. No-See-Um
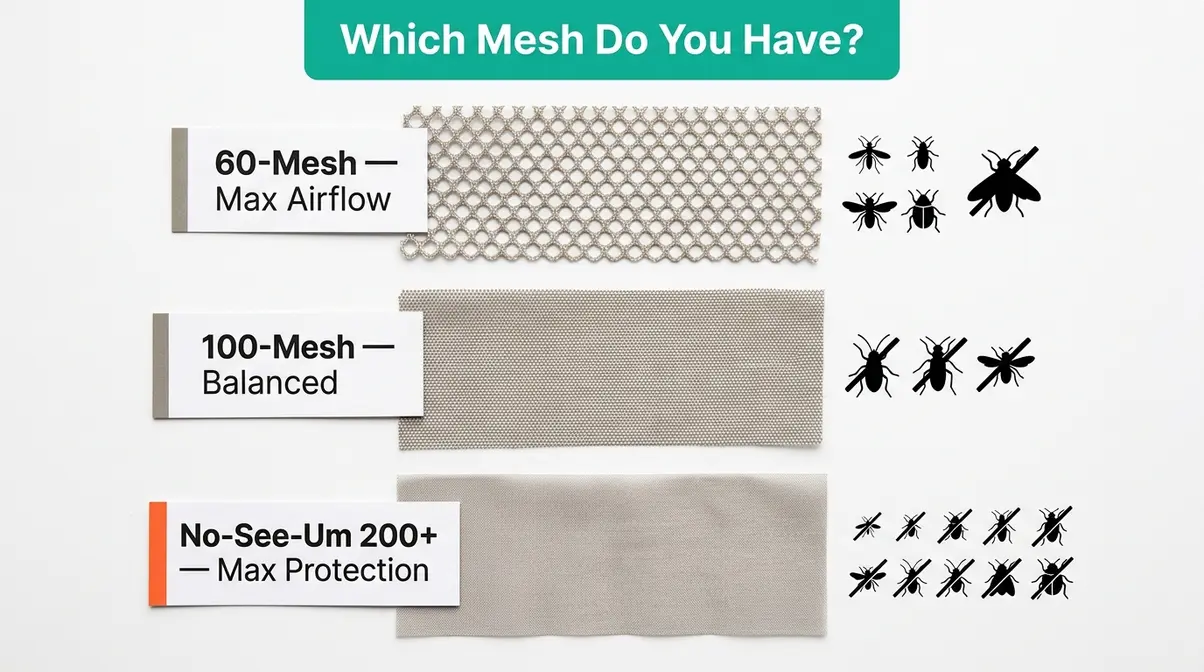
A mesh rating simply counts the number of threads (or openings) per square inch of fabric. Higher number equals finer weave, which means smaller insects get blocked — but airflow decreases slightly. So is 60-mesh or 100-mesh better? It depends entirely on your camping environment.
A 60-mesh panel has larger openings and excels in high-airflow tents used in areas with only larger insects like mosquitoes and flies. A 100-mesh panel is tighter and blocks most insects including gnats. No-see-um mesh is typically rated at 200+ threads per square inch, specifically engineered to stop no-see-ums (tiny biting midges roughly 1mm in size) that pass right through coarser screens.
For repair purposes, the rating tells you exactly which patch to buy:
| Mesh Type | Thread Count | Best Blocks | Best For | Repair Approach |
|---|---|---|---|---|
| Standard (60-mesh) | ~60/sq in | Larger insects (mosquitoes, flies) | High-airflow tents | Heavy-duty adhesive patch |
| Fine (100-mesh) | ~100/sq in | Most insects including gnats | General camping | Standard mesh patch |
| No-See-Um | 200+/sq in | Tiny midges, no-see-ums | Bug-heavy environments | Fine flexible patch only |
Before you buy any repair materials, you need to know exactly what type of damage you’re dealing with. Not all mesh problems are the same — and the fix depends on the damage type.
Is 60-mesh or 100-mesh better?
Neither is universally better — the right choice depends on your camping environment. 60-mesh has larger openings and maximizes airflow, making it ideal for hot, dry climates where large insects (mosquitoes, flies) are the main concern. 100-mesh blocks a wider range of insects including gnats and small flies, with only a slight reduction in airflow. For areas with no-see-ums or biting midges, you need a 200+ thread-count no-see-um mesh — 60-mesh and 100-mesh both allow these tiny insects through. Most three-season tents use 60-mesh or 100-mesh as a balance between protection and ventilation.
Understanding Mesh Runs, Holes, and Tears
This is where The Mesh Damage Triage comes in — a simple three-question framework that instantly tells you which repair method to use. Gear experts and camping communities consistently report that misidentifying damage type is the number one reason DIY repairs fail.
A mesh run is a snag or pulled thread that creates a ladder-like distortion in the weave without actually opening a hole. Runs don’t let bugs in yet, but they will tear if you ignore them. The fix is to re-tension the loose thread and secure it with a tiny dot of fabric glue — no patch needed. NEMO Equipment’s repair guidance specifically flags runs as the most commonly misdiagnosed mesh problem.
A hole is a small puncture or burn mark, typically under 1 inch in diameter. Bugs can enter through even a pin-sized hole. The fix is a single adhesive patch applied to both sides of the fabric.
A large tear is a rip longer than 1–2 inches, often found near a zipper or seam where stress concentrates. This needs sewing plus a backing patch for a permanent repair.
- The Mesh Damage Triage — Three Questions:
- Is it a pulled thread with no hole? → It’s a run. Re-tension and monitor.
- Is the opening smaller than 1 inch? → It’s a small hole. Use adhesive patches.
- Is the rip longer than 1 inch or near a seam? → It’s a tear. Sew and patch.
Now that you’ve diagnosed the damage, let’s gather the right materials and walk through the repair step by step.
How to Repair Tent Mesh: Step-by-Step Instructions
Once you’ve used the Mesh Damage Triage to classify your damage, you’re ready to start the repair. For most campers, a peel-and-stick adhesive patch is the fastest and most reliable fix — no sewing experience needed. Self-adhesive mesh patches applied to both sides of a tear and cured for 24 hours provide a bond strong enough to outlast the surrounding mesh fabric (Gear Aid). This section of our tent mesh guide covers the full patch repair process plus an emergency on-trail method when you’re far from a gear store.
How do you fix ripped tent mesh?
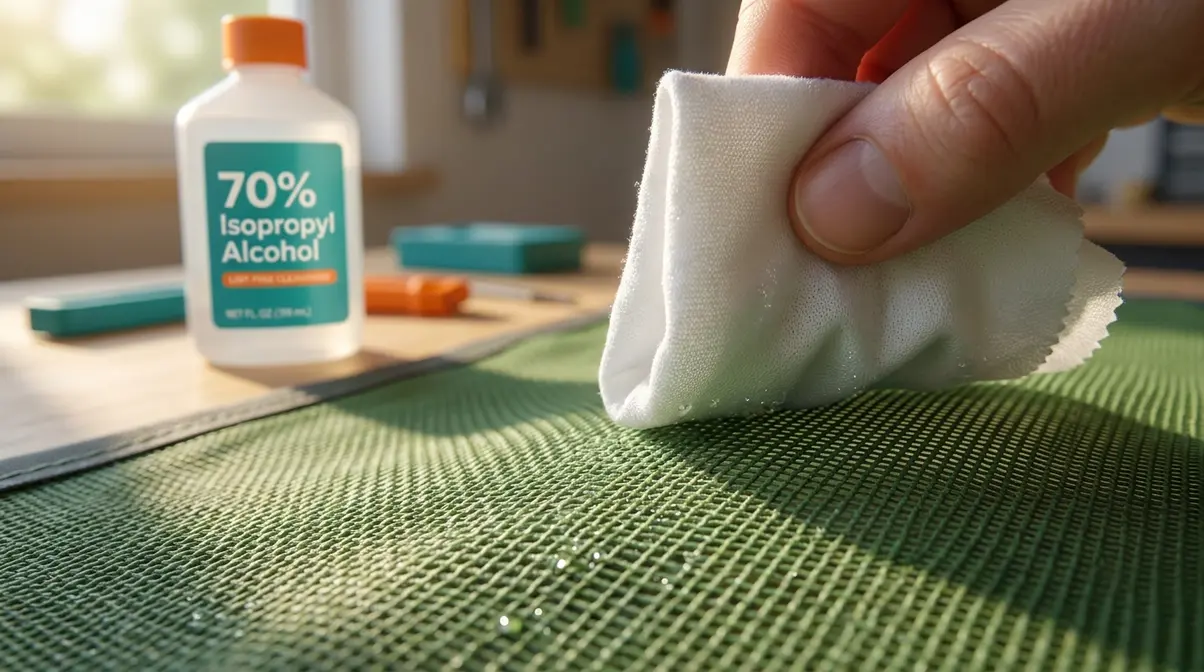
The fastest fix for ripped tent mesh is a peel-and-stick adhesive mesh patch applied to both sides of the tear. Clean the area with isopropyl rubbing alcohol, cut your patch to extend 0.5 inches beyond all edges of the damage, and press firmly from the center outward. Apply a matching patch to the interior side — this doubles bond strength. Allow 24 hours to cure before using the tent. For tears longer than 2 inches, sew the tear closed first, then apply patches over the stitching.
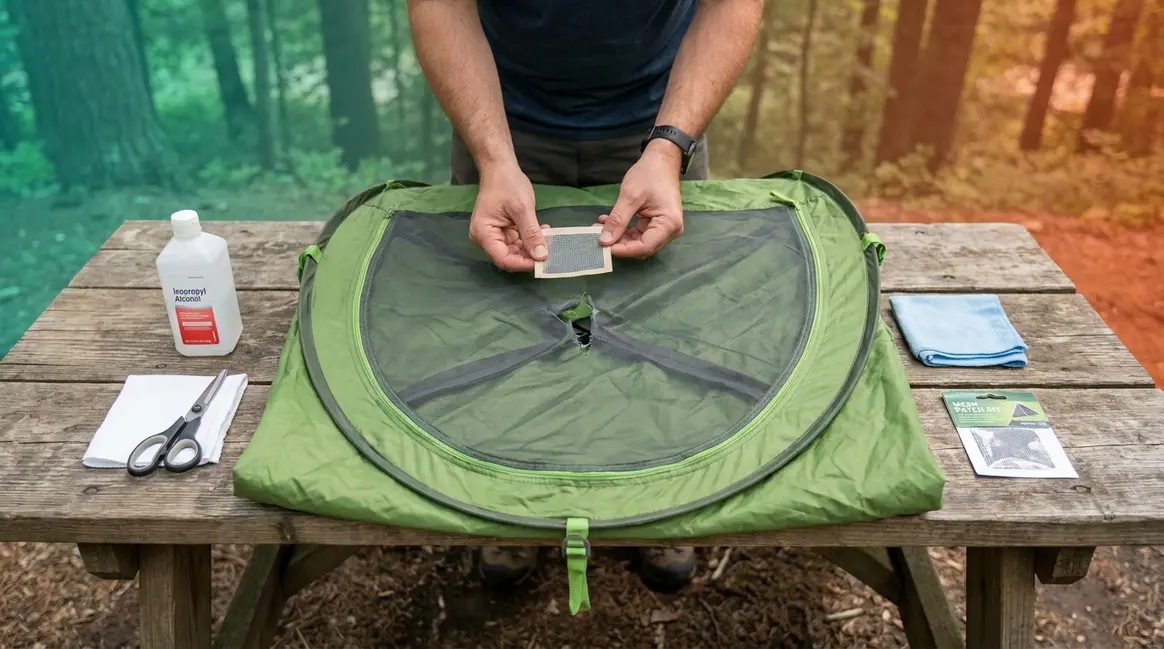
What You’ll Need: Repair Materials Checklist
Estimated Time: 10-15 minutes
Gather these items before you start. Having everything within reach means you won’t accidentally touch the adhesive surface mid-repair.
- For adhesive patch repairs:
- Self-adhesive mesh repair patches (Tenacious Tape Mesh Patches, a self-adhesive bug screen repair product by Gear Aid, or Coghlan’s Mesh Repair Patches)
- Isopropyl rubbing alcohol (a common household cleaner that removes oils and debris from mesh), 70% or higher
- Clean lint-free cloth or paper towel
- Small scissors
- Flat hard surface (a cutting board or book)
- For sewing repairs (large tears):
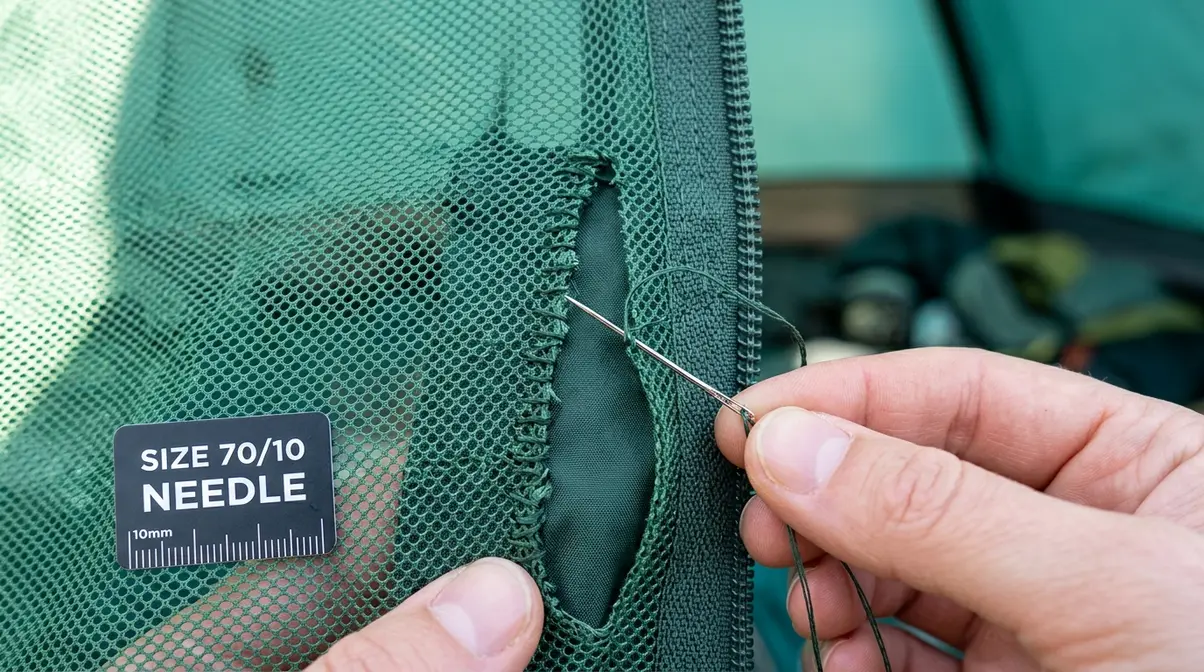
- Fine sewing needle (size 70/10 or smaller for no-see-um mesh)
- Thread matching your mesh color
- Backing fabric patch (cut from an old mesh panel or a repair kit)
- Fabric scissors
- For on-trail emergency repairs:
- Duct tape or tent repair tape (temporary use only)
- Small scissors or a multi-tool
You can find pre-assembled repair kits from Big Agnes’ DIY tent repair guide and REI’s tent repair how-to that include most of these items in one pouch.
Step 1–3: Prepare and Assess the Damage
Step 1: Lay the tent flat on a clean surface.
Spread the damaged panel on a hard, flat surface — a picnic table, a cutting board indoors, or even a smooth rock in a pinch. Why: Patching on an uneven surface causes bubbles and weak spots in the adhesive bond.
Step 2: Measure the damage.
Use your fingers to gently stretch the mesh around the tear. Measure the full extent of the damage, including any frayed edges. Why: Your patch needs to extend at least 0.5 inches beyond every edge of the damage for a secure bond.
Step 3: Clean the area with rubbing alcohol.
Apply isopropyl rubbing alcohol to your lint-free cloth and wipe a 2-inch radius around the tear. Allow it to dry completely — usually 60 seconds. Why: Oil, sunscreen, insect repellent, and dirt prevent the adhesive from bonding properly. Skipping this step is the most common reason patches fail.
Step 4–7: Apply the Adhesive Mesh Patch
Step 4: Cut your patch to size.
Cut the patch so it extends at least 0.5 inches beyond all edges of the damage. Round the corners with scissors. Why: Square corners lift and peel faster than rounded ones — this is a small cut that dramatically extends patch life.
Step 5: Peel the backing and apply the first patch to the outside of the mesh.
Peel the paper backing carefully, touching only the edges. Center the patch over the damage and press firmly from the center outward. Why: Starting from the center pushes air bubbles outward rather than trapping them under the patch.
Step 6: Apply a second patch to the inside of the mesh.
Cut a second patch to the same size. Flip the panel and apply it directly over the same area on the interior side. Why: This is the single most overlooked step in most repair guides. Patching both sides doubles bond strength and prevents the outer patch from peeling under repeated zipping stress. Gear Aid’s own repair instructions recommend this dual-patch method for any hole larger than a pinhole.
Step 7: Apply firm, even pressure for 60 seconds. Then allow 24 hours to cure.
Press both patches firmly with your fingertip or the flat side of a spoon. Do not fold or compress the mesh during curing. Why: The adhesive needs time to fully bond at a molecular level — using the tent within an hour risks lifting the patch before it has set.
Products like Coghlan’s Mesh Repair Patches (available in our Recommended Products table above) are designed specifically for this type of repair and include pre-cut patches that work for most tent mesh types.
On-Trail Emergency Repairs
Sometimes a mesh run or tear happens 15 miles from the trailhead. You need a fix that lasts the night, even if it isn’t permanent.
- Emergency method with duct tape:
- Clean the area as best you can with water and let it dry.
- Cut two small pieces of duct tape or tent repair tape.
- Press one piece firmly over the outside of the tear.
- Press the second piece over the inside.
- Smooth out all edges with your fingernail.
This on-trail repair won’t be as durable as a proper adhesive mesh patch, but it will block insects and hold through a weekend. Replace it with a proper patch as soon as you’re home. For more detailed guidance on field repairs, REI’s tent repair how-to covers several emergency scenarios.
Safety note: When applying any adhesive product indoors, work in a well-ventilated area. Most mesh patch adhesives are low-VOC, but fumes can build up in a small tent or van.
Sewing vs. Adhesive Patches: Choosing a Repair
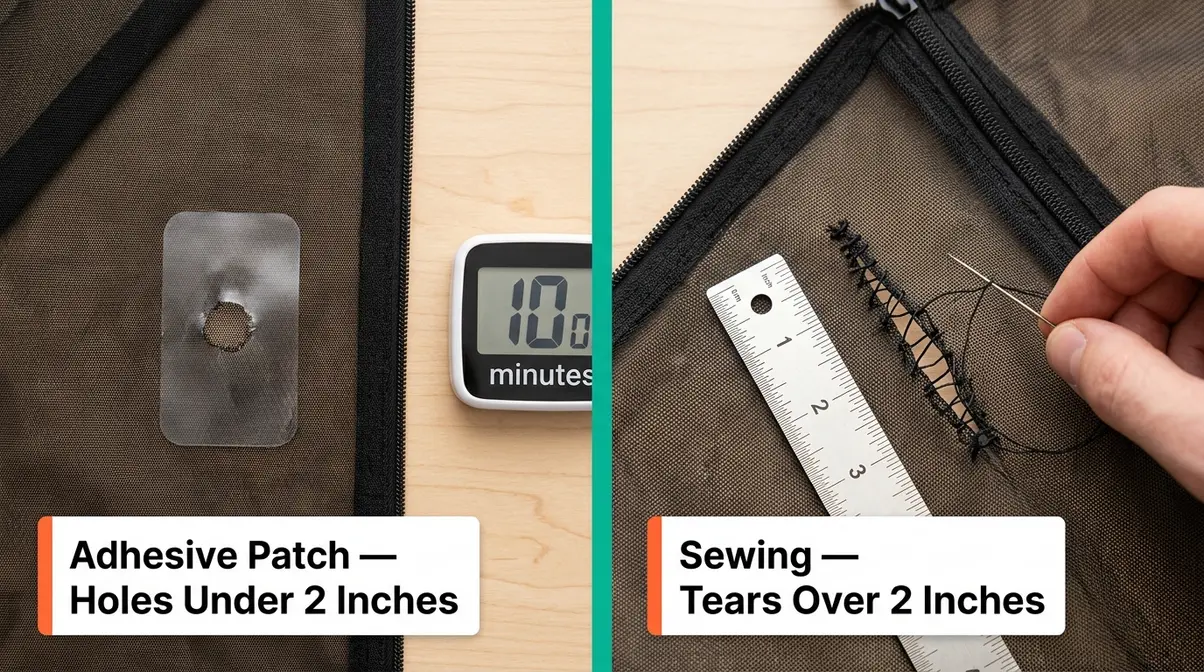
Adhesive patches handle the vast majority of tent mesh damage — but sewing is the right tool for specific situations. Knowing which method fits your damage type saves you time, money, and a failed repair. The Mesh Damage Triage from the previous section already pointed you toward one or the other; this section explains the reasoning in detail.
When Adhesive Patches Are the Best Choice
For most campers, peel-and-stick patches are the correct answer. Can you sew tent mesh? Yes — but for holes under 2 inches, a good adhesive patch is actually stronger and faster than hand-stitching, because a needle repeatedly piercing fine mesh can enlarge the damage.
- Adhesive patches work best when:
- The hole is under 2 inches in any direction
- The damage is not at a stress point (not directly on a zipper seam or frame attachment)
- You need a quick fix — at home or on the trail
- You’re working with no-see-um mesh (fine weave that sewing can worsen)
Gear Aid’s Tenacious Tape Mesh Patches are the most widely recommended option across camping communities for this purpose — flexible, UV-resistant, and compatible with all mesh types.
When to Sew Your Tent Mesh
Sewing becomes the right choice when the damage is large, structural, or in a high-stress location. User consensus in camping repair forums consistently indicates that adhesive patches alone fail within one to two seasons when applied to tears longer than 2 inches near zipper tracks — the repetitive stress of zipping simply peels the adhesive edge.
- Sewing is the better choice when:
- The tear is longer than 2 inches
- The damage runs along or near a seam
- You want a permanent repair that will outlast the tent’s other components
- You have a coarser mesh (60-mesh or 100-mesh) that a needle won’t damage
Use a fine needle (size 70/10 or smaller) and a thread that matches your mesh color. A backing patch behind the stitching prevents the thread from pulling through the weave over time. Big Agnes’ DIY tent repair guide recommends a simple whip stitch around the perimeter of the tear before applying the backing patch.
Is mesh difficult to sew?
Standard mesh is relatively straightforward to sew — no-see-um mesh is more challenging. The tight weave of no-see-um mesh means a standard needle creates small tears with each pass, potentially widening the damage. Use a fine needle (size 70/10 or smaller), sew slowly, and use a backing patch behind the repair area to prevent thread pull-through. For beginners, adhesive patches are a more forgiving option on fine mesh. Across camping repair communities, the consistent recommendation is to reserve sewing for coarser mesh types unless you have experience with fine fabric.
Side-by-Side Comparison Table
| Factor | Adhesive Patch | Sewing |
|---|---|---|
| Skill required | None | Basic sewing |
| Time to complete | 10–15 minutes | 20–45 minutes |
| Best damage size | Under 2 inches | 2 inches or larger |
| Works on no-see-um mesh | Yes (fine patches) | With care (fine needle) |
| Durability | 1–3 seasons | 3–5+ seasons |
| On-trail use | Yes | Yes (with kit) |
| Cost | $5–$15 | $8–$20 (with kit) |
Where adhesive patches excel at speed and simplicity, sewing takes over when you need a repair that truly lasts. For tears near a zipper seam, consider combining both: sew the tear closed first, then apply a patch over the stitching for maximum strength.
Tent Mesh Maintenance and Preventative Care
The best tent mesh repair is the one you never need to make. Across camping communities, the consistent feedback is that most mesh damage comes from two preventable sources: improper storage (mesh pressed against abrasive surfaces) and poor cleaning habits. A small amount of regular maintenance extends mesh life by years.
How to Safely Clean Your Tent Mesh
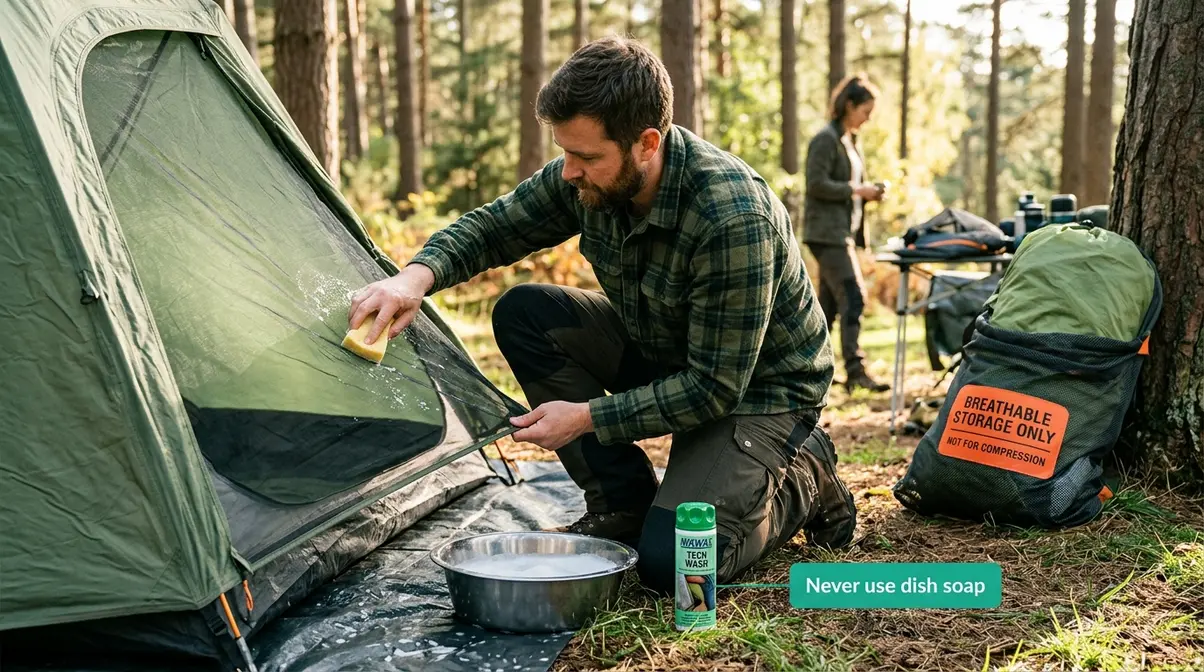
Can you use Dawn dish soap to wash a tent? The short answer is no — and this is one of the most common mistakes campers make. Standard household dish soaps like Dawn contain degreasers and surfactants that strip the DWR (durable water repellent) coating from your tent’s fly and degrade mesh fibers over time. Gear experts at REI recommend using only tent-specific cleaners or a small amount of mild, non-detergent soap (like Nikwax Tech Wash) for the mesh panels specifically.
- Safe cleaning method for tent mesh:
- Shake out loose debris — leaves, dirt, dead insects.
- Fill a basin with cool water and a capful of tent-specific cleaner (or a very small amount of non-detergent soap).
- Use a soft sponge or cloth — never a stiff brush, which snags the weave.
- Rinse thoroughly with clean water until no soap residue remains.
- Air dry completely in shade before packing. Never use a dryer — heat degrades mesh fibers and adhesive patches.
For spot cleaning on the trail, a damp cloth with plain water is sufficient. Avoid insect repellent contact with mesh panels — DEET, in particular, degrades synthetic mesh fibers.
Preventing Snags, Runs, and Future Damage
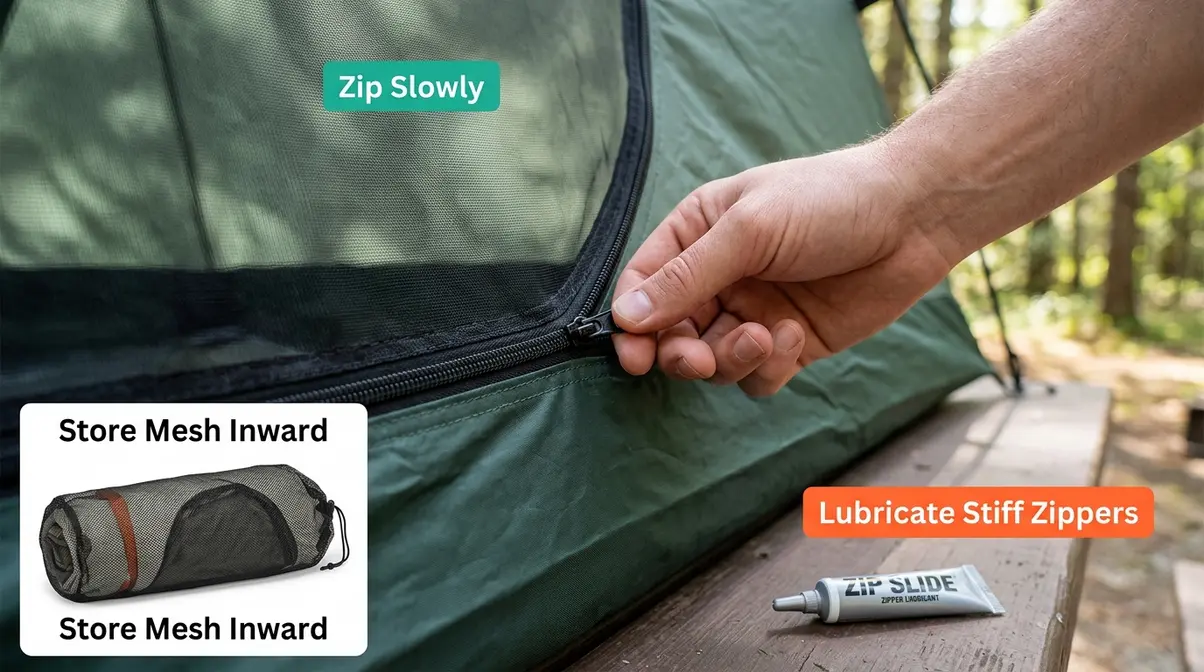
Most mesh runs start with a single snag — a zipper pull catching the weave, a branch brushing the door panel, or a tent packed against a rough surface. A few simple habits prevent the majority of damage:
- Zip slowly and carefully. A sticky zipper dragging against mesh is the leading cause of runs near door frames. If your zipper feels stiff, apply a zipper lubricant rather than forcing it.
- Pack mesh panels inward. When folding your tent, keep mesh panels facing inward, away from the tent bag’s abrasive interior.
- Store in a breathable bag. Compression sacks trap moisture, which weakens mesh fibers over time. Use a loose mesh storage bag instead.
- Inspect before every trip. A 2-minute visual check before you leave home lets you catch a small run before it becomes a 2-inch tear on day three of your trip.
- Keep DEET away from mesh. Apply insect repellent to skin and clothing only — spray it before entering the tent to avoid direct contact with mesh panels.
Common Mistakes to Avoid When Repairing Tent Mesh
Even a simple repair goes wrong when campers skip steps or use the wrong materials. Our evaluation of common repair failures — drawn from user reports across gear forums and manufacturer guidance — points to five mistakes that account for the vast majority of failed patches.
5 Mistakes That Ruin a Mesh Repair
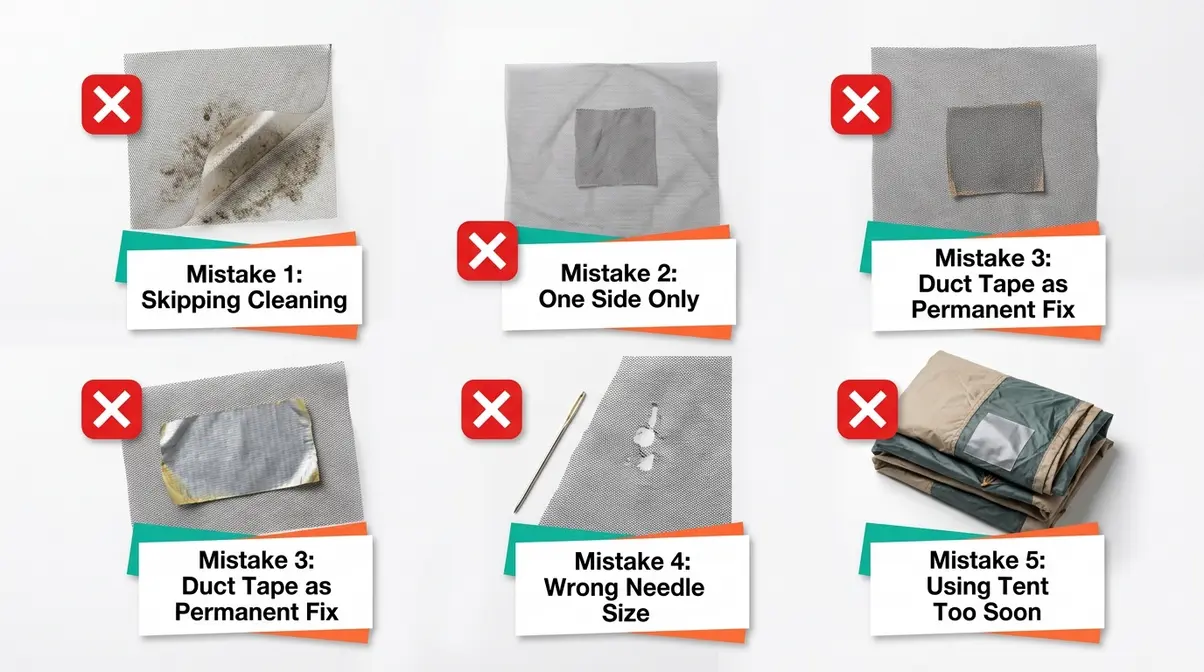
Mistake 1: Skipping the cleaning step.
Applying a patch to a dirty or oily surface is the single most common cause of patch failure. Sunscreen, insect repellent, and trail grime all act as a barrier between the adhesive and the mesh. Always clean with isopropyl rubbing alcohol and let it dry before touching the patch.
Mistake 2: Patching only one side.
Most competing repair guides show a single patch on the outside of the tear. Applying a second patch to the interior side doubles bond strength and is the method Gear Aid recommends for any hole larger than a pinhole. Skipping this step means the outer patch peels under zipper stress within weeks.
Mistake 3: Using household tape or duct tape as a permanent fix.
Duct tape is a legitimate on-trail emergency repair, but it is not a permanent solution. The adhesive breaks down in UV light within days, leaving a sticky residue that attracts dirt and makes the surface harder to patch properly later. Always follow up with a proper mesh repair patch.
Mistake 4: Sewing fine no-see-um mesh with a standard needle.
A standard sewing needle (size 90/14 or larger) creates micro-tears in tight no-see-um mesh with each pass. Use a size 70/10 or smaller. If you’re unsure, use an adhesive patch instead — it’s the safer choice for fine mesh.
Mistake 5: Using the tent before the patch cures.
Adhesive patches need a full 24 hours to reach maximum bond strength. Folding or compressing the mesh within the first few hours — even just to pack the tent — can shift the patch and create a weak seal. Patch the night before your trip, not the morning of.
Frequently Asked Questions
Can you sew tent mesh?
Yes, you can sew tent mesh, but the technique matters significantly. Standard mesh (60-mesh or 100-mesh) handles a needle well. Fine no-see-um mesh requires a size 70/10 or smaller needle to avoid creating micro-tears with each stitch. For holes under 2 inches, most camping gear experts recommend adhesive patches over sewing — they’re faster and less likely to worsen fine mesh damage. Sewing becomes the better choice for tears longer than 2 inches or damage near a high-stress seam. Use a whip stitch and a backing patch for the most durable result.
What material is used for tent screens?
Tent screens are made from woven polyester or nylon mesh, with the specific type depending on the tent’s intended use. Polyester mesh is more UV-resistant and holds its shape longer in direct sun. Nylon mesh is lighter, making it common in backpacking tents. No-see-um mesh — the tightest variety — is a fine polyester or nylon weave rated at 200+ threads per square inch, designed to block insects as small as 0.6mm. Standard mesh uses a looser weave that prioritizes airflow over insect protection.
Can I use Dawn dish soap to wash my tent?
No — Dawn and other household dish soaps are not safe for tent mesh or tent fabric. Standard dish soaps contain degreasers and surfactants that strip the DWR (durable water repellent) coating from your tent fly and degrade synthetic mesh fibers over time, ruining your tent ventilation. Use a tent-specific cleaner like Nikwax Tech Wash, or a very small amount of mild non-detergent soap diluted in cool water. Rinse thoroughly and air dry in shade. Never machine wash or tumble dry tent mesh — heat and agitation damage the weave and any existing repair patches.
How do you correctly use tent stakes?
Tent stakes should be driven into the ground at a 45-degree angle, angled away from the tent, so the stake leans into the tension load. Push the stake in at least 6 inches for soft ground; rocky ground may require specialized stakes with wider flanks. Attach guy lines to the stake’s top hook, not around the shaft. For sandy or loose soil, use wider sand/snow stakes driven horizontally for maximum hold. Properly staked tents distribute stress evenly across the mesh and fabric panels, reducing the strain that leads to mesh tears near attachment points. For more details, check our guide on the best tent stakes for high winds.
What is the 200 rule for camping?
The 200-foot rule is a Leave No Trace principle that guides campsite setup distance from water sources, trails, and other campers. Specifically, you should set up your tent, camp kitchen, and latrine sites at least 200 feet (about 70 adult steps) from any lake, stream, or river to protect water quality and riparian ecosystems. The same 200-foot buffer applies to trails, to minimize visual and physical impact on other hikers. This rule helps preserve the natural environment so camping areas remain usable for future visitors.
Wrapping Up: Fix Your Tent Mesh and Get Back Outside
For any camper dealing with a ripped or snagged bug screen, the repair process is more straightforward than it looks. Most tent mesh damage falls into one of three categories — a run, a small hole, or a large tear — and each has a clear, beginner-friendly fix. Adhesive patches handle roughly 90% of repairs in under 15 minutes, while sewing covers the remaining cases where the tear is too large or too close to a seam for a patch alone to hold. Regular cleaning with tent-safe products and proper storage prevent most damage before it starts.
The Mesh Damage Triage is your starting point every time: ask three questions, identify your damage type, and you’ll know exactly what to buy and how to fix it. We hope this tent mesh guide turns a frustrating campsite discovery into a solvable problem — usually before your coffee gets cold.
Start with the Coghlan’s Mesh Repair Patches from the Recommended Products table above, or pick up a full Tenacious Tape Mesh Patch kit before your next trip. A 10-minute repair at home beats a night of mosquitoes by any measure.

Dave King
I'm Dave King. I publish Tent Explorer, a site built to answer the questions people actually ask before they buy.