Camping Safety Tips for Beginners: Complete Guide
 Dave King
Updated July 1, 2026
25 min read
Dave King
Updated July 1, 2026
25 min read
⚠️ Important Safety Notice: The information in this guide is for educational purposes only. Always check current local park regulations, fire restrictions, weather advisories, and wildlife alerts before your trip. This guide is not a substitute for hands-on outdoor training or professional guidance. In an emergency, call 911 or your local emergency services.
That mix of excitement and dread before a first camping trip is completely real. You’ve packed your bag three times, Googled “what if it rains,” and still feel like you’re missing something.
“I have been camping alone once before, and was very lucky that the site was small and my only neighbors were an elderly lesbian couple…” — First-time solo camper, Reddit r/camping
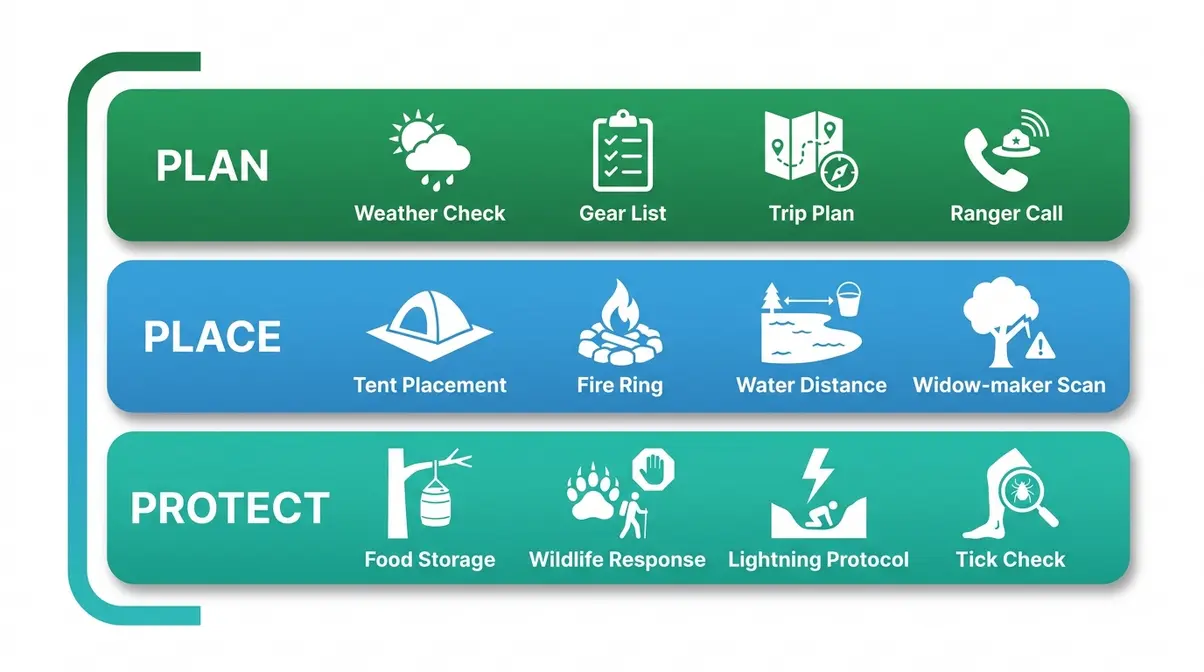
That feeling — hoping you got lucky — is exactly what this guide is designed to replace with preparation. The campers who run into serious trouble aren’t unlucky; they’re underprepared. Wildlife, sudden weather, gear failures, and being alone with no signal are real risks — but every single one of them is manageable with the right system. In this guide, you’ll learn the essential camping safety tips for beginners — from pre-trip planning through wildlife encounters — so you can enjoy your first trip with confidence, not anxiety. We’ll walk through the Campsite Safety Stack: Plan, Place, and Protect — the three layers every beginner needs before lighting their first fire.
Camping safety for beginners comes down to three layers: Plan before you leave, choose your Place wisely, and actively Protect yourself from hazards — the Campsite Safety Stack every first-timer needs.
- Plan first: Share a detailed trip plan with an emergency contact before every trip
- The 7 C’s cover your gear: Cover, Cooking, Comfort, Clothing, Cleanliness, Care, Communication
- Food storage saves lives: Store food 10 feet high and 4 feet from tree trunks to prevent bear encounters
- Tents offer zero lightning protection: Seek a hard-topped vehicle the moment you hear thunder (National Weather Service)
- The Campsite Safety Stack (Plan → Place → Protect) gives you a mental checklist for every scenario
Pre-Trip Preparation: Your Safety Foundation
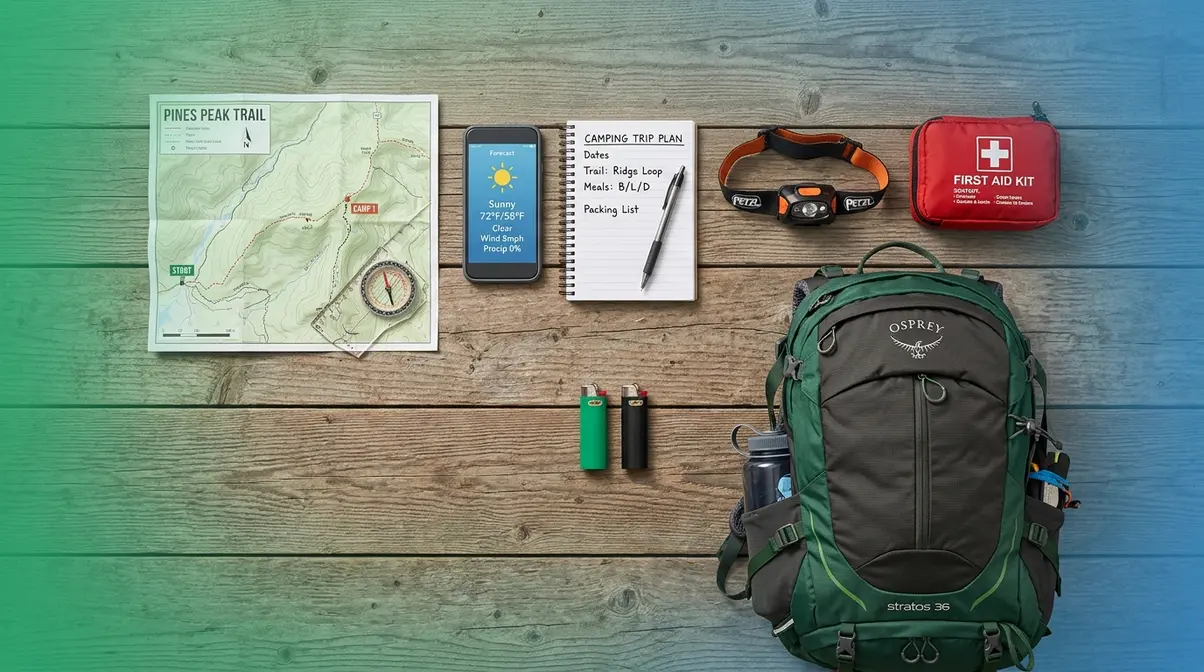
Strong camping safety starts before you ever leave your driveway. The Plan layer of the Campsite Safety Stack is where most beginners skip steps — and where most preventable problems begin. Checking conditions, packing smart, and telling someone where you’re going takes less than two hours and dramatically reduces your risk. According to the National Park Service, the majority of search-and-rescue operations involve visitors who either didn’t check conditions ahead of time or failed to share their plans with anyone.
Check the Weather and Know Your Location Before You Pack
Weather is the single most common reason beginner camping trips go wrong. Don’t just check the forecast the morning you leave — check it 72 hours out, 48 hours out, and again the night before. Conditions in mountain, forest, and coastal environments can change far faster than in cities. For more foundational advice, explore our top 10 tent camping tips for beginners.
The National Weather Service (NWS) offers free point-specific forecasts down to your exact campsite coordinates. Use the “hourly forecast” view to spot afternoon thunderstorm windows — common in summer at elevation — rather than relying on a daily summary that says “partly cloudy.” Before you pack:
- Search your exact campsite on weather.gov — enter the GPS coordinates or zip code.
- Check the hourly forecast for each day of your trip, not just the daily summary.
- Look for wind speed, precipitation probability, and overnight lows — all three affect your safety and comfort.
- Call the ranger station for your destination. Rangers know local micro-weather patterns that no app captures. This step takes five minutes and can save your trip.
Beyond weather, know your location precisely. Write down — not just save in your phone — the campsite name, campsite number, the nearest ranger station address, and the GPS coordinates of the trailhead if you’re hiking in. Cell service is unreliable in most campgrounds, and a dead battery makes a digital map useless.
Build Your Safety Gear Kit Using the 7 C’s of Camping
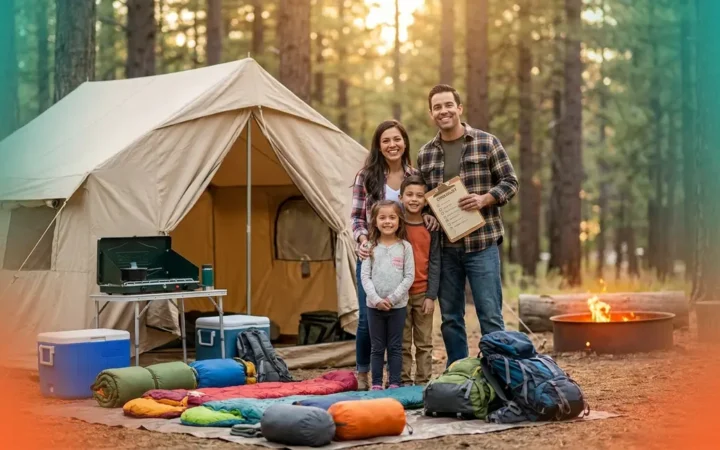
Anxiety about forgetting something critical is one of the most common fears new campers report. The 7 C’s of Camping — a framework endorsed by outdoor survival educators — gives you a checklist that covers every functional category of gear you need to stay safe. If you need a comprehensive packing list, review our camping checklist for first-time campers. The 7 C’s are: Cover (shelter — tent, tarp, bivy), Cooking (stove, fuel, cookware, food), Comfort (sleeping bag, pad, appropriate clothing), Clothing (weather-appropriate layers, rain gear), Cleanliness (soap, waste bags, hand sanitizer), Care (first aid kit), and Communication (phone, backup battery, whistle, or satellite communicator).
Your first aid kit — the “Care” C — deserves particular attention. The American Red Cross recommends that any outdoor first aid kit include adhesive bandages in multiple sizes, antiseptic wipes, antibiotic ointment, moleskin for blisters, tweezers for tick removal, an elastic bandage, pain relievers, and any personal prescription medications. For camping specifically, add after-bite treatment, blister pads, and a SAM splint — a flexible foam splint that weighs almost nothing and can immobilize a sprained ankle.
The most forgotten camping items, according to outdoor communities, are consistently: extra batteries, a headlamp (not just a phone flashlight), toilet paper, a lighter backup, and a physical map of the area. Pack two lighters. Seriously.
Share Your Trip Plan with an Emergency Contact
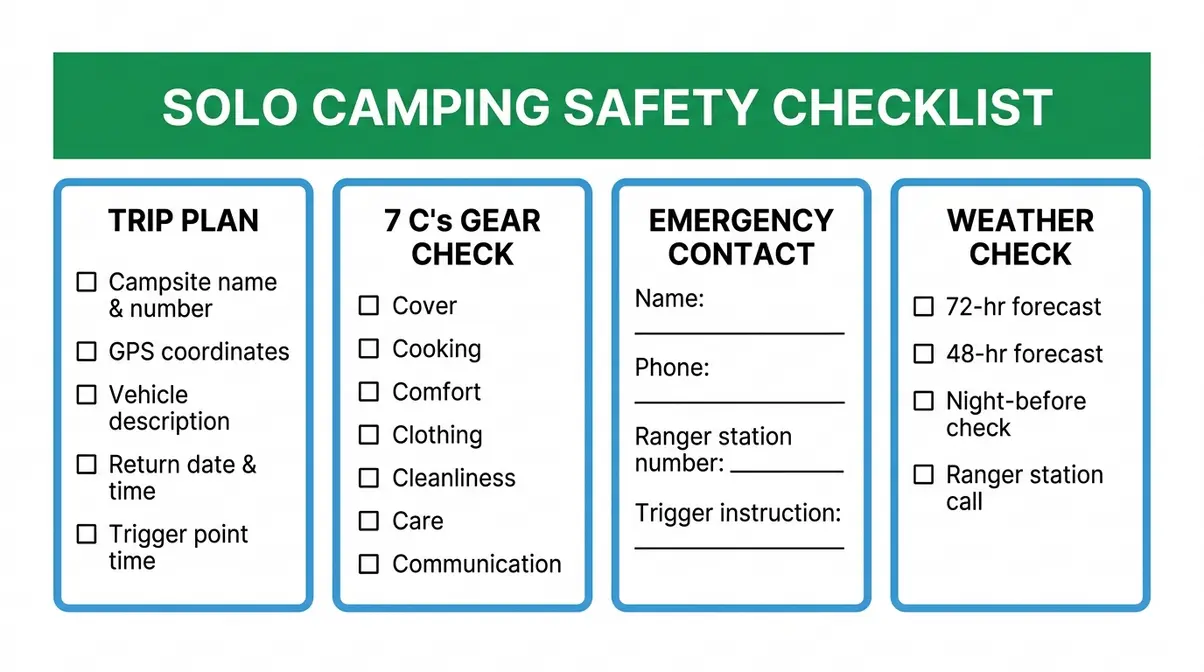
Before you leave, give a trusted person your complete trip details. This isn’t just a good idea — it’s the single most effective safety measure a solo or beginner camper can take. If something goes wrong and you can’t call for help, your emergency contact is the person who triggers a rescue.
Your trip plan should include all of the following:
| Detail | What to Include |
|---|---|
| Destination | Full campground name, site number, physical address |
| Route | Trailhead name, GPS coordinates, planned hiking route |
| Vehicle | Make, model, color, license plate |
| Planned return | Exact date and time you expect to be home |
| Check-in schedule | Agreed times you’ll send a “I’m safe” text or call |
| Trigger point | “If you haven’t heard from me by , call and then 911” |
Set a specific check-in schedule — for example, a text at 8 PM each evening — and agree on a trigger point. The trigger point is the time after which your contact should call the ranger station and then emergency services. Outdoor communities consistently recommend setting the trigger 4–6 hours after your expected return time to account for normal delays, while still ensuring a timely rescue if something goes wrong.
Test Every Piece of Gear Before You Leave Home
A soggy tent discovered at 10 PM in the dark is a genuine safety hazard, not just an inconvenience. Set up your tent in your backyard or living room at least once before your trip. Run your stove. Test your headlamp. Check that your sleeping bag’s zipper works smoothly. This step takes 30 minutes and eliminates one of the most common beginner camping problems.
Pay special attention to your rain fly — the outer waterproof layer of your tent. Many budget tents come with a rain fly that doesn’t extend to the ground, leaving the tent base exposed to water runoff. If yours has this gap, bring a ground tarp to place underneath. Field experience and outdoor community reports both indicate that a wet sleeping bag is one of the fastest ways a trip turns from uncomfortable to dangerous, especially in cool temperatures.
Campsite Selection & Setup: How to Create a Safe Home Base
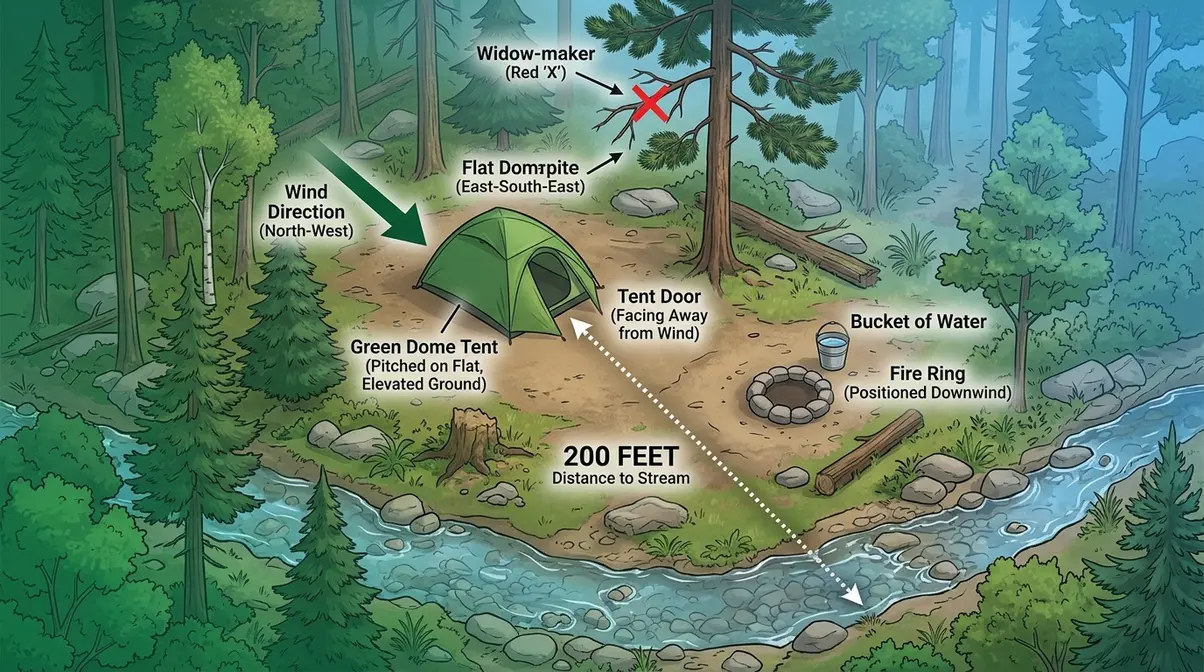
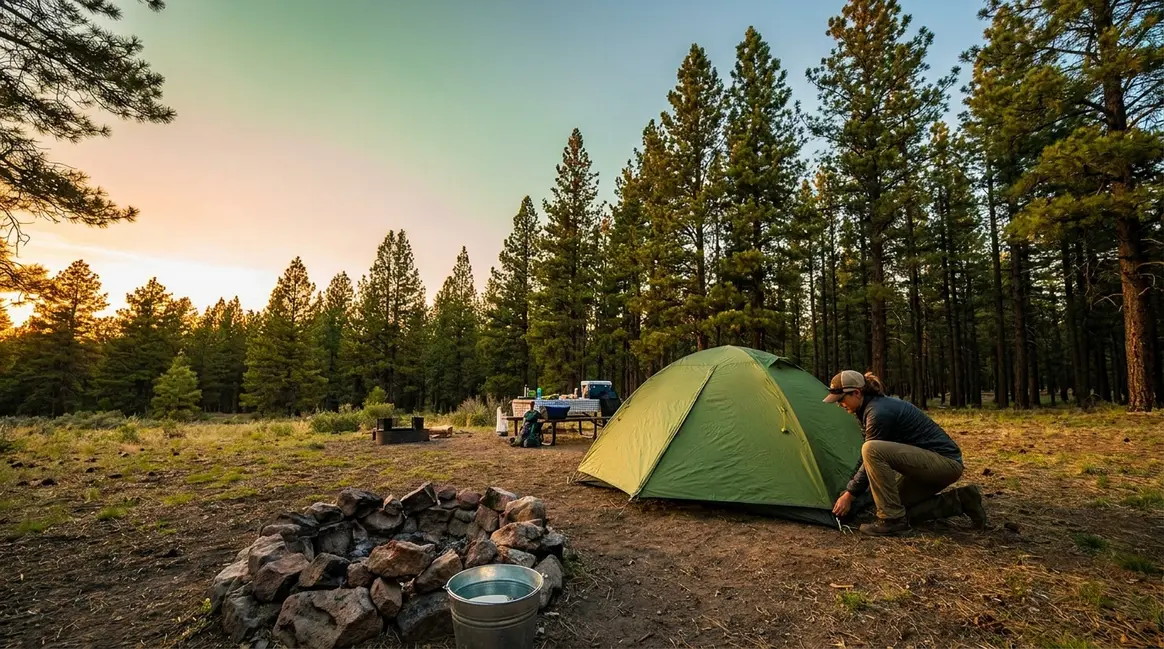
The Place layer of the Campsite Safety Stack is about making smart decisions the moment you arrive. Mastering these camping safety tips for beginners ensures your home base remains secure. Where you pitch your tent and how you set up your fire determine your exposure to the most common campsite hazards: falling branches, flooding, fire spread, and lightning. The USDA Forest Service recommends that campers assess their immediate surroundings before unloading any gear.
How to Choose a Safe Spot for Your Tent
The location you choose for your tent matters more than the quality of your tent. A $400 four-season tent pitched in the wrong spot is more dangerous than a $100 tent pitched correctly.
Follow these placement rules before staking down:
- Look up, not just down. Scan overhead for “widow-makers” — dead branches or leaning trees that can fall without warning. If you see large dead branches directly overhead, move at least 1.5 tree-lengths away.
- Check for water flow paths. Even on a clear day, look for dry channels or depressions in the ground around your site. These fill during rain and can flood a tent quickly. Pitch on slightly elevated, flat ground.
- Stay 200 feet from water sources. The National Park Service advises camping at least 200 feet (roughly 70 adult steps) from lakes, rivers, and streams to reduce flooding risk and protect the ecosystem.
Once you have evaluated the immediate terrain and water risks, optimize your tent orientation for comfort:
- Face your tent door away from prevailing wind. Check which direction the wind is coming from when you arrive. A door facing into the wind makes your tent dramatically colder and harder to enter.
- Avoid low-lying areas and valley bottoms. Cold air sinks overnight, making these spots significantly colder than surrounding terrain — and more prone to frost and condensation.
Campfire Safety Rules Every Beginner Must Know
Campfire accidents are a leading cause of preventable injuries at campgrounds. The good news: every common campfire injury is preventable with a few non-negotiable habits. Before you strike a match, check the campground’s current fire restrictions — many parks enforce fire bans during dry conditions, and violating them carries significant fines and legal liability.
Building and maintaining a safe fire:
- Use only designated fire rings or fire pits. Never build a fire directly on bare ground unless specifically permitted.
- Keep your fire small — a fire the size of a basketball provides plenty of warmth and light. Large fires are harder to control and more likely to throw embers.
- Never leave a fire unattended. Not for “just a minute.” Embers can travel 30 feet in light wind (USDA Forest Service, 2026).
- Keep a bucket of water and a shovel at your fire at all times.
Extinguishing a campfire completely:
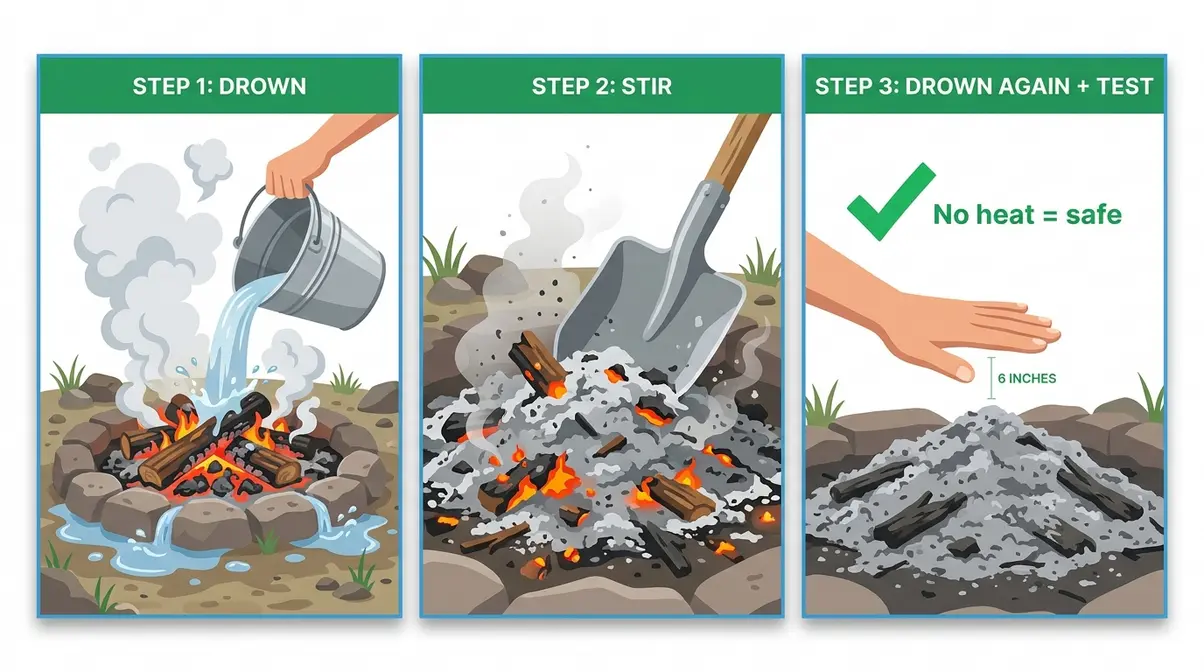
The USDA Forest Service recommends the “drown, stir, drown” method: pour water on the fire, stir the ashes with a stick or shovel to expose any remaining embers, then pour water again. Repeat until you can hold your hand 6 inches above the ashes without feeling heat. If you can’t do that, the fire is not out.
Protecting Your Tent from Weather, Flooding, and Hazards
Once your tent is pitched correctly, a few additional steps protect you from the two most underestimated campsite hazards: lightning and flash flooding. To prevent leaks, learn about perfect tent seam sealing in 30 minutes. Additionally, you can secure your shelter with the best tent stakes for high winds.
Lightning: Tents offer zero protection from lightning. The moment you hear thunder, count the seconds until you see lightning — if it’s under 30 seconds (roughly 6 miles away), the storm is close enough to act. According to the National Weather Service, you should move immediately to a hard-topped vehicle and stay there for 30 minutes after the last thunder. If no vehicle is available, move to a low-lying area away from tall trees, spread out from your group, and crouch low on the balls of your feet — do not lie flat on the ground.
Flash flooding: Flash floods can occur miles from any visible rain. If your campsite is near a stream or canyon and you hear a sustained roaring sound from upstream, move to higher ground immediately — do not wait to gather belongings. The NWS reports that flash floods are the leading weather-related cause of death in the United States, causing approximately 80–150 fatalities per year (NWS, 2026).
Wildlife & Environmental Hazards: Staying Safe in the Wild
The Protect layer of the Campsite Safety Stack is where active hazard management happens. Most wildlife encounters and environmental health issues are entirely preventable with consistent habits. “Avoid bugs, bears” is a common beginner concern — and the solutions are simpler than most people expect.
How to Store Food Safely and Avoid Bear Encounters
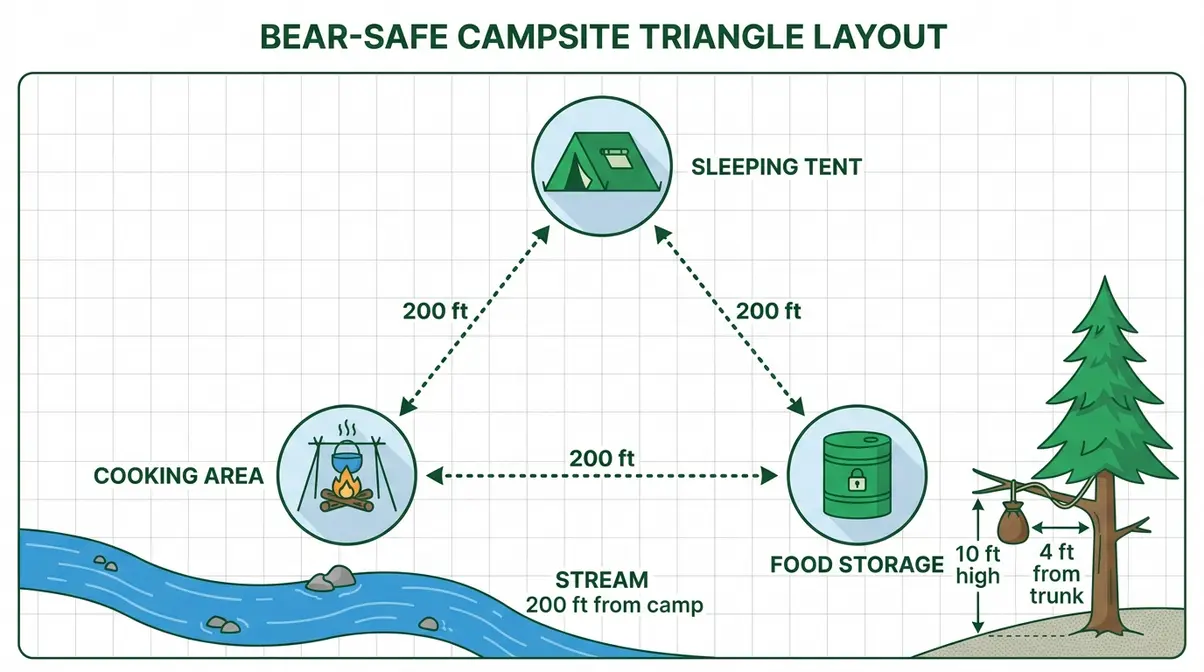
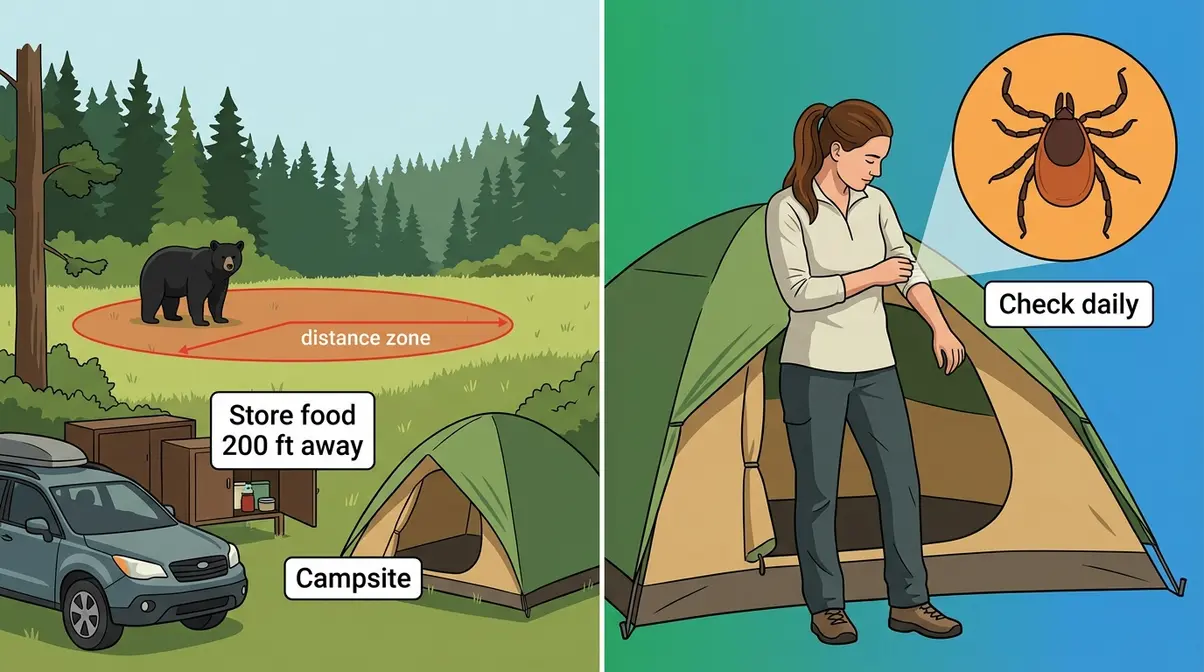
Bears are attracted to smell, not sight. This means every scented item — food, toiletries, toothpaste, lip balm, sunscreen, and trash — must be stored away from your sleeping area. For safe cooking ideas, check out our camping meal prep guide. The National Park Service specifies that food should be stored at least 10 feet off the ground and 4 feet from the tree trunk when hung in a bear bag, or in an approved bear canister — a hard-sided, smell-proof container designed specifically for backcountry food storage.
Follow this food storage protocol every night and whenever you leave your campsite:
- Cook and eat at least 200 feet from your tent.
- Pack all food, wrappers, and scented items into your bear canister or hang bag before dark.
- Never store food inside your tent — not even a granola bar wrapper.
- Pack out all trash. A “Leave No Trace” principle: if you packed it in, pack it out.
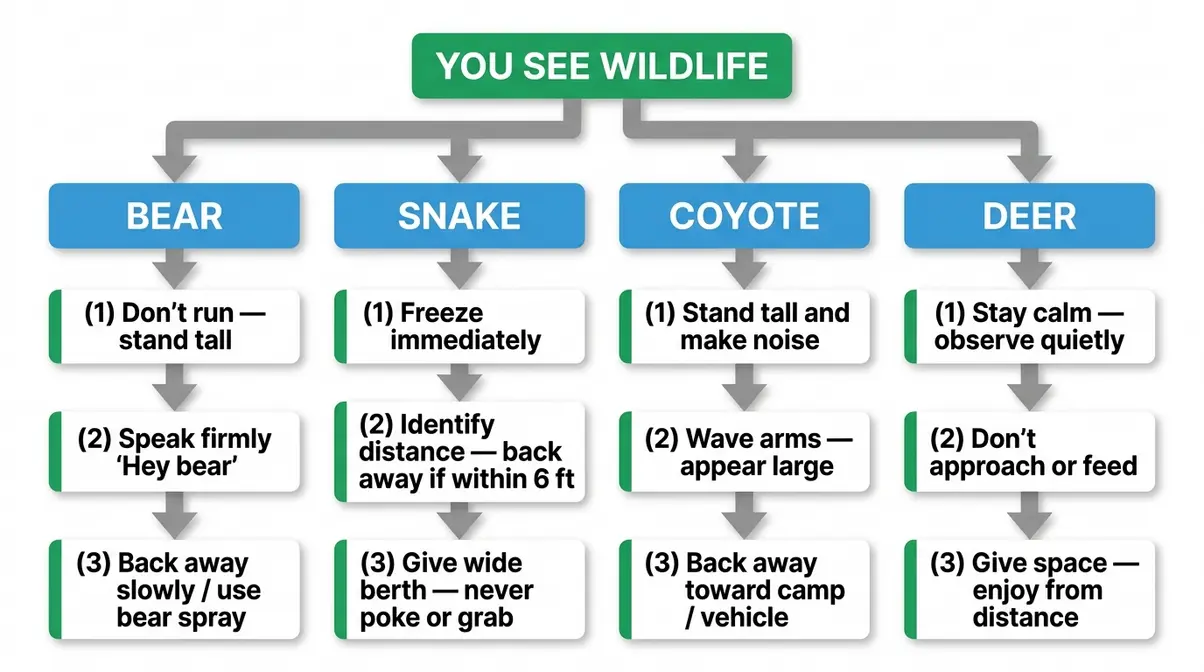
If you encounter a bear at your campsite: Do not run. Stand tall, speak in a calm, firm voice (“Hey bear, go away”), and back away slowly. Most bears will leave when they realize you’re human. State wildlife officials advise carrying bear spray — a capsaicin-based deterrent — in bear country, and knowing how to use it before you need it.
Protecting Yourself from Bugs, Ticks, and Insects
Insects are the most consistent annoyance for beginner campers — but ticks carry real health risks including Lyme disease and Rocky Mountain spotted fever. You might also consider investing in the best tent for mosquitoes to ensure a bite-free night. The CDC recommends using an EPA-registered insect repellent containing DEET (20–30%), picaridin, or IR3535 on exposed skin, and treating clothing with permethrin before your trip.
Daily tick check routine:
- At the end of each day, do a full-body tick check — check your scalp, behind your ears, armpits, groin, and behind your knees.
- Shower or wipe down within two hours of coming indoors or into your tent.
- If you find an attached tick, use fine-tipped tweezers to grasp it as close to the skin as possible and pull upward with steady, even pressure. Do not twist or jerk.
- Clean the bite area with rubbing alcohol or soap and water.
- Monitor the site for 30 days. A bullseye rash or flu-like symptoms warrant immediate medical attention.
Wear long sleeves and pants when hiking through brush, and tuck your pants into your socks in tick-heavy environments — this is unglamorous but genuinely effective.
Water Safety: How to Purify Water in the Wild
Never drink untreated water from any natural source — streams, lakes, and rivers, no matter how clear they look, can carry Giardia lamblia and Cryptosporidium, parasites that cause severe gastrointestinal illness. The CDC reports that waterborne illness from untreated natural water affects thousands of backcountry travelers annually.
You have three reliable purification options:
| Method | How It Works | Pros | Cons |
|---|---|---|---|
| Filter (e.g., Sawyer Squeeze) | Physical filtration removes bacteria and protozoa | Fast, reusable, no taste | Doesn’t remove viruses |
| Chemical tablets (iodine/chlorine dioxide) | Chemical treatment kills pathogens | Lightweight, cheap | 30-min wait; slight taste |
| UV pen (e.g., SteriPen) | UV light destroys pathogen DNA | Fast (90 seconds), effective | Requires batteries |
| Boiling | 1 minute at rolling boil (3 min above 6,500 ft) | No equipment needed | Time-consuming; fuel cost |
For most beginner camping in established campgrounds, carry at least 2 liters of clean water from home plus a backup purification method. If you’re at a site with potable water hookups, you don’t need field purification — but always confirm the water is potable before your trip.
Solo Camping Safety: Special Considerations for Going It Alone
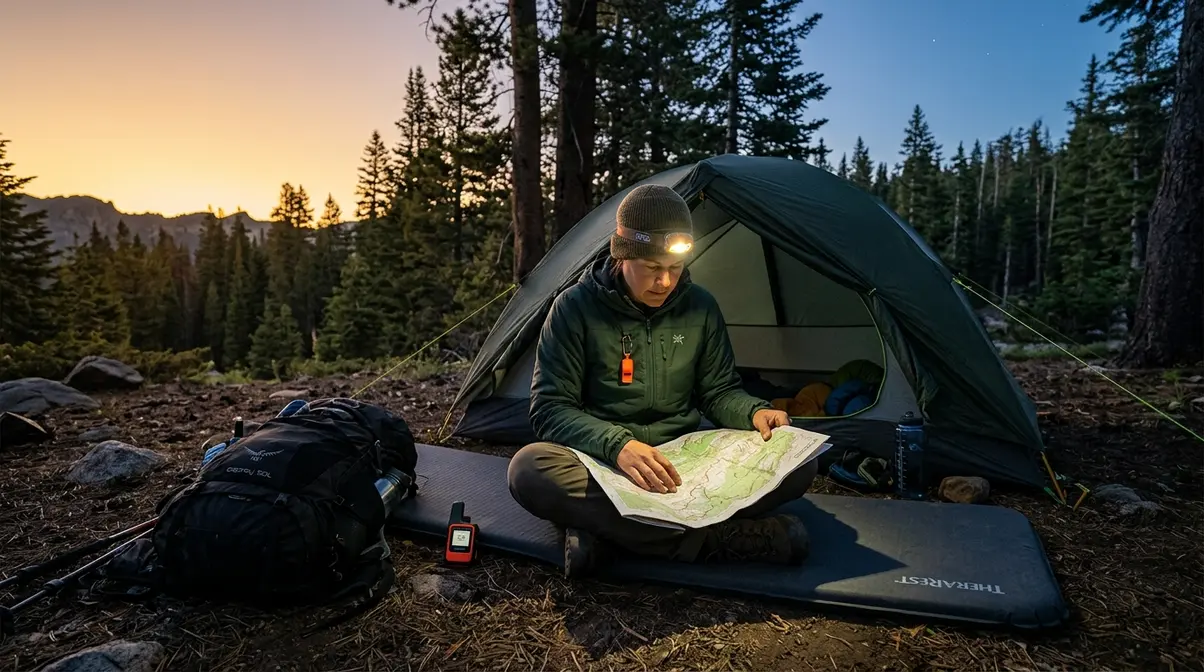
Solo camping — or “wild camping” as it’s sometimes called — offers a unique kind of freedom, but it requires an extra layer of awareness. The Campsite Safety Stack applies here exactly as it does for group camping, with one important addition: your decision-making capacity is your only safety net. Outdoor communities consistently report that solo campers who run into trouble share one common factor — they didn’t plan for the possibility of being incapacitated.
Situational Awareness and Personal Safety as a Solo Camper
Feeling conspicuous or unsafe around strangers is a common concern, particularly for solo female campers. These concerns are legitimate and worth addressing directly. When you arrive at a campsite, take five minutes to observe your surroundings before setting up:
- Note who is camped nearby and how they behave.
- Identify the nearest campground host or ranger station location.
- Choose a site that isn’t isolated but also isn’t directly adjacent to high-traffic areas like bathrooms or parking lots — both attract foot traffic at odd hours.
- Trust your instincts. If a site feels wrong, move. You never owe anyone an explanation for relocating.
For personal safety, consider these practical steps:
- Don’t advertise that you’re alone. You don’t need to lie, but you also don’t need to volunteer the information.
- Keep a whistle on your person — a Fox 40 pealess whistle carries over 100 decibels and can be heard from a significant distance.
- Lock your vehicle. Keep your keys, phone, and wallet inside your tent with you overnight.
- Camp near other people when possible. Established campgrounds with neighbors nearby are significantly safer for first-time solo campers than remote backcountry sites.
If you are upgrading your gear, look into the best 1-man backpacking tent for a secure, low-profile shelter.
Emergency Planning and Communication for Solo Campers
The question “how do I stay safe while camping alone?” has one foundational answer: never be the only person who knows where you are. Beyond your emergency contact, consider these tools and protocols:
Communication tools for low/no signal areas:
- Personal Locator Beacon (PLB): A one-way device that, when activated, sends your GPS coordinates directly to search-and-rescue authorities via satellite. No subscription required. The ACR ResQLink 400 is a widely recommended entry-level option.
- Satellite communicator (e.g., Garmin inReach Mini): Two-way messaging via satellite. More expensive but allows you to send and receive texts from anywhere. Requires a subscription.
- SPOT device: One-way GPS tracker that sends check-in messages to your emergency contact at set intervals.
Emergency signal protocol: If you’re injured and can’t move, use the universal distress signal — three of anything: three whistle blasts, three fires in a triangle (if safe), three flashes of a mirror or light. Stay where you are; rescuers search from your last known location.
Camping Rules, Lingo & Survival Acronyms Explained
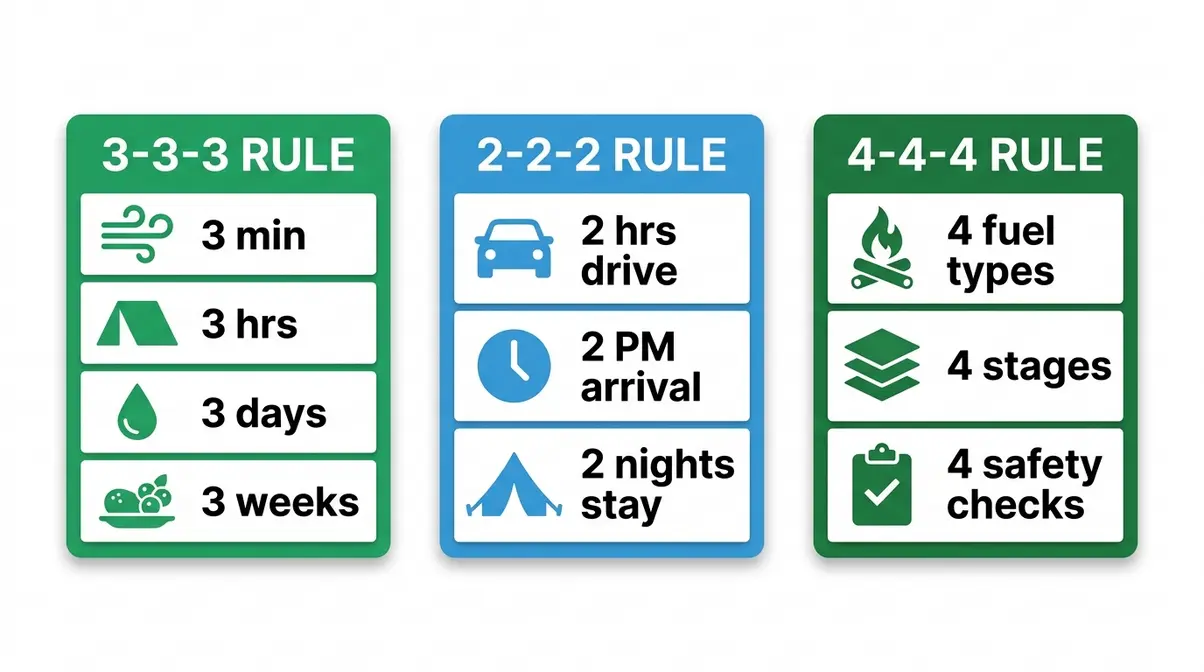
Every community has its shorthand, and camping is no different. Some of these rules have genuine safety implications — knowing the 3-3-3 rule could save your life. Others, like “FF,” simply help you book the right campsite. This section decodes the most commonly searched camping rules so you arrive prepared, not confused.
The 3-3-3 Rule and 4-4-4 Rule: Survival Priorities
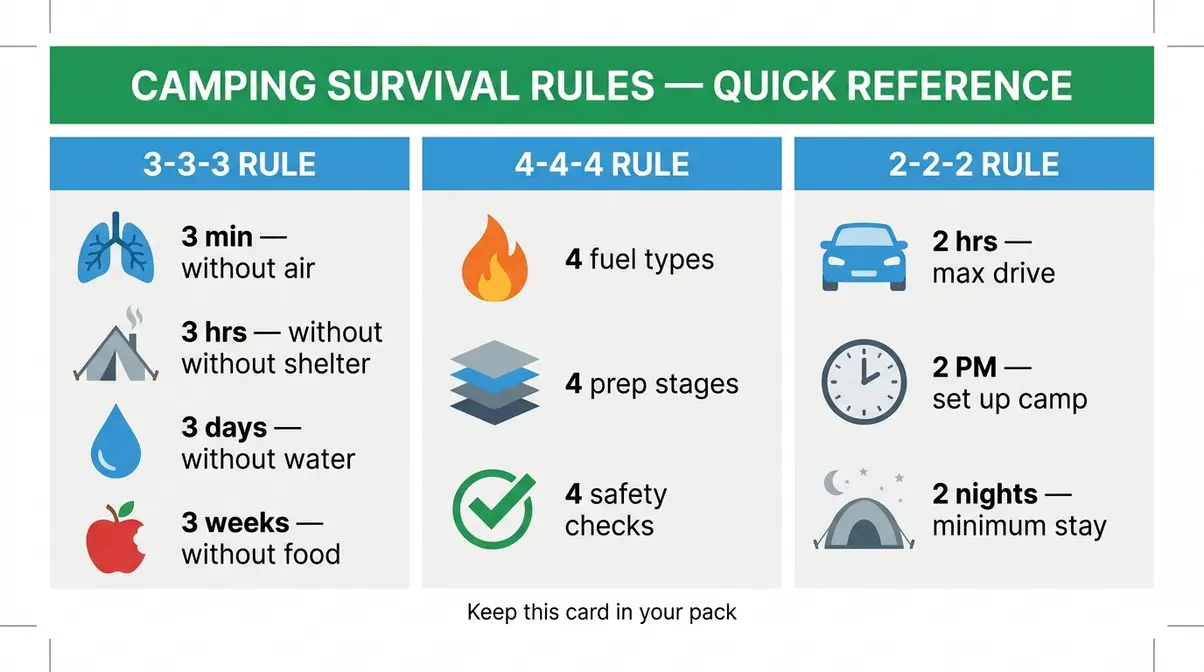
The 3-3-3 Rule is a survival memory aid that outlines how long the human body can survive without critical resources. It states: you can survive approximately 3 minutes without air (or in icy water), 3 hours without shelter in harsh conditions, 3 days without water, and 3 weeks without food. The rule is taught by wilderness first aid organizations including NOLS (National Outdoor Leadership School) to help survivors prioritize their actions in an emergency — shelter before water, water before food.
What this means practically for beginner campers: if you’re ever in an unexpected survival situation, your first priority is always getting out of the elements. A tarp and a space blanket weigh almost nothing and should be in every camping kit.
The 4-4-4 Rule is a complementary framework focusing on fire-making conditions. It holds that for a reliable campfire, you need: 4 types of fuel (tinder, kindling, small wood, large wood), fuel prepared in 4 stages (dry, split, stacked, lit in sequence), and 4 safety checks before leaving (fire is cold to touch, no embers, no smoke, no smell). While this rule is less universally standardized than the 3-3-3, it’s widely used in beginner fire-safety workshops as a memorable structure.
The 2-2-2 Rule: A Beginner Travel Formula
The 2-2-2 Rule is a practical road-trip and camping travel guideline designed to reduce driver fatigue and improve trip safety. It recommends: drive no more than 2 hours per travel day, stop no later than 2 PM to set up camp, and stay a minimum of 2 nights at each location. The rationale behind each element is worth understanding. The 2-hour driving limit reduces fatigue-related accidents — a leading cause of camping-trip injuries that happens before anyone even reaches the campsite. Stopping by 2 PM gives you sufficient daylight to set up your tent, assess your surroundings, and handle any setup problems before dark. Staying two nights allows you to actually rest and explore rather than spending every day packing and driving.
For beginner campers specifically, the 2-night minimum is particularly valuable — your first night at any new campsite is an adjustment period. You’ll sleep better, feel safer, and enjoy the experience far more on night two.
Leave No Trace: The 7 Principles Every Camper Should Know
Leave No Trace (LNT) is a set of seven outdoor ethics principles developed by the Leave No Trace Center for Outdoor Ethics and endorsed by the National Park Service and the USDA Forest Service. Following LNT isn’t just about environmental responsibility — several principles directly protect your safety and the safety of other campers. For more specific shelter advice, read our dedicated tent camping safety tips.
The 7 LNT Principles are:
- Plan Ahead and Prepare — Know the regulations and hazards of your specific area before you arrive.
- Travel and Camp on Durable Surfaces — Use established trails and campsites; avoid fragile ground that can give way or flood.
- Dispose of Waste Properly — Pack out all trash; use established toilet facilities or bury human waste 200 feet from water.
- Leave What You Find — Don’t disturb natural features, plants, or cultural artifacts.
- Minimize Campfire Impacts — Use established fire rings; keep fires small; follow all local fire restrictions.
- Respect Wildlife — Observe from a distance; never feed animals; store food properly.
- Be Considerate of Other Visitors — Keep noise low; yield to other hikers; respect quiet hours.
What Does FF Mean at a Campground?
FF stands for “Full Hookup” (sometimes written as “FHU”) at most North American campgrounds — though you’ll also see it abbreviated as “FF” for “Full Facilities” on some booking platforms. A Full Hookup or Full Facilities campsite provides three connections at your site: electrical power (typically 30- or 50-amp), water hookup (potable water directly to your site), and sewer hookup (for RV waste tanks). For tent campers, FF or Full Hookup sites are less relevant — you won’t need sewer or electrical connections. However, a site listed as FF does confirm you’ll have access to potable water nearby, which is useful to know before packing water purification equipment.
When searching campground booking sites like Recreation.gov or KOA, look for “W/E” (water and electric) if you want hookups without sewer, or “FHU/FF” if you need all three. Tent campers typically book “primitive” or “standard” sites.
Common Beginner Camping Mistakes to Avoid
Even well-prepared campers make predictable mistakes on their first few trips. Knowing these patterns in advance puts you ahead of 80% of first-timers. This section also covers the honest limits of what a guide like this can teach you — because some skills only come from hands-on experience.
When to Seek Expert Help or Ranger Guidance
Certain situations require more than a guide can provide. Outdoor communities consistently report that the campers who handle emergencies best are those who sought training before they needed it, not after. Consider taking a Wilderness First Aid (WFA) course — a 16-hour weekend course offered by organizations like NOLS and SOLO Wilderness Medicine — before attempting remote or solo camping.
Always consult your local ranger station before your trip. Rangers know current conditions that no website reflects: recent bear activity, trail closures, active fire risk, and water source status. Most ranger stations have a phone line staffed during business hours and can answer specific questions in under five minutes. Check official park advisories at your destination’s NPS or state parks website before every trip.
Specific situations that warrant expert consultation:
- Camping above 10,000 feet elevation (altitude sickness risk)
- Camping in known grizzly bear territory (different protocols than black bears)
- Camping during wildfire season in fire-prone regions
- Any trip involving river crossings, technical terrain, or extended backcountry travel
The Limits of This Guide: What You Still Need to Learn
This guide covers the essential beginner camping safety tips that apply to most established campground situations. It is not a substitute for professional outdoor training, and it has honest limits.
What this guide doesn’t cover:
- Technical wilderness navigation (compass and map reading)
- Backcountry first aid beyond basic wound care
- River crossing safety
- Avalanche awareness for winter camping
- Altitude illness recognition and treatment
The Campsite Safety Stack — Plan, Place, Protect — gives you a strong foundation. But the outdoors is dynamic, and no written guide replaces time spent outside with experienced mentors. Take a beginner hiking or camping skills course at your local REI, outdoor center, or community college. Join a local hiking club for your first few trips. The goal of this guide is to get you to your first campsite safely and confidently — the rest of your outdoor education happens best in the field.
Frequently Asked Questions
What is the 3-3-3 rule for camping?
The 3-3-3 rule is a wilderness survival memory aid covering how long the human body can endure without critical resources. You can survive roughly 3 minutes without air or in icy water, 3 hours without shelter in harsh conditions, 3 days without water, and 3 weeks without food. For campers, the rule’s most practical application is prioritization: if you’re ever in an unexpected emergency, get out of the elements before worrying about water or food. Organizations like NOLS teach this rule in wilderness first aid courses as a foundational survival framework.
What are the 7 C’s of camping?
The 7 C’s of camping are a gear-planning framework covering every essential category: Cover (shelter), Cooking (food and stove), Comfort (sleeping gear), Clothing (weather-appropriate layers), Cleanliness (hygiene and waste), Care (first aid), and Communication (phone, whistle, or satellite device). Using the 7 C’s as a packing checklist ensures you don’t miss any functional category of gear before your trip. It’s particularly useful for beginner campers who aren’t yet sure what “complete” gear looks like.
What is the 4-4-4 rule for camping?
The 4-4-4 rule is a campfire safety and preparation guideline used in beginner fire-building workshops. It covers 4 types of fuel (tinder, kindling, small wood, large wood), 4 stages of fuel preparation (dry, split, stacked, lit in sequence), and 4 safety checks before leaving a fire unattended (cold to touch, no embers, no smoke, no smell). While less universally standardized than the 3-3-3 rule, it serves as a helpful memory structure for campers learning campfire management for the first time.
What are the 5 basic camping safety rules?
The 5 basic camping safety rules are: (1) Always share your trip plan with an emergency contact before leaving. (2) Store all food and scented items away from your sleeping area to avoid wildlife encounters. (3) Extinguish campfires completely using the drown-stir-drown method before sleeping or leaving. (4) Check the weather forecast 72 hours before your trip and monitor it throughout. (5) Carry a first aid kit and know how to use the contents. These five rules cover the majority of preventable camping incidents and form the core of safe camping for beginners.
What does FF mean at a campground?
FF at a campground typically stands for “Full Facilities” or “Full Hookup” — a site that provides electrical, water, and sewer connections, primarily designed for RV campers. On some booking platforms, it may specifically mean “Full Hookup” (abbreviated FHU), confirming all three utility connections at the site. Tent campers generally don’t need FF sites and should look for “primitive” or “standard” site types instead. Confirming the site type before booking prevents surprises — especially regarding water availability.
What is the most forgotten item when camping?
The most commonly forgotten camping item is a headlamp or reliable light source, according to consistent reports from outdoor communities and gear forums. Runners-up include extra batteries, a backup lighter or fire starter, toilet paper, and a physical map of the area. Phone flashlights drain battery quickly and leave you without navigation or communication capability. A dedicated headlamp — ideally with a red-light mode to preserve night vision — weighs under 3 ounces and should be at the top of every beginner’s packing list.
What is the 2-2-2 rule for camping?
The 2-2-2 rule is a travel safety guideline for road trips and camping journeys: drive no more than 2 hours per travel day, stop to set up camp by 2 PM, and stay at least 2 nights at each location. The driving limit reduces fatigue-related accidents. The 2 PM arrival window ensures you have daylight for setup. The 2-night minimum allows genuine rest and reduces the stress of constantly packing and moving. For first-time campers especially, the 2-night stay is valuable — night one is an adjustment period, and night two is when you actually relax.
What is the best way to stay safe while camping alone?
The most important solo camping safety step is ensuring someone always knows your exact location and return plan. Give an emergency contact your campsite name, site number, vehicle description, planned return time, and a specific trigger point — “if you haven’t heard from me by , call and then 911.” Beyond that, carry a whistle, keep your tent locked with valuables inside, and choose established campgrounds with neighbors nearby for your first solo trips. Consider a personal locator beacon (PLB) for remote areas with no cell service.
Your First Trip Starts Here
Safe camping for beginners is not about eliminating risk — it’s about replacing anxiety with preparation. Every hazard covered in this guide has a clear, manageable response. Wildlife encounters, sudden storms, gear failures, being alone without signal — none of these are reasons to stay home. They’re reasons to plan. The Campsite Safety Stack (Plan → Place → Protect) gives you a sequential mental framework you can run through before every trip, at every campsite, and in any unexpected moment. According to the National Park Service, most search-and-rescue operations involve visitors who skipped the planning layer entirely — not people who were simply unlucky.
The Campsite Safety Stack isn’t just a checklist — it’s a mindset shift. Once you internalize Plan, Place, and Protect, you stop reacting to the outdoors and start reading it. That shift is what separates anxious first-timers from confident campers.
Your next step: download or screenshot the survival rules pocket card from this guide, fill out the emergency contact trip plan template, and set up your tent once in your backyard this week. Start with an established campground — somewhere with neighbors, a ranger station nearby, and cell service. Give yourself two nights. The outdoors rewards the prepared, and you’re already more prepared than most first-timers who ever set foot on a trail. By following these camping safety tips for beginners, you are setting yourself up for a memorable and secure adventure.

Dave King
I'm Dave King. I publish Tent Explorer, a site built to answer the questions people actually ask before they buy.