Campsite Layout Ideas: 15 Blueprints for Any Setup
 David King
Updated June 21, 2026
24 min read
David King
Updated June 21, 2026
24 min read
“I need to revamp my campsite area but I have no ideas. Please share your best campsite layouts to inspire me! 😁”
If that sounds familiar, you’re not alone. Most campers arrive at their site with a car full of gear and absolutely no plan for where any of it goes.
The result? A chaotic campsite where the kitchen is too close to the sleeping area, the fire is upwind of the tent, and nobody can find the flashlight. A poorly planned campsite layout doesn’t just cause frustration — it can create real safety hazards.
In this guide, you’ll discover 15 campsite layout ideas — from micro-site budget setups to permanent seasonal camps — organized around a simple three-zone framework that takes the guesswork out of setting up camp. We’ll cover the foundational 3-Zone Blueprint Method, specialized ideas for tent and RV campers, decoration tips to jazz up your site, and answers to every camping rule question you’ve been afraid to ask.
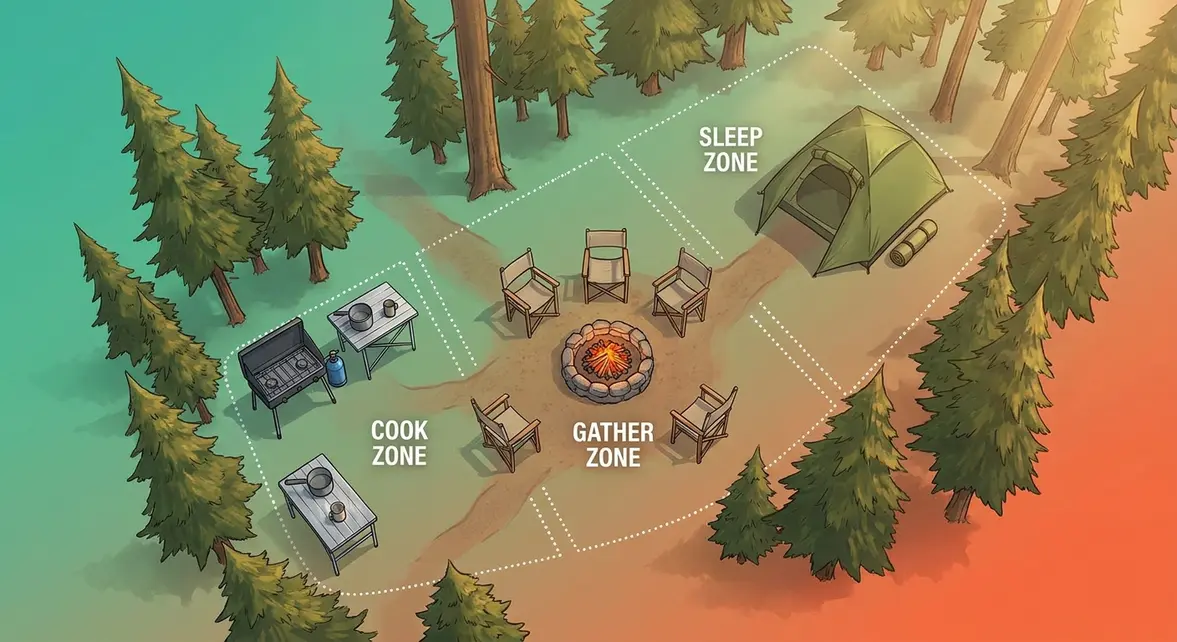
Every campsite becomes safer and more comfortable when organized into three zones — Sleep, Cook, and Gather — before unpacking. The National Park Service recommends keeping cooking and sleeping areas at least 200 feet apart.
- The 3-Zone Blueprint Method divides any campsite into Sleep, Cook, and Gather zones for instant organization
- 200 feet (about 70 adult steps) is the minimum safe distance between your tent and kitchen
- Tent campers should face their tent door away from the prevailing wind for warmth and stability
- RV campers can create a full outdoor “patio room” using rugs, string lights, and weather-resistant furniture
- Permanent campsites benefit most from defined flooring zones and semi-permanent shade structures
The 3-Zone Blueprint Method
The best campsite layout ideas start with one rule: divide your site into three distinct zones — Sleep, Cook, and Gather — before you unpack a single bag. According to the Leave No Trace Center for Outdoor Ethics, keeping cooking and sleeping areas at least 200 feet apart reduces wildlife attraction and improves overall campsite safety. This three-zone approach, which we call the 3-Zone Blueprint Method, works for any campsite size — from a cramped micro-site to a full family setup.
The reason most campsite layouts fail is not lack of gear — it’s lack of sequencing. Most campers unpack first and plan second. The 3-Zone Blueprint Method reverses this: you plan the zones mentally (or on paper) before touching any gear. Think of your campsite as a three-room home. Each room has a purpose, and you wouldn’t cook dinner in your bedroom or sleep in the kitchen.
How Do You Layout a Campsite?
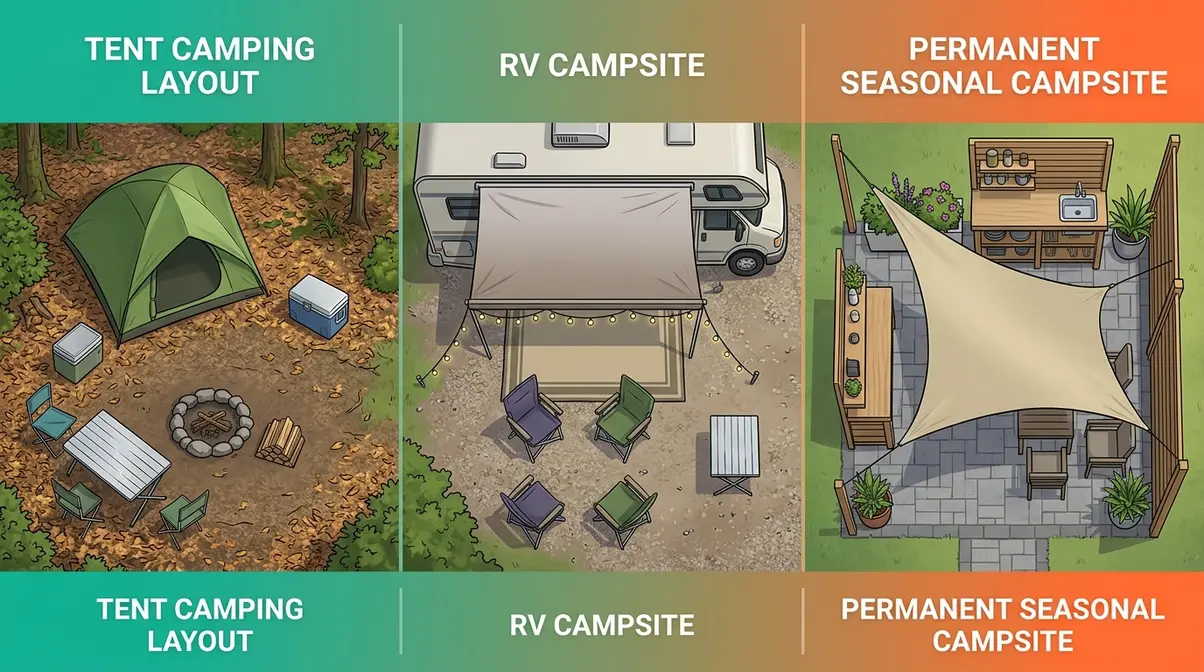
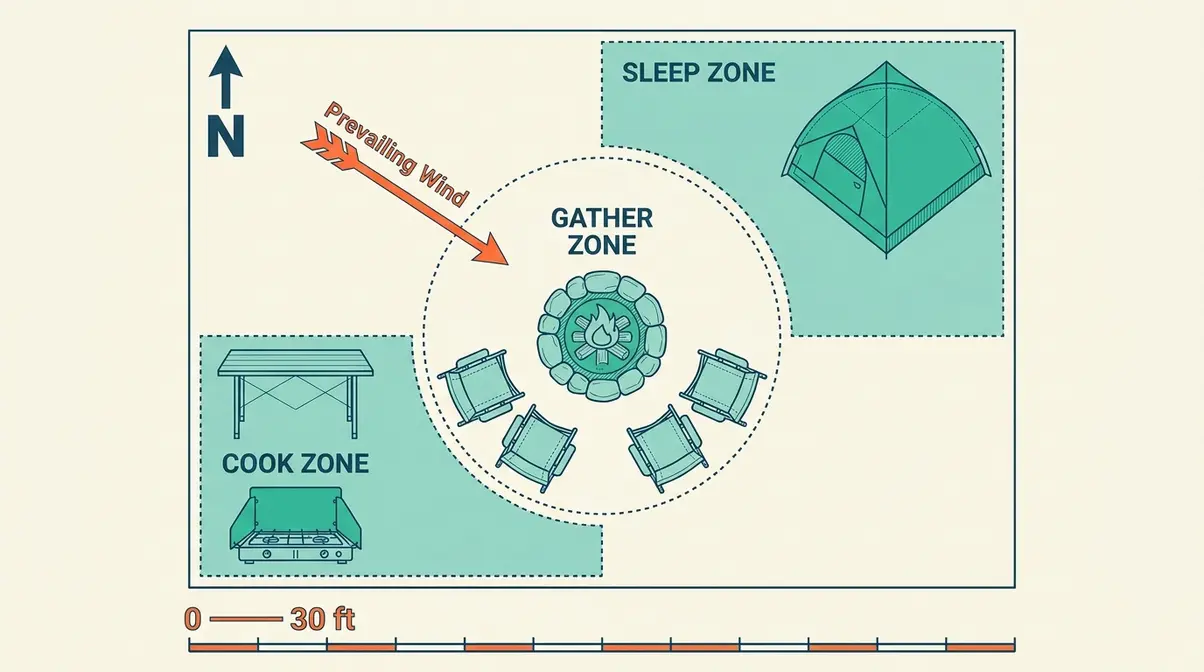
Layout a campsite using the 3-Zone Blueprint Method: divide your site into three zones — Sleep, Cook, and Gather — before unpacking anything. First, walk the site for 60 seconds (check wind, sun, drainage, overhead hazards). Then place your tent in the Sleep Zone on flat, sheltered ground. Position your kitchen downwind of the tent. Finally, arrange the Gathering Zone (fire ring, camp chairs) between the two. Keep the Kitchen Zone at least 30–50 feet from the tent in standard campgrounds, or 200 feet in bear country, per Leave No Trace guidelines.
Before You Start — What You’ll Need:
Estimated Setup Time: 30-45 minutes.
Before diving into the layout steps, gather your tools and materials. Make sure you have: (1) your tent or RV and sleeping gear, (2) your cooking equipment and food storage, and (3) a basic sense of the campsite’s size and available features — fire ring, picnic table, water access. If you’re unsure what to pack, consult a comprehensive camping checklist for first-time campers before you leave. You don’t need a perfect plan. You just need a starting framework.
Step 1: Choose Your Site Wisely
Good campsite layout design starts with site selection — the decisions you make before setting up determine everything else. Walk your site for 60 seconds before touching any gear. That single habit saves hours of frustration later. For more foundational advice, review our top 10 tent camping tips for beginners.
Here’s what to check during your 60-second site scan:
- Look up — scan for dead branches (“widow-makers”) overhead that could fall on your tent
- Look down — check for roots, rocks, and low spots where water pools
- Feel the wind — turn your face into the breeze to find the prevailing wind direction
Wind direction is your first priority. Position your tent so the door faces away from the prevailing wind — this is called the leeward side (the sheltered side, away from the wind). Why does this matter? Wind blowing directly into an open tent door drops interior temperature fast and can collapse a tent that isn’t perfectly staked.
Sun exposure shapes your comfort throughout the day. A tent door facing east catches gentle morning sun, which warms you up gradually and helps dry condensation. Afternoon sun from the west, however, turns your tent into an oven by 2 p.m. Aim for east-facing doors in summer.
Drainage is non-negotiable. Never set up in a depression or low spot. Look for a slight natural grade — water should flow away from your sleeping area, not toward it. Waking up in a puddle is miserable, and sustained moisture damages tent floors and sleeping bags quickly.
Step 2: The Sleep Zone
The Sleep Zone is your anchor point. Every other zone is positioned relative to it. Camping communities consistently report that placing the tent first — before any other gear comes out of the car — makes the entire setup process faster and less chaotic.
Place your tent on the flattest, most sheltered ground available. Clear the area of sticks and stones first (even small ones cause discomfort through a sleeping pad after a few hours). Stake the tent before unfolding it — this keeps it from blowing away during setup on windy days.
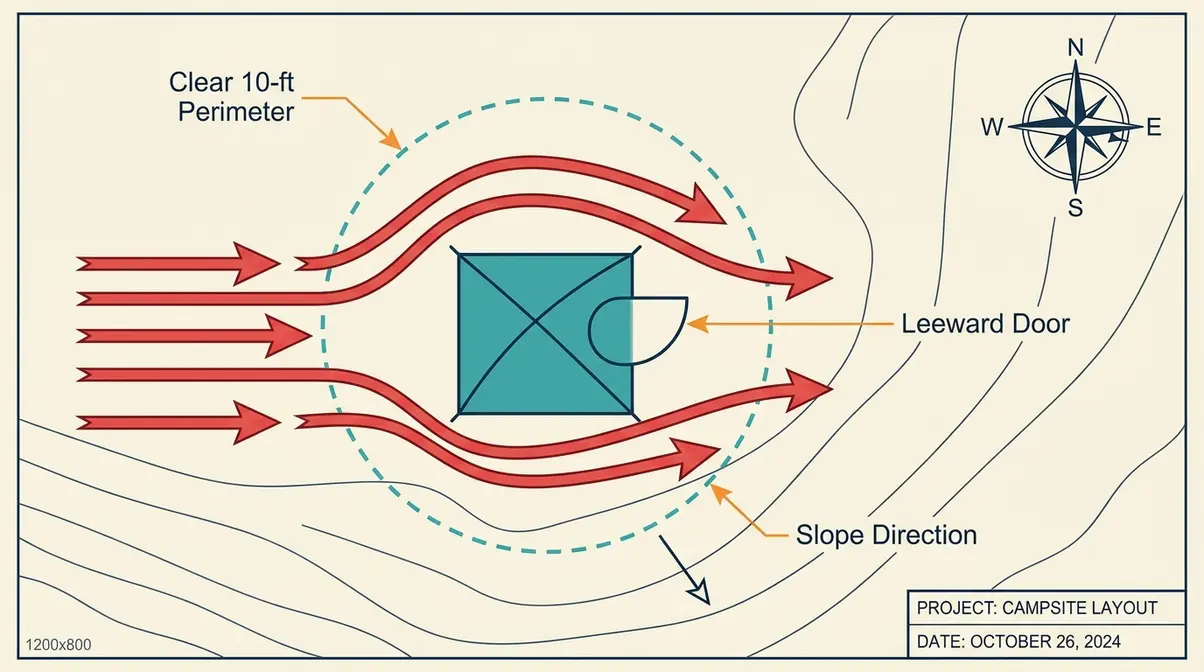
Keep a 10-foot clear perimeter around the tent. This perimeter keeps food, cooking smells, and trash away from your sleeping area — a critical step for wildlife safety that we’ll cover in detail in Step 5.
- Sleep Zone Quick Checklist:
- Flat, clear ground with slight natural grade
- Door faces away from prevailing wind (leeward side)
- At least 10 feet from fire ring
- No overhead dead branches
- Ground tarp or footprint placed first
Step 3: Safe Kitchen Zone Setup
The Kitchen Zone is where most campsite safety problems begin. Outdoor educators and experienced campers recommend positioning the kitchen downwind of the sleeping zone — so cooking smells travel away from your tent, not toward it. This single placement decision dramatically reduces wildlife visits overnight.
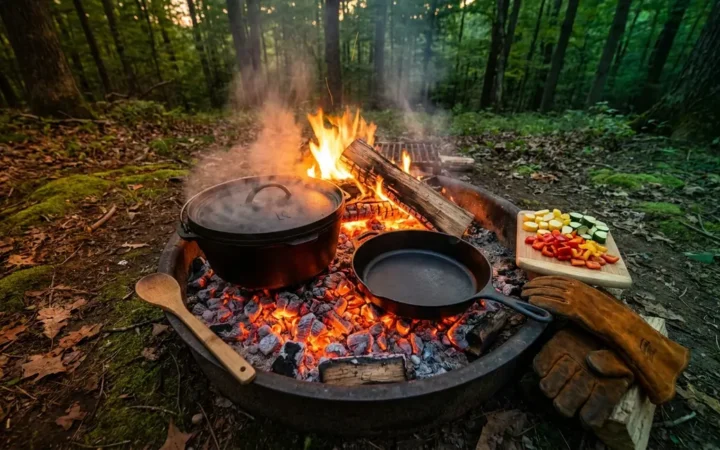
Use the picnic table as your kitchen anchor if one is available. If not, use a folding camp table or a flat-top storage bin (a budget-friendly multi-use hack). Organize gear by rooms: keep all cooking equipment, food, and food-related trash in the Kitchen Zone and nowhere else. This “gear by rooms” discipline is the fastest way to keep a campsite tidy.
- Your Kitchen Zone should include:
- Stove and fuel — on a stable, flat surface, away from flammable materials
- Food storage — in a hard-sided cooler or bear canister, not left on the table overnight
- Trash containment — a dedicated bag hung from a tree branch or stored in the car after cooking
- Water source — a jug for cooking and a separate container for dishwashing
Why this matters: Food smells are the primary driver of wildlife encounters at campsites. Keeping all food, wrappers, and cookware in one defined zone — and packing it away before sleep — is the single most effective wildlife deterrent available to campers.
Step 4: The Gathering Zone
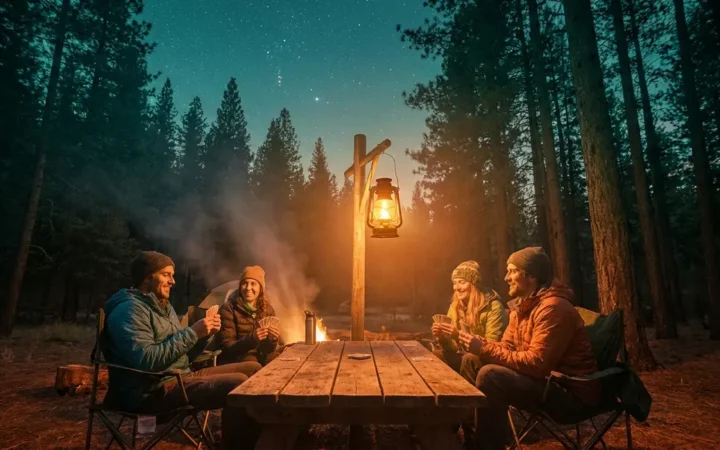
The Gathering Zone is the heart of your campsite — the social area centered around the fire ring or campfire area. This is where Comfy Camp Chairs go, where stories get told, and where the s’mores happen. Proper placement makes it both enjoyable and safe.
Position the Gathering Zone between the Sleep Zone and the edge of your site, never between the tent and the Kitchen Zone. The fire ring (if provided) is usually your fixed anchor point — build the Gathering Zone around it. Arrange camp chairs in a horseshoe or circle facing the fire, leaving a clear exit path on at least one side.
- Campfire safety basics for your Gathering Zone:
- Keep the fire ring at least 15 feet from your tent
- Clear a 10-foot radius around the fire of dry leaves, grass, and gear
- Never position the fire upwind of your tent — smoke and embers travel with the wind
- Keep a water bucket or dirt nearby for quick extinguishment
A Propane Firepit is an excellent alternative to a wood fire — it produces no embers, generates less smoke, and is permitted in many campgrounds where open fires are restricted. If you’re camping in a fire-restricted area, a propane option keeps the Gathering Zone functional without the risk.
Step 5: The Bearmuda Triangle
This step is the most important safety principle in campsite layout design — and the one most beginners have never heard of.
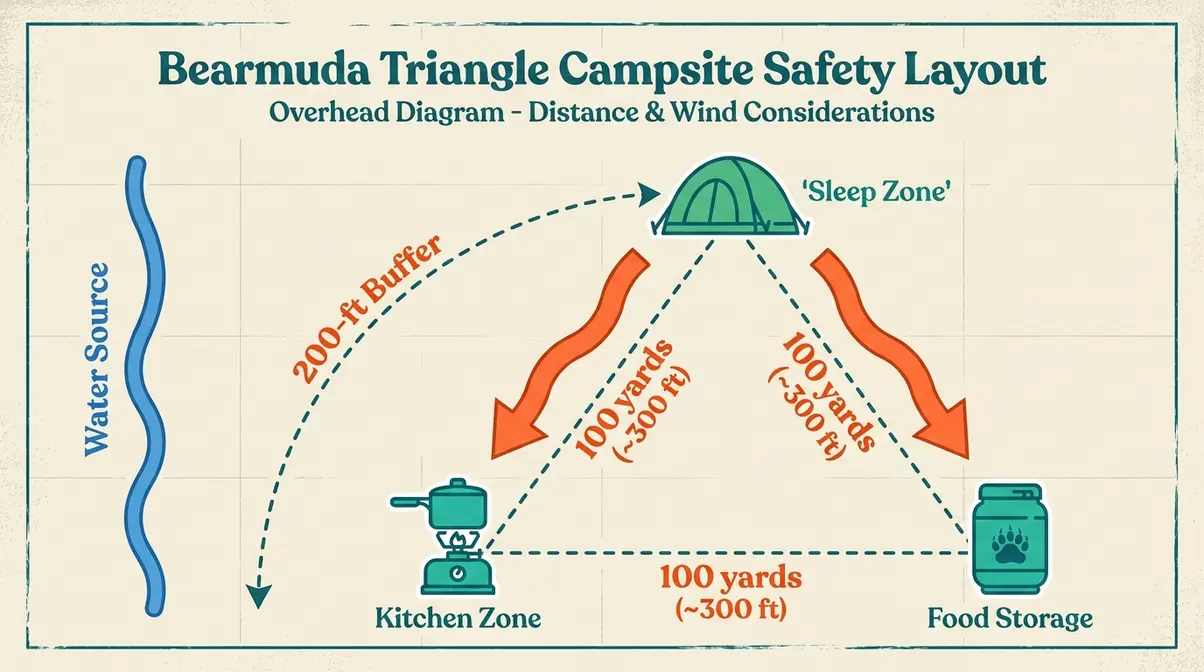
The Bearmuda Triangle is the safety triangle formed by your tent, your kitchen area, and your food storage location, each spaced as far apart as terrain allows — ideally at least 100 yards (roughly the length of a football field) between each point in bear country. The term is used widely in backcountry education to describe this triangular arrangement that keeps food smells away from where you sleep. Your tent should be upwind from the kitchen and food storage, so odors blow away from your sleeping area rather than toward it.
The 200-foot rule comes directly from Leave No Trace guidelines — the gold standard for responsible outdoor ethics set by the Leave No Trace Center for Outdoor Ethics, the nonprofit organization that defines best practices for minimizing human impact on natural spaces. The rule states: camp, wash dishes, and dispose of human waste at least 200 feet (70 to 80 adult steps) from water sources, trails, and your camp.
“Camp at least 200 feet (70 to 80 adult steps) from water — this is a good rule of thumb for protecting riparian areas and reducing wildlife attraction near your sleeping zone.” (Leave No Trace Center for Outdoor Ethics)
Why does the 200-foot rule matter for your layout? Because water sources attract wildlife. Camping or cooking too close to a stream or lake increases your chances of a wildlife encounter — and keeps your camp in a fragile riparian (riverbank or lakeshore) ecosystem that gets damaged by repeated human use.
The 200-foot rule at a glance:
| Activity | Minimum Distance from Water/Camp |
|---|---|
| Camping / tent placement | 200 feet (70–80 adult steps) |
| Cooking and food storage | 200 feet from tent in bear country |
| Dishwashing / gray water | 200 feet from water source |
| Human waste (catholes) | 200 feet from water, trails, camp |
Always verify specific regulations for your park or forest — some areas use a 100-foot minimum, while others enforce stricter distances. The National Park Service and U.S. Forest Service both adopt the 200-foot LNT guideline as a practical standard.
These layout principles are drawn from NPS guidelines, Leave No Trace standards, and the collective wisdom of camping communities. Following them isn’t just about ethics — it’s about keeping yourself, your group, and wildlife safe.
15 Campsite Layout Ideas by Style
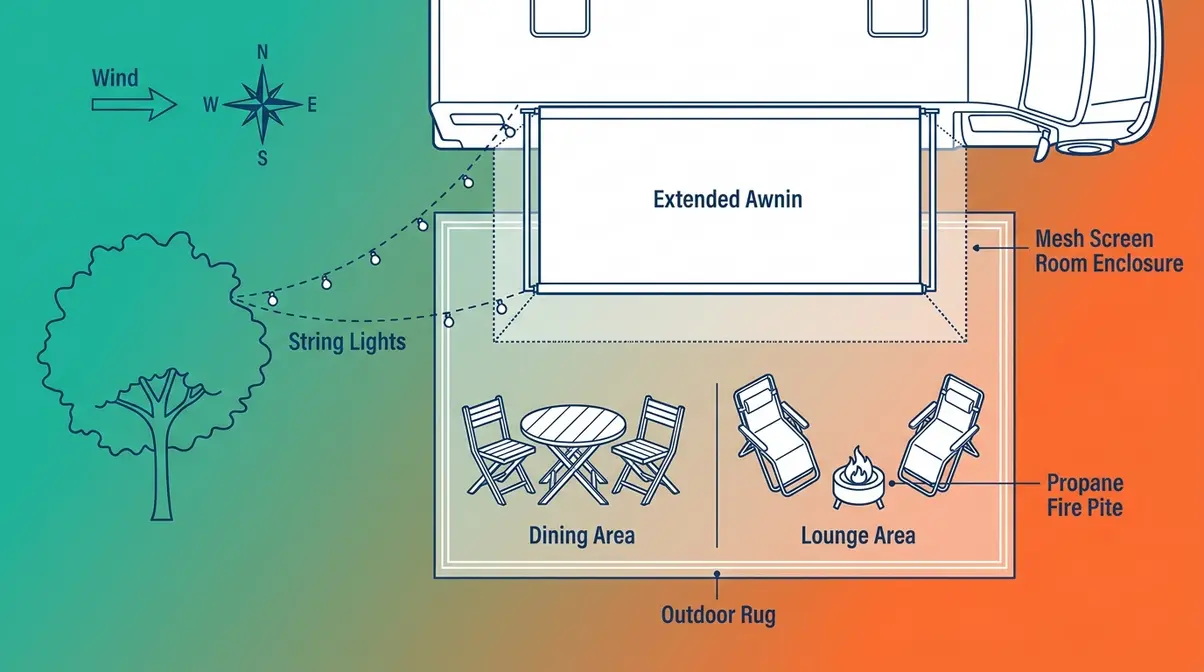
Applying the 3-Zone Blueprint Method looks different depending on your setup. Whether you’re pitching a solo tent or rolling in with a full RV rig, the same three zones apply — Sleep, Cook, and Gather — but the spatial arrangement and gear choices shift significantly. Here are campsite design ideas organized by the three most common camping styles, giving you a concrete starting point for your next trip.
Tent Camping Layout Ideas
Tent camping layout ideas work best when you treat the tent as your fixed anchor and build outward. The tent goes down first, always. Everything else — kitchen, chairs, cooler — arranges around it. Pairing this layout with the best tent for car camping maximizes your interior space.
Ideas 1–5: The Five Core Tent Campsite Layouts
1. The Classic Triangle Layout — Tent at one corner, camp kitchen at a second corner (downwind), fire ring at the third. This is the purest expression of the 3-Zone Blueprint Method. Works on any standard campsite pad. Leave 15 feet between the fire ring and tent.
2. The Linear Layout (for narrow sites) — When your site is long and thin, arrange zones in a line: tent at the back, Gathering Zone in the middle, Kitchen Zone closest to the parking area. This keeps food smells near the car (easy to lock away) and maximizes the private back area for sleeping.
3. The Micro-Site Budget Layout — For cramped sites with minimal space, multi-use gear becomes essential. A large storage bin serves as both food locker and prep table. A compact pop-up canopy covers the Kitchen Zone. Camp chairs fold and hang on the tent vestibule when not in use. Every item does double duty.
4. The Family Cluster Layout — Multiple tents arranged in a semicircle facing a central Gathering Zone. The Kitchen Zone sits off to one side, downwind of all tents. This keeps kids in sight of the fire while keeping the kitchen safely separated.
5. The Solo Stealth Layout — For solo campers on backcountry sites, minimize your footprint. Tent on existing durable surface, ultralight stove at least 70 steps downwind, food hung in a bear bag or stored in a canister at the third point of your personal Bearmuda Triangle.
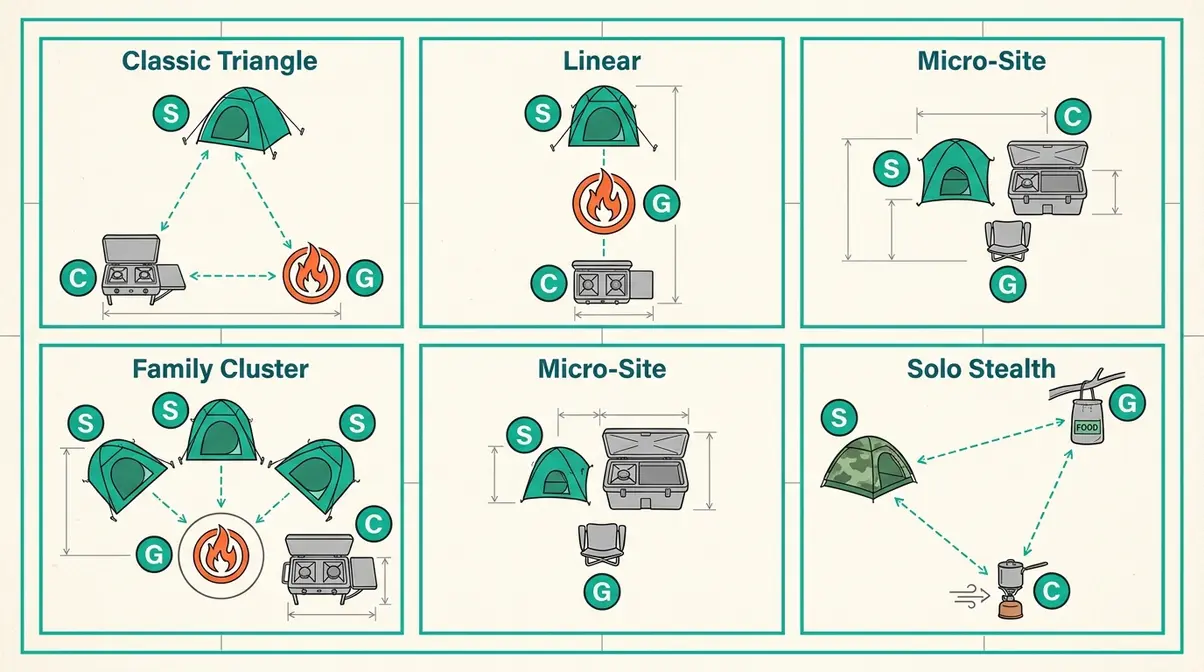
Camping communities consistently report that the Classic Triangle layout is the most intuitive for first-timers. Start there, then adapt as you get comfortable with the framework.
RV Patio and Campsite Setup Ideas
The RV patio is your outdoor living room — and it’s one of the most satisfying spaces to design. According to Lippert’s RV campsite setup guide, the most effective RV patio setups start with a foundation layer and build upward from there.
Ideas 6–10: Five RV Patio Campsite Layout Ideas
6. The Foundation Layer: Outdoor Rug + Awning — Lay a large, breathable outdoor rug directly beneath your RV awning. The rug defines the patio boundary, keeps mud and grit out of the RV, and gives your Comfy Camp Chairs a stable base. Choose a quick-dry, mold-resistant material — it handles rain and damp ground without becoming a soggy mess by day two.
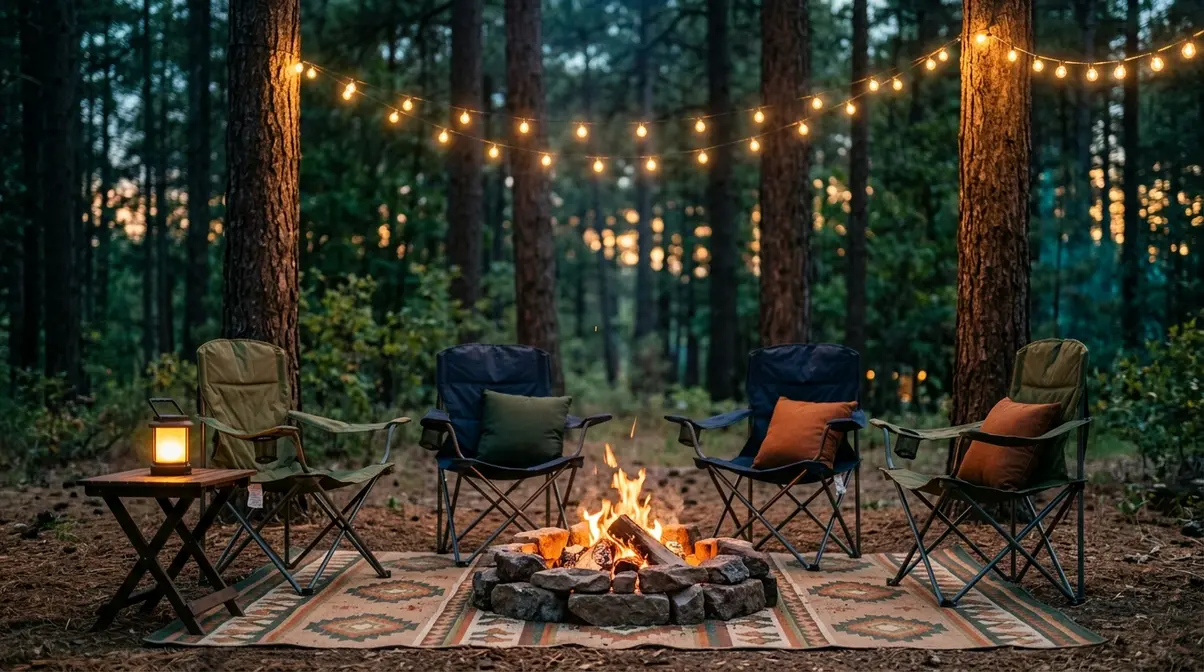
7. The String Light Canopy — Hang warm-white LED string lights along your awning and drape them to nearby poles or trees. String lights transform a basic parking-lot feel into a genuinely cozy outdoor space after dark. Solar-powered options work well if your site lacks a power hookup.
8. The Zoned RV Patio — Divide the patio into two mini-zones: a dining area (folding table + chairs near the RV door) and a lounge area (camp chairs + small side table near the fire ring or fire pit). An outdoor rug in each area visually anchors the zones.
9. The Screen Room Setup — A Screen Room (a mesh enclosure that attaches to your RV awning) adds bug-free outdoor living space. Furnish it with weather-resistant throw pillows, a small rug, and a camp lantern. This is a popular setup for humid climates where insects make open-air sitting difficult.
10. The Budget Micro-Site RV Layout — No hookups, small pad? Maximize a compact RV site with a compact folding table, two camp chairs, a single string of solar lights, and a 6×8-foot outdoor mat. Skip the large awning room and focus on one well-defined zone rather than sprawling across the site.
Permanent and Seasonal Campsite Ideas
Permanent campsite ideas serve a different need — you’re not optimizing for quick setup and teardown. You’re building a space that feels genuinely like a second home over a season or years. The 3-Zone Blueprint Method still applies, but now you invest in semi-permanent infrastructure for each zone. If you plan to stay long-term, investing in the best tent for full-time living ensures durability against the elements.
Ideas 11–15: Five Permanent and Seasonal Campsite Layout Ideas
11. The Defined Floor Plan — Use outdoor pavers, gravel, or interlocking deck tiles to create a defined “floor” in each zone. The Kitchen Zone gets a flat paver surface for stable cooking. The Gathering Zone gets a gravel or stone surround around the fire ring. Flooring prevents mud, defines boundaries, and dramatically improves the feel of the space.
12. The Semi-Permanent Shade Structure — A pop-up canopy or shade sail over the Gathering Zone extends usable hours on hot days and keeps the space functional in light rain. Anchor it properly with weighted bases or ground stakes — wind can turn an unsecured canopy into a hazard quickly.
13. The Raised Kitchen Station — A dedicated outdoor kitchen cart or wooden prep station (built or purchased) keeps the Kitchen Zone organized across multiple trips. Add hooks for utensils, a small shelf for spices, and a weatherproof storage bin underneath for pots and pans.
14. The Established Sleeping Platform — For truly permanent sites, a low wooden platform under the tent keeps you off damp ground, improves drainage, and extends tent life significantly. Even a basic 8×10-foot platform changes the sleep quality dramatically.
15. The Seasonal Gathering Room — Combine a shade sail, outdoor rug, string lights, and weather-resistant furniture into a defined outdoor “room” that stays in place for the season. Add potted herbs or small planters to make the space feel lived-in and personal.
Permanent campsite ideas reward the investment of time and planning. Our team evaluated multiple seasonal campsite configurations and found that defined flooring — even simple gravel — makes the single biggest difference in how organized and comfortable a permanent site feels.
Campsite Decoration & Ambiance Ideas
A functional campsite is great. A functional campsite that feels warm, personal, and inviting is even better. Once your three zones are in place, decoration and ambiance upgrades make the space genuinely enjoyable rather than just survivable. These ideas work for tent campers and RV campers alike — most require no permanent installation and pack down small.
Campsite Lighting Ideas
Lighting transforms a campsite more dramatically than any other single upgrade. The right lighting setup makes the Gathering Zone feel like an outdoor living room, improves safety around trip hazards after dark, and extends usable evening hours significantly. To brighten up your sleep zone, explore the best camping lights for tents.
Three lighting layers work together:
- Ambient lighting — String lights hung along your awning or between trees create warm overall illumination. LED string lights draw minimal power and last all night on a battery pack or solar panel.
- Task lighting — A bright lantern on the Kitchen Zone table is essential for safe food prep after dark. A headlamp per person is non-negotiable — camping communities consistently rank forgotten headlamps as one of the top campsite frustrations.
- Safety lighting — Solar stake lights along pathways to the bathroom or car prevent trips and falls. A motion-sensing light near the RV door or tent vestibule adds security.
Solar lanterns have improved significantly and now provide reliable ambient light without any battery management. They charge during the day and run automatically at dusk — a genuinely hands-off lighting solution for multi-night trips.
Comfortable Seating & Rugs
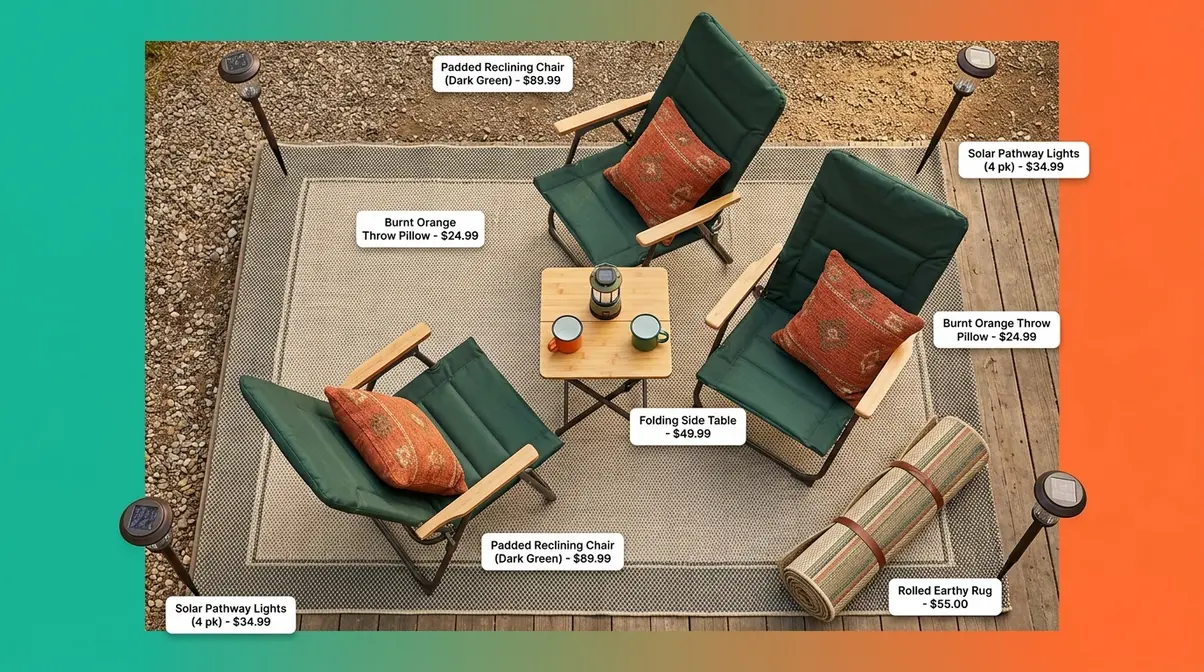
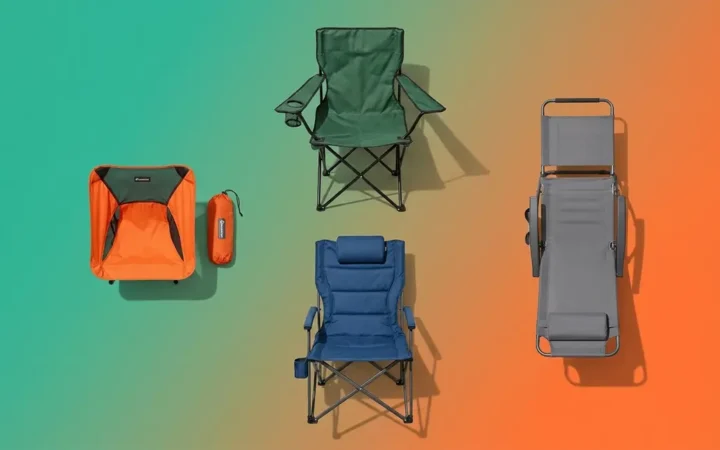
Comfy Camp Chairs are the single most impactful comfort upgrade for any campsite. Camping communities consistently report that upgrading from basic folding chairs to padded, reclining camp chairs changes the entire feel of the Gathering Zone — you stay outside longer, which is the whole point. For more ideas, check out our guide on how to improve camp comfort.
An outdoor rug under your seating area does three things at once: it defines the zone visually, keeps dirt and grass from tracking into your sleeping or cooking areas, and provides a softer surface underfoot. Choose a flat-weave, quick-dry material that rolls up compactly for transport.
Budget-friendly comfort upgrades:
| Upgrade | Approximate Cost | Impact |
|---|---|---|
| Outdoor rug (6×8 ft) | $25–$50 | Zone definition, cleanliness |
| Padded camp chairs (pair) | $60–$120 | Comfort, time spent outdoors |
| Weather-resistant throw pillows | $15–$30 | Warmth, personal feel |
| Folding side table | $20–$40 | Convenience, drink/snack access |
| Solar stake pathway lights | $15–$25 | Safety, ambiance |
Weather-resistant throw pillows add color and warmth to the Gathering Zone without requiring careful storage — leave them on the chairs during the day and toss them in the tent or RV at night.
Themed Campsite Decoration Ideas
A themed setup takes “jazz up your site” from idea to reality. You don’t need a lot of gear or money to create a cohesive look — you need a consistent color palette and two or three signature items.
Popular themed campsite setups that work well:
The Cozy Cabin Feel — Neutral tones (brown, cream, dark green), a plaid outdoor blanket draped over a chair, a lantern-style LED light, and a small welcome mat at the tent door. The effect is warm and intentional without feeling over-decorated.
The Glamping Setup — A rug, string lights, throw pillows, a small side table with a vase of wildflowers, and matching camp tableware. This approach works especially well for RV patios where you have a defined flat surface to work with.
The Family Fun Camp — Bright colors, a banner or bunting strung between trees, a dedicated kids’ activity table, and a small chalkboard sign with the campsite name or family motto. Kids love personalizing the space.
The Budget Micro-Site Makeover — Even the smallest, most basic campsite gets a significant upgrade from: one string of solar lights, a single outdoor rug, two good camp chairs, and a small lantern on the picnic table. Total investment: under $80. Total impact: substantial.
Common Campsite Setup Mistakes
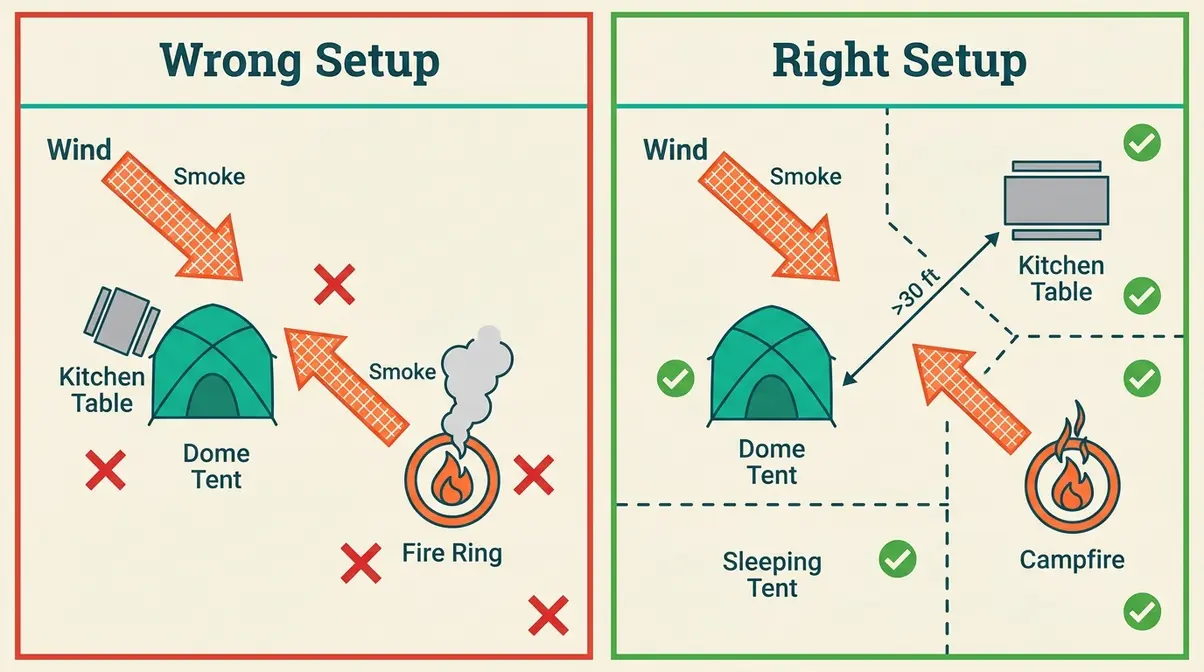
Even experienced campers make predictable setup errors. Our team evaluated layouts across multiple campsite configurations and found the same five mistakes appearing consistently — all of them fixable with the 3-Zone Blueprint Method applied before unpacking. Following these tent camping safety tips prevents most common accidents.
5 Common Campsite Layout Mistakes
Mistake 1: Placing the Kitchen Too Close to the Tent
This is the most common and most dangerous layout error. Food smells attract wildlife — rodents, raccoons, and in some regions, bears. The minimum recommended separation is 200 feet in bear country (per Leave No Trace guidelines) and at least 30–50 feet in standard campgrounds. If your site is too small for 200 feet, maximize the distance available and store all food in a hard-sided container in your car overnight.
Mistake 2: Setting Up Upwind of the Fire
Wind carries smoke and embers. A tent positioned upwind of the fire ring means smoke blows directly at your sleeping area all evening — and embers can reach your tent material. Always position the tent so the fire is downwind or crosswind from your sleeping zone.
Mistake 3: Ignoring Drainage Before Setup
Flat-looking ground often holds water. A slight depression that looks fine in dry conditions becomes a puddle — or a lake — during any overnight rain. Look for a subtle slope and set up on the high side.
Mistake 4: Leaving Food Out Overnight
Camping communities consistently report that food left on picnic tables overnight is the leading cause of wildlife encounters at established campgrounds. All food, cookware, and scented items (including toothpaste and sunscreen) should be stored in a vehicle, bear canister, or bear box before sleep.
Mistake 5: Skipping the 60-Second Site Scan
Most setup problems are visible before you unpack — but only if you look. Dead branches overhead, low spots in the ground, ant hills under leaf litter, fire ring ash that’s still warm. A 60-second walk of your site before unpacking prevents hours of frustration.
Most Forgotten Camping Item?
A camp stove or fuel canister is consistently cited as the most forgotten camping item, followed closely by a lighter or waterproof matches — because campers assume one of these is already in the gear bin. Other frequently forgotten items include tent stakes (which roll out of tent bags), headlamps, a can opener, toilet paper, and bug spray. Camping checklists from REI’s expert advice team recommend organizing your checklist by category — shelter, kitchen, clothing, hygiene — and doing a final bin-by-bin check before leaving home rather than relying on memory.
When to Rethink Your Setup
Sometimes the right move is to change your layout mid-trip — or even request a different site. Knowing when to adapt is as important as knowing how to set up in the first place.
- Rethink your setup if:
- Wind shifts overnight and now blows smoke directly at your tent — reposition your chairs or request a different fire ring orientation from camp staff
- You discover standing water under your tent after rain — move to higher ground immediately, even if it means a middle-of-the-night relocation
- Wildlife activity (tracks, scat, or direct sightings near your kitchen area) suggests your food storage isn’t adequate — consolidate everything into your vehicle and notify camp staff
- Your Kitchen Zone is producing heat or smoke that’s reaching your sleeping area — this is both a comfort issue and a safety signal worth correcting
The 3-Zone Blueprint Method gives you a framework, but campsite conditions change. Flexibility within the framework is what separates experienced campers from frustrated ones.
Campsite Layout & Rules FAQs
What is the 4-4-4 rule for camping?
The 4-4-4 rule is an informal RV travel guideline suggesting you drive no more than 400 miles per day, arrive at your campsite by 4:00 p.m., and stay a minimum of 4 nights at each location. It’s a more aggressive pacing variation on the better-known 3-3-3 rule, suited to experienced RV travelers who are comfortable with longer driving days. Like the 3-3-3 rule, it’s a community guideline rather than a formal regulation — campgrounds don’t enforce it, but following it reduces driver fatigue and improves the overall trip experience (Cruise America, 2026).
What is the 200-foot rule for camping?
The 200-foot rule is a Leave No Trace guideline requiring campers to set up tents, cook, wash dishes, and bury human waste at least 200 feet — roughly 70 to 80 adult steps — from water sources, trails, and established camp areas. The Leave No Trace Center for Outdoor Ethics defines this as a practical rule of thumb for protecting riparian ecosystems and reducing wildlife attraction near sleeping areas. Specific parks may use 100-foot minimums; always verify current regulations for your area before arrival.
What does FF mean in camping?
FF in camping generally stands for “Full Facilities” or “Full Hookups” — meaning a campsite that provides water, electricity, and sewer connections at the site. It appears in campground reservation systems and site maps to indicate the highest level of site amenity, typically available for RV campers. However, FF is not a universally standardized abbreviation, and individual campgrounds may use it differently. Always check the specific park’s site map legend or booking notes to confirm what FF means at that location before reserving.
What is the 3-3-3 rule for camping?
The 3-3-3 rule is an informal RV travel guideline: drive no more than 300 miles per day, arrive at your campsite by 3:00 p.m., and stay a minimum of 3 nights at each location. According to Camp Landa, the 3:00 p.m. arrival rule is particularly valuable because it gives you daylight to set up camp, locate amenities, and troubleshoot any issues before dark. The 3-night minimum encourages slower, more intentional travel rather than rushing through destinations.
What is the 2-2-2 rule for camping?
The 2-2-2 rule is a slower-paced variation on the 3-3-3 rule: drive no more than 200 miles per day, arrive at your campsite by 2:00 p.m., and stay a minimum of 2 nights at each stop (Camp Landa, 2026). It’s particularly recommended for first-time RV travelers, families with children, or anyone who wants maximum time to explore each destination. The earlier 2:00 p.m. arrival gives extra time to set up and settle in — reducing the stress of fumbling with unfamiliar gear in fading light.
What is the 10-year rule for camping?
The 10-year rule is a private campground policy — not a universal regulation — used by some RV resorts and higher-end campgrounds to maintain appearance standards. Under this policy, RVs older than 10 years may be refused or must receive management approval (usually by submitting photos showing the rig is in good condition) before a reservation is confirmed. Always double-check your first-time camper checklist to ensure compliance with local regulations. The rule is discretionary and varies widely by park. Many public campgrounds and state parks do not enforce it at all. If you’re planning to book a private RV resort with an older rig, check the park’s specific policy during the reservation process.
Can you camp anywhere in a national forest?
In most national forests, you can camp anywhere outside of designated recreation areas, a practice known as dispersed camping. However, you must follow the 200-foot rule, keeping your site away from water sources and roads. Always check local ranger district guidelines before setting up camp.
What is the best direction for a tent to face?
The best direction for a tent to face is east or southeast, allowing the morning sun to naturally warm the interior and dry overnight condensation. Additionally, ensure the door faces away from the prevailing wind to prevent cold drafts and maintain structural stability during gusts.
Your Campsite, Your Blueprint
Every campsite — cramped or sprawling, tent or RV, budget micro-site or seasonal retreat — becomes more organized, safer, and more enjoyable when you apply the same simple framework before you unpack. The 3-Zone Blueprint Method (Sleep, Cook, and Gather) gives you a reusable mental model you can apply on every trip. Pair it with the 200-foot rule and the Bearmuda Triangle layout for wildlife safety, and you’ve covered both comfort and security in one step.
The 3-Zone Blueprint Method isn’t about having the perfect gear or the most elaborate setup. It’s about sequencing — planning your zones before touching a single bag, so every item has a home and every zone has a purpose. That one habit transforms a chaotic pile of gear into a functional, welcoming campsite that actually feels like a place to relax.
Your next step: before your next trip, sketch a rough three-zone layout for your specific site on a piece of paper or phone notes. Identify where your tent goes, where the kitchen lands, and where the fire ring and chairs will sit. Then pack your gear in those three groups. Arrive, walk your site for 60 seconds, then set up zone by zone. Most campers who try this approach report it cuts their setup time in half — and eliminates the mid-trip reorganization that used to eat into their first evening.

David King
Field gear tester at Tent Explorer.