How to Pack for Camping: Beginner’s Complete Guide
 David King
Updated June 16, 2026
20 min read
David King
Updated June 16, 2026
20 min read
Most first-time campers pack for two weeks and use about half of it — then realize they forgot the can opener. Across camping communities, the consistent feedback is that forgetting small items is the #1 stress trigger for new campers, not the big gear.
“I’ve learned a few things after packing/taking our first RV trip. 1: I didn’t use half the things I thought I would. 2: The fridge held WAY more food than I estimated.” — Experienced camper, r/camping
Show up without a sleeping pad and you’re sleeping on cold, hard ground all night. Show up without a headlamp and you’re stumbling to the bathroom in the dark. In this guide, you’ll learn exactly how to pack for camping using The Clear Bin System — a step-by-step approach that ensures you never forget the essentials again. We’ll cover every category from shelter to food to clothing, plus backpack and car packing techniques — all in beginner-friendly steps.
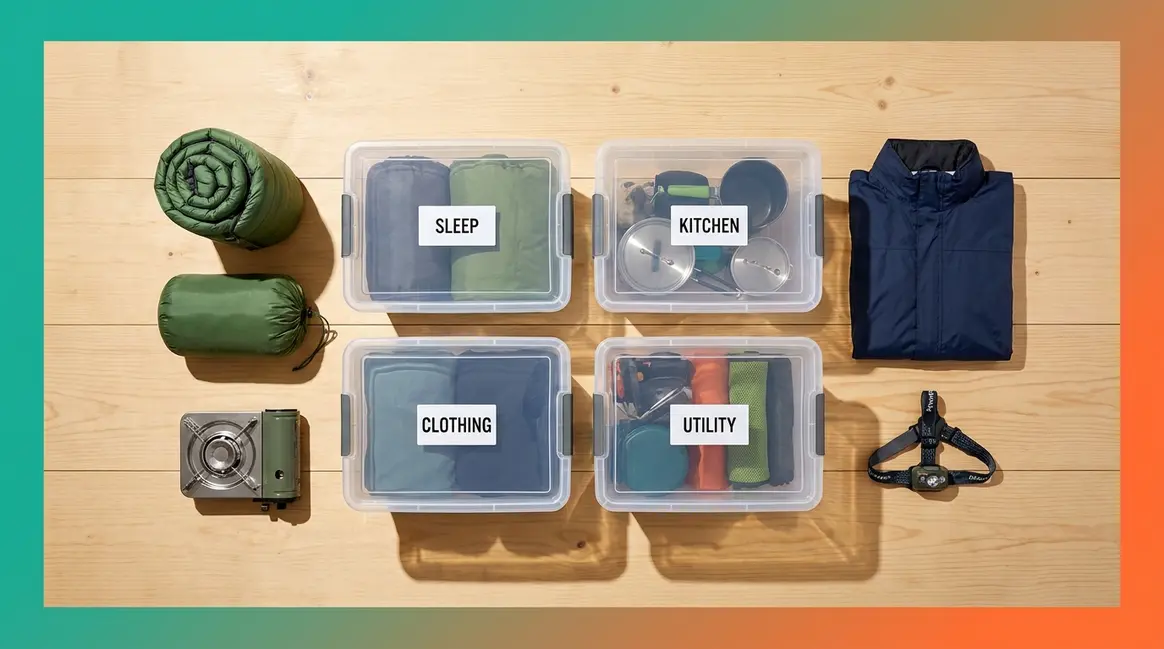
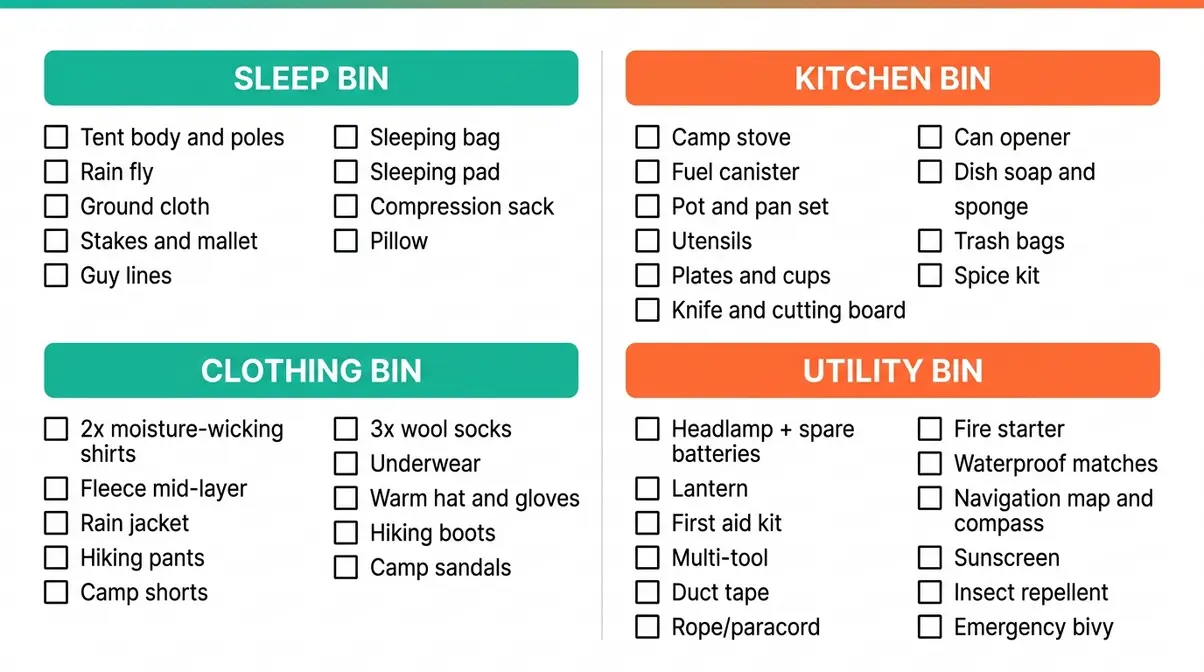
Learning how to pack for camping becomes simple when you organize gear into four clear bins: Sleep, Kitchen, Clothing, and Utility — a system that prevents forgotten items and speeds up campsite setup.
- The Clear Bin System organizes all camping gear into 4 labeled categories before you leave home
- The 10 Essentials (defined by the U.S. Forest Service) are non-negotiable for any trip
- Pack your cooler last and keep beverages separate from perishables for safe food temperatures
- Heaviest backpack items go closest to your spine — this prevents back pain on the trail
- Most forgotten items include a can opener, extra batteries, and a tent mallet
Before You Pack: Beginner Basics
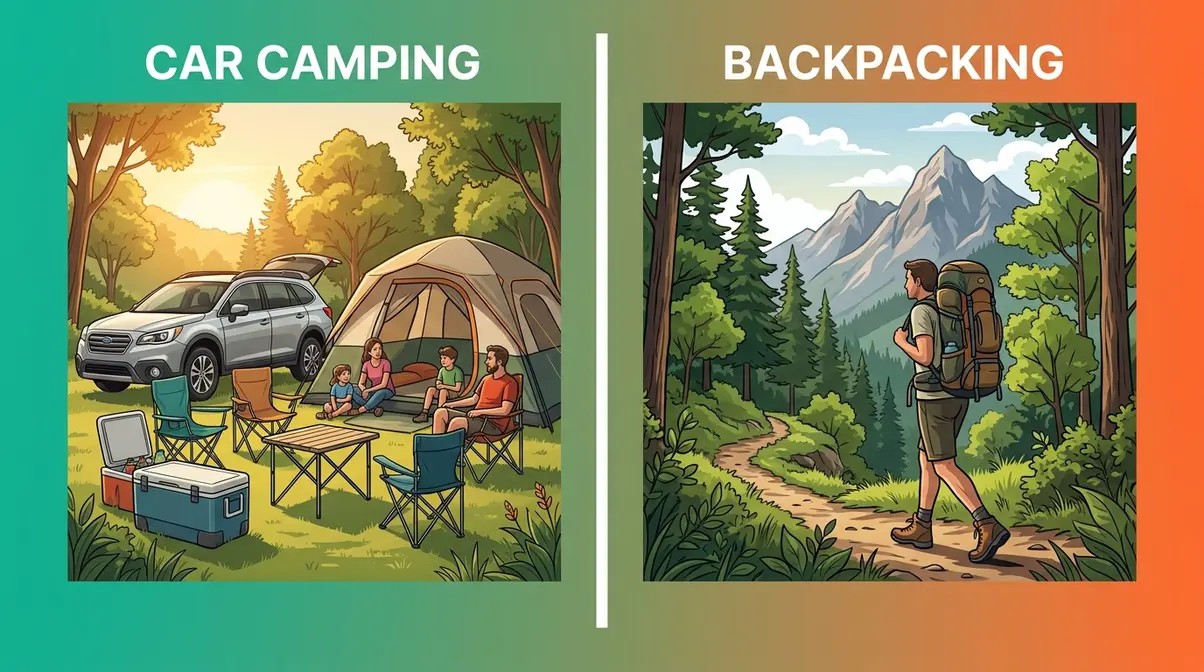
Knowing your camping type before you pack is the single most important decision — it determines every item on your list. Car camping means you drive directly to your campsite and can pack more gear — bins, coolers, and camp chairs are all fair game. Backpacking means you carry everything on your back for miles, so every ounce counts.
Trip length shapes how much you bring just as much as trip type does. A one-night trip needs only the basics: shelter, sleep system, food for two meals, and a day bag. A three-day weekend trip calls for a full kit — the complete Clear Bin System works perfectly here. A week-long trip requires planning for resupply, especially for food and fuel.
This guide focuses on car camping and backpacking, since those are the two most common starting points for beginners. If you’re heading out by kayak, canoe, or raft — or flying to a trailhead in winter — the same foundational principles apply, but those scenarios have unique constraints worth a dedicated look. Whichever type you’re doing, The Clear Bin System introduced in the next section works for both.
The Clear Bin System: Gear Organization
Knowing how to pack for camping starts with one insight that most guides skip entirely: organization before the car is loaded is what separates a smooth trip from a frantic one. Using a camping checklist for first-time campers alongside this system ensures nothing gets left behind.
What Is the Clear Bin System?
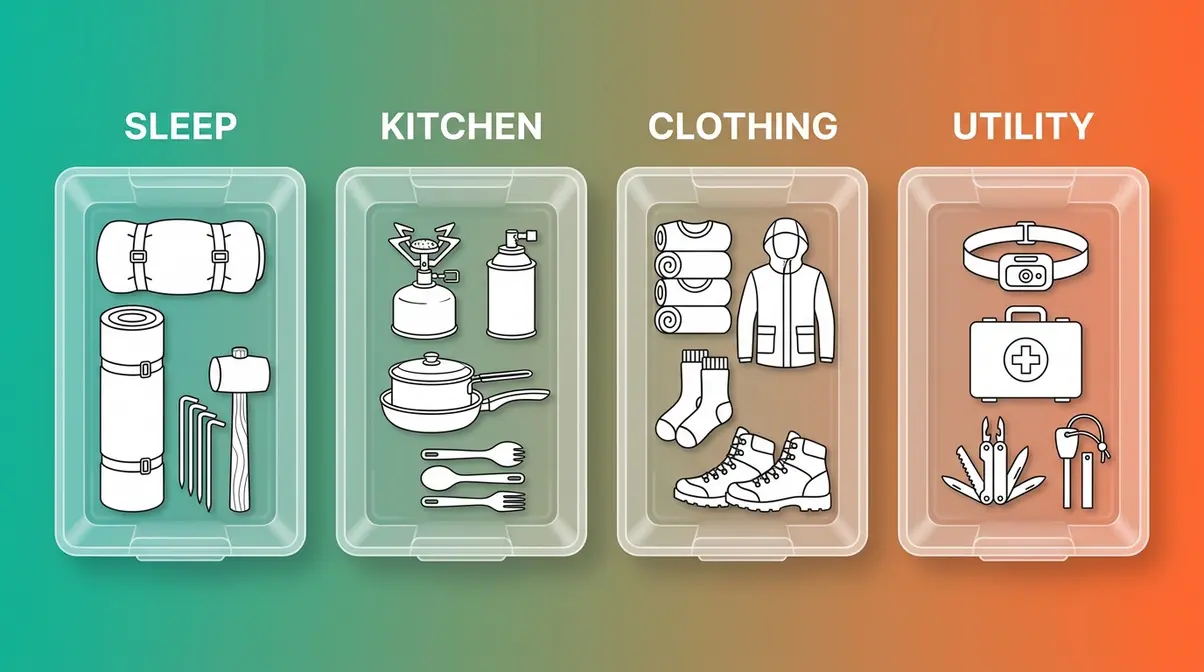
The Clear Bin System is a categorized, bin-by-bin packing method where every piece of gear lives in a clearly labeled, see-through plastic storage bin before it goes into your car or pack. Instead of dumping everything into one bag and hoping for the best, you sort gear into four core categories: Sleep, Kitchen, Clothing, and Utility.
The “clear” part matters. When you can see through the bin without opening it, you spend zero time digging at the campsite. You grab the Kitchen bin to cook, the Sleep bin to set up your tent, and the Utility bin when you need the headlamp. Common pain points reported by first-time campers include wasted time searching for items buried under other gear — the Clear Bin System eliminates that problem entirely.
How Many Bins Do You Need?
For a weekend trip, four bins cover everything. Here’s how to size them:
| Bin | Recommended Size | What Goes In |
|---|---|---|
| Sleep | 27-gallon | Sleeping bag, pad, pillow, tent stakes |
| Kitchen | 27-gallon | Stove, fuel, cookware, utensils, spices |
| Clothing | 18-gallon | Clothes, rain gear, footwear extras |
| Utility | 18-gallon | First aid, lighting, tools, fire starters |
For solo trips, you may combine Clothing and Utility into one bin. For families or trips longer than three days, add a fifth bin for kids’ gear or extra food. The goal is simple: one bin per category, never mix categories. This rule is what makes the system repeatable — you’ll pack faster on your second trip than your first.
- Estimated Time: 1-2 hours
- Tools and Materials Needed:
- 4 Clear Plastic Bins (27-gallon and 18-gallon sizes)
- Printed Packing Checklist
- Masking Tape and Sharpie (for labeling)
- Your Camping Gear
Step 1 — Shelter, Sleeping, and Campsite Gear
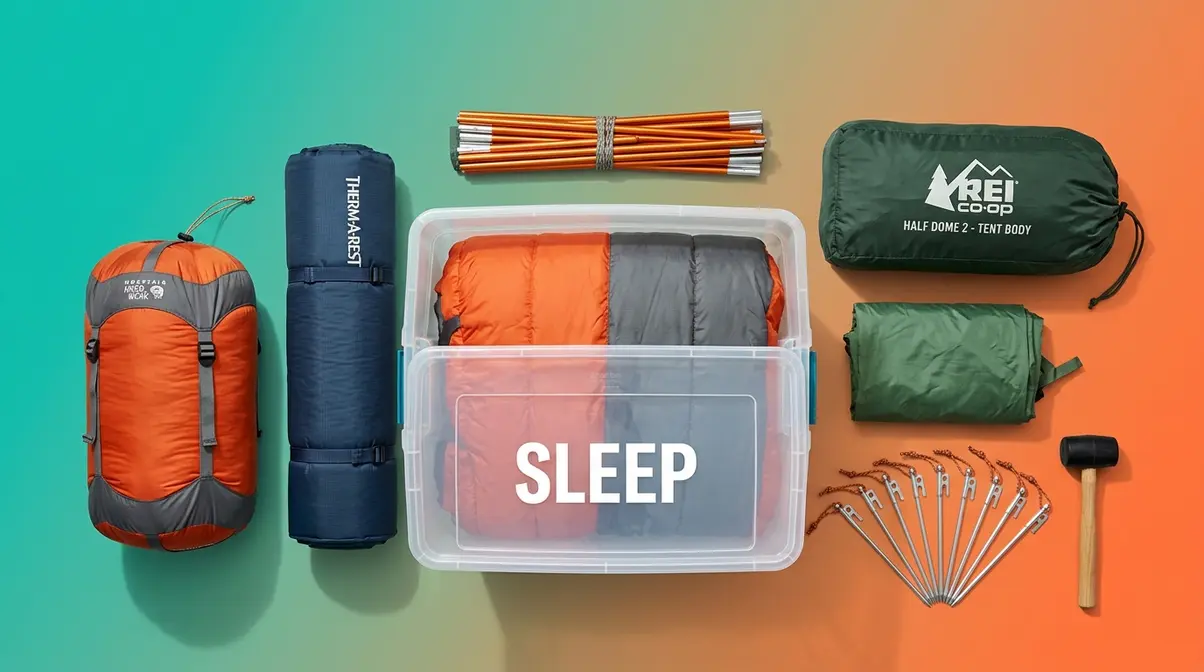
Your Sleep Bin is the most critical bin to pack correctly. Getting this wrong means a miserable night — and a very short camping career.
Tent and Shelter Essentials
Start with your tent. Before every trip, do a quick backyard setup to confirm all poles, stakes, and the rain fly (the waterproof outer layer that goes over the tent body) are accounted for. According to REI’s family camping checklist, a forgotten rain fly is one of the most common campsite disasters — especially on trips where afternoon thunderstorms are likely.
Your tent checklist:
- Tent body and poles
- Rain fly
- Ground cloth or footprint (a protective sheet under the tent floor)
- Tent stakes and a mallet
- Guy lines (extra cords that stake out the tent walls in wind)
Pack the tent in its stuff sack first, then place it at the bottom of the Sleep Bin. The mallet goes in last — you’ll need it immediately on arrival.
Sleep System: Sleeping Bag and Pad
Your sleep system has two parts that work together: the sleeping bag and the sleeping pad — the insulated mat you put under your sleeping bag. Many beginners skip the pad, not realizing that the ground pulls heat from your body faster than cold air does. User consensus across camping forums indicates that a cold, sleepless night is the most common reason people quit camping after one trip.
Check your sleeping bag’s temperature rating (the lowest temperature it’s designed to keep you warm). For summer camping, a 30°F–40°F bag is a safe starting point. For three-season use, go with a 15°F–20°F bag.
Pack your sleeping bag in a compression sack (a bag with straps that squeezes it down) to save space. Lay the sleeping pad flat across the top of the Sleep Bin or strap it to the outside.
What Does FF Mean in Camping?
FF stands for “fill power” (often seen as FP or FF) in down sleeping bags and jackets. It measures the loft quality of down insulation — how many cubic inches one ounce of down occupies. Higher fill power (700FF, 800FF, 900FF) means lighter weight for the same warmth. A 700FF sleeping bag is a solid choice for most beginners; 800FF and above are premium options worth the investment for serious backpackers.
Campsite Setup and Tools
A few small tools make campsite life dramatically easier:
- Headlamp (hands-free lighting — critical for setting up in the dark)
- Mallet (for driving stakes)
- Multi-tool or knife
- Rope or paracord (for hanging a tarp or clothesline)
- Duct tape (fixes almost everything)
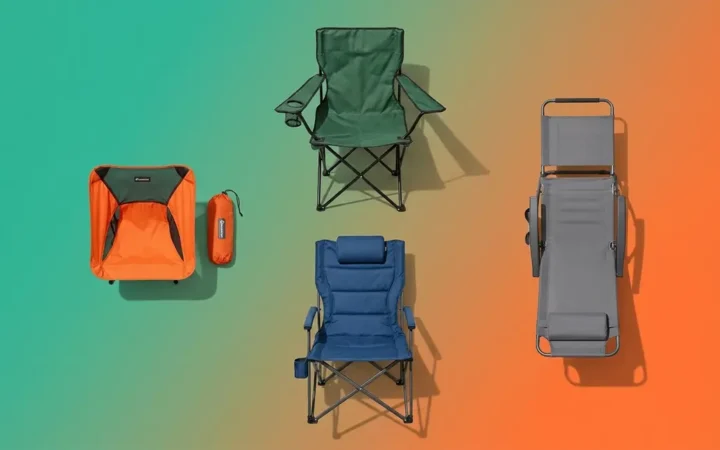
- Camp chairs and a small folding table (car campers only — leave these home if backpacking)
For overnight trips, this list is your minimum. For trips longer than three days, add a tarp shelter for shade and rain protection beyond your tent.
Step 2 — Camp Kitchen, Food, and Cooler Packing
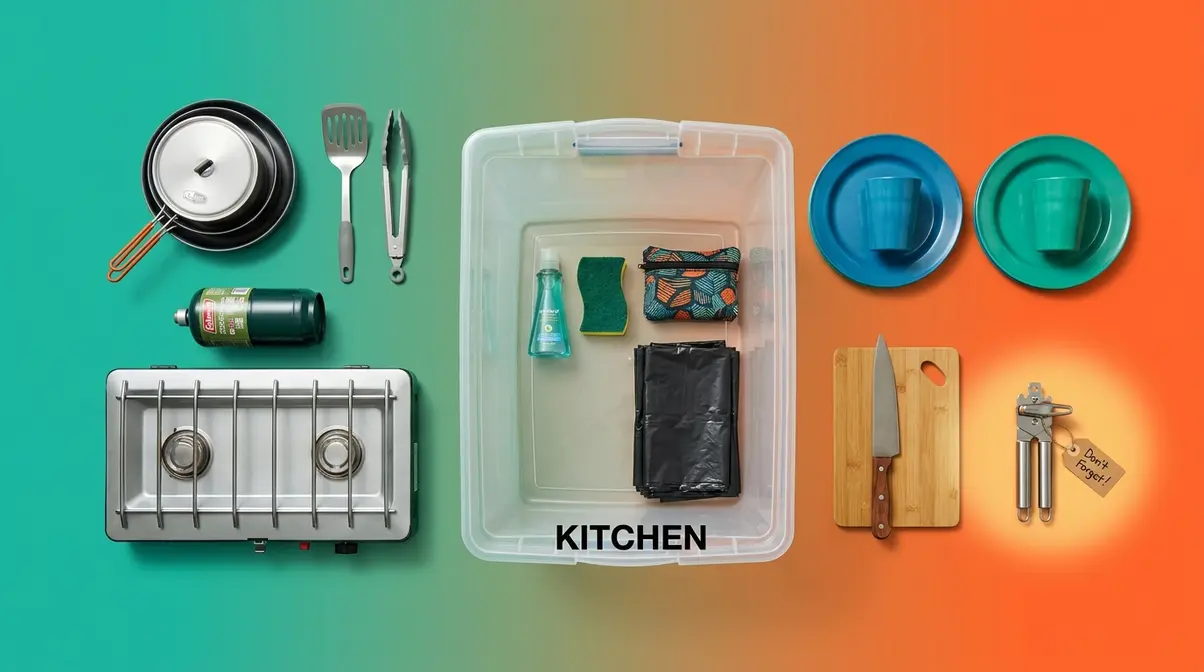
The Kitchen Bin is where most beginners overprepare on equipment and underprepare on organization. Here’s how to get it right.
Cooking Gear Checklist
You don’t need a full kitchen. For a weekend trip, this covers everything:
- Camp stove (a two-burner propane stove is easiest for beginners)
- Fuel canister (always bring one more than you think you need)
- Pot and pan set (lightweight nesting cookware saves space)
- Cooking utensils — spatula, spoon, tongs
- Plates, bowls, and cups — opt for reusable over disposable
- A sharp knife and cutting board
- Can opener (the single most forgotten item in camping, per camping community surveys)
- Dish soap, sponge, and a small basin for washing
- Trash bags — pack out everything you pack in; following Leave No Trace food repackaging advice helps minimize campsite waste.
- Spice kit in a small zippered bag — salt, pepper, oil, and your go-to seasonings
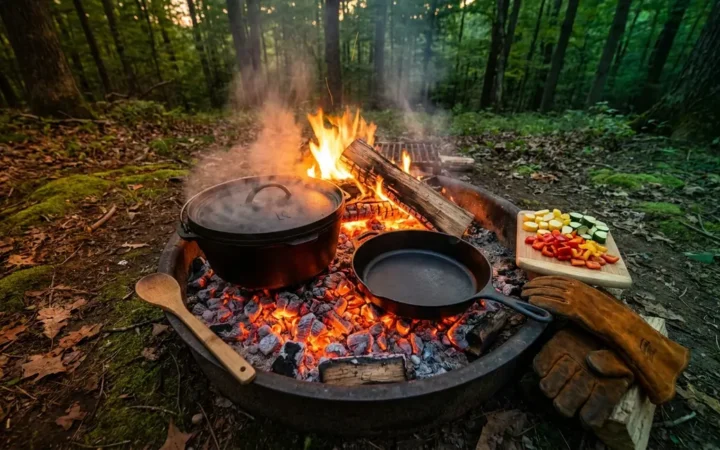
A common mistake beginners make is forgetting that camp stoves need a flat, stable surface. Bring a small cutting board to set the stove on if your picnic table is uneven. Pack all cooking gear into the Kitchen Bin together so you can pull the entire bin to the picnic table at once — this is the Clear Bin System working exactly as designed.
How to Pack Your Cooler for Camping
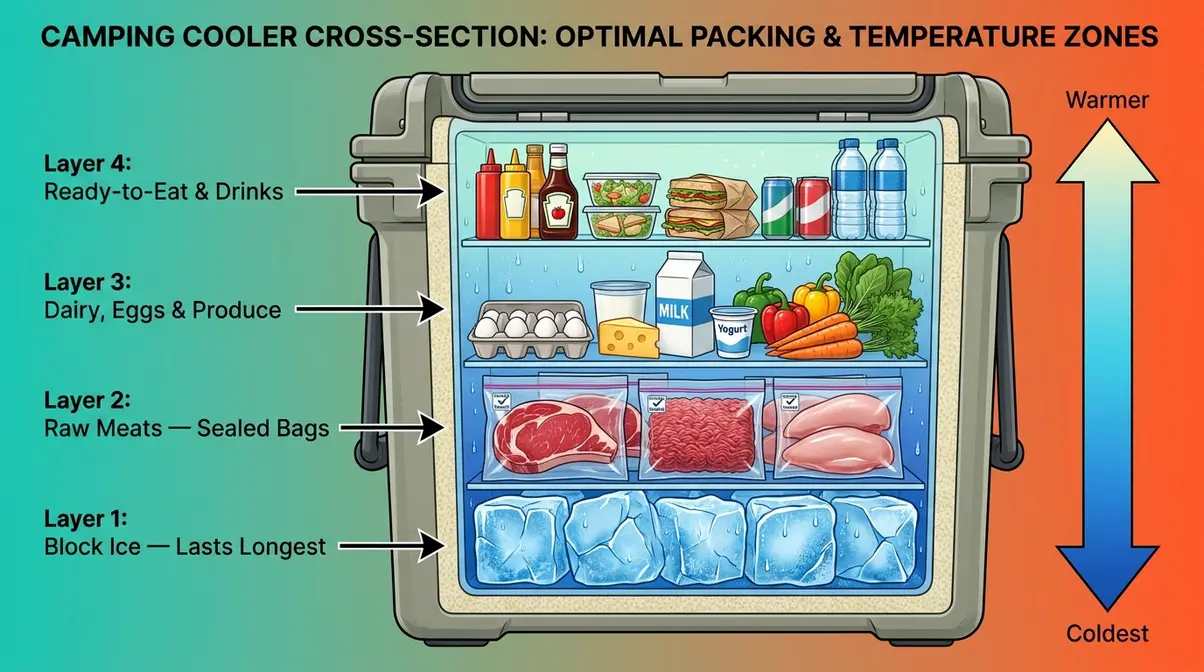
A well-packed cooler keeps food safe for 2–3 days without buying more ice. The Minnesota DNR’s camping guide recommends pre-chilling your cooler for at least 30 minutes before loading food — this dramatically improves ice retention.
Layer your cooler in this exact order (bottom to top):
- Bottom layer: Block ice or large ice chunks (lasts longer than cubed ice)
- Second layer: Raw meats in sealed, leak-proof bags or containers
- Third layer: Dairy, eggs (in a hard-sided egg carrier), and produce
- Top layer: Ready-to-eat foods, condiments, and drinks you’ll grab frequently
Pack beverages in a separate soft-sided cooler. Every time you open the main food cooler, you let warm air in. Keeping drinks separate means the food cooler stays cold far longer — the FDA outdoor food safety guidelines recommend keeping perishables below 40°F to prevent bacterial growth.
Packing Fragile Foods and Meat
Eggs are the item beginners are most anxious about packing — and for good reason. Here’s a reliable method:
- Option A: Crack eggs at home, pour into a leak-proof bottle or jar, and refrigerate. No shells to break, no mess.
- Option B: Use a hard-sided plastic egg carrier that holds 6–12 eggs securely.
For raw meat, double-bag everything in zip-lock bags and place in a sealed container. This prevents cross-contamination if a bag leaks. For produce like tomatoes and avocados, wrap individually in paper towels before placing in the cooler — this prevents bruising and absorbs excess moisture. Implementing a camping meal prep guide strategy at home will drastically reduce the amount of fragile food you need to pack in the first place.
Step 3 — Clothing and Personal Items
Clothing is where beginners consistently overpack. The rule most experienced campers follow: pack half of what you think you need, then add one rain layer.
The Layering System Explained
The layering system is a three-part approach to dressing for variable outdoor conditions. It’s the standard used by outdoor guides and recommended by organizations like REI because it handles temperature swings far better than a single heavy jacket.
- Base layer: Moisture-wicking fabric worn against your skin (synthetic or merino wool — NOT cotton, which stays wet and gets cold)
- Mid layer: Insulating layer that traps body heat (fleece jacket or down vest)
- Outer layer: Waterproof and windproof shell that blocks rain and wind
For a summer weekend trip, you likely only need the base and outer layers. For shoulder-season trips (spring or fall), bring all three. The key insight: cotton kills in wet conditions — it absorbs water, loses insulation, and takes hours to dry. Avoid cotton base layers entirely.
Clothing Checklist for a Weekend Trip
For a two-night trip, pack this:
- 2 moisture-wicking t-shirts or base layer tops
- 1 fleece or insulating mid-layer
- 1 waterproof rain jacket (non-negotiable)
- 1 pair of hiking pants or convertible pants
- 1 pair of camp shorts or extra pants
- 3 pairs of moisture-wicking socks (wool is best)
- 2 pairs of underwear (moisture-wicking)
- 1 warm hat and lightweight gloves (even in summer — nights get cold)
- Sturdy footwear — broken-in hiking boots or trail runners
- Camp sandals for around the site
Roll your clothes instead of folding them — you’ll fit roughly 30% more into your Clothing Bin, and rolling reduces wrinkles on anything you care about.
Toiletries and First Aid Essentials
Keep toiletries in a small, dedicated bag inside the Utility Bin. Your camping toiletry kit:
- Biodegradable soap and shampoo (required in most campgrounds)
- Toothbrush and toothpaste
- Sunscreen (SPF 30 minimum)
- Insect repellent (DEET or picaridin-based)
- Hand sanitizer
- Toilet paper in a zip-lock bag
- A small trowel (if camping without toilet facilities)
For first aid, the American Red Cross first aid kit recommendations suggest carrying a kit that includes bandages, antiseptic wipes, blister treatment, pain relievers, and any personal medications. Blister treatment — specifically moleskin padding — is the most underestimated item on this list.
Step 4 — Safety, Navigation, and Lighting
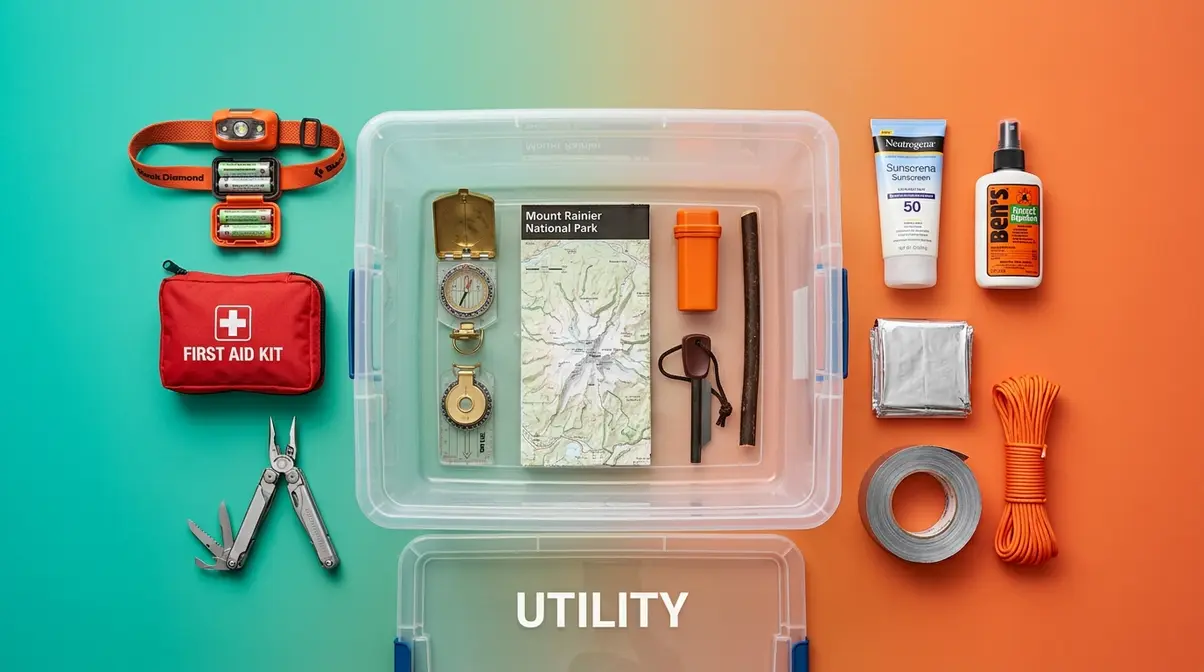
Safety gear is the category beginners are most likely to skip because it feels abstract until something goes wrong.
The 10 Essentials for Camping Safety
The 10 Essentials list was originally developed by The Mountaineers and is now referenced by the U.S. Forest Service as the baseline safety kit for any outdoor trip. Every item belongs in your Utility Bin:
- Navigation — map and compass (and know how to use them; a phone GPS fails without signal)
- Sun protection — sunscreen, sunglasses, and a sun hat
- Insulation — extra layers beyond what you plan to wear
- Illumination — headlamp with fresh batteries (bring spares)
- First-aid supplies — a pre-built kit, not a collection of loose bandages
- Fire — waterproof matches or a lighter, plus a fire starter
- Repair tools and knife — multi-tool, duct tape, and cordage
- Nutrition — extra food beyond your planned meals (one full day extra)
- Hydration — water filter or purification tablets plus extra water
- Emergency shelter — a lightweight emergency bivy or space blanket
The 10 Essentials aren’t optional — they’re the minimum standard for safe camping. Missing even one of these on a remote trip can turn a minor problem into an emergency.
Lighting and Fire Safety
Your headlamp is your most important piece of camp lighting — it keeps your hands free for cooking, setting up, and navigating to the bathroom at 2 a.m. Always pack:
- Headlamp with fresh batteries and a spare set
- Lantern for ambient campsite light (battery or solar-powered is safer than fuel-based for beginners)
- Lighter and waterproof matches — bring both, stored in separate locations
- Fire starter (fire starters are wax-soaked cubes or sticks that light even in damp conditions)
Check your campground’s fire regulations before you leave. Many parks enforce fire bans during dry seasons, and arriving with fire-starting gear you can’t legally use is a common beginner frustration.
How to Pack a Backpack for Camping
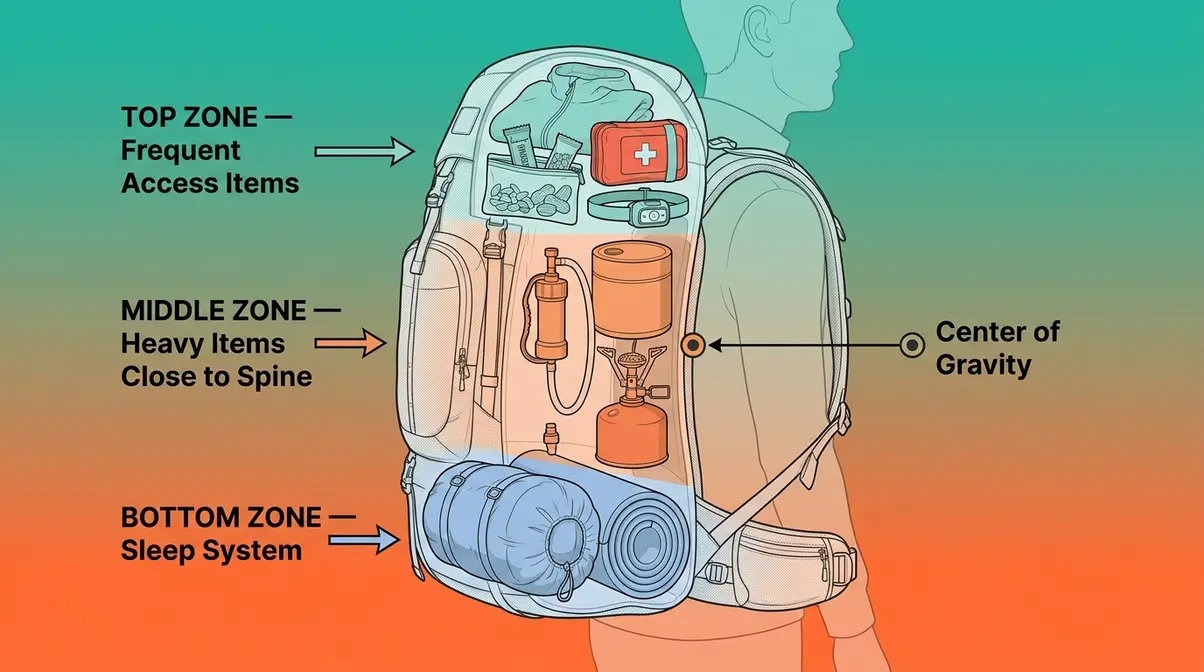
Packing a backpack incorrectly is one of the fastest ways to ruin a hiking trip. A poorly loaded pack throws off your balance, strains your lower back, and makes every uphill feel twice as hard.
The Three Packing Zones of a Backpack
Think of your backpack as having three vertical zones. Each zone has a specific purpose:
- Bottom Zone: Sleeping bag and sleeping pad (compressed). These are bulky but light, and you won’t need them until camp.
- Middle Zone (closest to your spine): Heaviest items — food, water, cookware, and fuel. Centering weight here keeps the pack’s center of gravity close to your body, which reduces strain dramatically.
- Top Zone: Frequently accessed items — rain jacket, snacks, first aid, and headlamp. You want to reach these without unpacking the entire bag.
Packing Order: What Goes Where
Follow this sequence every time you pack:
- Compress your sleeping bag into its stuff sack and drop it into the bottom zone
- Load heavy items (food, water filter, stove, fuel) into the middle zone, pressed against the back panel
- Fill gaps with soft items — extra clothing, a fleece — to prevent shifting
- Add frequently needed items to the top zone and hip belt pockets
- Attach bulky items (sleeping pad, trekking poles) to external straps on the outside
User consensus across backpacking communities, echoing Scouting Magazine’s ABC method, indicates that the single biggest mistake beginners make is putting heavy items at the bottom. This drops the center of gravity below your hips and forces your lower back to compensate — leading to fatigue within the first mile.
Adjusting Your Pack for a Proper Fit
A properly fitted backpack transfers 70–80% of its weight to your hips, not your shoulders. To adjust:
- Loosen all straps completely before putting the pack on
- Put the pack on and fasten the hip belt so it sits on top of your hip bones (iliac crest), not your waist
- Tighten the hip belt first until it feels snug
- Tighten the shoulder straps until they follow the curve of your shoulders — no gap between strap and shoulder
- Clip and tighten the sternum strap (the horizontal strap across your chest) to stabilize the shoulder straps
If your shoulders are bearing most of the weight after adjustment, the pack’s torso length may be wrong for your body — most outdoor retailers like REI offer free fitting appointments.
How to Pack Your Car for Camping
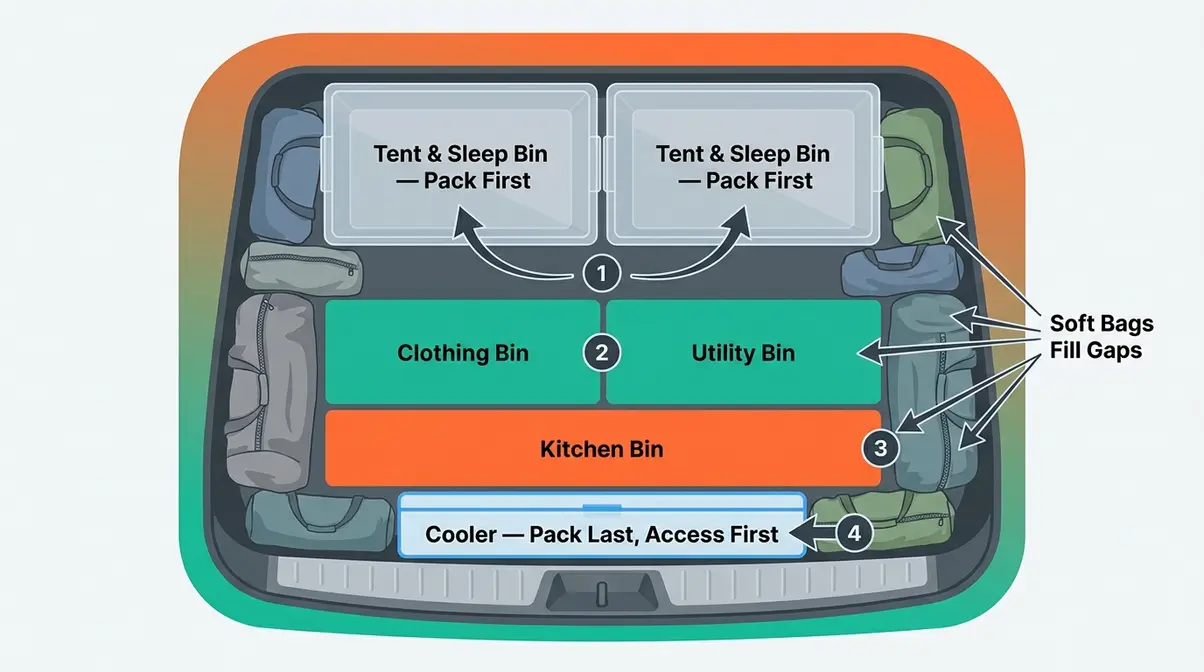
Car camping gives you the luxury of packing more — but a disorganized car creates a disorganized campsite. If you’re heading to remote Bureau of Land Management dispersed camping rules areas, you must be entirely self-contained, making this organization even more critical. The goal is to load your car so that the last thing you need on the road is the first thing you packed.
The Load-Last-Use-First Method
This method is simple: pack in reverse order of need. Whatever you’ll use first at camp goes in last (and sits on top). Here’s the sequence for a typical best tent for car camping trip:
- Pack first (goes deepest): Tent, sleeping bags, sleeping pads, and camp chairs — you won’t need these until you arrive
- Pack second: Clothing Bin and Utility Bin
- Pack third: Kitchen Bin and non-perishable food
- Pack last (most accessible): Cooler, day bag, snacks, and anything you’ll need during the drive
Keep the cooler accessible — you’ll want drinks and snacks on the road without digging past the tent. The Clear Bin System makes this loading sequence dramatically easier, because you’re moving four organized bins instead of a pile of loose gear.
Packing a Small Car, SUV, or Hatchback
Space constraints vary by vehicle, but the core principles stay the same:
- Flat, heavy items on the floor: Cooler, bins, and water jugs go flat on the cargo floor — never stacked where they can shift during braking
- Soft bags fill the gaps: Clothing bags and sleeping bags in compression sacks are flexible — use them to fill awkward spaces around bins
- Roof rack or cargo carrier: If you’re out of floor space, a roof cargo bag (a soft-sided carrier that straps to roof rails) adds significant capacity for bulky but light items like sleeping bags and camp chairs
- Sedan with no trunk access: Load sleeping bags and soft items in the back seat; keep bins in the trunk with smaller items on top
For small cars, prioritize the four Clear Bins over any optional gear. If something doesn’t fit, it either goes on the roof or stays home.
Special Packing Scenarios
Some camping trips come with unique packing challenges that go beyond the standard car camping setup. Here’s a quick orientation — each scenario has a dedicated guide with full detail.
Kayak and Canoe Camping
Watercraft camping adds one critical constraint: everything must be waterproof. Dry bags (sealed, roll-top bags that keep water out) replace your clear bins for anything that goes in the boat. Weight distribution between bow and stern matters for paddling stability, so heavier gear goes in the center of the hull. Fragile items like stoves and food go in hard-sided waterproof cases when possible. The core packing categories stay the same, but you’ll want to review the best tent for kayak camping to ensure your shelter fits inside a standard dry hatch.
Winter Camping and Flying with Gear
Winter camping requires a fundamentally different sleep system: a four-season best tent for winter camping, a sleeping bag rated to at least 0°F, and an insulated sleeping pad with an R-value (insulation rating) of 4.0 or higher. Layering becomes even more critical — add a heavyweight base layer and insulated boots to your clothing checklist.
Flying with camping gear is manageable with planning. Most camping fuel canisters are prohibited on flights (TSA regulations), so plan to buy fuel at your destination or ship it ahead. Trekking poles must go in checked luggage. Everything else flies without issue in a checked bag or large duffel.
Common Camping Packing Mistakes to Avoid
Even with the Clear Bin System in place, a few consistent mistakes trip up beginners. Our team evaluated the most common complaints from first-time campers across camping forums and community groups — these are the patterns that appear most often.
1. Overpacking clothing. The number one volume mistake. Apply the half-and-add-one-rain-layer rule ruthlessly.
2. Packing food without a meal plan. Bring ingredients for specific meals — not a random assortment of food you might feel like eating. Meal planning reduces food weight by roughly 20–30% and eliminates the “what are we having?” problem at 7 p.m. in the dark.
3. Leaving the first aid kit for last. First aid is the most deprioritized item in packing and the most urgently needed in an emergency. Pack it first, put it on top.
4. Not doing a gear check the night before. Lay everything out on the floor, physically check each bin against your checklist, then pack. This single habit catches 90% of forgotten items before you leave the driveway.
What is the most forgotten camping item?
The most forgotten camping item is the can opener, followed closely by extra batteries, tent stakes, and a mallet. Across camping communities, the consistent feedback is that small “connector” items — the things that make other gear actually functional — are the most commonly left behind. The best prevention is keeping a dedicated section in your Utility Bin lid for these items and checking it against your list the night before departure.
Frequently Asked Questions
What is the 3-3-3 rule for camping?
The 3-3-3 rule is a campsite selection guideline: drive no more than 300 miles in a day, arrive by 3 p.m., and stay at least 3 nights. According to RVshare’s travel guidelines, this pacing framework helps beginners avoid arriving exhausted and setting up in the dark.
What are the 10 camping essentials?
The 10 Essentials are: navigation tools, sun protection, insulation, illumination, first-aid supplies, fire-starting tools, repair tools, extra nutrition, hydration, and emergency shelter. Originally developed by The Mountaineers, these categories represent the minimum safety baseline for any outdoor trip. Missing even one item can turn a minor situation into a serious emergency, especially in remote areas. For example, relying solely on a cell phone for navigation often leads to trouble when signals drop. Always pack these items in your Utility Bin, regardless of the trip’s length.
What is the 4-4-4 rule for camping?
The 4-4-4 rule is a campfire safety framework: keep your fire within a 4-foot circle, maintain a 4-foot clear zone around the fire pit, and never leave a fire unattended for more than 4 minutes. According to standard Smokey Bear wildfire prevention guidelines, it’s a beginner-friendly memory aid used to reduce accidental wildfires. Always check your campground’s specific fire regulations, as many parks impose stricter rules during dry seasons.
What is the 2-2-2 rule for camping?
The 2-2-2 rule is a conservative road trip pacing guide: drive no more than 200 miles per day, stop every 2 hours to rest, and arrive at your campsite by 2 p.m. Favored by families with children, this rule ensures you have a full afternoon to pitch your tent and explore before losing daylight.
Conclusion
For any beginner, knowing how to pack for camping comes down to one principle: organize before you go, not after you arrive. The Clear Bin System — four labeled, see-through bins for Sleep, Kitchen, Clothing, and Utility — transforms a chaotic gear pile into a repeatable, confidence-building process. Common pain points reported by first-time campers almost always trace back to disorganization, not missing gear.
The Clear Bin System works precisely because it forces decisions at home, where you have time and space to think clearly. Every bin you pack the night before is one less problem you’re solving in the dark at a campsite you’ve never seen before.
Start with your Sleep Bin tonight. Lay out your tent, sleeping bag, and pad — confirm everything is there. Then work through Kitchen, Clothing, and Utility over the next few days. By the time your trip arrives, you won’t be packing frantically. Whether you’re heading to a quiet state park or looking for the best tent for festivals, you’ll be loading four organized bins into your car and heading out with confidence.

David King
Field gear tester at Tent Explorer.