Tent Livability Guide: 4 Features That Actually Matter
 David King
Updated June 30, 2026
23 min read
David King
Updated June 30, 2026
23 min read
You’ve got your first forestry contract, a truck full of gear, and a tent that’s supposed to be your home for the next three months. The problem? Nobody told you that tent square footage has almost nothing to do with how comfortable you’ll actually be.
“I’m about to start working in the forestry service and will be traveling a lot to work temporary jobs in different national forests. I’m hoping to find a tent that genuinely works for full time living — not just weekend camping.”
Choosing the wrong tent based on specs alone means months of poor sleep, wet gear, and cramped mornings — in conditions that don’t forgive bad decisions. Most buying guides list specs; almost none explain livability. This tent livability guide covers the four features that actually determine comfort, the safety rules that keep you alive in remote locations, and how to match a tent to your specific situation — whether you’re camping for a weekend or a full season. You’ll move through livability features, tent types, essential safety rules, and common mistakes that trip up first-timers.
Key Takeaways: Tent Livability at a Glance
Tent livability depends on four measurable features — not just square footage or price.
- Vertical walls and peak height determine whether you can actually stand, sit, and move inside your tent
- Vestibules are your weatherproof gear storage zone — a non-negotiable for multi-week stays
- Ventilation design is the single biggest factor in condensation control and air quality
- The VAST Framework (Vertical walls, Air circulation, Storage, Transitions) gives you a repeatable way to evaluate any tent in five minutes
- Long-term tent living is legal on USFS land — but only for 14 days per location within a 30-day period (USFS, fs.usda.gov)
Understanding Tent Livability: The VAST Framework
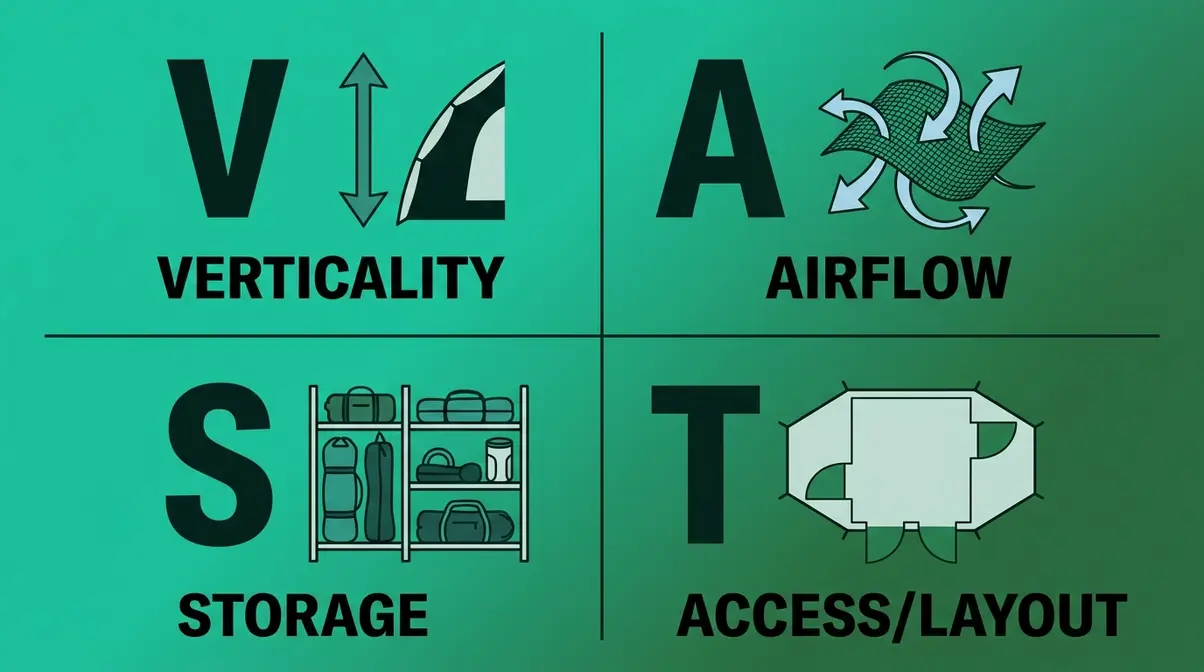
Tent livability — the measure of how comfortable and functional a tent is for daily use — comes down to four specific, measurable dimensions. After reviewing hundreds of real-world reports from forestry workers, thru-hikers, and long-term tent dwellers, a consistent pattern emerged: the tents people actually want to live in share the same four traits. We call this the VAST Framework, a four-part evaluation system developed to give beginners a repeatable checklist for assessing any tent’s livability. VAST stands for Vertical walls, Air circulation, Storage, and Transitions (vestibules and entry points).
When applying this tent livability guide to your next purchase, remember that a tent’s square footage tells you how many bodies fit — peak height and vertical walls tell you whether you can actually live there. Run any tent you’re considering through all four VAST dimensions before you buy, and you’ll avoid the most common and costly beginner mistakes. According to REI’s expert tent evaluation standards, livability features like peak height and vestibule design are consistently ranked among the top factors separating functional shelters from genuinely comfortable ones.
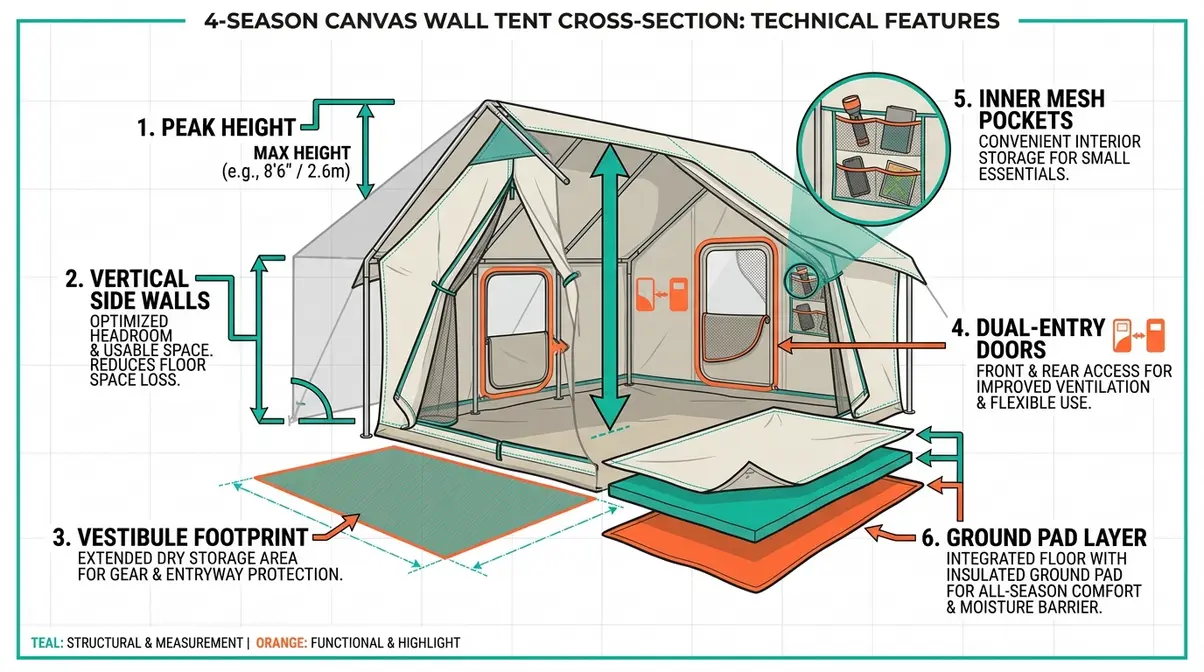
Peak Height and Vertical Walls
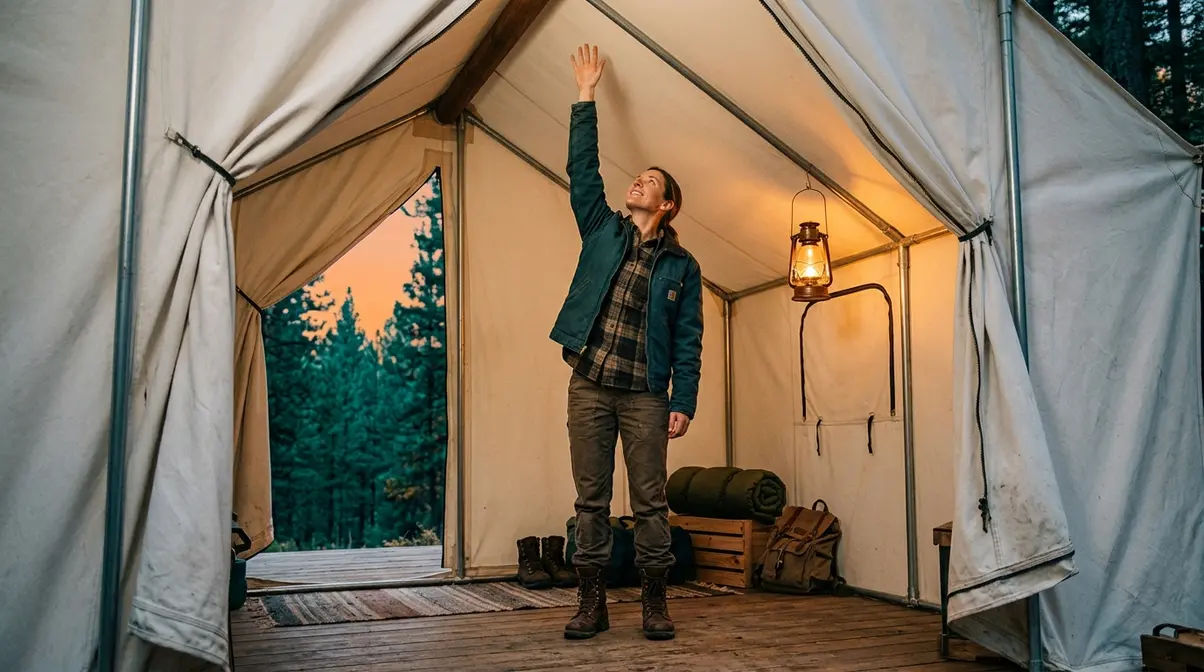
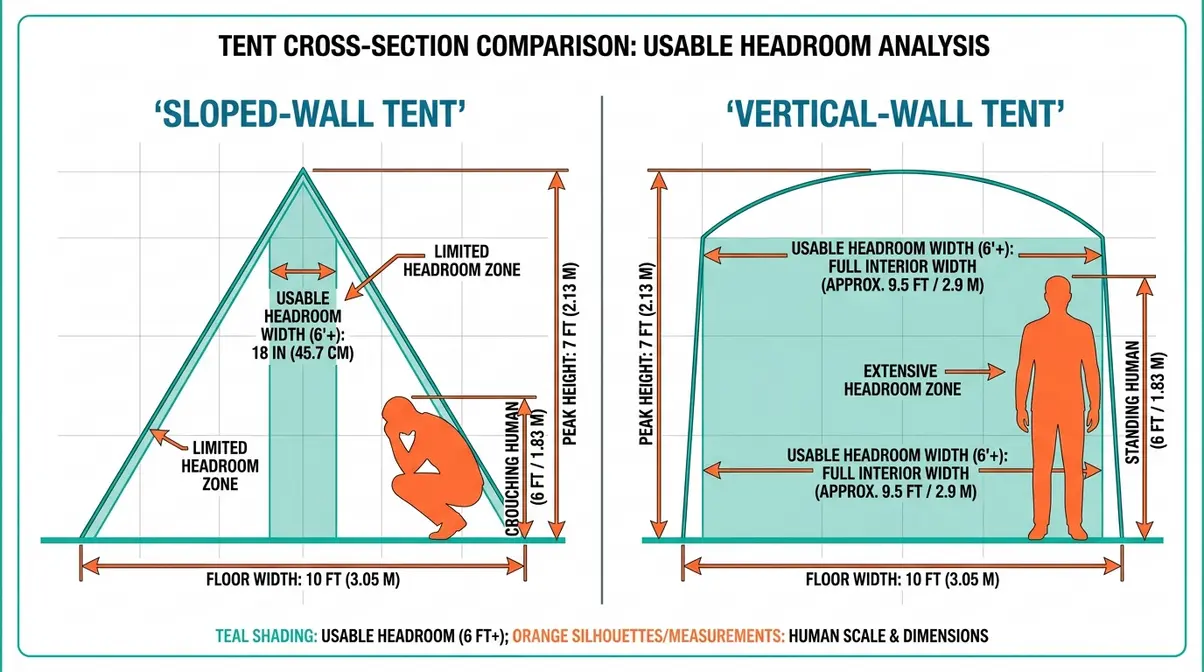
Peak height — the measurement from the tent floor to the highest interior point — is the single number most beginners ignore and most regret ignoring. A tent with a 4.5-foot peak height forces you to crouch every time you get dressed. A tent with a 6-foot peak height lets you stand upright, which matters enormously when you’re doing it twice a day for three months. That difference of 18 inches is the difference between a campsite and a place you can genuinely call home.
Why this matters: Crouching repeatedly throughout the day adds up to real physical fatigue — and it makes simple tasks like layering up for cold mornings feel like a chore. Vertical walls compound this benefit. A tent with near-vertical side walls (common in cabin-style and canvas wall tents) maintains usable headroom all the way to the tent’s edges. A tent with steeply sloped walls (common in lightweight backpacking designs) may advertise a 6-foot peak but only delivers that height in a narrow center strip — a few inches to the left or right and you’re hunching.
Practical benchmarks to use when shopping:
| Peak Height | What You Can Do | Best For |
|---|---|---|
| Under 4 ft | Crawl in, lie down only | Ultralight backpacking only |
| 4–4.9 ft | Sit upright comfortably | Weekend camping, fair weather |
| 5–5.9 ft | Sit and move with some crouching | Short-term seasonal stays |
| 6 ft+ | Stand fully upright | Long-term living, forestry work |
For full time living or multi-week forestry service deployments, target a minimum of 6 feet peak height with near-vertical walls. Anything less and the tent’s functional space shrinks faster than the spec sheet suggests. User consensus from long-term tent dwellers consistently identifies “couldn’t stand up inside” as the top regret in their first tent purchase.
Vestibules and Dual Entry
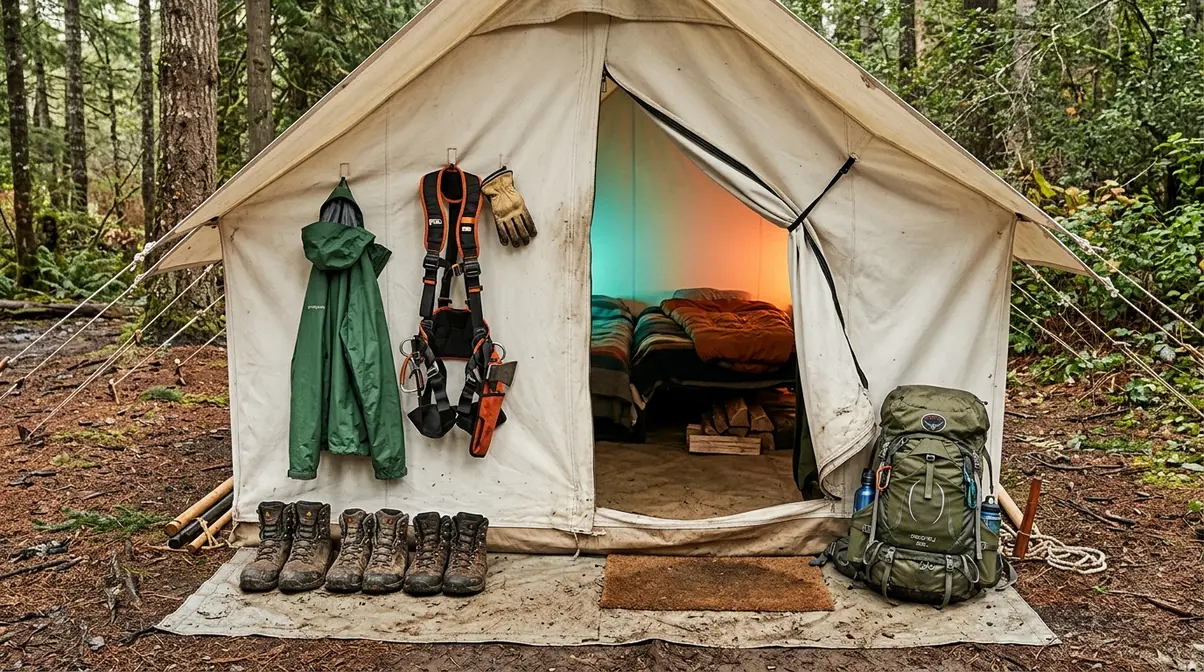
A vestibule (think of it as a mudroom for your tent) is a covered, sheltered zone between the tent’s inner sleeping area and the outside world. It’s not part of the sleeping floor — it’s a protected anteroom where you store muddy boots, wet rain gear, cooking supplies, and anything else you don’t want inside your sleeping space. For frontcountry camping over a weekend, a vestibule is a nice bonus. For multi-week stays in national forests, it is a non-negotiable.
Why this matters: A vestibule keeps your sleeping area dry and organized, reduces the amount of mud and moisture tracked inside, and gives you a staging area for gear without exposing it to rain. In a forestry service context where you’re moving between sites every few weeks, a vestibule also functions as a quick-access storage zone — you can find your chainsaw harness without unpacking the entire tent.
Vestibule size guidance for extended stays:
- Under 10 sq ft: Barely enough for two pairs of boots. Acceptable for solo weekend trips only.
- 10–20 sq ft: Fits boots, a pack, and some rain gear. Adequate for solo extended stays.
- 20+ sq ft: The target for any multi-week or full time living setup. Fits two packs, cooking gear, and work equipment with room to move.
Dual-entry design (two separate doors, typically on opposite sides of the tent) solves two problems at once. First, it means one occupant can exit without disturbing the other — critical if you’re sharing a tent with a partner on rotating shifts, as many forestry workers do. Second, opposing doors create cross-ventilation, which directly reduces condensation (covered in the next section). When evaluating any tent for livability, check whether both doors have their own vestibule — a tent with two doors but one shared vestibule loses much of the organizational benefit.
For a deeper dive into maximizing this space, check out our tent vestibule design guide.
Floor Shape and Internal Storage
Floor shape determines how much of your advertised square footage you can actually use. A rectangular floor plan uses nearly 100% of its stated area — every corner is accessible. A tapered or “mummy” floor plan (wide at the shoulders, narrow at the feet) wastes corner space and limits how you can arrange gear and sleeping positions. For long-term living, rectangular or near-rectangular floor plans win every time.
Why this matters: A 40-square-foot rectangular tent feels noticeably larger than a 40-square-foot tapered tent because the usable area is distributed more evenly. When you’re in that tent for months, that difference shapes your daily quality of life.
Internal storage — mesh pockets, gear lofts (overhead storage nets), and internal loops for hanging lanterns or wet gear — multiplies the functional space without adding floor area. Common pain points reported by long-term tent dwellers include having nowhere to put a phone, headlamp, or water bottle at night without placing them on the floor where they get kicked. Look for:
- Minimum 4 interior mesh pockets for a solo long-term setup
- At least one gear loft (an overhead mesh shelf) for items you need within arm’s reach
- Interior loops or hooks for hanging a lantern or drying small items overnight
For forestry service work specifically, a tent with a defined “equipment zone” — either a second room divider or a dedicated side vestibule — keeps work gear separated from sleeping gear, which matters for both hygiene and mental decompression at the end of a long shift.
Ventilation and Condensation
Condensation is the invisible livability killer — and it’s the single comfort problem most beginners don’t see coming until they wake up in a soaked sleeping bag. Condensation (moisture that forms when warm, humid air from your breath and body meets the cool inner tent fabric) is not a sign of a leaking tent. It’s a physics problem, and the only solution is airflow.
Why this matters: In a sealed tent with poor ventilation, a single sleeping person exhales roughly half a liter of moisture per night. Two people double that. Without ventilation to carry that moisture out, it condenses on every surface — your sleeping bag, your clothing, your gear. After a week, you’re sleeping in a damp environment that accelerates mold growth and degrades insulation performance.
The ventilation features to look for:
- Mesh inner tent: A full-mesh or partial-mesh inner tent allows air to pass through even when the rainfly is closed. This is the most effective passive condensation control available.
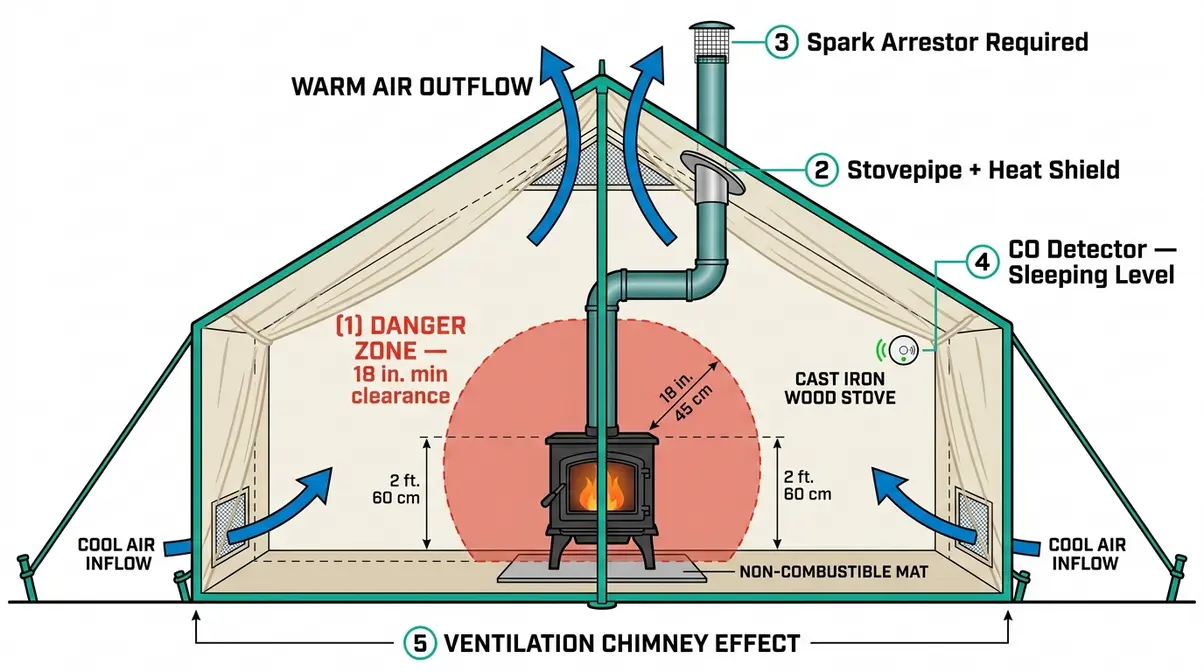
- High-low ventilation: Vents placed both near the ground (low) and near the peak (high) create a chimney effect — cool air enters at the bottom, warm moist air exits at the top. A tent with only one vent level loses most of this benefit.
- Adjustable rainfly vents: Vents in the rainfly that can be opened even in rain allow moisture to escape without letting precipitation in. Look for vents with storm hoods (small overhanging covers that deflect rain).
- Guy lines: Pitching the rainfly taut and away from the inner tent using guy lines (adjustable cords that stake out from the fly) creates an air gap between the two layers — this gap is where condensation forms on the fly rather than on your gear.
User consensus from thru-hiking and long-term camping communities consistently identifies poor ventilation as the top reason tents are abandoned after one season. A stormworthy tent that breathes well is dramatically more comfortable than a waterproof tent that traps moisture inside.
Insulation and Flooring
Ground cold is a more serious comfort threat than air cold for tent dwellers — and it’s the one most beginners underestimate. The ground acts as a heat sink, drawing warmth away from your body throughout the night even in mild temperatures. A sleeping bag rated to 20°F provides almost no protection against ground cold without a proper insulation layer between you and the floor.
Why this matters: For forestry service workers operating in national forests at elevation, overnight temperatures in spring and fall can drop into the 30s even when daytime highs are comfortable. Without floor insulation, you’ll wake cold regardless of your sleeping bag’s rating.
The floor insulation stack (from bottom to top):
- Tent footprint (a groundsheet cut to match your tent’s floor): Protects the tent floor from abrasion and adds a thin barrier against ground moisture.
- Closed-cell foam pad: Dense, lightweight foam (like a Therm-a-Rest Z Lite) provides critical insulation against ground cold. R-value (a measure of insulation resistance) of at least 2.0 is recommended for three-season use; 4.0+ for winter.
- Sleeping pad (air or self-inflating): Adds comfort and additional R-value on top of the foam base. Layering foam + air pad is the standard approach for year-round comfort in long-term tent setups.
- Optional: Foam floor tiles (interlocking EVA foam squares, similar to gym flooring): For canvas wall tents or larger base camp setups, foam tiles create a defined living area that dramatically improves warmth and comfort underfoot.
For stove-ready options — tents designed to accommodate a wood stove or propane heater — insulation priorities shift. The tent itself must meet the CPAI-84 standard (a fire resistance certification for canvas tents, ensuring the fabric is treated to resist ignition from sparks). Never use a stove in a tent that is not rated for it.
To understand how to layer effectively, read our sleeping pad R-value guide.
Best Tents for Long-Term Living
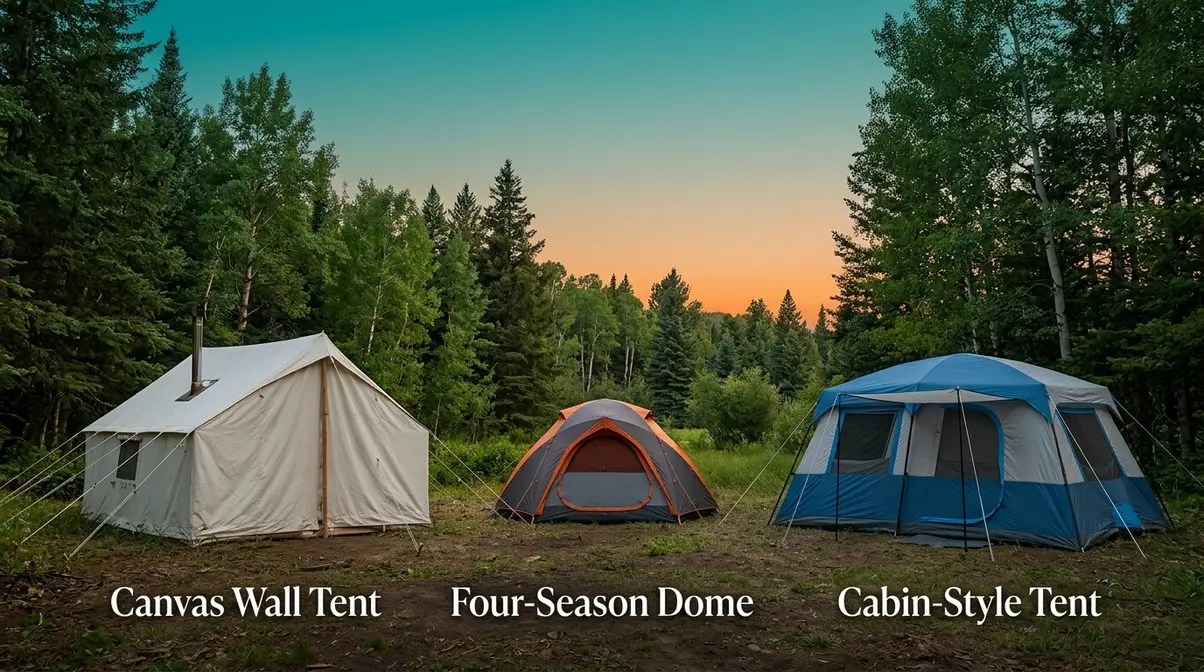
Choosing the right tent for full time living or extended forestry service deployments goes beyond the VAST Framework — it involves matching the tent’s construction category to your specific conditions. tentexplorer.com covers the best tents for full time living in detail, but here’s the condensed picture.
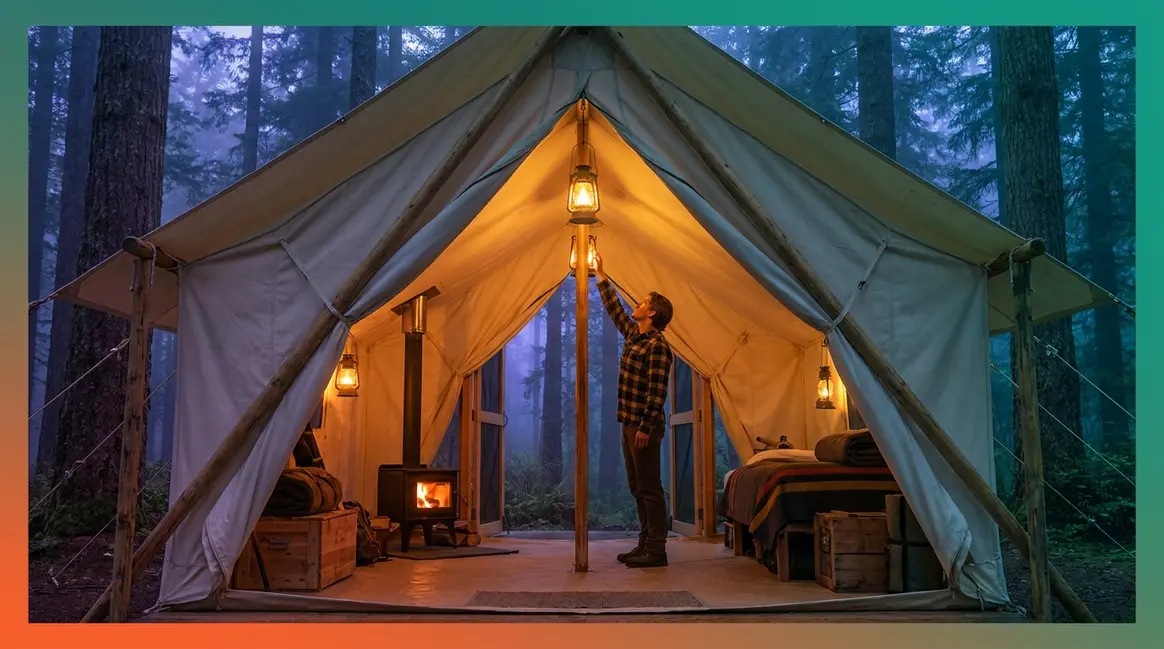
For year-round comfort in national forests, three tent categories consistently outperform the rest. Canvas wall tents (large, rectangular, wood-framed structures with a stove jack — an opening reinforced for a stovepipe) offer the most livable interior space and the best thermal performance in cold conditions. They are heavy and slow to set up, but for a semi-permanent base camp, they are the gold standard. Their natural breathability also dramatically reduces the condensation issues common in synthetic fabrics.
Four-season dome tents balance portability and weather resistance, with geodesic (dome-shaped, multi-pole) designs that shed snow load and resist high winds better than three-season alternatives. When evaluating four-season domes, look for pole structures that cross multiple times. This geometry not only handles heavy snow but also creates steeper lower walls, directly improving your VAST vertical score. Finally, cabin-style car camping tents with vertical walls and room dividers offer the best livability-per-dollar ratio for frontcountry camping where weight is not a constraint.
The VAST Framework applies equally across all three categories — evaluate peak height, air circulation, storage, and transitions regardless of which category you’re shopping in. A canvas wall tent that lacks cross-ventilation will still have condensation problems. A four-season dome with minimal vestibule space will still leave you storing wet gear inside your sleeping area.
Freestanding vs. Non-Freestanding Tents
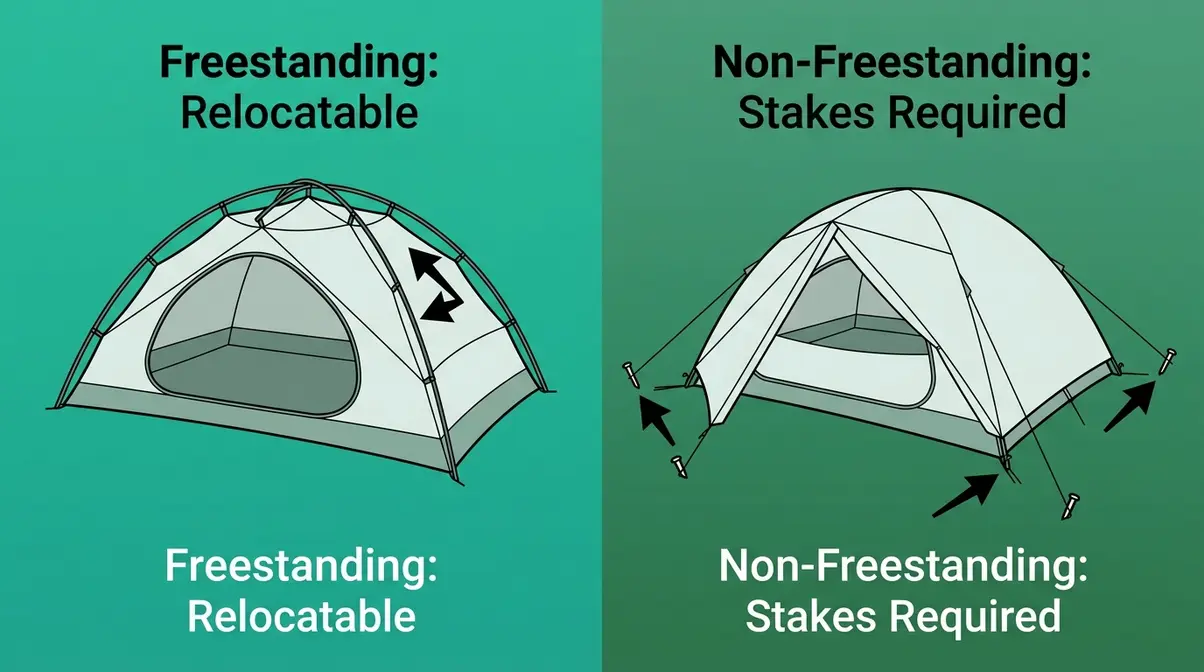
Understanding tent construction categories is a prerequisite for applying the VAST Framework intelligently. Freestanding tents support themselves using internal poles and require no stakes to hold their shape — you can pick them up and move them fully assembled. Non-freestanding tents (also called trekking pole tents or tarptents) rely on stakes and guy lines to maintain structure; remove the stakes and the tent collapses.
| Feature | Freestanding | Non-Freestanding |
|---|---|---|
| Setup ease | High — pitch anywhere | Moderate — requires good staking ground |
| Interior space | Generally more vertical walls | Often tapered, lower peak |
| Weight | Heavier (more poles) | Lighter (fewer poles) |
| Livability | Usually higher VAST scores | Variable — check peak height carefully |
| Best for | Forestry workers, long-term living | Ultralight thru-hiking |
Semi-freestanding tents offer a compelling middle ground for those balancing weight and livability. These designs typically use a single hubbed pole system that supports the head and torso areas independently but require stakes to pull the footbox taut. While they save weight compared to fully freestanding models, they often sacrifice vertical wall space at the foot end, which can reduce your overall VAST score.
For forestry service work and long-term tent living, freestanding designs consistently score higher on the VAST Framework’s Vertical walls and Transitions dimensions. The ability to relocate the tent without full teardown is also practically valuable when moving between forest sites. If you frequently camp on rocky terrain or wooden tent platforms where staking is difficult, a fully freestanding tent is non-negotiable. Read our complete freestanding vs. non-freestanding tent comparison for specific model recommendations.
Essential Camping Safety Rules
Safety in a tent — especially for long-term stays in remote national forests — is not optional knowledge. The VAST Framework helps you choose a comfortable tent; the rules in this section help you stay alive in it. Common pain points reported by first-time long-term campers include underestimating wildlife risk, misunderstanding CO hazards from portable heaters, and not knowing the legal limits of dispersed camping before a ranger shows up. Several practical frameworks have emerged from wilderness survival communities and forestry culture to help campers make sound decisions in the field.
What is the 3-3-3 rule for camping?
The 3-3-3 rule means: arrive at camp by 3 p.m., camp at least 3 miles from the trailhead, and plan no more than 3 days in a single remote location without a check-in. The 3 p.m. arrival time is the most practically important element — it ensures you have adequate daylight to set up your tent correctly, identify hazards (widow-maker branches, flood-prone low ground), and establish your campsite before dark. Rushing tent setup in failing light is a leading cause of setup errors that compromise weather protection. The 3-mile guideline reduces crowding and increases your chance of finding undisturbed sites with better access to water and firewood.
What are the 7 C’s of camping?
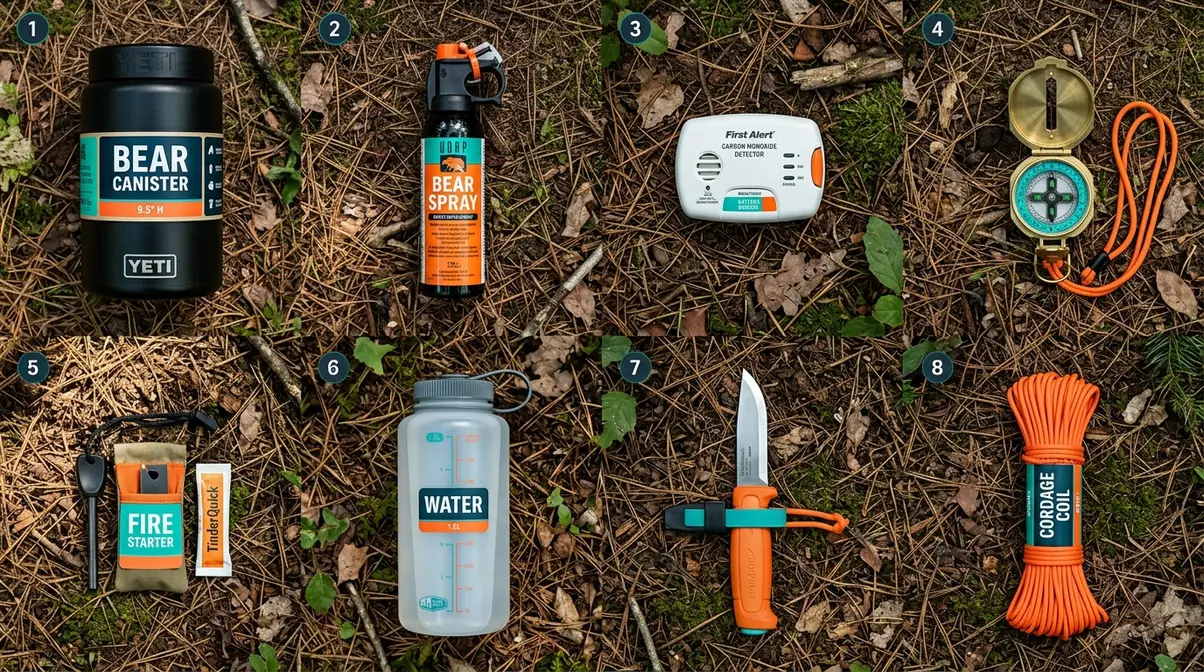
The 7 C’s of camping are Cutting tool, Combustion device, Cover, Container, Cordage, Cotton, and Compass. This framework comes from wilderness survival education and is widely used in forestry safety training to ensure campers have covered every critical preparedness category. Each C represents a functional need: cutting (knife or saw), fire starting, shelter (your tent), water carrying, rope work, first aid/fire tinder, and navigation. Running through the 7 C’s before departing for a remote site takes about two minutes and can prevent life-threatening oversights. Note that cotton clothing is dangerous in cold and wet conditions — the “Cotton” C refers specifically to its use in first aid and fire starting.
What is the 7-7-7 rule for survival?
The 7-7-7 rule is a survival priority hierarchy: you can survive 7 minutes without shelter in extreme cold, 7 hours without water in extreme heat, and 7 days without food. Its primary practical value is prioritizing decision-making under stress — shelter comes first, always. For forestry workers setting up camp in unfamiliar terrain, this hierarchy clarifies why tent setup takes precedence over cooking, water filtering, or any other camp task on arrival. In the context of the VAST Framework, the 7-7-7 rule reinforces why stormworthy construction is a critical life-safety feature, not just a comfort preference.
Bear Safety and Wildlife
⚠️ Safety Warning: The following guidance is based on NPS and USFS published protocols. Always check local ranger station advisories before camping in bear-active areas — protocols vary by region and species.
Bears do bother people in tents — but the risk is almost entirely food-driven, and it’s largely preventable. According to the National Park Service’s bear safety guidelines, the vast majority of bear-human encounters at campsites involve food, scented items, or garbage stored improperly. Bears that are food-conditioned (accustomed to finding food near humans) are significantly more likely to approach tents than wild bears with no prior human-food association.
The NPS advises these specific protocols for tent campers in bear country:
- Store all food in a bear canister or bear box — never inside your tent or within 200 feet of your sleeping area. This includes cooking supplies, utensils, and anything that has contacted food.
- Hang food using the PCT method (a counterbalance hang from a tree branch at least 10 feet high and 4 feet from the trunk) where bear canisters are not available or required.
- Never cook or eat inside your tent. Food odors absorbed into tent fabric are extremely difficult to remove and can attract bears on subsequent nights even after the food is gone.
- Store scented items with food — toothpaste, sunscreen, lip balm, insect repellent, and deodorant all attract bears and should be stored identically to food.
- Use a bear spray (a capsaicin-based deterrent, not insect repellent) and know how to deploy it before you need it. The NPS reports bear spray is effective in over 90% of documented close encounters when used correctly.
For forestry service workers in active bear zones, the USFS recommends coordinating with local ranger districts for site-specific protocols, as some areas require hard-sided containers rather than canisters.
Carbon Monoxide and Stove Safety
⚠️ Safety Warning: Carbon monoxide (CO) is odorless and colorless. You cannot detect it without a CO detector. The CDC warns that CO poisoning can cause death within minutes at high concentrations, and symptoms (headache, dizziness, confusion) are easily mistaken for altitude sickness or fatigue.
Carbon monoxide poisoning is the leading cause of accidental non-fire-related deaths in camping and outdoor recreation in the United States. According to the CDC’s CO poisoning data, portable generators, charcoal grills, and propane or gas camping stoves are the most common sources of fatal CO buildup in enclosed spaces — including tents.
The rules are absolute:
- Never use a gas stove, propane heater, charcoal grill, or generator inside a tent — even briefly, even with the door open. A tent is not a ventilated space.
- Never run a vehicle engine near a tent — exhaust CO can accumulate in a closed tent within minutes.
- Install a battery-operated CO detector in any tent used for multi-night stays, particularly if a wood stove is present. The CPSC (Consumer Product Safety Commission) recommends CO detectors be placed at sleeping level, not mounted high on a wall as in a home.
- Wood stoves are the only safe heating option for enclosed tent use — but only in tents specifically rated for wood stove use (CPAI-84 certified canvas tents with a properly installed stove jack). The stovepipe must exit completely through the stove jack, and a spark arrestor must be installed to prevent fire.
Legal Rules for Long-Term Camping
Dispersed camping (camping outside of designated campgrounds, on undeveloped public land) is legal on most USFS and BLM land — but it comes with specific limits that every forestry worker and long-term tent dweller must know before setting up camp.
USFS standard rules (enforced nationally, with local variations):
- 14-day stay limit: You may camp in any one location for a maximum of 14 consecutive days within a 28- to 30-day period. After 14 days, you must move your camp at least 5 miles from the previous location. This rule is enforced by rangers and violations can result in citations.
- 200-foot setback: Camps must be located at least 200 feet from lakes, streams, trails, and roads to protect water quality and minimize impact — a Leave No Trace (LNT) principle codified in USFS regulations.
- Campfire restrictions: Fire bans (Stage 1 and Stage 2 restrictions) are common in national forests during fire season. Check current restrictions at USFS dispersed camping rules before every deployment.
BLM land rules follow similar 14-day limits, but enforcement and specific restrictions vary significantly by field office. Contact the relevant BLM field office before establishing a long-term camp.
Local zoning for tent living on private land is a separate category governed by county ordinances, not federal land rules. Many counties prohibit using a tent as a primary residence on residential-zoned land, regardless of landowner permission. If you’re planning a long-term tent setup on private property, verify local zoning ordinances with your county planning department before committing.
For forestry service employees specifically, your employer typically coordinates with USFS district offices for work-camp permits that supersede the 14-day limit — confirm this with your crew supervisor before assuming standard dispersed camping rules apply to your assignment. Always check the legal rules for long-term tent living to ensure full compliance.
Risks and Tent Living Pitfalls
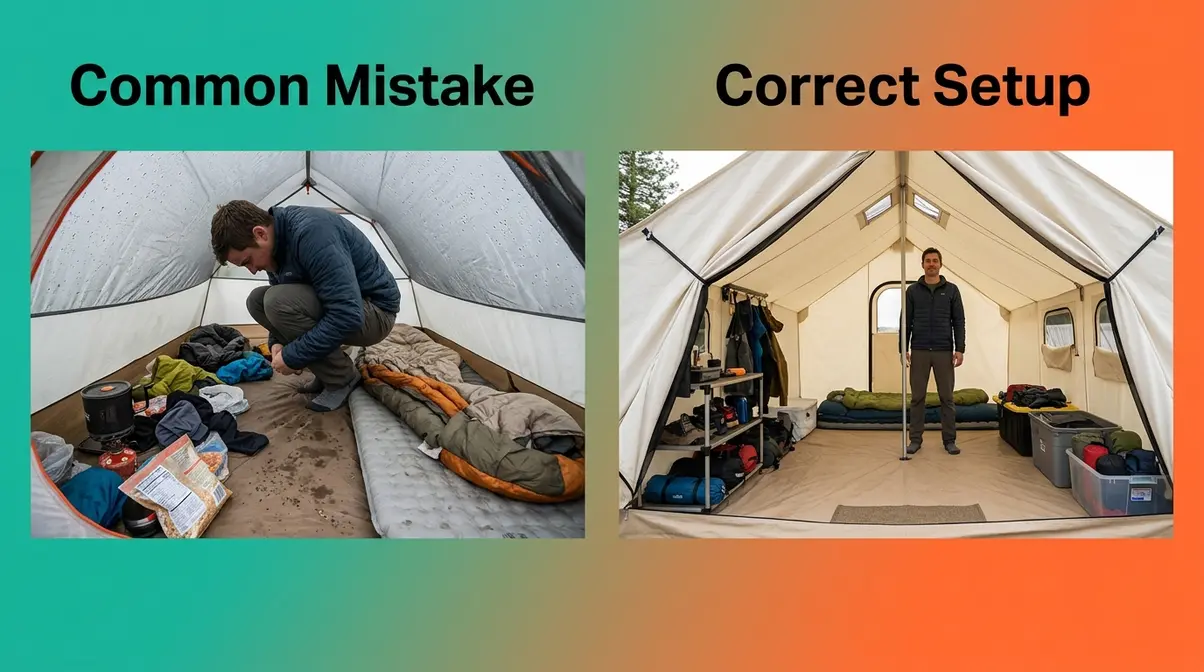
Even with the right tent and the VAST Framework applied correctly, long-term tent living has predictable failure modes. Knowing them in advance is the difference between a frustrating first season and a comfortable one.
Common Tent Living Mistakes
Mistake 1: Choosing a tent for its floor area instead of its peak height. A 60-square-foot tent with a 4.5-foot peak is less livable than a 40-square-foot tent with a 6-foot peak. Always prioritize the VAST Framework’s Vertical dimension first.
Mistake 2: Ignoring condensation until it’s a problem. Condensation management requires proactive habits, not reactive fixes. Open tent vents before sleeping — even in cold weather. Leaving vents closed to stay warm is the fastest path to a soaked sleeping bag and mold growth within two weeks. Crack both doors slightly on opposite sides to establish cross-ventilation every night.
Mistake 3: Storing food or scented items inside the tent. This is both a bear safety failure and a hygiene failure. Food odors attract insects and rodents in addition to bears, and once a tent absorbs food smells, the problem is nearly impossible to fully resolve.
Mistake 4: Skipping a tent footprint. Ground moisture migrates upward through tent floors, especially in wet climates and forested terrain. A footprint (a fitted groundsheet cut slightly smaller than the tent floor) costs $20–$40 and extends tent floor life by years while keeping your sleeping area dry.
Mistake 5: Underestimating setup time in poor conditions. A tent that takes 45 minutes to set up in ideal conditions can take two hours in wind and rain. Practice full setup and teardown at home before your first deployment. Arriving at a forest site in the dark with an unfamiliar tent is a genuine safety risk.
Alternative Shelter Options
A tent is the right choice for most forestry service and seasonal camping situations — but not all of them. Consider alternatives when:
- Mold risk is high: In consistently wet climates (Pacific Northwest, Southeast, coastal ranges), canvas tents require diligent daily ventilation to prevent mold. If you cannot commit to daily airing, a hard-sided trailer, wall tent with aggressive ventilation, or cabin accommodation is a more practical choice. Mold in canvas tent fabric is difficult to fully remediate and can cause respiratory irritation.
- Stay duration exceeds 6 months: Extended stays beyond a single season push the limits of tent durability and comfort. Seasonal structures, yurts, or employer-provided housing typically become more cost-effective and comfortable beyond this threshold.
- Extreme cold is a constant: Below -20°F sustained temperatures exceed the safe operational range of most sleeping systems and tent materials. At this threshold, hard-sided shelter with a reliable heat source is a safety requirement, not a preference.
Common pain points reported by tent dwellers who switched to alternatives include underestimating mold in wet climates and overestimating the warmth of stove-ready canvas tents in sustained extreme cold. Both are correctable by reading a tent vs. alternative shelter comparison to make the right choice from the start.
Frequently Asked Questions
How do you make a tent more livable?
The most impactful changes to tent livability are peak height, ventilation, and vestibule access. If you already own a tent, you can immediately improve your setup by adding a foam floor layer to address ground cold and installing interior mesh pockets. Establish a strict condensation management routine by opening opposing vents before sleep, cracking both doors slightly, and airing the tent fully each morning.
Best tent for year-round living?
For year-round comfort, a CPAI-84 certified canvas wall tent with a wood stove jack consistently outperforms other tent categories. Canvas breathes naturally, regulating humidity better than synthetic fabrics while holding heat effectively in cold conditions. For high mobility, a four-season geodesic dome tent is the best all-season alternative since it handles snow loads and high winds flawlessly. The specific best choice depends entirely on whether you need a semi-permanent base camp or a portable shelter.
Do bears bother people in tents?
Bears are attracted to food smells, not tents themselves, meaning proper food storage reduces encounter risk dramatically. According to the NPS, the vast majority of campsite bear encounters involve improperly stored food, scented items, or garbage. Always use a bear canister or hang food, and never store scented items within 200 feet of your sleeping area.
What is the 444 rule for camping?
The 444 rule flags dangerous conditions: 4°C temperature, 4 mph wind, and precipitation present simultaneously. At this threshold, hypothermia risk becomes significant even in summer, because wet clothing loses 90% of its insulating value. According to the National Weather Service, severe weather and dropping temperatures require immediate proactive shelter management. This combination of conditions is a practical trigger for activating your tent’s full weather protection, staking out all guy lines, and changing into dry base layers.
How do the Amish keep warm in winter?
Traditional Amish winter warmth relies on layered wool clothing, wood stoves, and heavily insulated structures — principles that translate directly to tent living. Wool retains warmth even when wet (unlike cotton or down), making it the preferred base layer for cold-weather tent camping. Wood stoves provide radiant heat that warms both air and surfaces — which is why canvas wall tents with wood stoves are the closest functional equivalent to Amish winter heating in a portable shelter. For tent dwellers, the practical takeaways are: prioritize wool base layers, use a wood stove in a properly rated canvas tent, and insulate the floor aggressively (foam tiles + closed-cell pad) because ground cold is the primary heat loss vector in a tent.
Four Dimensions of a Comfortable Tent
For forestry workers, seasonal laborers, and first-time long-term campers, tent livability is not a vague feeling — it’s a measurable outcome of four specific features. The VAST Framework (Vertical walls, Air circulation, Storage, Transitions) gives you a repeatable evaluation tool you can apply to any tent in under five minutes, whether you’re standing in a gear store or reading specs online. A tent with a 6-foot peak, mesh inner tent, rectangular floor with interior pockets, and a 20+ square foot dual vestibule will outperform a more expensive tent that scores poorly on these four dimensions every time.
The VAST Framework also connects directly to safety. A tent with poor Air circulation creates the condensation conditions that accelerate mold and degrade insulation — both of which become health concerns on multi-week stays. A tent without adequate Transitions (vestibules) forces food and scented gear inside the sleeping space, which is the primary driver of bear encounters in camp. Livability and safety are not separate topics; they’re the same topic at different urgency levels.
Using this tent livability guide, your next step is specific: pick the two or three tents you’re considering and run each through the VAST Framework checklist. Score each one on Vertical walls (peak height and wall angle), Air circulation (mesh inner, vent placement, guy line compatibility), Storage (floor shape, interior pockets, gear loft), and Transitions (vestibule size, number of entries, dual-entry design). The tent with the highest combined VAST score for your specific conditions is the right tent — regardless of brand, price point, or what any gear list recommends. Be sure to review our complete camping checklist before heading out on your next extended trip.

David King
Field gear tester at Tent Explorer.