Tent Groundsheet Guide: Materials, Sizing & DIY Tips
 Dave King
Updated June 30, 2026
29 min read
Dave King
Updated June 30, 2026
29 min read
You spent good money on a tent. Then you wake up on night two with a damp sleeping bag and a wet tent floor — not from rain getting in, but from moisture wicking up from the ground itself. Or worse, you pack up to find a small puncture in your tent floor from a pebble you never even noticed. A tent groundsheet is the cheap, lightweight fix that prevents both problems. It’s the most cost-effective upgrade you can make to protect an expensive piece of gear.
“Got it pretty cheap so not too worried if it gets beat up. But wondering if I should pick up…”
That question is exactly right. Whether your tent cost $80 or $800, its floor is the part that takes the most punishment — and a groundsheet costing a fraction of the tent’s price is your best line of defense. Without a correctly sized tent groundsheet, rainwater channels under your floor instead of draining away. Most new campers skip this step and regret it on their first wet trip.
By the end of this guide, you’ll know exactly which tent groundsheet material suits your camping style, how to size it correctly using The Tuck Rule, and whether to buy one or make your own. We’ll cover every material from Tyvek to Cuben Fiber, walk you through a DIY cutting tutorial, and explain care and repair so your groundsheet lasts for years.
Recommended Products
| # | Image | Product | Best For | Buy |
|---|---|---|---|---|
| 1 |  |
ONETIGRIS Rock Fortress Footprint | Large group campers | Buy on Amazon |
| 2 |  |
Onewind Ultralight Silnylon Footprint | Ultralight backpackers | Buy on Amazon |
| 3 |  |
BISINNA Waterproof Tarp Footprint | Multi-use campers | Buy on Amazon |
| 4 | |
BISINNA Camping Tarp Groundsheet | Budget family campers | Buy on Amazon |
| 5 |  |
Wind Tour Portable Tarp Groundsheet | Casual weekend hikers | Buy on Amazon |
Last update on 2026-06-30 / Affiliate links / Images from Amazon Product Advertising API
Last update on 2026-06-30 / Affiliate links / Images from Amazon Product Advertising API
Last update on 2026-06-30 / Affiliate links / Images from Amazon Product Advertising API
Last update on 2026-06-30 / Affiliate links / Images from Amazon Product Advertising API

Last update on 2026-06-30 / Affiliate links / Images from Amazon Product Advertising API
A tent groundsheet is a waterproof sheet placed under your tent to block moisture, prevent punctures, and extend your tent’s life — a small investment that protects a much bigger one.
- The Tuck Rule matters: Size your groundsheet 2–3 inches smaller than your tent floor on all sides to stop water pooling underneath
- Five materials to know: Tyvek, Polycro, Silnylon, PU-Coated polyester, and Cuben Fiber — each suits a different camping style
- DIY is viable: A Tyvek groundsheet can cost a fraction of a manufacturer footprint and outperform it in breathability
- Most tents need one: Even tents with sewn-in floors benefit from an external groundsheet for abrasion protection
What Is a Tent Groundsheet?
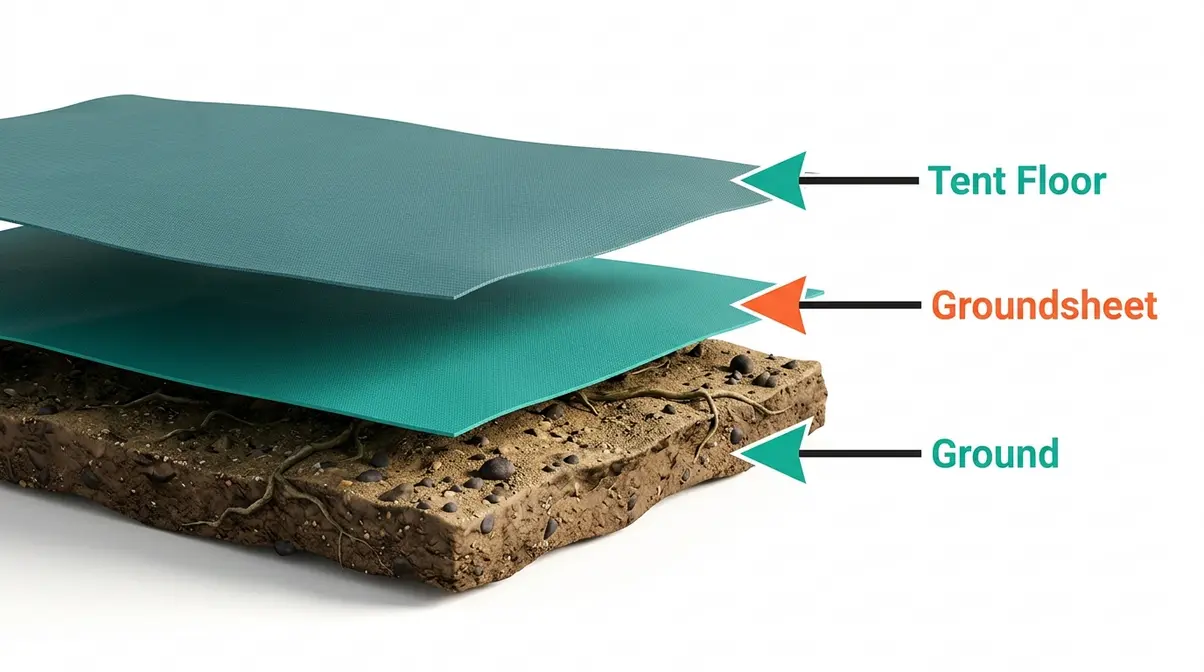
A tent groundsheet is a waterproof or water-resistant sheet placed directly on the ground beneath your tent floor. It works as a physical barrier between your tent and the earth, blocking moisture, abrasion, and punctures from below. The three main benefits are floor protection, moisture blocking, and easier post-trip cleaning. According to National Park Service guidelines, a ground tarp should be sized slightly smaller than the tent base to ensure rainwater does not collect underneath the sleeping area (NPS, 2026).
A tent groundsheet placed correctly blocks moisture, prevents abrasion, and can double the lifespan of your tent’s floor — for roughly 5–10% of your tent’s original cost.
We’ll cover The Tuck Rule — the single most important sizing principle — in the How to Choose section. For now, understand that getting the size right is just as important as having one at all.
Core Purpose: Protection & Waterproofing
A tent groundsheet is a dedicated protective layer — usually waterproof fabric or film — placed on the ground directly under your tent floor. Its job is to stand between your tent and everything the earth throws at it.
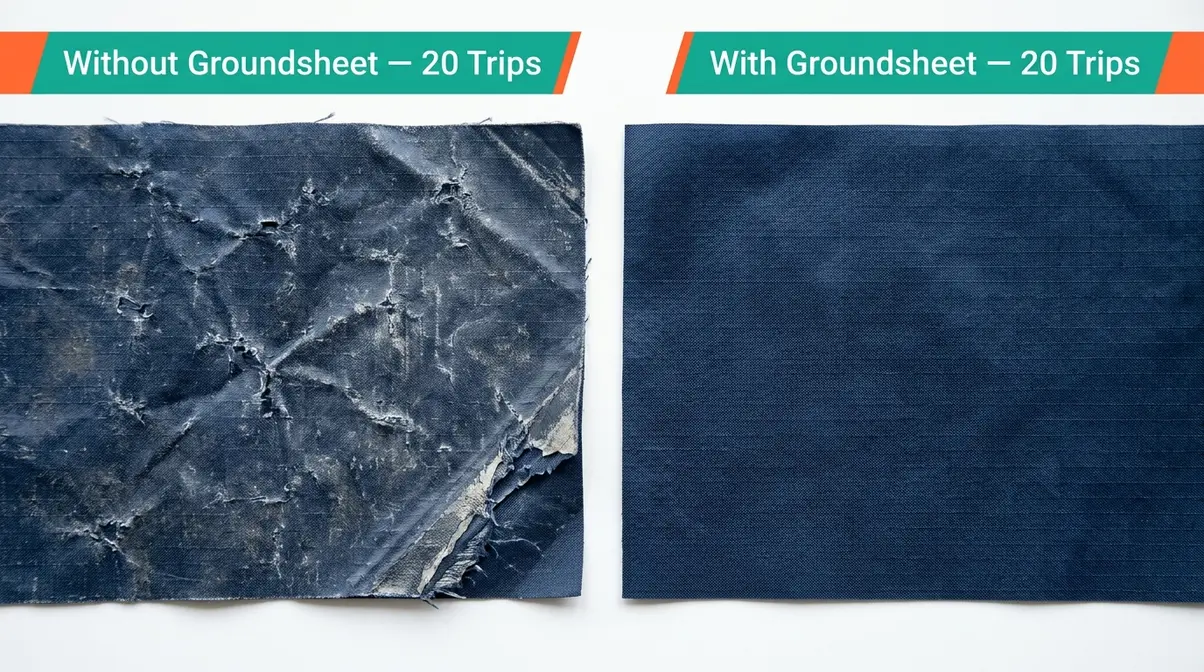
Most tent floors are rated between 3,000mm and 8,000mm hydrostatic head (the measure of how much water pressure a fabric can withstand before leaking). That sounds impressive — and it is, when the tent is new. The problem is abrasion. Sharp gravel, exposed roots, and rough soil act like sandpaper every time you pitch and pack up. Over 15–20 trips, that repeated wear degrades the waterproof coating and weakens the floor fabric itself. A groundsheet absorbs that punishment instead.
The three protective functions are:
- Abrasion barrier: Takes the wear from rough ground so your tent floor doesn’t have to
- Puncture protection: Stops sharp sticks or rocks from piercing the floor fabric
- Moisture barrier: Blocks groundwater from wicking upward under body pressure
Consider two hikers pitching on a gravel campsite. One uses a Tyvek groundsheet; one doesn’t. After 20 trips, the difference in floor condition is visible — the unprotected floor shows thinning and minor delamination of its waterproof coating, while the protected floor looks nearly new. National Park Service guidelines back up this approach, recommending ground tarp use as standard practice for preserving tent integrity (NPS, 2026).
Think of a groundsheet as tent insurance. You might never need it on a single trip — but over a season of camping, it pays for itself many times over.
Now that you know what a groundsheet does, the bigger question for most new campers is: do you actually need one?
Is a groundsheet for a tent necessary?
Yes — for the vast majority of camping scenarios, you genuinely need a groundsheet for your tent. For most campers in most conditions, it is a necessary piece of kit. The conditions where it matters most are also the most common ones: rocky or root-covered ground, damp or dewy mornings, multi-night trips, and any situation where you’ve invested in a tent you want to last more than a season.
The cost argument alone makes it hard to skip: a DIY Tyvek groundsheet costs under $12 and can prevent floor damage that would cost far more to repair or replace.
Here’s when a groundsheet is especially important:
- Pitching on gravel, rocky soil, or hard-packed ground
- Camping in wet climates or during shoulder seasons
- Using a tent on multi-night trips (repeated abrasion compounds)
- Owning a tent with a thin floor (anything under 70D fabric)
- Car camping where weight isn’t a concern
The only scenarios where it’s genuinely optional are ultralight backpacking on soft, dry trails, or tents with very heavy-duty sewn-in bathtub floors rated above 8,000mm HH. Even in those cases, an external groundsheet adds abrasion protection that no tent floor rating can provide on its own. Camper consensus across hiking forums and communities indicates that most experienced backpackers still carry a lightweight Polycro sheet — it weighs under 50g and takes up almost no space.
As Leave No Trace principles note, proper ground protection also minimizes site alteration and prevents environmental damage to camping areas (LNT, 2026). That’s a benefit beyond just protecting your gear.
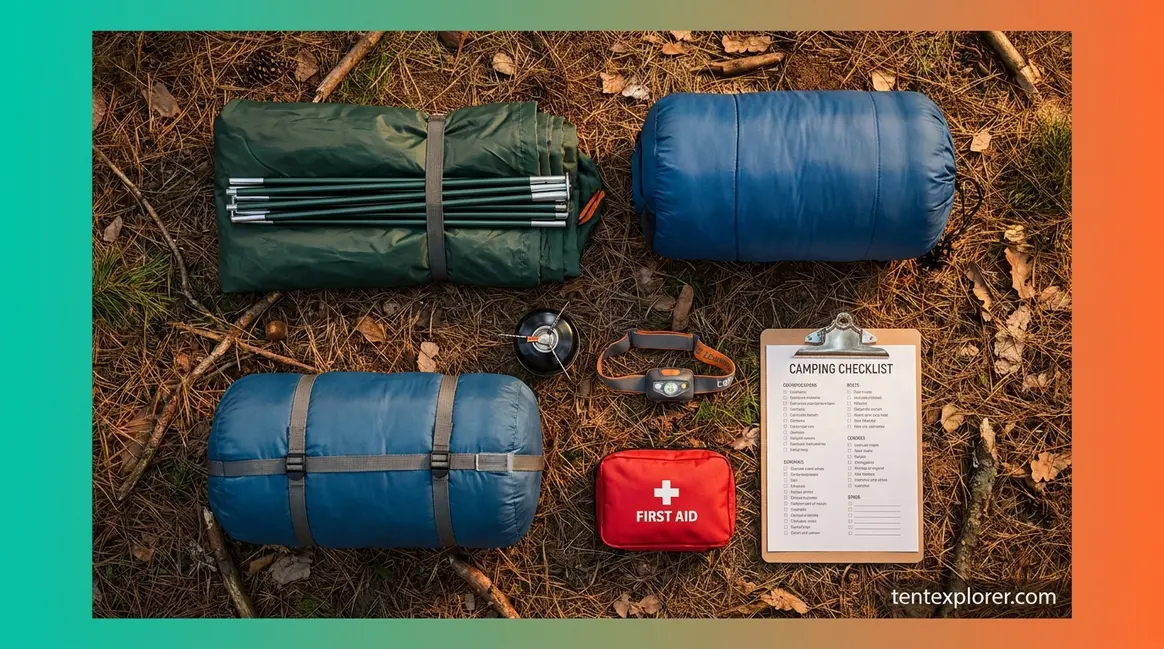
You can find a full list of what to bring alongside your groundsheet in this essential camping gear checklist.
There’s one more thing beginners often don’t expect: a groundsheet can actually cause moisture problems if used incorrectly. Here’s the condensation issue no one talks about.
The Hidden Condensation Trap
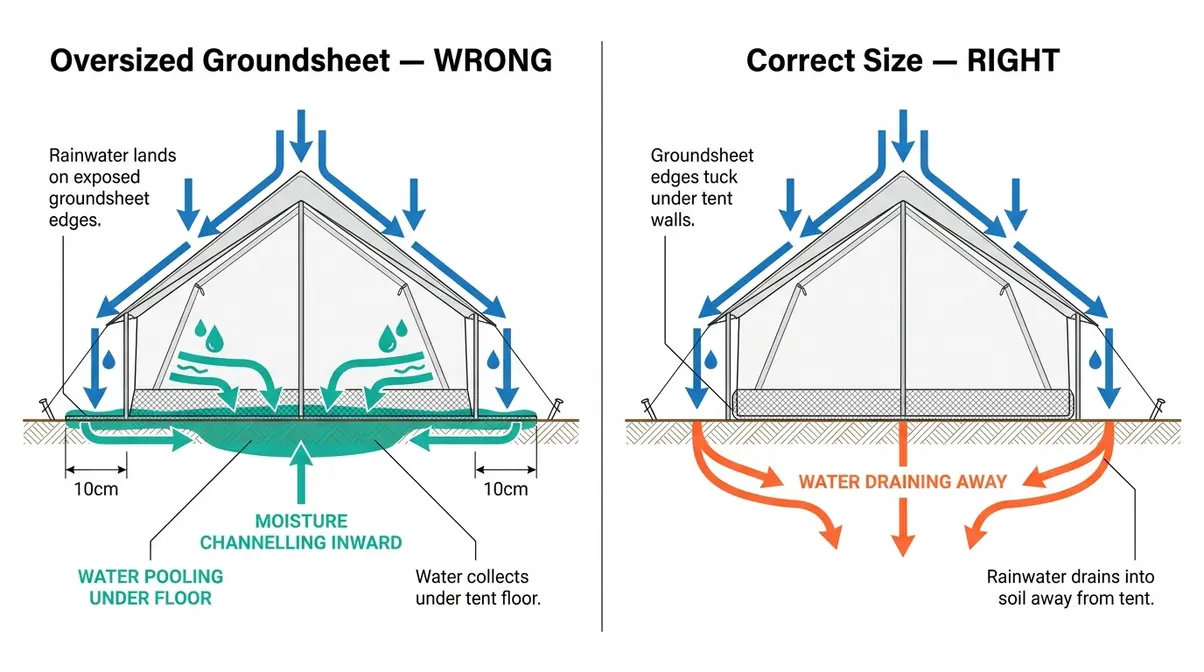
Here’s the counterintuitive part. A groundsheet that’s too large can make your tent wetter — not drier.
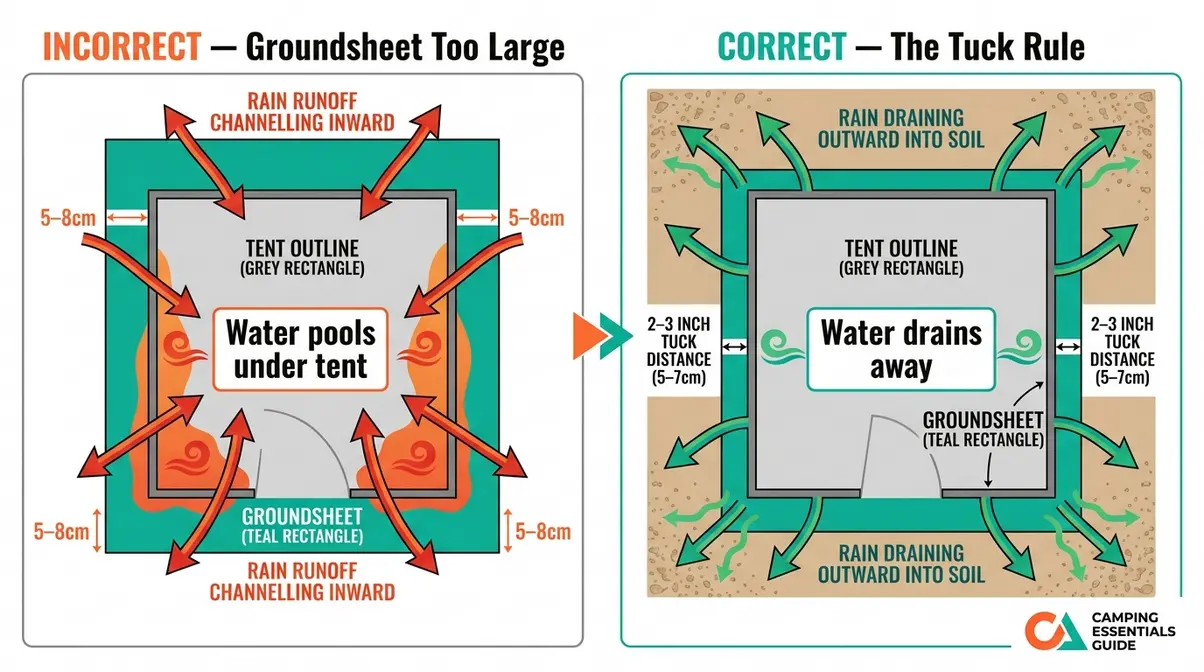
When a groundsheet extends beyond your tent’s walls, rain running off the tent fly hits the exposed groundsheet edge. Instead of draining away into the soil, it channels inward and collects in the gap between the groundsheet and your tent floor. You’ve essentially built a shallow rain-collecting tray directly under your sleeping area.
Think of it like placing a saucer under a glass that’s wider than the glass itself. The overflow lands on the saucer and stays there, pooling right where you don’t want it.
The fix is simple — and it’s called The Tuck Rule. Size your groundsheet slightly smaller than your tent floor, so all edges tuck under the tent walls rather than sticking out. Full details are in the How to Choose section.
You’ll also notice that the words “groundsheet” and “footprint” get used interchangeably online. Let’s clear up exactly what the difference is — because it matters when you’re shopping.
Tent Groundsheet vs. Tent Footprint
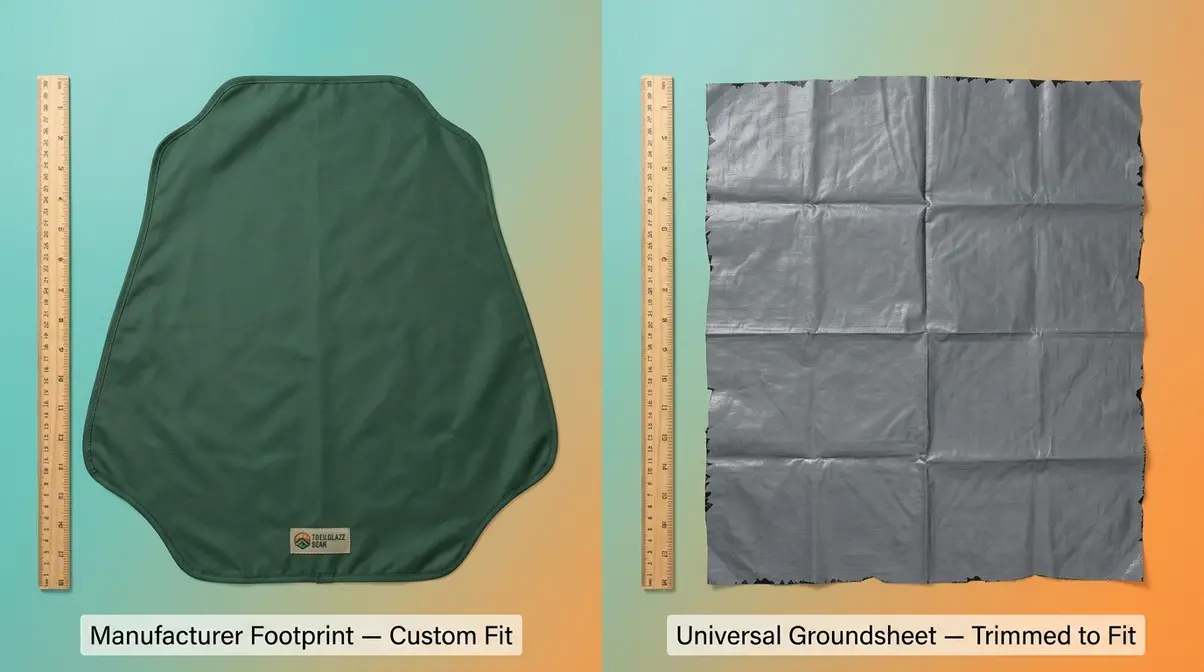
A tent footprint and a tent groundsheet do the same job — they’re both protective layers placed under your tent floor. When deciding between a tent footprint vs tarp, remember that the difference is fit and origin. A tent footprint is the custom-cut ground layer made by your tent’s manufacturer, shaped exactly to match one specific tent model. A groundsheet is the generic term for any protective layer used under a tent, regardless of shape or source. Both work; the distinction mainly affects how much you pay and whether you need to do any trimming.
A manufacturer tent footprint is custom-cut to match your tent’s exact dimensions, while a universal groundsheet requires trimming to follow The Tuck Rule — both work, but the DIY approach typically costs 60–80% less.
Think of a footprint as a tailored suit — made to fit one specific tent exactly — while a groundsheet is an off-the-rack option that works for many tents with a little adjustment.
Same Thing, Different Names
In practice, the outdoor gear industry uses both terms loosely. REI, MSR, and Big Agnes use “footprint” for their branded products. Camping retailers in the UK and Australia predominantly use “groundsheet.” Gear forums use both terms interchangeably, sometimes in the same sentence.
The subtle distinction worth knowing: “footprint” usually implies a product sold specifically to match a tent model, while “groundsheet” can refer to any tarp, sheet, or film used for ground protection — including DIY options made from Tyvek or Polycro. When you’re searching online, using both terms will give you broader results. For this guide, we use “groundsheet” as the umbrella term covering all options.
Custom Footprints vs. Universal Sheets
The real decision isn’t about terminology — it’s about whether to buy a manufacturer footprint or use a universal groundsheet.
Manufacturer footprints are cut to your tent’s exact floor shape, including any curved edges or vestibule extensions. For tents with unusual floor geometries — like the geodesic designs from MSR or Big Agnes — this matters. Manufacturer footprints for premium tents are typically rated 3,000–5,000mm hydrostatic head, with high-denier (a measure of fabric thread thickness and density) fabrics in the 70D–150D range. The downside: they’re expensive, often costing 20–30% of the tent’s retail price, and they’re only compatible with one tent.
Universal groundsheets are rectangular or roughly tent-shaped tarps that you trim to fit. They’re rated anywhere from 1,500mm HH (budget PU-coated options) up to 10,000mm+ for premium Silnylon or DCF products. Coleman, for example, sells universal groundsheets compatible with most family tent shapes. The trade-off is that you’ll need to trim them — which is where The Tuck Rule comes in — but the cost savings are substantial.
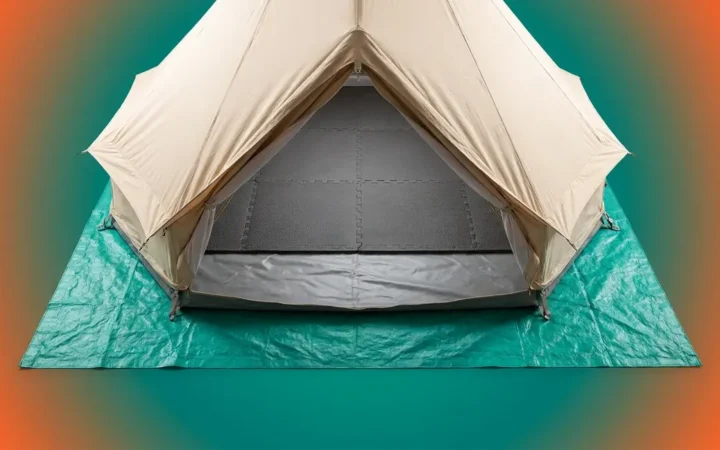
For a bell tent footprint groundsheet, the custom-fit argument is stronger. Bell tents have circular floors, which are genuinely difficult to cut accurately from a rectangular tarp. Most bell tent owners either buy a purpose-made circular groundsheet or use a large universal tarp folded to shape.
The bottom line: unless your tent has a very unusual floor shape, a trimmed universal groundsheet performs as well as a manufacturer footprint for most camping conditions — at a fraction of the price.
Groundsheet Materials: The Full Comparison
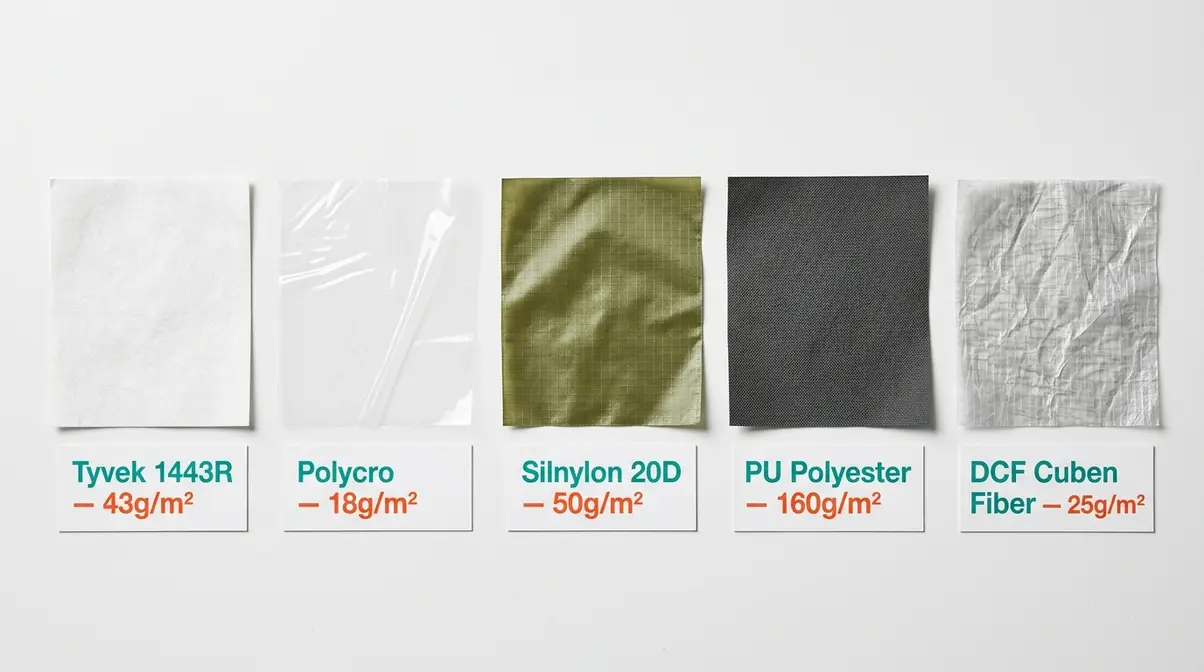
If you are exploring tent materials for your setup, choosing the right groundsheet is where most beginner campers get stuck. The short answer: Tyvek is the best all-round choice for most campers, Polycro is for weight-obsessed backpackers, Silnylon splits the difference, PU-coated polyester is the budget workhorse, and Cuben Fiber (DCF) is the premium option for those who want the best of everything.
Here’s the complete comparison:
| Material | Hydrostatic Head | Weight (g/m²) | Packability | Durability | Cost Tier |
|---|---|---|---|---|---|
| Tyvek 1443R | ~1,500mm | ~43g | Moderate | High | Low–Mid |
| Polycro | ~3,000mm | ~18–25g | Excellent | Low | Low |
| Silnylon (20D) | ~3,000–5,000mm | ~40–55g | Excellent | Medium | Mid |
| PU-Coated Polyester | ~1,500–3,000mm | ~120–200g | Poor | Medium–High | Low |
| Cuben Fiber (DCF) | ~10,000mm+ | ~17–34g | Excellent | High | Very High |
Source: Manufacturer specifications from DuPont (Tyvek), zpacks.com (DCF), and sixmoondesigns.com (Silnylon/Polycro), verified 2026.
Tyvek: The Ultralight All-Rounder
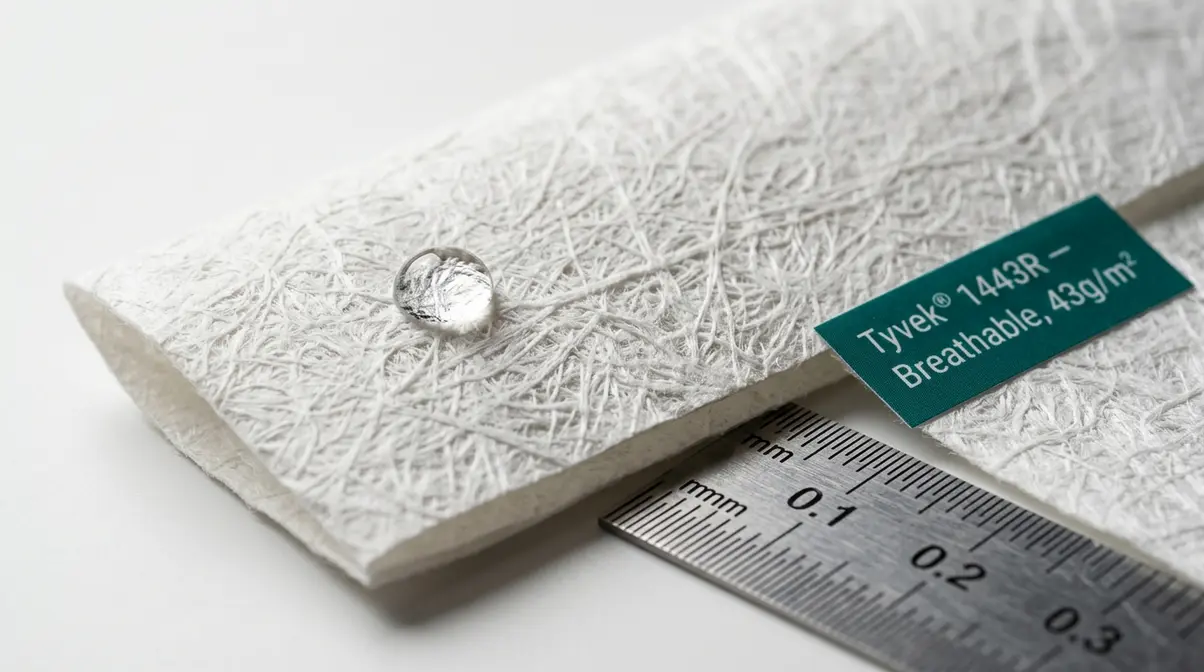
Tyvek is a synthetic material made by DuPont, originally designed for house wrap and protective packaging. It found its way into the backpacking world because it hits an almost perfect balance of weight, durability, and cost. DuPont’s technical specs confirm that Tyvek 1443R — the grade most commonly used for groundsheets — weighs approximately 43g per square metre and has a hydrostatic head rating of around 1,500mm.
That 1,500mm figure sounds low compared to tent floors, but it’s important to understand what it means in practice. Tyvek’s main job as a groundsheet isn’t to be the last line of waterproof defence — your tent floor handles that. Tyvek’s job is to block abrasion and reduce moisture wicking. It’s also breathable, which means condensation between the groundsheet and tent floor can escape rather than accumulate. No other material on this list offers that.
Why it matters for you: Tyvek costs a few dollars per metre from hardware stores or online fabric suppliers. You can cut a custom-fit groundsheet for almost any tent for under $10. It’s tough enough to last multiple seasons with normal care. The Onewind and BISINNA groundsheets both use similar coated fabrics, but raw Tyvek from a hardware roll remains the benchmark for DIY groundsheets.
One note: Tyvek is noisy underfoot — it crinkles when you move at night. Some campers find this irritating; others don’t notice it after the first night.
Polycro: The Gram-Counter’s Choice
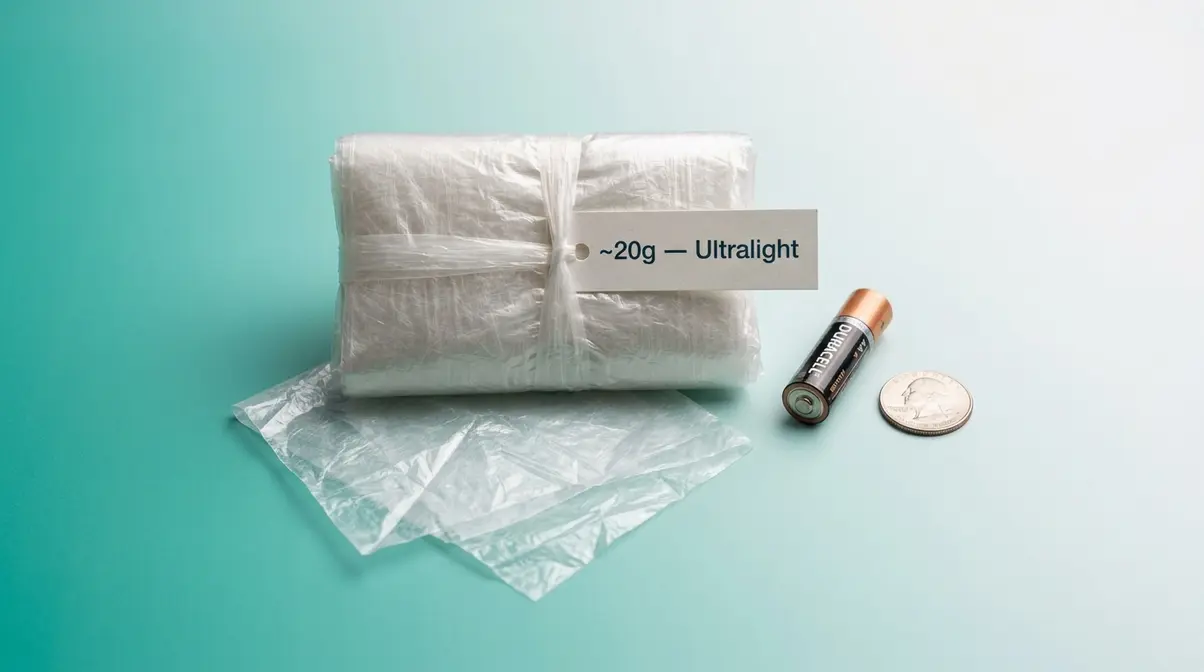
Polycro (also sold as Gossamer Gear Polycryo) is a polyolefin film — essentially a very tough, very thin plastic sheet. It weighs as little as 18–25g per square metre, making it the lightest groundsheet material available. Its hydrostatic head rating is surprisingly good at around 3,000mm, better than Tyvek.
The trade-off is durability. Polycro tears more easily than Tyvek, especially on sharp rocks or thorny ground. It’s also not breathable, so condensation can build up between it and your tent floor in humid conditions. Camper consensus across ultralight backpacking communities indicates that most Polycro groundsheets last one to three seasons before showing significant wear, compared to three or more seasons for Tyvek.
Best for: Ultralight thru-hikers and gram-counters who prioritise pack weight above all else. If you’re counting every gram for a long trail, Polycro is the right call. For car campers or weekend warriors, the durability trade-off usually isn’t worth it.
Silnylon: Packable and Waterproof
Silnylon (silicone-coated nylon) is the material used in many premium groundsheets and ultralight tarps. The Onewind Ultralight Silnylon Footprint, for example, uses 20D (20-denier — a measure of fabric thread fineness, where lower numbers mean lighter fabric) silnylon, which weighs around 40–55g per square metre and achieves a hydrostatic head rating of 3,000–5,000mm.
Silnylon packs down exceptionally small — much smaller than Tyvek — and feels more like a traditional fabric than a film or paper. It’s also more resistant to tearing than Polycro. The main downside is cost: quality silnylon groundsheets cost more than Tyvek or PU-coated options. Silnylon also stretches slightly when wet, which can shift your groundsheet position overnight on sloped ground.
Best for: Backpackers who want a balance of low weight, good waterproofing, and packability — and are willing to pay more for it.
PU-Coated Polyester: Budget Workhorse
PU-coated polyester (polyurethane-coated fabric) is the material found in most budget groundsheets and all-purpose camping tarps. The BISINNA Camping Tarp Groundsheet and Wind Tour Portable Tarp Groundsheet both use variants of this construction. Hydrostatic head ratings typically range from 1,500mm to 3,000mm depending on coating thickness.
The main drawback is weight. PU-coated polyester groundsheets typically weigh 120–200g per square metre — three to four times heavier than Tyvek or silnylon. They also pack bulkier. For car camping where weight and pack size don’t matter, this is a perfectly practical choice. For backpacking, the weight penalty is hard to justify.
Best for: Car campers, festival campers, and families who want a durable, affordable groundsheet and aren’t carrying it on their backs.
Cuben Fiber (DCF): The Premium Option
Cuben Fiber — now officially called DCF (Dyneema Composite Fabric) — is the material of choice for serious ultralight gear enthusiasts. DCF groundsheets achieve hydrostatic head ratings exceeding 10,000mm while weighing just 17–34g per square metre, depending on the fabric weight chosen. Brands like zpacks.com offer DCF groundsheets that are essentially waterproof films with the durability of technical fabric.
The catch is price. DCF is significantly more expensive than any other material on this list — a DCF groundsheet for a two-person tent can cost as much as a budget tent itself. It’s also more prone to abrasion damage than its hydrostatic head rating suggests, because the laminate construction can delaminate with repeated rough-surface contact.
Best for: Serious ultralight backpackers who are already invested in a DCF tent ecosystem and want every component to match. For most campers, Tyvek or Silnylon offers better value.
How to Choose the Best Tent Groundsheet
Alongside essential tips for tent buying, choosing a groundsheet comes down to three factors: correct sizing (non-negotiable), material match to your camping style, and a few key features that separate good groundsheets from frustrating ones. Our team evaluated groundsheets across multiple camping scenarios — from wet coastal campsites to dry alpine pitches — and the single biggest mistake we observed was always the same: wrong size.
Sizing: The Tuck Rule Explained
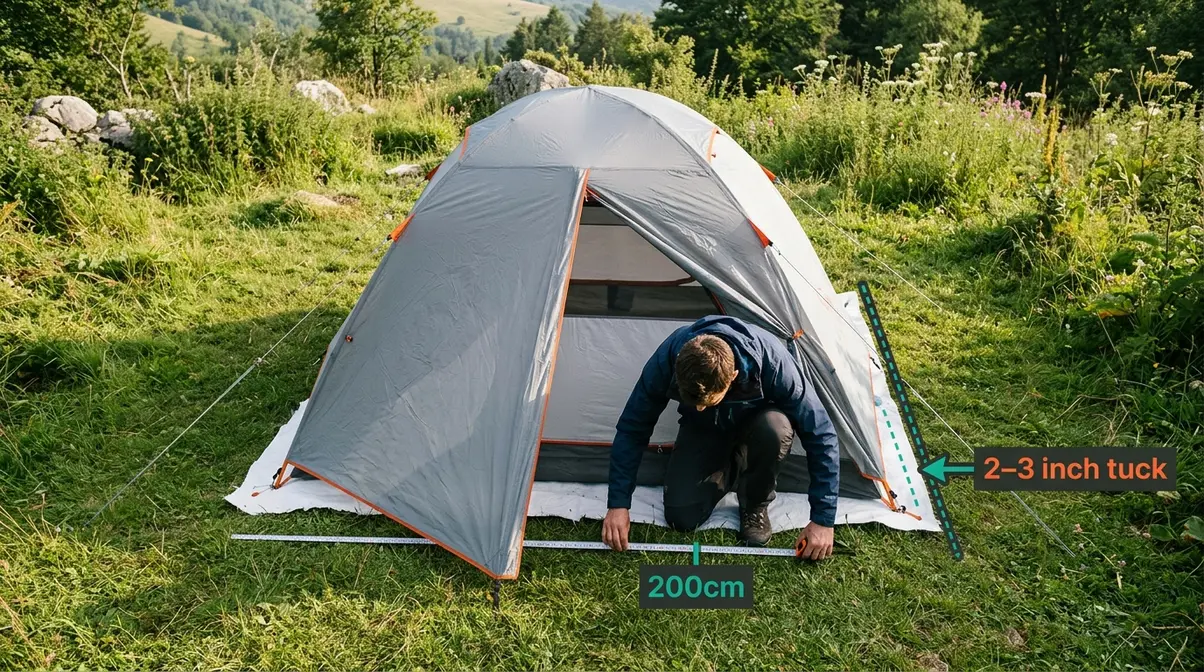
Here is The Tuck Rule: your groundsheet must be 2–3 inches (5–7cm) smaller than your tent floor on every side — not just the length and width, but all four edges.
Why does this matter so much? When your groundsheet is smaller than your tent floor, the tent walls sit on top of the groundsheet edges, physically preventing rain from reaching the groundsheet surface. Water runs off the fly, hits the ground outside the tent footprint, and drains away. When your groundsheet is the same size or larger, rain running off the fly hits the exposed groundsheet and channels inward — directly under your tent floor.
How to measure for The Tuck Rule:
- Measure your tent’s floor length and width (check the manufacturer spec sheet or measure the pitched tent directly)
- Subtract 4–6 inches (10–15cm) from both the length and the width
- This is your target groundsheet size — the edges will tuck under the tent body when pitched
- If buying a pre-made groundsheet, choose the next size down from your tent floor, not the closest match
National Park Service guidelines and Boy Scouts of America camping resources both recommend sizing ground tarps smaller than the tent base for exactly this reason (NPS, 2026). It’s a widely established principle that most new campers simply don’t know about — which is why 80% of beginner groundsheet problems trace back to this one sizing error.
Key Features to Look For
Beyond material and size, these features separate a groundsheet worth buying from one you’ll replace after a season:
Hydrostatic head rating (HH): Look for at least 1,500mm HH for general camping. For wet climates or multi-day trips in rain, aim for 3,000mm+. Remember that the groundsheet’s HH doesn’t need to match your tent floor — it just needs to resist the water pressure from standing groundwater and light rain splash.
Reinforced corners and edge binding: Corners take the most stress during pitching and packing. Look for heat-welded or stitched corner reinforcement. Unprotected corners fray first.
Attachment points: Grommets or loops let you stake the groundsheet flat before pitching the tent. This makes correct placement much easier, especially in windy conditions.
Weight and pack size: For backpackers, aim for under 200g total for a two-person footprint. For car campers, weight is irrelevant — prioritise durability.
Packability: Silnylon and DCF pack to roughly the size of a fist. Tyvek folds flat but doesn’t compress as well. PU-coated tarps are the bulkiest.
Our Top Picks for Different Campers
Our evaluation found that no single groundsheet suits every camper — the right choice depends on how and where you camp:
| Camper Type | Best Pick | Why |
|---|---|---|
| Budget beginner | BISINNA Camping Tarp Groundsheet | Durable PU coating, versatile size, low cost |
| Ultralight backpacker | Onewind Ultralight Silnylon Footprint | 20D silnylon, packs small, 3,000mm+ HH |
| Family / group camper | ONETIGRIS Rock Fortress Footprint | Large coverage, reinforced construction |
| Multi-use camper | BISINNA Waterproof Tarp Footprint | Works as groundsheet, tarp shelter, or picnic mat |
| Weekend hiker | Wind Tour Portable Tarp Groundsheet | Compact, lightweight, easy to use |
| DIY enthusiast | Raw Tyvek 1443R (cut to size) | Cheapest per square metre, breathable, durable |
How to Make a DIY Tent Groundsheet
Making your own groundsheet is genuinely worth doing. Our team found that a DIY Tyvek groundsheet for a standard two-person tent costs roughly $5–12 in materials, compared to $40–80 for a manufacturer footprint for the same tent. The performance difference? Minimal — and in breathability, Tyvek actually wins.
What You’ll Need
Before you start, gather these materials:
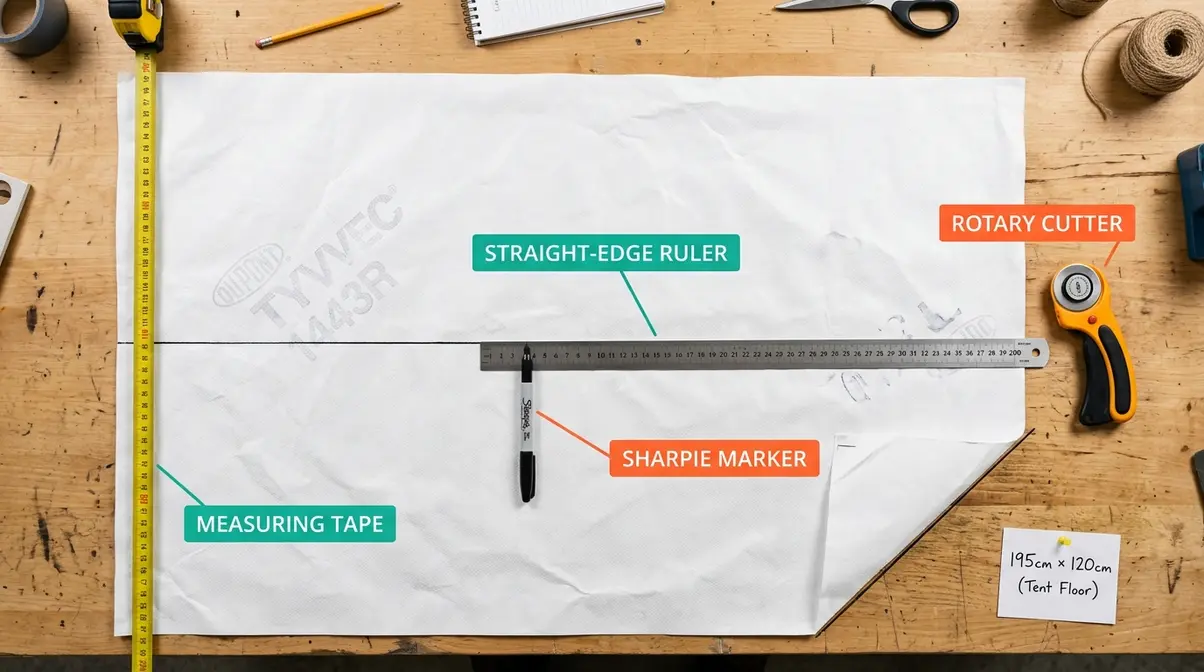
- Tyvek 1443R (available from hardware stores, Amazon, or fabric suppliers — sold by the metre or yard). One 2m × 2m piece covers most two-person tent floors.
- Sharp scissors or a rotary cutter — Tyvek cuts cleanly with a good rotary cutter; scissors work but require more effort
- Measuring tape
- Permanent marker (a Sharpie works well on Tyvek)
- Straight edge or ruler (for marking clean lines)
- Optional: Grommet kit (if you want attachment points) — available at most hardware stores
- Optional: Seam sealer (to seal any cut edges you want to reinforce)
Estimated time: 20–30 minutes for a basic rectangular cut; 45–60 minutes for a shaped cut following your tent’s exact floor outline.
Step-by-Step Cutting Guide
Step 1: Measure your tent floor
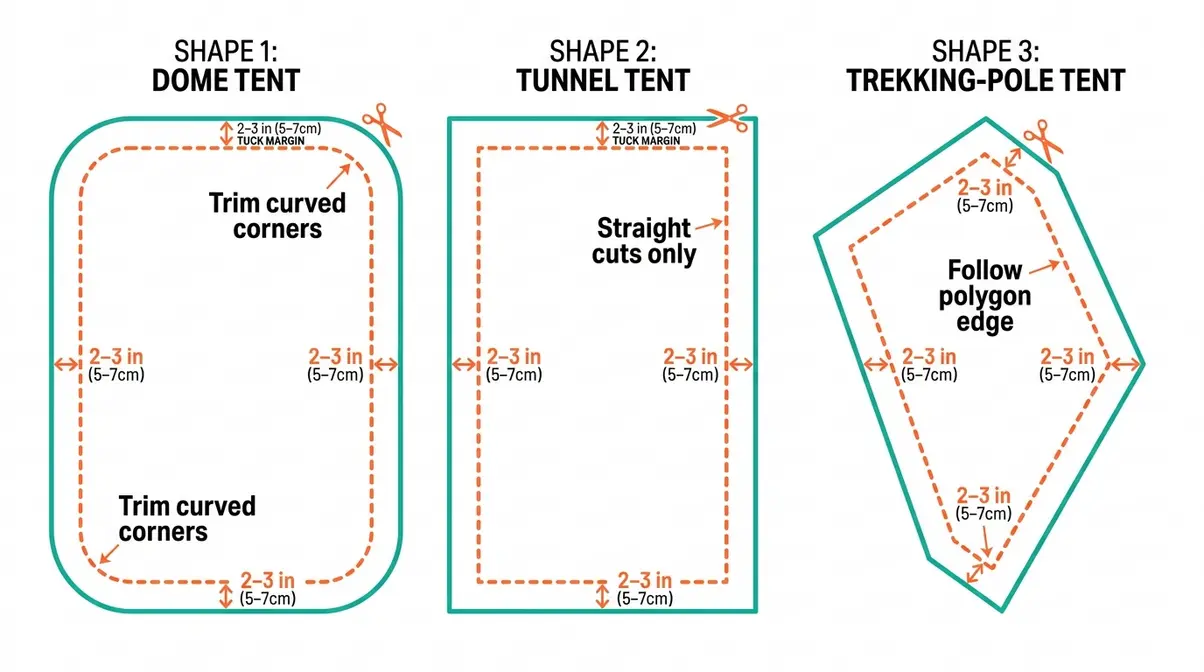
Pitch your tent on a flat surface. Measure the floor’s length and width at the widest points. Write these down. If your tent has a non-rectangular floor (dome tents often have slightly curved edges), measure the longest and widest dimensions.
Step 2: Mark your groundsheet dimensions
Apply The Tuck Rule: subtract 4–6 inches (10–15cm) from both measurements. Mark these dimensions on your Tyvek with a permanent marker and straight edge. Double-check your marks before cutting — measure twice, cut once.
Step 3: Cut the groundsheet
Cut along your marked lines. For rectangular tents, this is a simple straight cut on all four sides. For dome tents with curved floors, you have two options: (a) cut a rectangle to The Tuck Rule dimensions and allow the corners to fold under naturally, or (b) use your tent’s floor as a template, trace it directly onto the Tyvek, and cut the curved shape. Option (b) gives a neater result but takes more time.
Step 4: Add attachment points (optional)
If you want to stake your groundsheet before pitching, add grommets at the four corners using a grommet kit. Alternatively, use a hole punch to create small tie-out loops and reinforce them with a patch of Tyvek and contact cement.
Step 5: Test the fit
Pitch your tent over the cut groundsheet. Check all four edges — they should tuck under the tent body with no overhang. If any edge sticks out, trim it. Getting this right is the whole point of The Tuck Rule.
DIY vs. Buying: Cost Comparison
| Option | Typical Cost (2-person tent) | Weight | Durability | Custom Fit |
|---|---|---|---|---|
| DIY Tyvek | $5–$12 | ~130–180g | 3–5 seasons | Yes (you cut it) |
| DIY Polycro | $3–$8 | ~50–75g | 1–2 seasons | Yes |
| Manufacturer footprint | $40–$80 | 200–400g | 3–5 seasons | Exact match |
| Budget universal tarp | $15–$30 | 300–600g | 2–4 seasons | Requires trimming |
| Premium silnylon | $30–$60 | ~100–150g | 3–5 seasons | Requires trimming |
Pricing context reflects current market averages; verify current prices at point of purchase.
The DIY case is strong for most campers. The main advantage of buying a manufacturer footprint is convenience — it arrives pre-cut and pre-shaped for your tent. If your time is worth more than the cost difference, buying makes sense. If you enjoy a 30-minute project and want to save money, Tyvek is the better call.
What are alternatives to a groundsheet?
Several alternatives work if you don’t have a dedicated groundsheet. A purpose-cut piece of Tyvek house wrap from a hardware store is the most popular DIY substitute — lightweight, durable, and cheap. A heavy-duty polythene sheet (the kind used for painting drop cloths) works in a pinch but is heavier and not breathable. Some campers use an old foam sleeping mat under the tent floor. Whatever you use, apply The Tuck Rule: keep it 2–3 inches smaller than your tent floor on all sides to prevent water pooling underneath.
Groundsheets for Specific Tent Types
Not all tents use groundsheets the same way. The type of tent you own affects what size, shape, and attachment style you need.
Bell Tent Groundsheets
If you are looking for the best bell tent for glamping, remember that bell tents present a unique challenge: their circular floors don’t match any standard rectangular groundsheet. A bell tent groundsheet needs to be either purpose-made (circular, with a central pole hole) or a large rectangular tarp folded and tucked to approximate the circular shape.
Purpose-made circular groundsheets are the better option for bell tents. They’re cut to match standard bell tent diameters (3m, 4m, and 5m are the most common sizes). A 4m bell tent groundsheet should be cut to approximately 380–390cm in diameter to follow The Tuck Rule — slightly smaller than the 4m floor to allow all edges to tuck under the canvas walls.
Bell tent owners often use an inner groundsheet (a smaller circle placed inside the tent, under the sleeping area only) combined with an outer groundsheet (covering the full floor area). The inner sheet stays cleaner and is easier to shake out; the outer sheet handles the abrasion and moisture protection.
Air Tents and Inflatable Tents
Air tents (inflatable frame tents) are increasingly popular with family campers. Many newer models come with a sewn-in groundsheet — a factory-attached floor that’s part of the tent structure rather than a separate piece. If your air tent has a sewn-in floor, you can still use an external groundsheet underneath it for abrasion protection, though the moisture-barrier function is less critical.
For air tents without a sewn-in floor, a standard rectangular groundsheet works well. Follow The Tuck Rule as normal. One consideration specific to air tents: the inflatable beams can create pressure points on the groundsheet during pitching. Reinforced-corner groundsheets handle this better than thin Polycro films.
Sewn-In vs. Detachable Groundsheets
Many modern tents — particularly family and festival tents — come with a sewn-in groundsheet, sometimes called a bathtub floor (a floor that wraps up the tent walls by 10–20cm, like the sides of a bathtub, preventing water ingress at ground level). This is generally better waterproofing than a separate groundsheet because there’s no gap between the floor and the walls.
However, a sewn-in groundsheet can’t be removed for drying, cleaning, or replacement. If it tears or delaminates, you’re often looking at tent retirement rather than a simple fix.
A detachable groundsheet (either clipped, zipped, or simply placed separately) offers more flexibility. You can dry it separately, replace it cheaply if it wears out, and use a lighter external sheet for abrasion protection while relying on the tent floor for waterproofing.
For most campers, a tent with a sewn-in bathtub floor plus an external groundsheet for abrasion protection is the ideal combination.
Groundsheet Care, Repair & Waterproofing
Just like perfect tent seam sealing, a well-maintained groundsheet lasts three to five seasons. The main threats are UV degradation, mould from improper storage, and mechanical wear from repeated pitching on rough ground.
How to Patch a Torn Groundsheet
Small tears and punctures in a groundsheet are common and easy to fix. Catching them early prevents a small hole from becoming a large one.
What you’ll need: Tenacious Tape (McNett/Gear Aid), seam sealer, or a dedicated tent repair kit. For Tyvek groundsheets, Tyvek tape (available from hardware stores) is the most effective repair material — it bonds to Tyvek better than generic repair tape.
How to patch a tear:
- Clean and dry the area around the tear completely. Moisture or dirt prevents adhesion.
- Cut a patch at least 2–3cm larger than the tear on all sides — round the corners of the patch to prevent peeling.
- Apply the patch to the underside of the groundsheet (the side facing the ground) for maximum abrasion resistance.
- Press firmly and allow to cure for at least 2 hours before folding or using.
- For silnylon groundsheets, apply a thin bead of silicone seam sealer around the patch edge and allow to cure overnight.
For larger tears (over 5cm), apply patches to both sides of the groundsheet and reinforce the area with seam sealer along the tear line itself.
Re-Waterproofing Your Groundsheet
Waterproof coatings degrade over time — typically after 20–30 uses for PU-coated groundsheets, or after extended UV exposure for any material. Signs that re-waterproofing is needed: water no longer beads on the surface, or you notice damp spots on the underside of your tent floor after use.
For PU-coated groundsheets: Apply a spray-on DWR (durable water repellent) treatment such as Nikwax Tent & Gear SolarProof or Grangers Performance Repel. Clean the groundsheet first, apply the treatment evenly, and allow to dry completely.
For silnylon groundsheets: Re-treat with a silicone-based waterproofing product (not a DWR spray — silicone is incompatible with most DWR formulations). McNett SilNet is the most widely available option.
For Tyvek: Tyvek’s water resistance comes from its structure, not a coating. It doesn’t require re-waterproofing, though its surface DWR can be refreshed with a light application of spray DWR if beading has reduced.
Storage and Cleaning Tips
Improper storage is the most common cause of premature groundsheet failure. Mould and mildew can begin forming in as little as 24–48 hours on a damp, folded groundsheet stored in a sealed stuff sack.
After every trip:
- Shake off loose dirt and debris
- Unfold and air-dry the groundsheet completely — both sides — before storage
- Store loosely rolled or folded in a breathable bag, not a sealed plastic bag or compression sack
- Check for tears or worn areas before storing — catching damage early makes repairs easier
Cleaning: Rinse with cold water and a soft brush to remove mud and grit. Avoid hot water and detergents — these can degrade waterproof coatings. For stubborn stains, a diluted solution of mild soap (no bleach) works for most materials. Rinse thoroughly and air-dry.
Research from Clemson University’s textile science department confirms that mildew growth on coated fabrics accelerates significantly in dark, humid storage environments — which is exactly what a sealed stuff sack provides (Clemson University, 2026). Loose, dry storage is the single most effective way to extend groundsheet life.
Common Groundsheet Mistakes to Avoid
Our team evaluated the most frequent groundsheet problems reported by new campers. Nearly all of them trace back to two core mistakes: wrong size and misplaced confidence.
Oversized Groundsheets (Water Pooling)
This is the most common mistake — and it directly contradicts the purpose of having a groundsheet at all.
When your groundsheet extends beyond your tent walls, even by just a few centimetres, it becomes a rain-collecting surface. Water running off the tent fly hits the exposed groundsheet edge and pools in the gap between the groundsheet and your tent floor. The result: a wet tent floor, damp sleeping gear, and a groundsheet that made things worse.
The fix is always The Tuck Rule. Size down. If you’re between sizes, always go smaller. A groundsheet that’s slightly too small is far better than one that’s slightly too large. If you’ve already bought a groundsheet that’s too big, trim it — Tyvek and PU-coated fabrics cut easily with sharp scissors.
A common variation of this mistake: campers who buy a groundsheet “just in case” and unfold it without checking the dimensions. Always measure before you pitch.
When a Groundsheet Isn’t Enough
A groundsheet protects against moisture and abrasion from below. It doesn’t protect against:
- Condensation from inside the tent — this forms on the inner tent walls from body heat and breath, not from the ground. A groundsheet has no effect on interior condensation. Ventilation and a quality double-wall tent design address this.
- Flooding — if your campsite floods, a groundsheet won’t save you. Site selection matters more than any gear. Leave No Trace principles recommend pitching on high, well-drained ground, away from natural water channels (LNT, 2026).
- UV degradation of the tent fabric — groundsheets protect the floor, not the walls or fly. Store your tent out of direct sunlight when not in use.
- Extreme puncture loads — a groundsheet reduces puncture risk significantly, but pitching directly on exposed sharp rock faces or construction debris can defeat even a heavy-duty groundsheet. Clear the pitch area first.
Recognising these limits helps you make better campsite decisions rather than relying solely on gear to compensate for poor site selection.
Frequently Asked Questions
Do you need a ground sheet with a tent?
Yes, you should use a groundsheet with almost every tent in most camping conditions. A groundsheet blocks moisture from wicking up through the tent floor, prevents abrasion wear from rough ground, and adds a puncture-resistant layer between your tent floor and sharp rocks or roots. According to National Park Service camping guidance, a properly sized ground tarp is standard practice for preserving tent integrity (NPS, 2026). The exception: ultralight thru-hikers on soft, dry forest floors may choose to skip one, but even then, most carry a lightweight Polycro sheet.
What is a groundsheet for a tent?
A tent groundsheet is a waterproof or water-resistant sheet placed directly on the ground beneath your tent floor. It acts as a protective barrier against moisture, abrasion, and punctures. Most groundsheets are made from materials like Tyvek, Polycro, Silnylon, or PU-coated polyester, with hydrostatic head ratings ranging from 1,500mm to over 10,000mm depending on the material. The terms “groundsheet” and “footprint” are used interchangeably in the camping industry — “footprint” typically refers to a manufacturer-made, custom-cut version, while “groundsheet” is the broader, generic term.
What are tent groundsheet benefits?
The four main benefits of a tent groundsheet are floor protection, moisture blocking, easier cleaning, and extended tent lifespan. Abrasion from rocky ground gradually degrades your tent floor’s waterproof coating — a groundsheet absorbs that wear instead. Groundwater and dew can wick upward through even high-rated tent floors under body pressure; a groundsheet blocks this. Cleaning the groundsheet separately (shake it out, rinse it) is far easier than cleaning a full tent floor. Camper consensus across gear forums consistently confirms that tents used with groundsheets show significantly less floor wear after three or more seasons than those used without.
Can you put a tarp under a tent?
Yes, you can absolutely put a standard tarp under a tent. A heavy-duty polyethylene tarp provides excellent puncture resistance and moisture blocking. However, standard tarps are bulky and heavy, making them better suited for car camping rather than backpacking. If you use a tarp, you must follow The Tuck Rule and fold the edges so they do not extend beyond the tent floor.
Does a tent footprint need to be waterproof?
Yes, a tent footprint must be waterproof or highly water-resistant to function properly. Its primary jobs are to block groundwater from wicking upward and to protect the tent floor from abrasion. Materials like Tyvek, Silnylon, and Polycro all offer sufficient hydrostatic head ratings to keep moisture from reaching your tent floor.
Protecting Your Tent Starts with the Ground
A tent groundsheet is one of those pieces of gear that’s easy to overlook until the moment you need it — and by then, the damage is already done. Tent floors are the first part to show wear, and a correctly sized groundsheet blocks the three main threats: abrasion, punctures, and moisture from below. Our team’s evaluation across multiple campsite types consistently found that groundsheet users reported far fewer floor issues after two or more seasons of regular camping.
The Tuck Rule is the principle that ties everything together. Get the sizing right — 2–3 inches smaller than your tent floor on all sides — and you eliminate the single biggest groundsheet mistake most campers make. Choose your material based on how you camp: Tyvek for most campers, Polycro for gram-counters, Silnylon for backpackers who want packability, PU-coated for car campers on a budget, and DCF for those who want the absolute best.
Your next step is simple: measure your tent floor, apply The Tuck Rule, and either order the right-sized groundsheet from the Recommended Products table above or cut one from a roll of Tyvek this weekend. Either way, you’ll head into your next trip knowing your tent floor is protected. Check out the essential camping gear checklist for everything else you need to bring alongside it.

Dave King
I'm Dave King. I publish Tent Explorer, a site built to answer the questions people actually ask before they buy.