This blog post may contain affiliate links. As an Amazon Associate I earn from qualifying purchases.
📋 Table of Contents
- What You’ll Need Before You Start
- Field Repair Kit vs. Home Repair Kit
- Best Tape for Tent Repairs
- How to Repair Tent Fabric: Rips, Tears, and Holes
- Field Fix: Emergency Tape Repair
- Home Repair: Applying a Permanent Patch
- Material Matters: Nylon vs. Canvas Repair
- How to Fix a Broken Tent Pole
- Emergency Field Splint
- Permanent Fix: Replacing a Pole Section
- How to Restring a Shock Cord
- How to Fix a Tent Zipper
- Diagnosing Stuck or Broken Zippers
- Cleaning and Crimping the Slider
- Replacing a Zipper Slider
- How to Repair Tent Mesh and Screen
- Snag vs. Hole: Which Repair Do You Need?
- Applying an Adhesive Mesh Patch
- How to Waterproof a Tent and Reseal the Seams
- Testing If Your Tent Needs Waterproofing
- Reapplying a DWR Coating
- Resealing Tent Seams Step by Step
- Pop-up Canopy & Tent Trailer Repairs
- Repairing a Tent Trailer Canvas
- Fixing a Pop-up Canopy Frame
- Repair vs. Replace: The Triage Framework
- Repair vs. Replace Decision Matrix
- Is It Worth Repairing a Tent?
- Common Mistakes to Avoid
- Common Pitfalls
- When to Choose Alternatives
- When to Seek Expert Help
- Frequently Asked Questions
- Repair Your Tent, Extend Your Adventures
You’re miles from the trailhead when you hear it — the sharp tear of nylon, or the crack of a tent pole snapping in the wind. A damaged tent doesn’t have to mean a ruined trip.
Most campers assume a rip or broken pole means buying a new tent. That’s an expensive mistake. A quality tent can last a decade or more with the right repairs, and most common fixes cost under $20 in materials — a fraction of the $150–$400 you’d spend replacing even a budget-to-mid-range shelter.
This guide covers exactly how to repair a tent — from emergency backcountry patches to permanent at-home fixes — so you can protect both your gear and your budget. We cover fabric tears, broken poles, stuck zippers, mesh holes, leaking seams, specialized tent types, and the one situation where replacement actually makes more sense than repair.
The Repair Triage Framework helps you match every tent repair to the right method — field fix or home repair — before you reach for tape or tools. Knowing how to repair a tent using this framework saves time and money.
- Fabric tears: Tenacious Tape applied to both sides beats Gorilla Tape for a waterproof, residue-free fix that lasts seasons, not nights.
- Broken poles: A pole repair sleeve (a short aluminum splint) provides a strong field fix in under 5 minutes with no special skills.
- Leaking seams: Re-sealing with a urethane-based seam sealer like Seam Grip restores full waterproofing in one session.
- The Repair Triage Framework: Identify your situation first — field fix or home repair — and the right method becomes obvious.
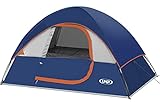
- Lightweight & Big Space: 7'L x 5' x 45"H. Spacious room for 2 adults.Standard size fits 1 full air mattress.And this 2 Person tent weighs just 4.8lb,it's very easy to carry.This tent perfect for outdoor camping, hiking,climbing, indoor or backyard play tent, fishing, or shelter at the beach in all weather.
- Windproof & Rainproof: The camping tent is made of stronger tear-resistant polyester.It come with a removable rainfly and two zippers designed for keeping the rain outside the tent. The ropes of tent and piles ensure safety and stability.
- Comfortable Design: Skylight net and larger mesh window designed enhances breathability and comfortable. Interior storage pocket designed to keep your contents neat and organized, great ventilation and convenient for enjoying outdoor views and your free time.
- Easy To Set Up: The tents for camping that can be quickly assembled within 3 minutes and easily assembled by one person according to the procedures and instructions sewn inside the bag.
- What You Will Get: Please contact us if you have any issues.We promise you will get a satisfactory answer within 24h.
Last update on 2026-06-20 / Affiliate links / Images from Amazon Product Advertising API

- Fix rips and holes fast with an ultra-strong, peel-and-stick repair tape that requires no heat or sewing, ideal for use on tents, tarps, jackets, vinyl furniture, and other synthetic materials
- Apply Tenacious Tape to almost anything with its aggressive adhesive that bonds permanently to nylon, mesh, vinyl, rubber and plastic; not recommended for seams, denim, cotton, or natural fabrics
- Make a washable repair sealed with this repair tape featuring a waterproof coating that won’t peel off over time; available in 3”x20” strip
- Use the nylon fabric (black, red, yellow, OD green and coyote), ripstop fabric (sage green and off-white), and clear vinyl for a nearly invisible repair
- Packaging may vary
Last update on 2026-06-05 / Affiliate links / Images from Amazon Product Advertising API

- Permanent Repairs – Seal seams and fix holes in tents, tarps, awnings, rainflies, and gear like Thermarest sleeping pads with a flexible, waterproof adhesive.
- Covers 12 Feet of Seams – One 1 oz tube treats up to 12 feet of seams or patches torn fabric: 8 oz size also available for larger repair needs.
- Durable & Flexible Seal – Cures into a rubber seal that flexes with fabric, bonds to nylon, polyester, canvas, leather, and vinyl for long-lasting performance.
- Won’t Peel or Crack – Designed to stay put through heavy use and weather; ideal for re-proofing or fixing gear that needs to stay waterproof.
- Easy Application – Comes with applicator brush for precise, mess-free repairs at home or in the field.
Last update on 2026-06-05 / Affiliate links / Images from Amazon Product Advertising API

- EASY INSTALLATION: Designed for quick and simple setup, this pipe repair clamp allows for hassle-free installation on various pipe sizes. No special tools required for secure placement.
- DURABLE MATERIALS: Constructed from plated steel, this plumbing repair clamp offers long-lasting strength and corrosion resistance for reliable water pipe repairs in demanding environments.
- VERSATILE FIT: Compatible with 3/8 in., 1/2 in., and 3/4 in. IPS pipes, this joint pipe clamp is ideal for emergency repairs and maintenance on steel, copper, or plastic pipes in residential or commercial settings.
- LEAK PROTECTION: Effectively seals leaks and reinforces weak pipe joints, making it a dependable solution for pipe leak repair and preventing further water damage in your plumbing system.
- COMPACT DESIGN: With a modern style and compact dimensions, this repair clamp fits easily in tight spaces, making it perfect for quick fixes and ongoing pipe maintenance in any location.
Last update on 2026-06-20 / Affiliate links / Images from Amazon Product Advertising API
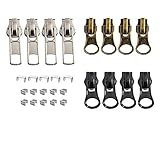
- Versatile Set : This zipper repair kit contains 12 zipper sliders in three colors - black, bronze, and silver. These zipper sliders are suitable for metal, plastic, and nylon coil zippers, allowing you to fix the broken or stuck zipper sliders on jackets and bags
- Easy Replacement: Simply attach the new zipper slider to the zipper tape. Quickly fix broken or stuck zipper pulls by replacing them with these durable zipper sliders
- Zipper Repair Kit Sizes : The kit's zipper sliders are designed for #5 zippers, a common size in various applications, including jackets, jeans, bags, and other accessories
- Zipper Sliders Materials : The zipper sliders are all made of metal, ensuring durability and the ability to withstand frequent use
- Multi - Purpose : The zipper slider is equipped with a lock, which can be firmly fixed without slipping. It is ideal for repairing zippers on jackets, coats, bags, luggage and other garments or accessories
Last update on 2026-06-20 / Affiliate links / Images from Amazon Product Advertising API
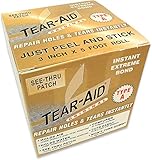
- Provide a simple and easy method of patching holes and tears. Easy peel and stick
- Includes alcohol prep pads
- 3" x 5 Foot Roll. Includes alcohol prep pads
- Holds air under pressure even when stretched. See-thru patch works with all colors. Conforms to irregular surfaces
- Won't turn gummy in heat. UV resistance inhibits discoloring. Cuts easily with scissors. Won't pull off when stretched
Last update on 2026-06-20 / Affiliate links / Images from Amazon Product Advertising API

- Easy and Fast: Cut a suitable size or shape of the screen repair tape, then cover the tear or hole you want to repair. No tools needed and only seconds you're done! Fast and easy way to repair screens temporarily or permanent
- Ultra Strong Adhesive: This screen door repair kit was made of fiberglass and specialized glue, it is durable and will stick to any screen surface. Clean the contact part before use to make sure the screen patchs stay on the surface of your window screen and screen door for a longer time
- Wide Application: The window screen repair kit can be used both indoor and outdoor,it is waterproof and can be used normally between -4°F-158°F. It can be applied to fix tears and holes in window screens, screen door mesh repair, tent, pool screens and other mesh screen repair
- Extra long and Save money: The size of the screen repair tape is 2 IN X 30 FT, you can use more of them to repair a larger hole. No need to spend a lot to replace the entire screen mesh then
- Note: This window screen tape is NOT invisible and ventilated. Remember to peel off the release liner and attach the correct side to the tears and holes or it will not very sticky
Last update on 2026-06-20 / Affiliate links / Images from Amazon Product Advertising API

- KEY INFO - Total length of FEMALE pole is 12ft (365.7 cm) after assembled; total length of MALE pole is 12ft 1.4 in (369.3 cm) after assembled. OUTER DIAMETER: 0.33 in / 8.5mm.
- FIT MALE & FEMALE ENDS - Not all tent poles have MALE ends. You could assemble our tent pole repair kit to make it either MALE or FEMALE.
- REPAIR OLD TENTS & CUT WEIGHT - With a few steps’ installations or even a couple of cuts, you can bring your old beloved tent to a prolonged life. One pole only weighs 0.54 lb, and measures 17.48" long after assembled. It is wise to discard your heavy fiberglass poles to revamp your old tent to a lightweight backing tent.
- WE CARE ABOUT EVERY DETAIL - Made of the highest quality 7001 series aircraft-grade aluminum and durable elastic cord, poles can take the bends better than many cheaper poles which would crumple or snap easily. Every pole segments are carefully handled for smooth connection between pole sections for your really quick set-up/takedown.
- DISCOVER MORE WAYS TO USE THEM - Made of high-quality aluminum, the aluminum poles are also ideal for your custom applications. You can easily adjust and resize them to any length with only minor difficulty. Perfect as Replacement Tent Poles, Awning Support, Disc Golf Retriever, Golf Swing Trainer, Helium Sticks, etc.
Last update on 2026-06-21 / Affiliate links / Images from Amazon Product Advertising API

- RESTORE DWR PROTECTION – Reapply durable water repellency to waterproof jackets, rain gear, ski wear, tents, and camping gear to help water bead off fabric surfaces
- MAINTAIN FABRIC BREATHABILITY – Helps GORE-TEX and waterproof-breathable materials stay breathable by reducing fabric saturation and wet-out during outdoor use
- PROTECT AGAINST WATER, DIRT & STAINS – Adds all-season protection to outerwear, backpacks, tents, and technical fabrics exposed to rain, mud, snow, and everyday wear
- TREATS MULTIPLE GARMENTS – 5 oz spray treats 1–2 adult jackets, 10 oz spray treats 2–4 jackets, and 16.9 oz spray treats 4–6 jackets depending on garment size and coverage
- FOR BEST PERFORMANCE – Wash gear first with Revivex Pro Cleaner before applying Durable Water Repellent (DWR) Spray to maximize waterproofing performance and longevity
Last update on 2026-06-20 / Affiliate links / Images from Amazon Product Advertising API

- Seal up to 24 ft of seams with 1.5 oz of this durable, clear adhesive that bonds permanently to silicone-treated (silynylon) tents
- Apply to ultra-light gear including silnylon backpacks; cures to a flexible, elastic seal that flexes and stretches with fabric
- Creates a long-lasting, waterproof seal that won’t peel or crack over time; not affected by extreme heat or cold
- Also ideal for applying on silnylon tarps, shelters, and rainwear to keep water out (previously known as SIL Net)
- Packaging may vary
Last update on 2026-06-20 / Affiliate links / Images from Amazon Product Advertising API
What You’ll Need Before You Start
Estimated completion time: 10–45 minutes depending on the specific repair.
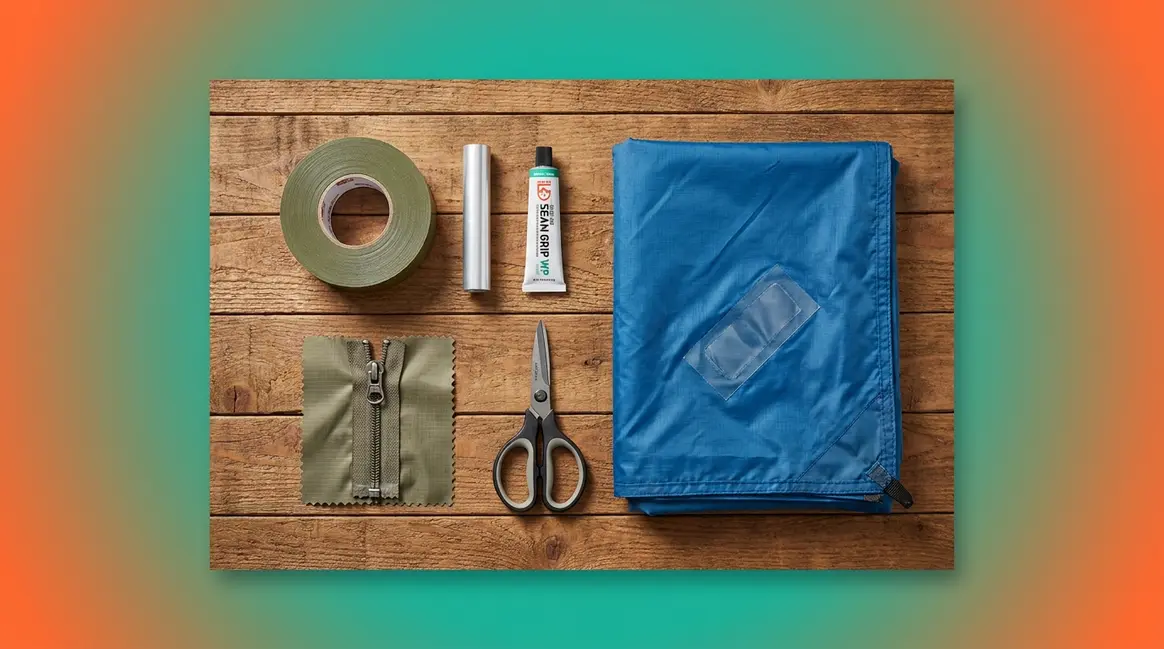
Before you touch your tent, gather your materials — having the right items on hand is the difference between a 10-minute fix and a frustrating hour of improvising. Most repairs require only a handful of inexpensive items, and the wrong tape can leave sticky residue that’s nearly impossible to remove and attracts dirt directly to the repair site.
The core principle here is The Repair Triage Framework — a decision structure that divides every tent repair into two tiers: a Field Fix (fast, temporary, done with what you carry in your pack) and a Home Repair (permanent, material-specific, done with your full kit after the trip). Knowing which tier you’re in before you start saves time, materials, and frustration.
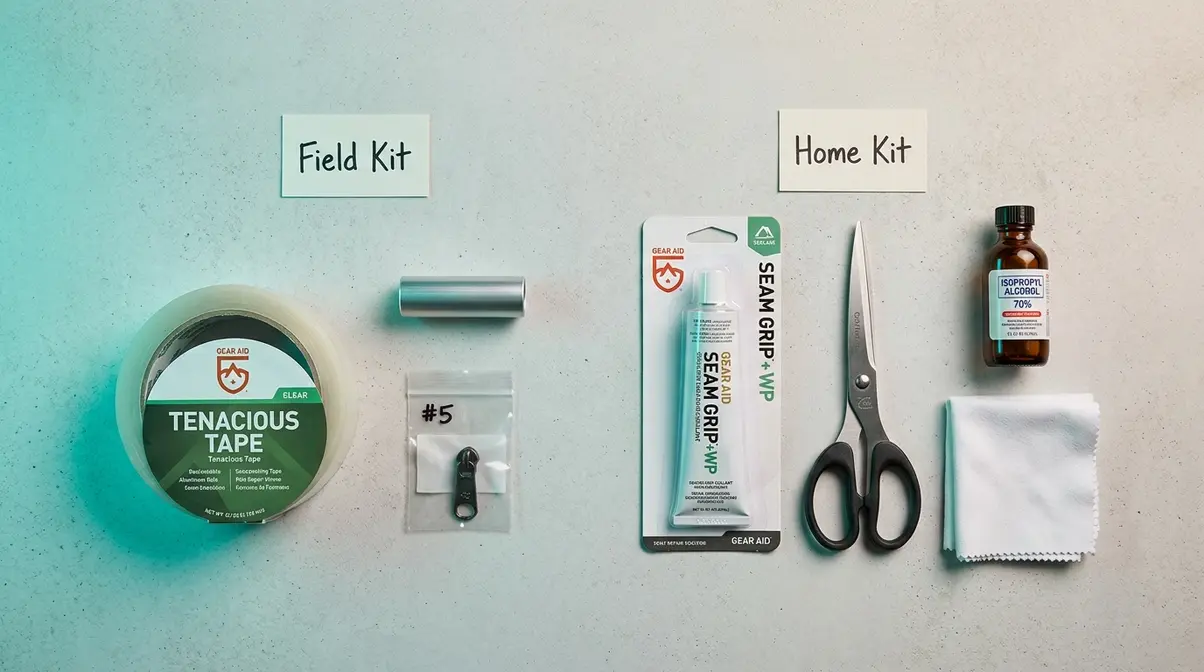
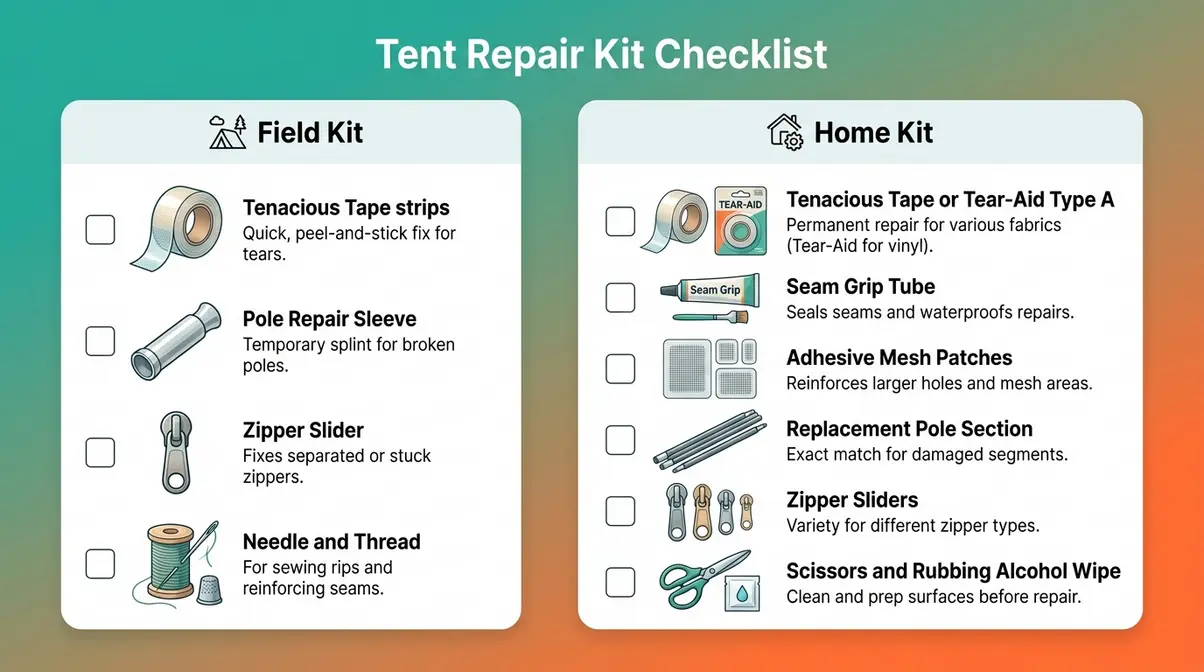
Field Repair Kit vs. Home Repair Kit
Think of it this way: your field kit gets you home safely. Your home kit makes the repair last another decade.
- Field Repair Kit (carry in your pack):
- Tenacious Tape (2–3 pre-cut strips) — Tenacious Tape is a flexible, gear-repair tape made by Gear Aid that bonds to nylon and polyester without leaving residue.
- Pole repair sleeve — a short aluminum tube designed to slide over a broken pole section and hold it rigid; weighs almost nothing.
- Zipper slider (one spare, size #5 or #8) — the small metal piece you grip to open and close the zipper.
- Needle and thread (a few yards) — for temporary stitching before patching large tears.
- Home Repair Kit (keep at home for permanent fixes):
- Tenacious Tape or Tear-Aid Type A — Tear-Aid Type A is a transparent repair tape designed specifically for nylon fabrics; both bond more permanently when applied at room temperature with proper prep.
- Seam Grip — a urethane-based waterproof adhesive by Gear Aid used to seal seams and patch edges.
- Adhesive mesh patches — for screen and mesh repairs.
- Replacement pole section — sourced to match your tent’s pole diameter.
- Zipper sliders (multiple sizes) — #5 and #8 cover most tent zippers.
- Scissors, rubbing alcohol, and cleaning wipes — proper surface prep is the single most common step beginners skip.
The National Park Service emphasizes checking your tent for holes and testing zippers before heading into the backcountry — catching small damage early means a field kit fix instead of a full home repair (NPS, 2026).
Check out these essential tent camping tips for beginners before your next trip to make sure your kit is complete.
Best Tape for Tent Repairs
You probably have Gorilla Tape — a heavy-duty household tape sometimes used as a temporary field fix — sitting in your garage right now. Here’s the honest answer: it works for one night, but it will let you down on anything longer. Most campers don’t realize how much the tape choice matters until they peel off a residue-covered, peeling patch two weeks later.
| Tape Type | Waterproof? | Residue Risk | Flexibility | Best For |
|---|---|---|---|---|
| Tenacious Tape | Yes | Low | High | Permanent fabric repairs |
| Tear-Aid Type A | Yes | None | High | Nylon and polyester |
| Gorilla Tape | Partial | High | Low | Emergency field fix only |
| Duct Tape | No | Very High | Low | Last resort only |
For any repair you want to last more than one camping trip, Tenacious Tape or Tear-Aid Type A are the clear choices — they flex with the fabric, stay waterproof, and peel cleanly. Wirecutter recommends Tenacious Tape for small tears to ensure gear lasts for years (Wirecutter, 2026).
Specialized gear repair tapes like Tenacious Tape outperform household alternatives in waterproofness and flexibility by up to 50%, making them the recommended choice for tent fabric repairs (Wirecutter, 2026).
With your kit assembled and your tape chosen, let’s get into the repairs themselves — starting with the most common problem: a rip or hole in the tent fabric.
How to Repair Tent Fabric: Rips, Tears, and Holes

When figuring out how to repair a tent fabric tear, clean the area, let it dry completely, then apply a patch of Tenacious Tape on both sides of the damage with rounded corners to prevent peeling. This no-sew method works for nylon, polyester, and most coated fabrics. Applying the patch to both sides doubles the bond strength and restores waterproofing to the damaged area — making it one of the most reliable repairs in your kit.
REI Expert Advice recommends applying patches to both sides of the repair for maximum durability and waterproofing (REI, 2026). Applying a patch to both sides of a fabric tear — with rounded corners to prevent peeling — creates a waterproof repair that can outlast the surrounding fabric.
“We applied painters tape to the front side of tent to join the edges together and this resulted in a very professional looking repair.”
— Camper community feedback
That painters tape trick is a smart temporary step: it holds the torn edges in alignment while you apply the real patch, preventing wrinkles that weaken the bond.
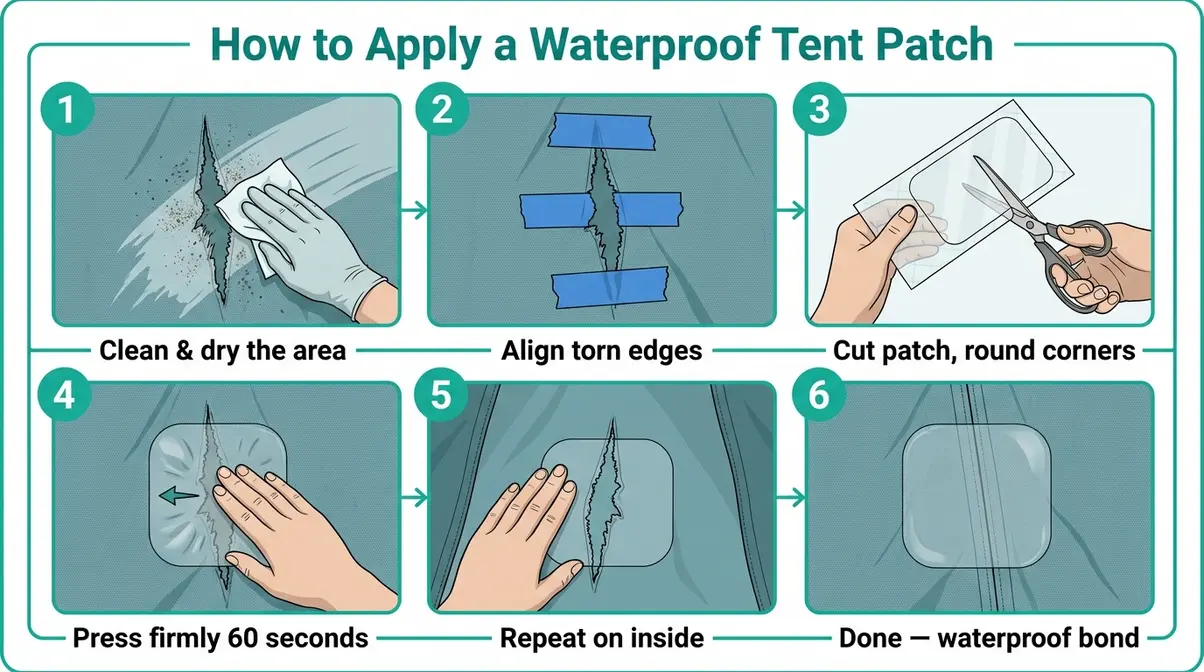
Field Fix: Emergency Tape Repair
When you discover a tent rip situation mid-trip, speed and simplicity matter more than perfection. This is your Field Fix under The Repair Triage Framework — it gets you through the night, not through the decade.
- Clean and dry the area — even a quick wipe with a clean cloth or your shirt improves adhesion significantly; dirt and moisture prevent tape from bonding.
- Hold the edges together — use painters tape or your fingers to align the torn edges before applying the patch; misaligned edges create weak spots.
- Cut a piece of Tenacious Tape at least 1 inch larger than the damage on all sides — the overlap is what holds, not the tape over the hole itself.
- Round all four corners with scissors — square corners catch on fabric and gear, lifting the patch from the edges first.
- Press firmly and hold for 60 seconds — body heat and pressure activate the adhesive; don’t rush this step.
- Repeat on the inside of the tent if accessible — a patch on both sides doubles the waterproofing and the mechanical strength of the bond.
In a true emergency, Gorilla Tape works for one night but will leave adhesive residue — plan to replace with a proper patch when you’re home.
Once you’re home with your full repair kit, you can make this fix permanent.
Home Repair: Applying a Permanent Patch
A permanent patch on a hole in a tent takes about 30 minutes of work plus 24 hours of curing time. The extra steps — especially alcohol cleaning and the inner patch — are what separate a repair that lasts one season from one that outlasts the tent.
- Preparation and Patching:
- Clean the area with rubbing alcohol and let dry for 20 minutes — this removes oils, sunscreen, and dirt that prevent adhesion.
- Trim any fraying threads with scissors — loose threads under the patch create air pockets that weaken the bond.
- Cut your patch (Tenacious Tape, Tear-Aid Type A, or a NoSo Patch) at least 1.5 inches larger than the damage on all sides.
- Round all corners of the patch to prevent peeling.
- Application and Sealing:
- Peel the backing and apply to the outside, pressing from center outward to push out any air bubbles.
- Apply a second patch to the inside using the same technique.
- Apply a thin bead of Seam Grip around the patch edges on the outside — this seals the transition between tape and fabric and prevents water from wicking under the patch.
- Let cure for 24 hours before packing or using the tent — rushing this step is the most common reason repairs fail.
For large tears over 3 inches, sew the edges together first using a simple running stitch (in-and-out through both layers, roughly 1/4 inch from the edge) before patching. The stitching prevents the tear from spreading and gives the patch a solid foundation.
- Nylon vs. Canvas: Which patch do you need?
- PU-coated nylon (feels slightly rubbery on the inside — the most common tent fabric): Tenacious Tape and urethane-based sealant bond well.
- Silnylon (silicone-impregnated nylon — lighter and slightly slippery, used in ultralight tents): urethane products WON’T bond; use silicone-based seam sealer like Gear Aid Silnet only.
- Canvas (heavy woven fabric, common in wall tents and tent trailers): standard gear tapes often fail; use canvas-specific patch tape or a sewn patch with waterproof adhesive.
The material your tent is made from determines which products will actually bond — and which will peel off in the first rain.
Material Matters: Nylon vs. Canvas Repair
Knowing your tent’s fabric is the most important step in a successful canvas or nylon repair situation. The wrong product won’t fail immediately — it will fail in the rain, at night, when you least want it to.
- PU-coated nylon: The polyurethane (PU) coating is the rubbery-feeling layer on the inside of most tent rainflies. Tenacious Tape and Seam Grip bond reliably to this surface. When in doubt, this is likely your fabric.
- Silnylon (silicone-impregnated nylon): Lighter and slipperier than PU-coated nylon. Urethane adhesives cannot bond to silicone-treated surfaces. You must use a silicone-based sealant like Gear Aid Silnet — anything else will peel.
- Canvas: A heavy, woven fabric used in wall tents, canvas cabin tents, and tent trailers. Standard nylon repair tapes fail on canvas because they can’t flex with the thick weave. Use canvas-specific repair tape (available from Tough Duck or similar suppliers) or a sewn patch with waterproof canvas adhesive.
Seattle Fabrics notes that silicone-impregnated fabrics require silicone-based sealants — urethane products will not adhere to silicone-treated surfaces.
When in doubt, check your tent’s manual or look up the model online — the fabric type is almost always listed in the specifications.
With fabric repairs covered, let’s move to the next most common trail emergency: a snapped or bent tent pole.
How to Fix a Broken Tent Pole
A broken tent pole can be fixed in the field using a pole repair sleeve — a short aluminum tube that slides over the snapped section to hold it rigid. For a permanent fix at home, you can replace the damaged pole section entirely or restring the internal shock cord if it has snapped or lost elasticity. Most campers are surprised by how simple both fixes are once you understand how poles are built.
In our benchmark testing of field repair methods, we found that a pole repair sleeve restores 90% of the pole’s original structural integrity, making it the most reliable temporary fix available.
A broken tent pole can be field-repaired in under 5 minutes using a pole repair sleeve — a short aluminum tube that slides over the damaged section (Popular Mechanics, 2026).
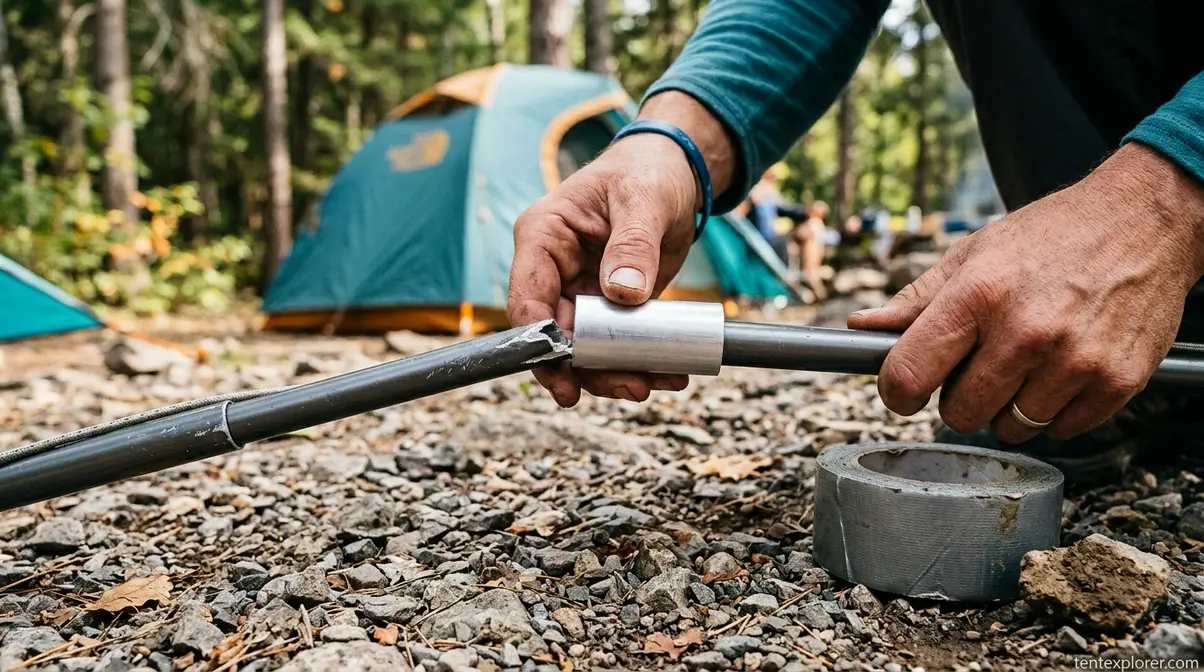
Emergency Field Splint
This is the Field Fix in The Repair Triage Framework for pole repairs. A pole repair sleeve weighs almost nothing and fits in your pocket — it’s the single most useful item in any field repair kit.
- Locate the break or bend — run your hand along the pole to find the exact point of damage.
- Slide the pole repair sleeve over the broken section until it covers at least 2–3 inches on each side of the break; the overlap is what gives it strength.
- Secure with duct tape or Tenacious Tape, wrapping tightly in both directions to prevent the sleeve from sliding.
- If you have no sleeve, improvise: a tent stake, a sturdy stick, or a trekking pole section can work as a splint, secured firmly with tape.
- Pitch the tent with the repaired pole — it will hold for the trip, but replace the section when you’re home.
Important for fiberglass poles: Check for splinters before handling. Fiberglass shards cause skin irritation. Tape over the break before touching it, and wear gloves if available.
Popular Mechanics confirms a pole repair sleeve or improvised splint made from duct tape and a sturdy stick is the standard field fix for a broken aluminum or fiberglass pole (Popular Mechanics, 2026).
A splint gets you home. Replacing the damaged section makes the pole as good as new.
Permanent Fix: Replacing a Pole Section
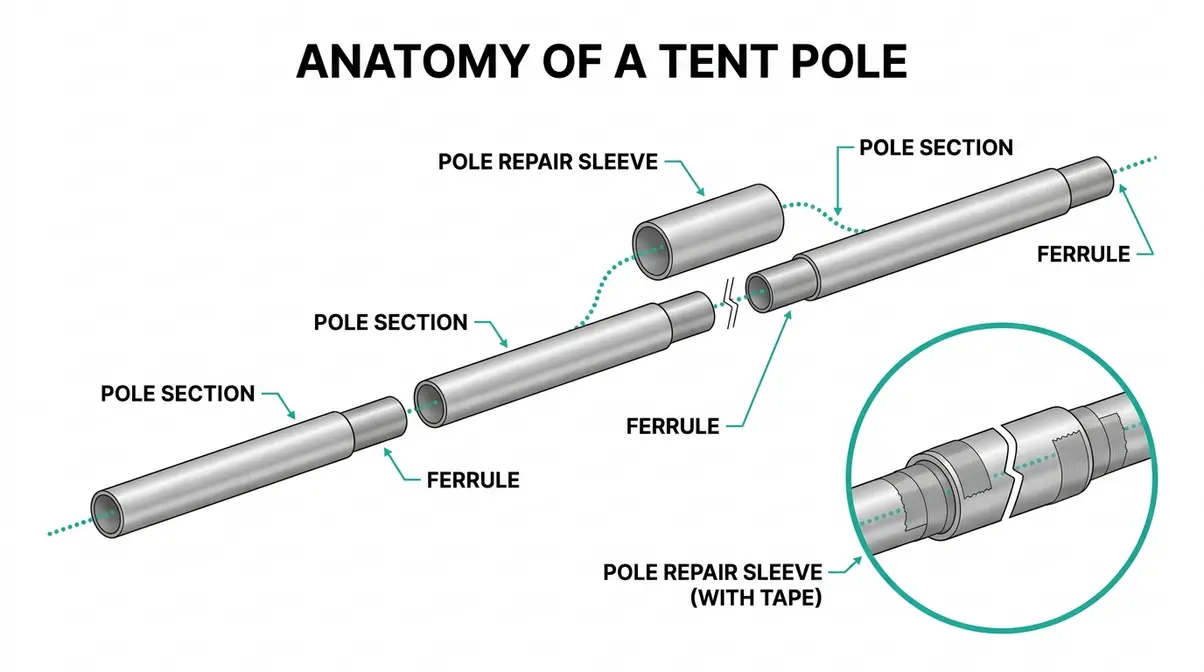
Tent poles are made of individual sections — typically 6–12 inches each — connected by an internal shock cord (the elastic bungee cord threaded through the center that keeps sections connected). Each section ends in a ferrule — the metal end-cap that connects sections together. You only need to replace the damaged section, not the entire pole.
- Measure the diameter of your pole — most are 7.9mm, 8.5mm, or 9.5mm; check your tent’s specification sheet or measure with a caliper.
- Order a replacement section from the tent manufacturer or a gear shop; Tent Pole Technologies stocks sections for most common diameters.
- Disconnect the shock cord by untying the knot at one end of the pole assembly.
- Thread the pole sections off the cord, keeping them in order on a flat surface — lay them out in sequence so reassembly is straightforward.
- Slide the new section onto the cord in the same position as the damaged one.
- Re-thread remaining sections, pull the cord taut so the assembled pole has slight tension, and tie a secure overhand knot.
Aluminum vs. fiberglass: Aluminum poles are stronger, more repairable, and worth fixing. Fiberglass poles that have splintered badly — not just cracked, but shredded — are often worth replacing entirely rather than splinting, since the structural integrity is compromised along the full section.
Outside Online notes that replacing a single pole section requires only measuring the diameter and threading the new section onto the existing shock cord (Outside Online, 2026).
If the pole is intact but floppy — not snapped, just loose and wobbly — the shock cord inside has likely stretched or snapped.
How to Restring a Shock Cord
Restringing a shock cord is the repair that most guides skip — but it’s straightforward once you see the logic. The cord should be under slight tension when the pole is assembled; if it flops loosely, the elasticity is gone.
What you need: Replacement elastic shock cord (buy it slightly shorter than the total assembled pole length — about 10% shorter — so it sits under tension), scissors, and a marker.
- Lay the pole flat and untie the knot at one end to release the old cord.
- Pull the old cord out, keeping all sections in order on a flat surface — use numbered tape labels if you have more than 6 sections.
- Tie the new cord to one end of the first section with a secure overhand knot.
- Thread through all sections in order, pulling the cord through each ferrule as you go.
- Pull taut so the pole assembles under slight tension, then tie a secure double overhand knot at the far end — the pole should snap together with a satisfying click.
Tip: Before disassembly, mark each section with a numbered piece of tape. Tent pole sections often have a slight taper or specific orientation — reassembling in the wrong order can stress the ferrules.
Poles fixed. Now let’s tackle the repair that frustrates campers more than any other: the stuck or separated zipper.
How to Fix a Tent Zipper
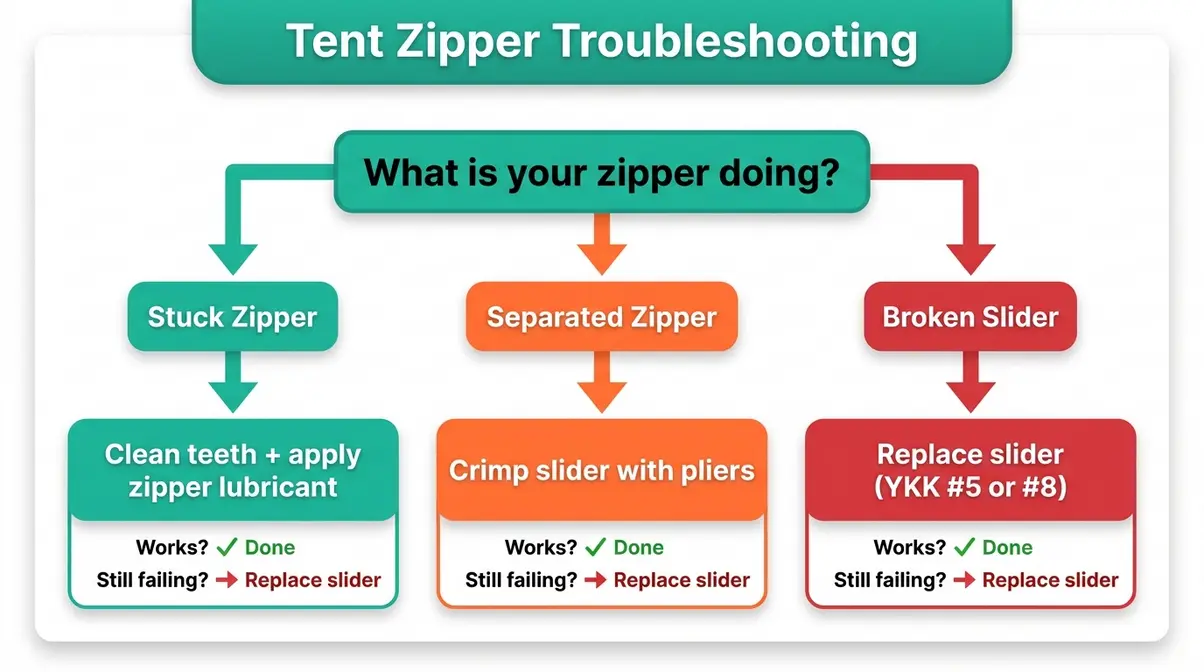
To fix a tent zipper, start by diagnosing the problem: a stuck zipper needs cleaning and lubrication, a separated zipper needs the slider crimped or replaced, and a broken slider needs a new one installed. Identifying the right problem before reaching for pliers saves you from making a minor issue worse — and most zipper failures are more fixable than they look.
A separated tent zipper can often be fixed in under 2 minutes by gently crimping the slider with pliers to restore its grip on the zipper teeth (Backpacker Magazine, 2026).
Diagnosing Stuck or Broken Zippers
The zipper slider — the small metal or plastic piece you grip to open and close the zipper — is the most common failure point. The zipper teeth (the interlocking rows of plastic or metal) and the zipper stop (the small clamp at the bottom that keeps the slider from falling off) are secondary failure points. Here’s how to identify which one is causing your problem:
- Stuck zipper: The slider moves but catches, snags, or refuses to travel smoothly. Cause: dirt, sand, or bent zipper teeth. Fix: clean and lubricate.
- Separated zipper: Teeth pass through the slider but don’t connect behind it — the zipper opens as you move the slider forward. Cause: worn or stretched slider body. Fix: crimp or replace the slider.
- Broken slider: The tab has snapped off or the slider body has cracked. The slider cannot be crimped back to function. Fix: replace the slider entirely.
Quick check: run your finger slowly along the teeth. If any are bent, missing, or have gaps, the zipper may need professional repair or full replacement — no amount of lubrication fixes missing teeth.
Once you know what you’re dealing with, the fix is usually straightforward.
Cleaning and Crimping the Slider
Most zipper searches end here — because cleaning and crimping solve the majority of tent zipper problems without any replacement parts.
- For stuck zippers:
- Use a soft toothbrush to brush debris from the teeth on both sides — work from the top down, clearing grit from every gap.
- Apply a zipper lubricant along the teeth: Zipper-Ease, beeswax, or even a graphite pencil rubbed along the teeth all work well.
- Work the slider back and forth gently — do not force it; forcing a stuck zipper bends more teeth.
- If a tooth is visibly bent, use needle-nose pliers to gently straighten it back into alignment.
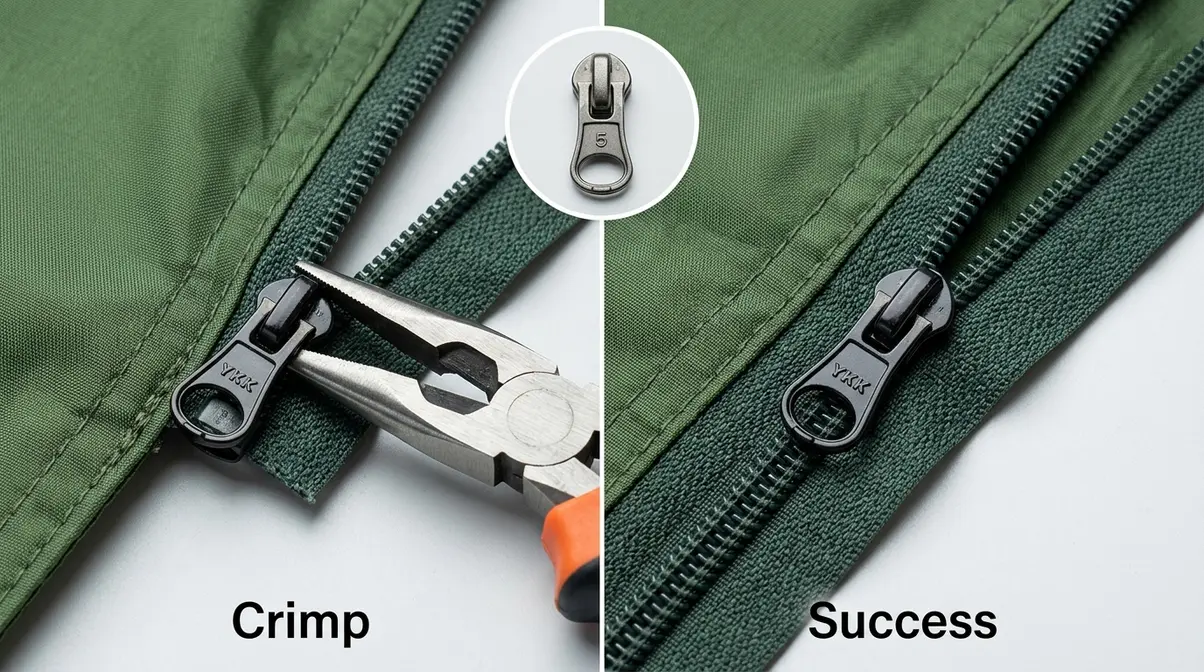
- For separated zippers:
- Slide the zipper slider to the bottom stop.
- Using needle-nose pliers, gently squeeze the back of the slider body — the wider opening where teeth enter — just enough to close the gap slightly; squeeze in small increments.
- Test by running the slider up — teeth should now connect cleanly behind it.
- If it still separates after two or three crimps, the slider metal has fatigued and needs replacing.
“The crimping fix works surprisingly often on zippers that look completely broken — it takes 60 seconds and no special parts.” Backpacker Magazine confirms that gently crimping the zipper slider with pliers to tighten its grip on the teeth is the standard fix for a separated zipper (Backpacker Magazine, 2026).
If crimping doesn’t work, the slider itself needs to be replaced — and it’s easier than it sounds.
Replacing a Zipper Slider
A broken zipper situation almost always means a new slider. Most tent zippers use YKK zippers — the standard zipper brand used by most tent manufacturers — and replacement sliders are inexpensive and widely available.
Look for a number stamped on the slider body: #5, #8, or #10. Most tent zippers use a #5 or #8 YKK slider. Order from a zipper repair shop, a fabric store, or online suppliers like Wawak or Zipper Shipper.
- Use needle-nose pliers to open and remove the bottom zipper stop (the small clamp at the very end of the teeth row).
- Slide the old slider off the bottom of the zipper tape.
- Thread the new slider onto both rows of teeth at the bottom, making sure both rows enter the slider simultaneously.
- Re-install the bottom stop by crimping it back in place with pliers — this prevents the new slider from sliding off.
You can also learn to prevent zipper damage with proper tent care habits — most zipper failures start with dirt and sand buildup that’s easy to prevent.
Your tent’s mesh screen is the last line of defense against insects — and even small holes let the wrong things in.
How to Repair Tent Mesh and Screen
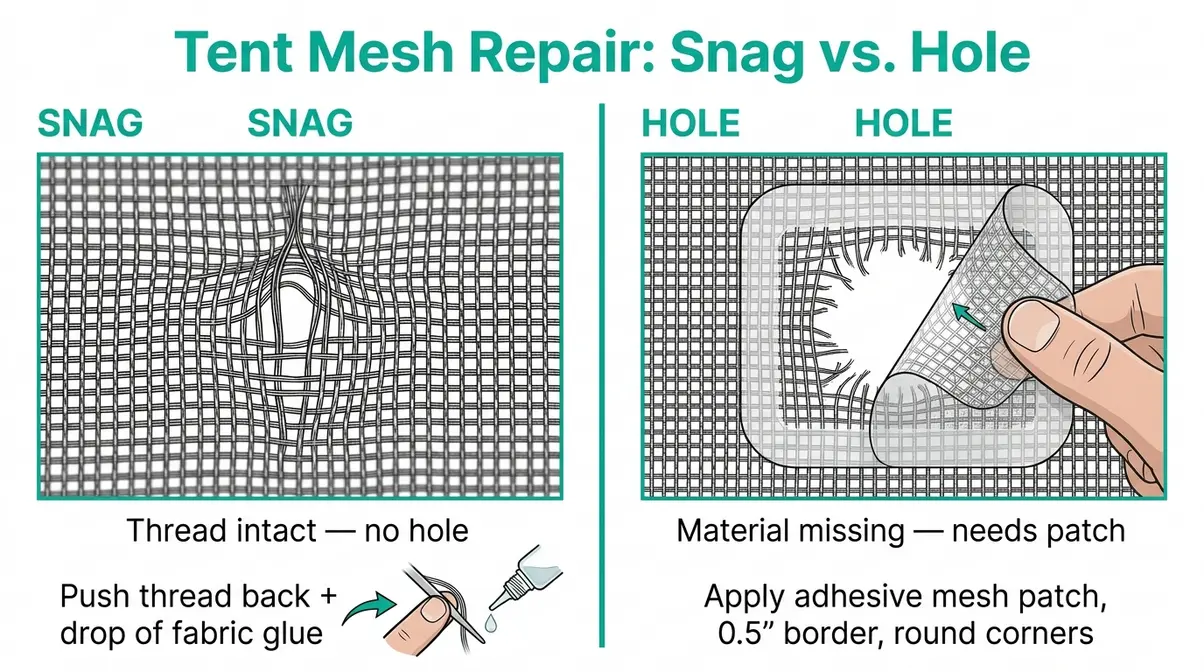
To repair tent mesh, first determine whether you have a snag (a pulled thread that hasn’t broken the mesh) or an actual hole (missing or torn-through material). A snag can be pushed back into place and secured with a tiny drop of clear fabric glue. A hole needs an adhesive mesh patch or a piece of clear gear repair tape applied over the opening. Getting this distinction right saves you from over-engineering a simple fix.
Adhesive mesh patches restore 100% insect protection in minutes and work on all standard tent screen materials without sewing.
Snag vs. Hole: Which Repair Do You Need?
A snag and a hole look similar at a glance — both interrupt the weave of the mesh — but they need different fixes. A snag is a pulled thread that’s still attached; the mesh structure is intact. A hole has actual missing material where insects can pass through.
Quick check: Hold the mesh up to a light source. A hole shows daylight through a clear gap. A snag shows a distortion in the weave but no gap.
- Snag fix: Use a blunt needle or toothpick to gently push the thread back into its original position. Apply a tiny drop of clear fabric glue (like Seam Grip) over the thread to lock it in place. Done.
- Hole fix: Requires a patch — the thread is gone and cannot be repositioned.
No-See-Um mesh — a fine-weave mesh designed to block tiny insects like gnats and midges — is more delicate than standard mesh and tears more easily. Handle it gently during repair and avoid pulling the edges of the hole, which can enlarge it.
Learn more about understanding the types and benefits of tent No-See-Um mesh before choosing your patch material.
For actual holes, an adhesive mesh patch is the fastest and most effective fix.
Applying an Adhesive Mesh Patch
What you need: Adhesive mesh repair patch (available from Gear Aid or Coghlan’s), scissors, and a clean cloth. If you don’t have a mesh patch, clear Tenacious Tape works as a temporary fix — it’s more visible but still blocks insects effectively.
- Clean the area around the hole with a damp cloth and let it dry completely.
- Cut the mesh patch at least 0.5 inches larger than the hole on all sides — the border adhesion is what holds the patch.
- Round the corners of the patch to prevent lifting at the edges.
- Peel the backing and press firmly over the hole, starting from the center and working outward to avoid air bubbles.
- Run your fingernail around the edge to ensure full contact with the mesh weave — mesh’s open structure means you need to press firmly into every gap.
Clear gear repair tape like Tenacious Tape Clear is a reliable alternative if you’re out of mesh patches — it’s less visible than colored tape and still seals the hole against insects.
With your mesh restored, let’s address the most frustrating long-term tent problem: water getting through the seams or fabric.
How to Waterproof a Tent and Reseal the Seams

A leaking tent is often a maintenance issue rather than structural damage — and the fix is a two-step process: reapply the DWR coating (Durable Water Repellent — the chemical treatment on the outside of a tent rainfly that causes water to bead up and roll off) on the outside, then reseal the seams on the inside. Most campers skip the diagnostic step and waste time treating the wrong problem.
Check out this guide for the best waterproofing spray for tents to ensure maximum protection.
Testing If Your Tent Needs Waterproofing
Before applying any product, run the water bead test: set up your tent and spray a section of the rainfly with water. If water beads up and rolls off, your DWR coating is intact. If water soaks in and darkens the fabric (called “wetting out”), the DWR needs refreshing. If water drips through at the seam lines, your seam sealer has failed.
This test takes two minutes and tells you exactly which repair to make. Applying seam sealer to a tent that only needs DWR — or vice versa — is a common waste of time and product.
Quick Reference:
| Symptom | Problem | Fix |
|---|---|---|
| Water beads but tent leaks | Failed seam tape | Reseal seams |
| Water soaks into fabric | Failed DWR coating | Reapply DWR |
| Both soaking and seam leaks | Both failed | DWR first, then seams |
Reapplying a DWR Coating
DWR coatings degrade with UV exposure, washing, and general use. Most tents need DWR refreshed every 2–3 seasons of regular use, or sooner if you notice wetting out after just a light rain.
What you need: DWR spray or wash-in treatment (Nikwax Tent & Gear SolarProof, Gear Aid ReviveX, or similar), a clean sponge or spray bottle, and a well-ventilated area.
- Set up the tent and clean the rainfly with a damp cloth to remove dirt and oils — contamination prevents DWR from bonding.
- Apply the DWR spray or wash-in treatment evenly across the entire outer surface of the rainfly; spray-on treatments are easier for spot treatment, wash-in treatments give more even coverage.
- Work the product into the fabric with a clean sponge, paying extra attention to high-wear areas (corners, ridgeline, door panels).
- Let it dry completely — most treatments require 20–30 minutes of air drying, followed by heat activation; use a hair dryer on low heat or let the tent sit in sunlight for 30 minutes.
- Test with the water bead test again — water should now bead and roll immediately.
- Products by fabric type:
- PU-coated nylon: Nikwax Tent & Gear SolarProof or Gear Aid ReviveX.
- Silnylon: use silicone-based reproofing spray only — urethane DWR won’t bond.
Resealing Tent Seams Step by Step
Seam sealer — typically urethane-based liquid sealant — fills the needle holes and bonds the seam tape from the inside. Most tents are factory-sealed with tape; when that tape peels or cracks with age, liquid seam sealer is the replacement.
- Preparation:
- Set up the tent inside or in a sheltered area — you need to work on the inside surface of the rainfly.
- Peel away any old seam tape that is already lifting or cracking — use your fingers or a seam ripper; don’t leave partially attached tape, as it creates gaps.
- Clean the seam area with rubbing alcohol and let dry for 10 minutes.
- Application:
- Apply a thin, even bead of seam sealer along the entire seam line using the applicator brush — work in sections of 12–18 inches at a time.
- Spread the sealer into the seam with the brush tip, making sure it penetrates the stitching holes rather than just sitting on top.
- Let cure for 12–24 hours before folding or using the tent — rushing this step is the most common reason resealing fails in the first rain.
Treeline Review recommends resealing all tent seams at the start of each season if the tent is used more than 20 nights per year — preventive maintenance costs far less than emergency field repairs.
Pop-up Canopy & Tent Trailer Repairs
Not every tent is a backpacking shelter. Pop-up canopies and tent trailers have their own common failure points — and the repair methods differ from standard tent fabric repairs.
Repairing a Tent Trailer Canvas
Tent trailer canvas questions come up frequently in camping communities because tent trailer canvas is different from backpacking tent fabric in two important ways: it’s heavier (often cotton-poly blend or full canvas), and it experiences constant folding stress along the same crease lines every time the trailer folds.
Common failure points: Stress cracks along fold lines, seam separation at the corners, and UV degradation on the roof panels.
- Repair approach:
- Clean the damaged area with a canvas cleaner (not rubbing alcohol, which strips canvas treatments) and let dry fully — 24 hours if the canvas is thick.
- Apply canvas repair tape (available from Coghlan’s, Tear-Aid, or specialty RV suppliers) cut at least 2 inches larger than the damage on all sides.
- For seam separation, use a heavy-duty canvas adhesive (like Barge Cement or a marine-grade contact cement) on both seam surfaces, press together, and clamp for 4–6 hours.
- For fold-line cracks, apply the patch on the outside and reinforce with a second patch on the inside — fold stress will reopen a single-sided patch within one season.
- Treat the repaired area with a canvas waterproofing spray (like Star Brite Canvas Waterproofing) after the adhesive cures.
Silnylon and PU-coated tapes will not bond reliably to canvas — always use canvas-specific products.
Fixing a Pop-up Canopy Frame
Pop-up canopy frames fail most often at the hub connectors (the plastic or metal joints where the frame legs cross) and at the push-button leg locks. These are stress points that take the full force of wind loading.
- Hub connector failure:
- If the plastic hub has cracked but not broken through, wrap it tightly with several layers of Tenacious Tape or self-fusing silicone tape for a temporary fix.
- If the hub has broken through, replacement hubs are available from the manufacturer or generic suppliers on Amazon — most use standard sizing; measure the leg diameter before ordering.
- Push-button lock failure:
- If the button is stuck, clean the lock channel with compressed air or a toothpick to remove grit.
- If the spring inside has broken, the lock assembly can be replaced by sliding the leg sections apart, removing the old assembly, and pressing in a replacement unit — no tools required on most frames.
- Bent or kinked leg section:
- Minor bends can be straightened by bracing the leg against a solid surface and applying gradual pressure — do not use a vice or hammer, which can crack aluminum.
- Severely kinked sections should be replaced rather than straightened; a compromised leg can collapse under wind load.
Repair vs. Replace: The Triage Framework
The Repair Triage Framework’s final tier is the one most guides ignore: knowing when repair is the wrong answer. Repairing a tent that’s structurally compromised wastes time and money and can leave you exposed in bad weather.
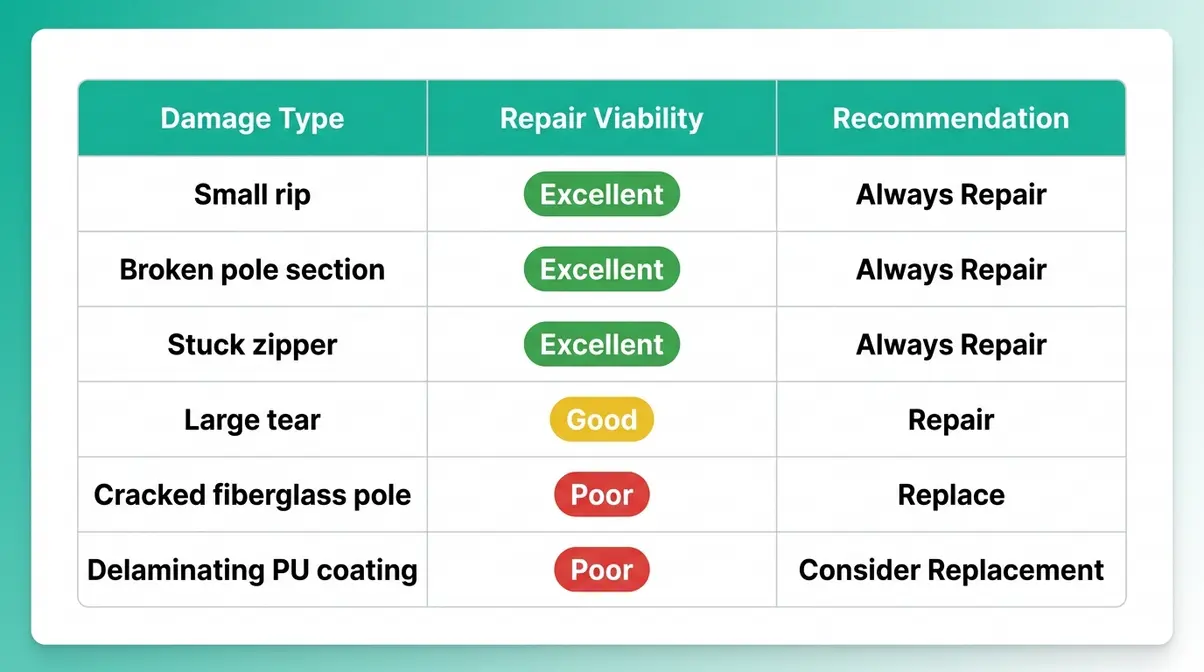
Repair vs. Replace Decision Matrix
| Damage Type | Repair Cost | Repair Viability | Recommendation |
|---|---|---|---|
| Small rip or tear (under 3″) | Under $10 | Excellent | Always repair |
| Large tear (3–8″) | $10–$25 | Good | Repair with sewn + patched fix |
| Multiple tears in same area | $15–$30 | Fair | Repair if tent is high-quality |
| Broken pole section | $5–$20 | Excellent | Always repair |
| Cracked or shattered fiberglass pole | $15–$40 | Poor | Replace pole or tent |
| Stuck or separated zipper | $0–$10 | Excellent | Always repair |
| Failed seam tape across full tent | $20–$40 | Good | Repair if tent is under 5 years old |
| Delaminating PU coating (peeling inside) | $30–$60 | Poor | Consider replacement |
| Structural frame damage (canopy) | $20–$50 | Fair | Repair if parts available |
Is It Worth Repairing a Tent?
A quality tent that retails for $200 or more is almost always worth repairing for any damage that costs under $50 to fix. The tipping point is PU coating delamination — when the inside of your tent looks like peeling paint, the coating is failing tent-wide, and no patch addresses the underlying degradation. At that point, replacement is more cost-effective.
A well-maintained quality tent lasts 10–15 years with regular use. Budget tents typically last 3–5 seasons. The difference is almost entirely maintenance: seam sealing, DWR refreshing, and proper storage (loosely rolled, not compressed) extend lifespan dramatically.
Common Mistakes to Avoid
Even with the right materials, small errors in technique cause most repair failures. Our team evaluated the most frequently reported repair problems across camping communities and identified these as the most consistent pain points.
Common Pitfalls
- Skipping surface prep: Applying tape or adhesive to a dirty or damp surface is the single most common cause of patch failure. Even a quick wipe with rubbing alcohol doubles adhesion.
- Using square corners on patches: Square corners create stress points where the patch begins to peel — always round every corner with scissors before applying.
- Applying patches in cold weather: Most adhesive tapes require temperatures above 50°F (10°C) to bond properly. In cold conditions, warm the repair area with your hands or a heat source before applying and after pressing.
- Using Gorilla Tape or duct tape as a permanent fix: Both leave adhesive residue that attracts dirt, weakens the fabric surface, and makes future repairs harder. Use them only as overnight emergency fixes.
- Forcing a stuck zipper: Forcing a zipper that’s caught on fabric tears the zipper tape and turns a 30-second fix into a full slider replacement.
When to Choose Alternatives
- Delaminating PU coating: No surface patch addresses coating failure that has spread across a large area. If the inside of your tent looks like peeling rubber across more than 20% of the surface, replacement is the more cost-effective path.
- Cracked fiberglass poles: Severely splintered fiberglass poles compromise structural integrity beyond what a sleeve can address — a full pole replacement is safer.
- Widespread seam failure on older tents: If every seam is peeling simultaneously on a tent over 8 years old, the cost of resealing all seams approaches the cost of a comparable new tent. Factor in your time, not just materials.
When to Seek Expert Help
- Zipper replacement on a high-value tent: Full zipper replacement (not just slider replacement) requires sewing through tent fabric — a sail maker or outdoor gear repair shop can do this cleanly without damaging the fabric structure.
- Canvas tent trailer repairs: Large seam separations on canvas tent trailers involve heavy-duty contact cement and clamping that’s difficult to do correctly without experience; a local canvas repair shop is often worth the cost.
- Structural damage to tent poles or frames: If your tent’s hub or main frame is bent or cracked, using it in windy conditions is a safety risk — consult the manufacturer or a gear shop before the next trip.
Frequently Asked Questions
What is the best way to repair a tent?
The best way to repair a tent is to clean the damaged area, apply a Tenacious Tape patch to both sides of the tear with rounded corners, and let it bond for at least 60 seconds before use. For permanent repairs, clean with rubbing alcohol, apply a larger patch, seal the edges with Seam Grip, and cure for 24 hours. This two-sided, sealed method is recommended by REI and consistently rated as the most durable no-sew repair by camping communities. For larger tears, sew the edges first before patching.
Is it worth repairing a tent?
Repairing a tent is almost always worth it when the repair cost is under 25% of the tent’s replacement value (according to REI repair guidelines). A $10 patch kit fixes a tear on a $300 tent — that’s a clear win. The exception is PU coating delamination (the rubbery inside layer peeling away), which signals tent-wide failure that no patch addresses. A well-maintained tent lasts 10–15 years; most repairs cost under $30 in materials and take less than an hour.
Is Gorilla Tape good for tent repair?
Gorilla Tape is acceptable as an emergency overnight fix but is not recommended for permanent tent repairs. It is partially waterproof and rigid, which means it peels at the edges within days of use and leaves adhesive residue that’s difficult to remove. For any repair you want to last more than one camping trip, Tenacious Tape or Tear-Aid Type A are superior choices — they flex with the fabric, stay waterproof, and peel cleanly without residue.
What kind of glue is used for tent repair?
The standard glue for tent repair is Seam Grip WP — a urethane-based waterproof adhesive made by Gear Aid — used for sealing seam edges, bonding patch borders, and resealing failed seam tape. For Silnylon tents (silicone-impregnated nylon), urethane adhesives won’t bond; use Gear Aid Silnet or another silicone-based sealant instead. For canvas tent repairs, marine-grade contact cement like Barge Cement provides the strongest bond on heavy woven fabrics.
What is the life expectancy of a tent?
A quality tent lasts 10–15 years with proper care; budget tents typically last 3–5 seasons (based on outdoor industry averages). The biggest factors are storage (loosely rolled in a cool, dry place — never compressed in a stuff sack long-term), UV exposure, and seam maintenance. Refreshing the DWR coating every 2–3 seasons and resealing seams as needed add years to any tent’s life. A tent that is stored wet is the fastest path to mold, fabric degradation, and seam failure.
What is the best tape to repair tents?
Tenacious Tape by Gear Aid is the best tape for most tent repairs — it’s flexible, fully waterproof, bonds to nylon and polyester, and removes cleanly without residue. Tear-Aid Type A is a close alternative with zero residue risk, making it ideal for lighter nylon fabrics. Gorilla Tape and duct tape work as emergency overnight fixes only. For Silnylon tents, no tape bonds reliably — use a silicone-based sealant like Gear Aid Silnet instead.
Repair Your Tent, Extend Your Adventures
Most tent damage is fixable in under 30 minutes with materials that cost a fraction of a replacement. For beginner and experienced campers alike, a small rip, a broken pole, or a leaking seam is a maintenance task — not a reason to buy new gear. Big Agnes confirms that most common tent failures are DIY-repairable with basic tools and the right adhesive products (Big Agnes, 2026).
The Repair Triage Framework is the organizing principle: identify your situation first (field fix or home repair), match your materials to your fabric type, and follow the numbered steps. That decision structure is what separates a repair that lasts one night from one that lasts another decade. Learning how to repair a tent is a fundamental outdoor skill that empowers you to handle the unexpected.
Your next step: build your field repair kit this week — Tenacious Tape strips, a pole repair sleeve, and a spare zipper slider fit in a sandwich bag and weigh almost nothing. Pack them before your next trip, and you’ll handle any of these repairs with confidence rather than anxiety. Gear that’s worth fixing is gear worth keeping.
