This blog post may contain affiliate links. As an Amazon Associate I earn from qualifying purchases.
📋 Table of Contents
- What You’ll Need Before You Start
- Step 1 — Clean Your Tent Before Storage
- Remove Loose Dirt and Debris
- Spot Clean and Hand Wash the Fabric
- Step 2 — Dry Your Tent Completely
- Air Dry in the Shade, Not the Sun
- How to Check Your Tent Is Truly Dry
- Step 3 — Pack Your Tent the Right Way
- Is it better to fold or stuff a tent?
- Choosing the Right Storage Bag
- Step 4 — Choose the Best Storage Location
- Can you store a tent in the garage?
- The Ideal Indoor Storage Conditions
- Step 5 — Care for Poles, Stakes, and Accessories
- Storing Poles Without Damaging Shock Cord
- Cleaning and Storing Stakes & Guy Lines
- Step 6 — Long-Term Habits That Protect Your Tent
- Repack Your Tent Every Few Months
- Storage Tips for Humid vs. Dry Climates
- The Science of Tent Damage: Hydrolysis and Mold
- What Is Hydrolysis and Why It Matters
- How Mold Takes Hold in 24-48 Hours
- Common Tent Storage Mistakes to Avoid
- Packing Your Tent While It’s Still Damp
- Storing in the Wrong Location
- Frequently Asked Questions
- How do you store a tent when not in use?
- Do tents go bad if not used?
- Can a tent be stored outside?
- How long does a tent last in storage?
- Protect Your Tent, Protect Your Investment
Storing a tent the wrong way is one of the most expensive mistakes a camper can make — and most people don’t realize they’ve done it until they unpack a mold-covered, peeling tent on the morning of their next trip. A quality tent costs $150 to $400 or more. Storing it correctly takes less than 30 minutes.
“Once mould takes hold of any tent it’s an absolute nightmare to get rid of — or in some cases you just can’t.”
The culprit is almost never obvious. Most campers blame a leaky rain fly or a bad batch of fabric. In reality, the damage happens in the closet — or worse, the garage — while the tent sits untouched for months. This guide shows you exactly how to store a tent properly using a six-step system built around defeating The Three Enemies of Tent Longevity: Moisture, Compression, and Heat.
Learning how to store a tent properly means defeating its three enemies — Moisture, Compression, and Heat — with a clean-dry-pack-store system that takes less than 30 minutes and can double your tent’s lifespan.
- Always dry completely: Mildew can form in as little as 24–48 hours on damp synthetic fabric (Scouting Magazine)
- Never use the stuff sack long-term: Compression damages the polyurethane (PU) waterproof coating over time
- Avoid the garage: Temperature swings accelerate hydrolysis — a chemical process that destroys tent coatings from the inside
- The Three Enemies of Tent Longevity are Moisture, Compression, and Heat — this guide shows you how to beat all three
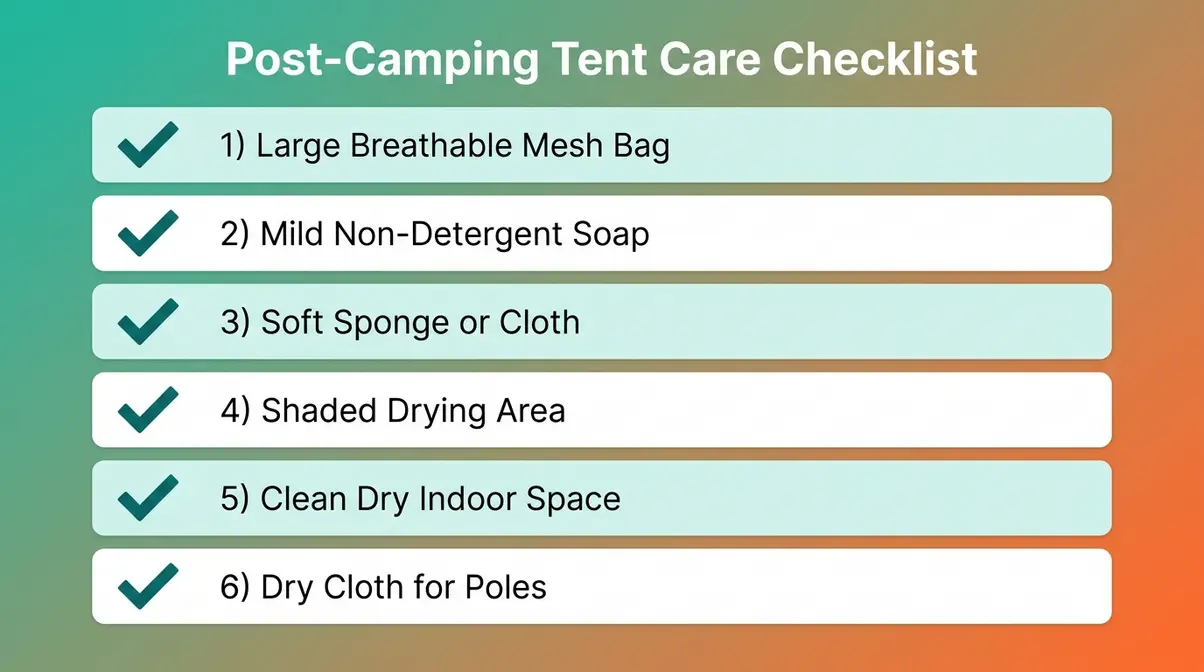
What You’ll Need Before You Start
Before you learn how to store a tent properly, gather these supplies. Having everything on hand prevents mid-process confusion and makes the whole system faster.
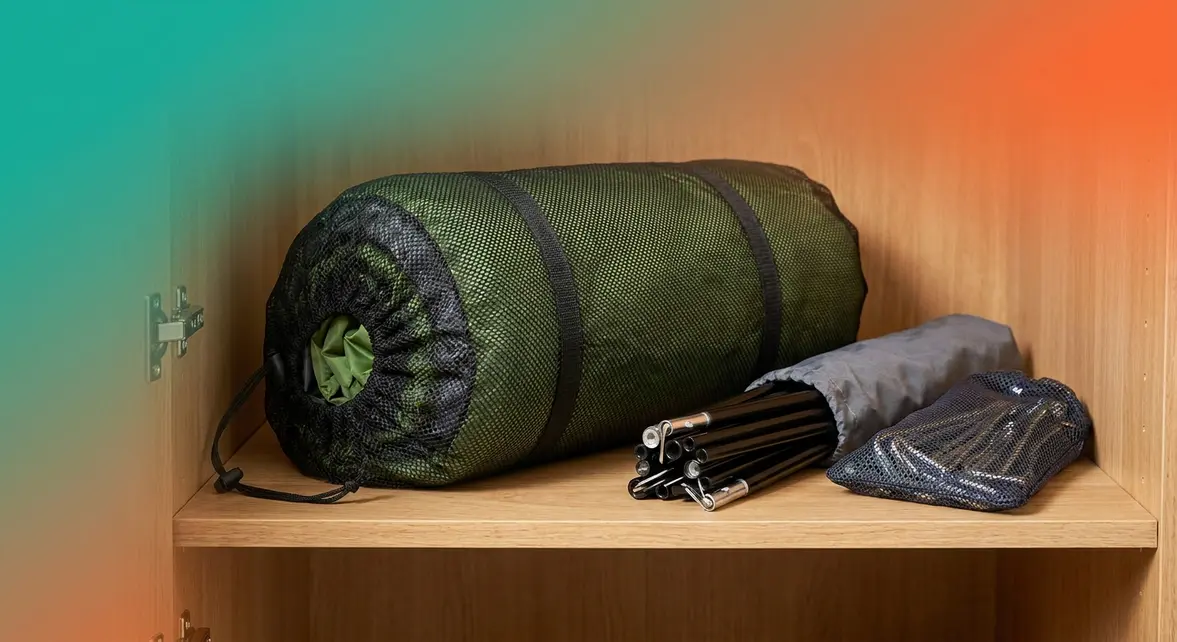
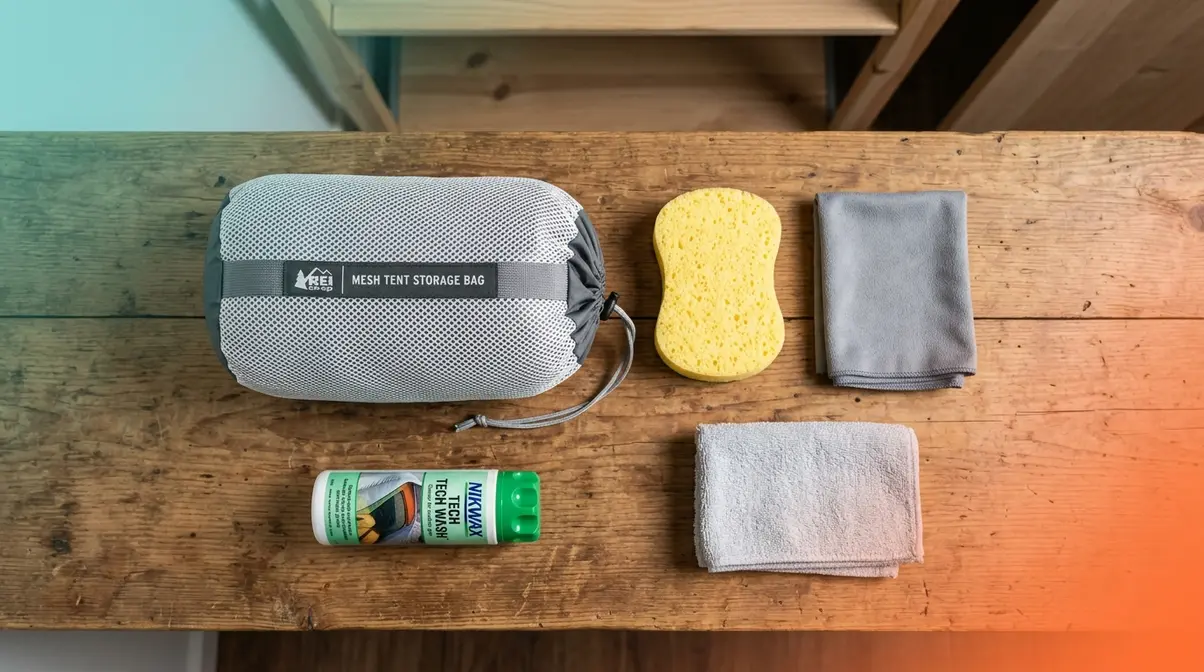
- Large breathable storage bag — a mesh sack or oversized cotton pillowcase; NOT the original stuff sack (the tight compression bag your tent came with)
- Mild, non-detergent soap — Nikwax Tech Wash or a gentle dish soap; standard detergents strip DWR (Durable Water Repellency, the outer coating that makes water bead off)
- Soft sponge or cloth — no abrasive scrubbing pads, which can scratch and thin the waterproof coating
- Access to shade — for drying; direct sun degrades tent fabric faster than most campers realize
- Clean, dry indoor space — a closet shelf or spare room corner works perfectly
- Dry cloth or towel — for wiping down poles and stakes before storage
These six items help you fight all three enemies: Moisture (soap + drying space), Compression (breathable bag), and Heat (shaded, climate-stable indoor spot). If you’re brand new to camping, our guide to tent camping tips for beginners covers gear selection and campsite setup.
Once you have everything ready, start with the most important step — cleaning.
Step 1 — Clean Your Tent Before Storage

A dirty tent stored long-term is a tent with a death sentence. Dirt, tree sap, sunscreen residue, and food particles all trap moisture and give mold the food source it needs to grow. Cleaning your tent before storage is the single most impactful thing you can do to protect it.
Remove Loose Dirt and Debris
Start outside. Shake the tent body and rain fly firmly to dislodge dirt, pine needles, leaves, and loose grit. Turn the tent inside out and shake again — grit trapped inside the seams is a common source of abrasion damage that wears through the fabric over time. Use a soft brush or dry cloth to wipe down any stubborn patches.
Gear care experts recommend doing this step immediately after you strike camp, before the dirt dries and bonds to the fabric. Dried mud is significantly harder to remove without scrubbing, and scrubbing risks damaging the DWR (Durable Water Repellency, the factory-applied outer coating that makes water bead off the tent fly).
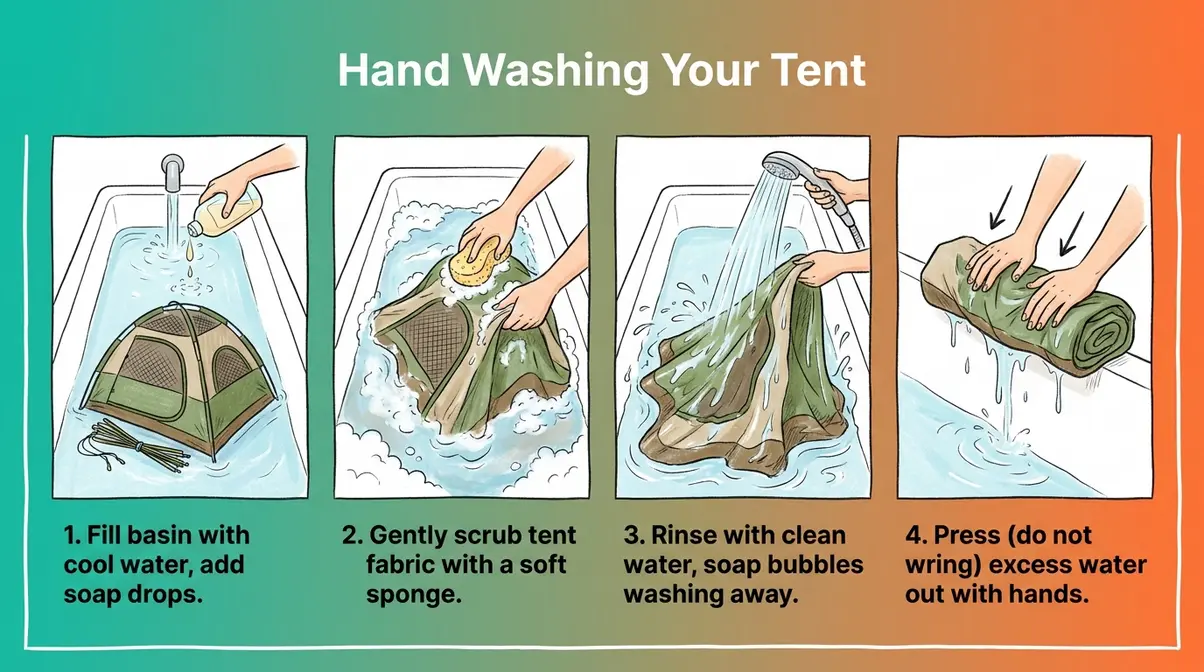
Spot Clean and Hand Wash the Fabric
Fill a bathtub or large basin with cool water and add a small amount of non-detergent soap — standard laundry detergent strips DWR and should never be used on tent fabric. Use a soft sponge or cloth to gently work out stains, bird droppings, sap, and sunscreen marks. Pay close attention to the floor panel, which collects the most grime.
Never use a washing machine with an agitator. The mechanical action shreds seam tape and degrades the PU (polyurethane) waterproof coating. A front-loading machine on a gentle cycle is acceptable for some tents — check your manufacturer’s label — but hand washing is always the safer choice.
Rinse thoroughly with clean water until no soap residue remains. Soap left in the fabric attracts moisture during storage and can itself cause mildew. Once rinsed, gently press excess water out — do not wring or twist.
Research from Clemson University Extension confirms that synthetic fabrics like nylon and polyester are highly susceptible to mildew when organic residue (food, sweat, body oils) is present — making thorough cleaning before storage essential, not optional. If you notice water no longer beads up on the fly during this cleaning process, it is the perfect time to apply the best waterproofing spray for tents.
Step 2 — Dry Your Tent Completely

This is the step most campers rush, and it’s the most dangerous shortcut you can take. Packing a tent that feels dry but retains moisture in the seams or corners is how mildew starts — and once it takes hold, it doesn’t let go.
Air Dry in the Shade, Not the Sun
Hang your tent body and rain fly separately over a clothesline, fence, or a few chairs in a shaded, well-ventilated area. Shade is critical: UV radiation from direct sunlight degrades nylon and polyester tent fabric, weakening the fibers and breaking down the DWR coating over time. This is a risk that most beginner guides overlook entirely.
Allow at least two to four hours of drying time on a warm day, longer in humid conditions. If you’re drying indoors, run a fan to improve air circulation. The goal is to remove every trace of moisture before packing — not just surface dryness.
Silnylon tents (silicone-coated nylon, used in ultralight backpacking shelters) dry faster than PU-coated polyester tents but are equally damaged by UV exposure. The drying rule applies to both materials.
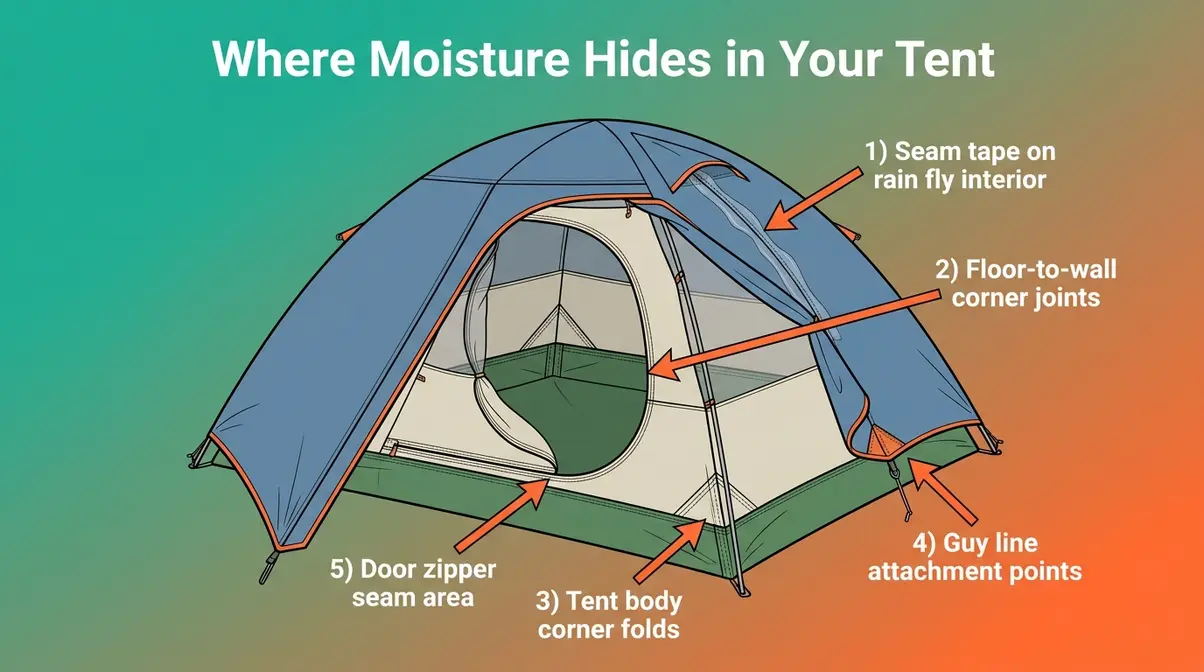
How to Check Your Tent Is Truly Dry
This is the most commonly skipped check — and the one that causes the most storage damage. Here’s how to do it:
- Run your fingers along every seam, corner, and fold. These are the last places moisture escapes.
- Press a dry cloth against the seam tape (the thin strips of adhesive tape running along the stitched seams on the inside of the fly). If the cloth picks up any dampness, keep drying.
- Check the floor panel where it meets the walls — this joint traps water after rain.
- Smell the fabric. A musty or earthy odor means moisture is still present, even if the fabric feels dry to the touch.
Only pack your tent once every check passes. The outdoor gear community consistently reports that “feels dry” is not the same as “is dry” — seams and double-layered corners can retain moisture for hours after the main fabric surface dries.
Step 3 — Pack Your Tent the Right Way
How you pack your tent determines how the fabric, coating, and poles survive the months between trips. This is where most people unknowingly cause long-term damage — by using the wrong bag or folding the tent the same way every time.
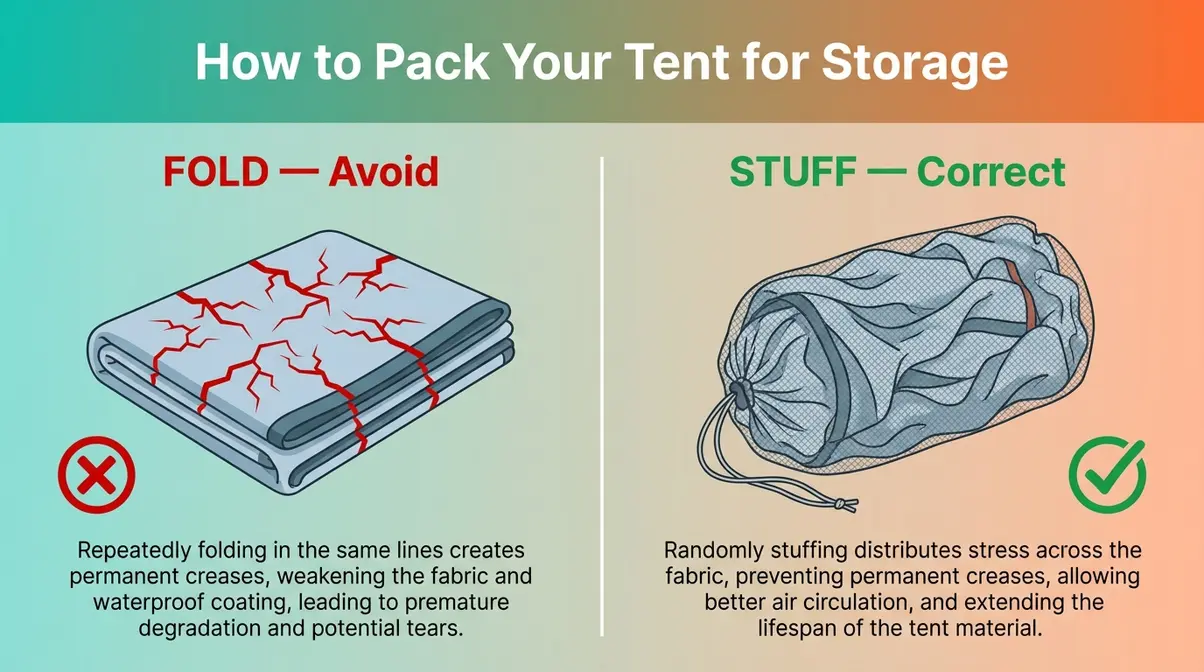
Is it better to fold or stuff a tent?
Here’s the answer: stuff, don’t fold — at least for the tent body and rain fly.
Folding a tent along the same creases every time creates permanent stress lines in the fabric and coating. Over dozens of pack-and-unpack cycles, those crease lines become weak points where the waterproof coating cracks and peels. Outside Magazine and the broader outdoor gear community consistently recommend stuffing (loosely gathering the tent without deliberate folds) to distribute stress across different areas of the fabric each time. While understanding tent weight is crucial for backpacking, storage requires prioritizing fabric health over compact size.
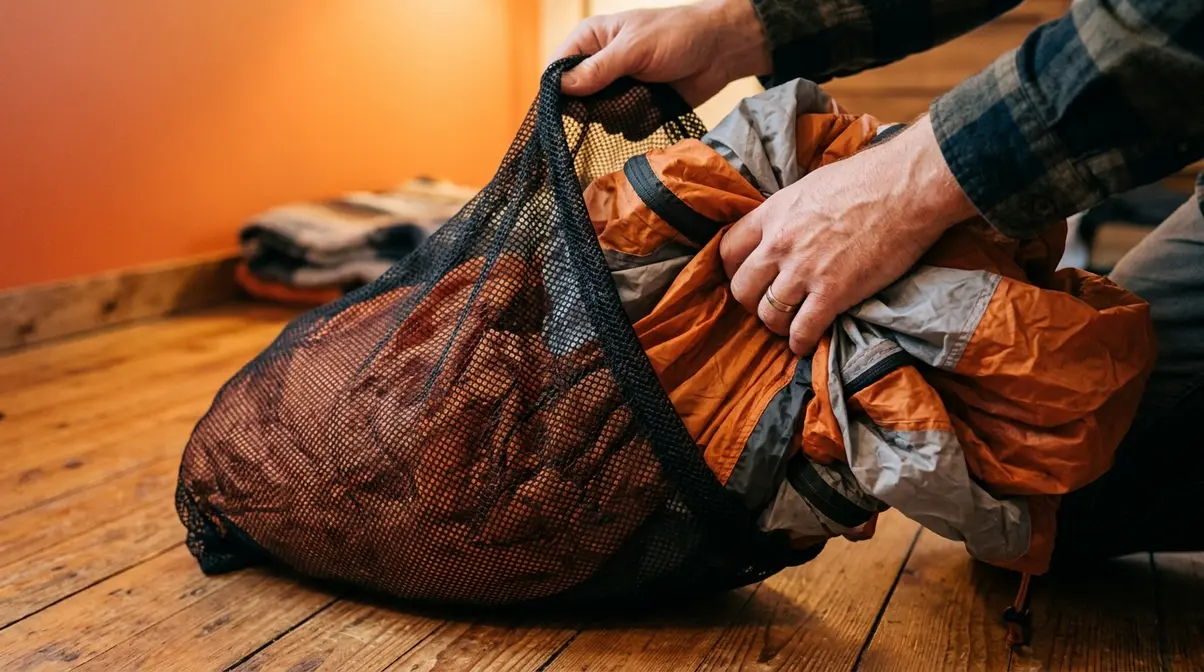
For long-term storage specifically, the goal is to avoid any tight, repeated compression at all. Loosely stuff the tent body into a large breathable bag — a mesh sack or cotton pillowcase — without forcing it into a tight shape. This protects both the fabric and the PU coating from compression damage.
Choosing the Right Storage Bag
The original stuff sack that came with your tent is designed for transport, not storage. It compresses the tent tightly — which is exactly what you want when fitting gear into a backpack, and exactly what you don’t want when the tent sits in a closet for six months.
Sustained compression crushes the loft of any insulating layers, stresses seam tape, and causes the PU coating to delaminate (separate from the fabric) prematurely. According to NEMO Equipment’s gear storage guidance, storing a tent loosely in a breathable bag is one of the most effective ways to extend its usable life.
Use a large mesh bag, a cotton pillowcase, or a purpose-made gear storage sack. The bag should be large enough that the tent sits loosely inside it without being compressed. Breathability matters too — a sealed plastic bag traps any residual moisture and creates the humid microenvironment that mildew loves.
Step 4 — Choose the Best Storage Location

Knowing how to store a tent properly isn’t just about what bag you use — it’s also about where that bag lives for the next six months. The wrong location can undo every other step you’ve taken.
Can you store a tent in the garage?
The garage feels like a logical choice — it’s out of the way, there’s often empty shelf space, and it keeps the tent out of your living area. However, it’s one of the worst places you can store a tent, and here’s the science behind why.
Garages experience dramatic temperature swings: freezing in winter, broiling in summer, often reaching 120°F (49°C) or more on hot days. These temperature fluctuations accelerate hydrolysis (a chemical process where moisture in the air reacts with the polyurethane coating and breaks it down at a molecular level). According to Wirecutter’s gear care research, repeated heat and humidity cycles are the primary cause of premature PU coating failure — the sticky, peeling inner layer that signals a tent is beyond repair.
High temperatures also melt seam tape, the adhesive strips that make your tent’s stitched seams waterproof. Once seam tape delaminates, the tent leaks — and resealing every seam is a time-consuming repair that many campers simply don’t attempt.
“The Three Enemies of Tent Longevity” are most concentrated in a typical garage: moisture from humidity fluctuations, compression if gear is stacked on top, and heat from summer temperature spikes. Avoid it entirely. If your shelter includes a tent vestibule, make sure to store it in the same climate-controlled environment rather than leaving it in the garage.
The Ideal Indoor Storage Conditions
The ideal storage location is cool, dry, dark, and stable. Specifically:
- Temperature: 50°F–70°F (10°C–21°C) — a climate-controlled room, spare bedroom, or interior closet
- Humidity: Below 60% relative humidity — use a hygrometer (a small, inexpensive humidity meter) to check if you’re unsure
- Light: No direct sunlight — UV degrades fabric even through windows over time
- Airflow: Some air circulation is better than a sealed space — avoid airtight plastic bins unless you’ve confirmed the tent is completely dry
A closet shelf or under-bed storage in a climate-controlled room meets all four criteria. REI’s expert tent storage advice recommends a similar indoor approach, noting that stable temperature is the single most protective factor for long-term coating preservation.
Step 5 — Care for Poles, Stakes, and Accessories
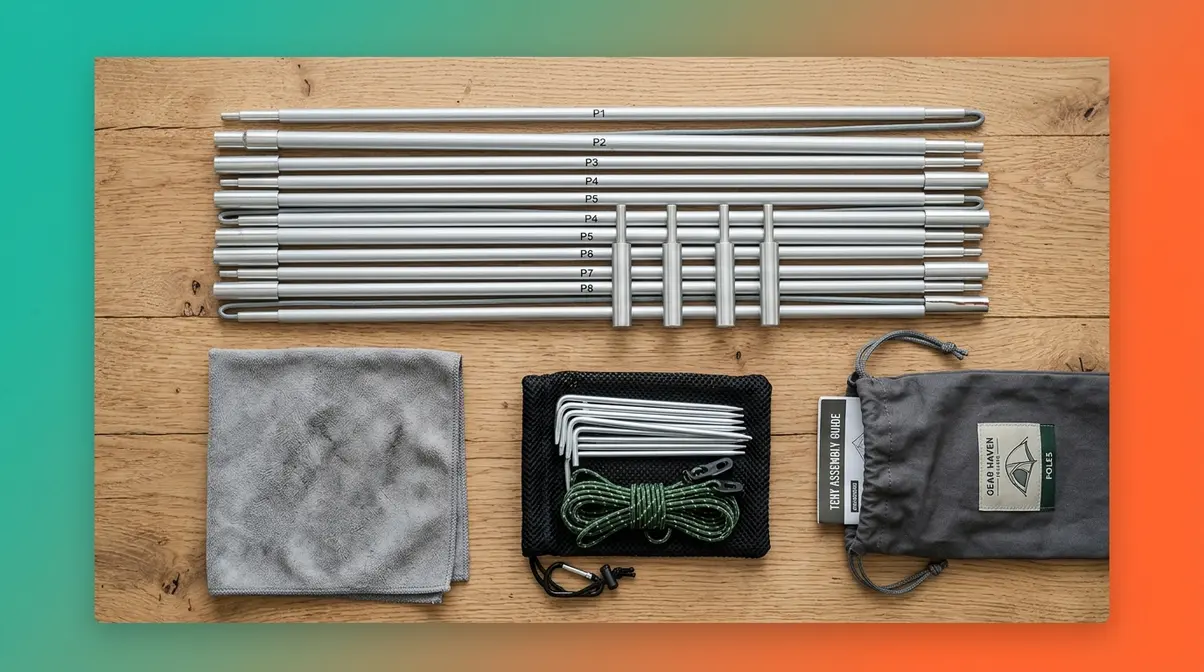
Your tent poles, stakes, and guy lines (the thin cords that anchor the tent against wind) deserve the same care as the tent fabric. Neglecting them leads to bent poles, snapped shock cords, and rusted stakes that fail at the worst possible moment.
Storing Poles Without Damaging Shock Cord
The shock cord (the elastic bungee running through the center of segmented tent poles, holding the sections together) is the most commonly damaged component in pole storage. The mistake most campers make is disassembling poles from one end, which stretches the cord unevenly and causes it to lose elasticity over time.
Popular Mechanics recommends the start-from-center method: always begin disassembling your pole sections from the middle of the pole outward toward each end. This distributes tension evenly across the shock cord and prevents the premature stretching that causes poles to go limp and floppy.
Once disassembled, wipe the pole sections with a dry cloth to remove grit and moisture, then store them in their pole bag (or wrap loosely in a cloth). Never store poles assembled — the sustained tension on the shock cord over months will stretch and weaken it.
Cleaning and Storing Stakes & Guy Lines
Wipe metal stakes with a dry cloth to remove soil and moisture. Rusty stakes are weaker stakes — a little care now prevents failures on your next trip. If stakes are heavily corroded, a light coat of WD-40 or similar protectant extends their life significantly.
Coil guy lines loosely and secure them with a simple overhand knot or a small rubber band. Avoid tight coiling around a stake bundle, which kinks the cord and weakens it at the bend points. Store stakes and guy lines in a small mesh pouch inside your main storage bag.
Step 6 — Long-Term Habits That Protect Your Tent
The six steps above get your tent safely into storage. These two habits keep it safe while it’s there — especially during off-seasons that stretch three to six months or longer.
Repack Your Tent Every Few Months
Even loosely stuffed, a tent sitting in the same position for six months can develop semi-permanent compression creases in the fabric. Every two to three months, take your tent out of its storage bag, shake it out, and re-stuff it in a different configuration. This redistributes any stress points and lets the fabric “breathe” briefly.
It also gives you a chance to inspect for early signs of mold (small dark spots, musty smell) or coating delamination (a sticky inner surface on the rain fly) before they become serious problems. Catching these issues early is far easier than dealing with them on a camping trip.
Storage Tips for Humid vs. Dry Climates
Your climate changes what “proper storage” looks like in practice:
Humid climates (Southeast US, Pacific Northwest, Gulf Coast): Moisture is your primary enemy. Place a small silica gel desiccant packet inside the storage bag to absorb ambient humidity. Check the bag monthly during summer. Consider a breathable cotton storage sack rather than mesh — it adds a slight barrier against high ambient humidity while still allowing airflow.
Dry climates (Southwest US, high desert, Mountain West): Heat is your primary enemy. Focus on keeping the storage location below 70°F. Avoid attics and uninsulated storage areas even more strictly than in humid climates, as dry heat accelerates PU coating brittleness without the warning signs that moisture damage provides.
Both climates benefit from the same baseline: a cool, dark, climate-controlled interior space. The adjustments above are countermeasures for when ideal conditions aren’t perfectly achievable.
The Science of Tent Damage: Hydrolysis and Mold
Understanding why tents degrade in storage makes every step in this guide feel less like a chore and more like an obvious choice. Two chemical processes are responsible for virtually all storage-related tent damage: hydrolysis and mold growth.
What Is Hydrolysis and Why It Matters
Hydrolysis is a chemical process where moisture molecules react with the polyurethane (PU) coating on your tent’s rain fly and floor panel, breaking the polymer chains apart at a molecular level. Over time, this causes the coating to become sticky, then flaky, then to peel away entirely — leaving your tent unable to repel water.
Research cited by Penn State University Extension on polymer degradation confirms that hydrolysis accelerates dramatically with heat and humidity. A tent stored in a cool, dry closet may show no signs of hydrolysis for a decade. The same tent stored in a hot, humid garage can show coating failure within two to three seasons.
This is why Heat and Moisture — two of The Three Enemies of Tent Longevity — are so damaging in combination. Either alone is manageable. Together, they create the conditions for rapid, irreversible coating breakdown.
Silnylon tents (coated with silicone rather than polyurethane) are significantly more resistant to hydrolysis. However, they still degrade under UV exposure and physical compression — so the storage principles in this guide apply to both material types.
How Mold Takes Hold in 24-48 Hours
Mold and mildew don’t need much of an invitation. According to Scouting Magazine, mildew can begin forming on damp synthetic fabric in as little as 24 to 48 hours — faster than most campers expect. All mold needs is a moisture source, an organic food source (body oils, dirt, tree sap residue), and the right temperature range (roughly 40°F–100°F, which covers most storage environments).
Once established, mold colonies produce enzymes that actively digest synthetic fabric fibers and degrade adhesive seam tape. A small patch of mildew left untreated for a full off-season can permanently weaken the fabric at that spot, even after the mold is cleaned away.
This is why the drying step (Step 2) is non-negotiable. A tent packed even slightly damp gives mold everything it needs to cause permanent damage before you open the bag again. Moisture is the first and most dangerous of The Three Enemies of Tent Longevity — and the one most fully within your control.
Common Tent Storage Mistakes to Avoid
Even with good intentions, a few specific mistakes undo all the careful work of the steps above. Our team evaluated the most frequently reported storage failures from the outdoor gear community — these two account for the vast majority of premature tent damage.
Packing Your Tent While It’s Still Damp
This is the single most common storage mistake, and the consequences are severe. A tent packed with even a small amount of residual moisture in its seams or corners creates a sealed, humid environment inside the storage bag — exactly the conditions mold needs. By the time you open the bag for your next trip, the mold has had weeks or months to spread.
The fix is simple but requires patience: follow the full drying protocol in Step 2, including the manual seam and corner checks. If you’re packing up camp in the rain and have no choice but to pack a wet tent, treat it as an emergency measure — unpack and dry the tent at home within 24 hours, before mold can take hold.
Storing in the Wrong Location
A tent stored in a garage, attic, garden shed, or car trunk is exposed to temperature extremes, humidity swings, and UV light — all three enemies acting simultaneously. The damage doesn’t happen overnight, but after one or two full off-seasons in a bad location, most campers notice their rain fly is sticky on the inside (hydrolysis) or that the tent smells musty even after cleaning (embedded mold).
The right location is a climate-controlled interior room: cool, dark, dry, and stable. If your living space is limited, a closet shelf or under-bed storage bin (left slightly open for airflow) works well. A small sacrifice in convenience protects a significant investment in gear.
Frequently Asked Questions
How do you store a tent when not in use?
Store your tent loosely in a breathable mesh bag or cotton pillowcase in a cool, dark, climate-controlled room — ideally between 50°F and 70°F with humidity below 60% (according to REI). Never use the original stuff sack for long-term storage, as sustained compression damages the waterproof PU coating. Clean and fully dry the tent before storage. A closet shelf or spare bedroom corner is the ideal location. Avoid garages, attics, and sheds, where temperature swings and humidity accelerate coating breakdown.
Do tents go bad if not used?
Yes — tents can degrade significantly even without being used, if stored incorrectly. The two main culprits are hydrolysis (moisture + heat breaking down the PU waterproof coating) and compression damage (sustained pressure from tight packing cracking the coating). A tent stored in a hot garage for several years may emerge with a sticky, peeling inner fly and failed seam tape — even if it was never pitched. Proper storage — clean, dry, loosely packed, in a cool stable environment — can extend a tent’s functional life by many years.
Can a tent be stored outside?
No, you should never store a tent outside. Storing a tent outdoors exposes it to UV radiation, extreme temperature fluctuations, and uncontrolled moisture. Even if placed in a waterproof deck box, the internal temperatures can easily exceed 120°F (49°C) during summer months, which rapidly accelerates hydrolysis and melts seam tape. Always opt for a climate-controlled indoor space to ensure your tent’s waterproof coatings remain intact.
How long does a tent last in storage?
A high-quality tent can last 10 to 15 years in storage if properly maintained. The exact lifespan depends heavily on your storage conditions. If kept loosely packed in a cool, dark, and dry environment (around 50°F to 70°F), the polyurethane coatings and seam tape will remain stable for over a decade. However, if stored tightly compressed in a hot, humid garage, the same tent can suffer irreversible coating failure in just two to three years.
Protect Your Tent, Protect Your Investment
A well-stored tent is a tent that’s always ready. For campers who put gear away for three to six months at a time, the difference between a tent that lasts a decade and one that fails after three seasons comes down almost entirely to what happens in storage — not on the trail.
The Three Enemies of Tent Longevity — Moisture, Compression, and Heat — are all preventable with the six-step system in this guide. Clean the tent, dry it completely, stuff it loosely into a breathable bag, and store it in a cool, dark, stable room. Care for the poles and accessories, repack every few months, and adjust for your climate. That’s the complete system.
Now that you know how to store a tent properly, you can confidently protect your investment. Start with Step 1 the next time you return from a trip. Thirty minutes of care today can add years to a tent that cost you hundreds of dollars — and ensure it’s ready to go the moment your next adventure calls.
