25 Camping Comfort Tips & Hacks for a Better Trip
 David King
Updated June 30, 2026
25 min read
David King
Updated June 30, 2026
25 min read
If you’ve ever stared at the tent ceiling at 2 AM, back aching, wondering why anyone does this voluntarily — you’re not alone. Every uncomfortable night chips away at the memories you came to make. And most of that discomfort is completely avoidable.
In this guide, you’ll discover 25 specific camping comfort tips and hacks — organized by category — so you can finally enjoy the outdoors the way it was meant to be. We cover sleep, campsite organization, temperature control, food, and hygiene — everything you need for a genuinely comfortable trip.
Recommended Products
| # | Image | Product | Best For | Buy |
|---|---|---|---|---|
| 1 |  |
Crisonky Inflatable Camping Pillow | Backpackers & light travelers | Buy on Amazon |
| 2 |  |
GCI Outdoor Comfort Pro Rocker | Relaxing around the campfire | Buy on Amazon |
| 3 |  |
Intex Queen Dura-Beam Air Mattress | Car campers wanting comfort | Buy on Amazon |
| 4 |  |
Whispering Winds Inflatable Seat Cushion | Stadium & outdoor seating | Buy on Amazon |
| 5 |  |
SoundAsleep Dream Series Air Mattress | Home-like sleep at camp | Buy on Amazon |
| 6 |  |
Drymate Waterproof Tent Carpet Mat | Keeping tents warm & dry | Buy on Amazon |
| 7 |  |
Coleman ComfortSmart Big & Tall Cot | Elevated, back-friendly sleep | Buy on Amazon |
| 8 |  |
Romswi XXL Padded Camping Chairs 2-Pack | Heavy-duty outdoor seating | Buy on Amazon |
The most impactful camping comfort tips and hacks target sleep first — a good night’s rest makes every other challenge easier. NIH research on camping sleep found that spending a week outdoors can shift your circadian rhythm by up to two hours, naturally improving sleep quality by aligning it with the sun’s natural light-dark cycle (PubMed).
- Sleep wins everything: Get off the ground with a cot or thick air mattress — it changes everything
- The Comfort Blueprint: Address sleep, organization, temperature, food, and hygiene as a system — not in isolation
- DIY beats gear-shopping: Foam tile flooring and hot-water bottles outperform expensive upgrades for most campers
- Temperature is the #1 comfort lever: Layering and ventilation fix most hot/cold problems before they start
- Hygiene = morale: Feeling clean boosts your enjoyment of the entire trip far more than any single piece of gear
Sleep & Shelter Hacks: Build Your Comfort Base
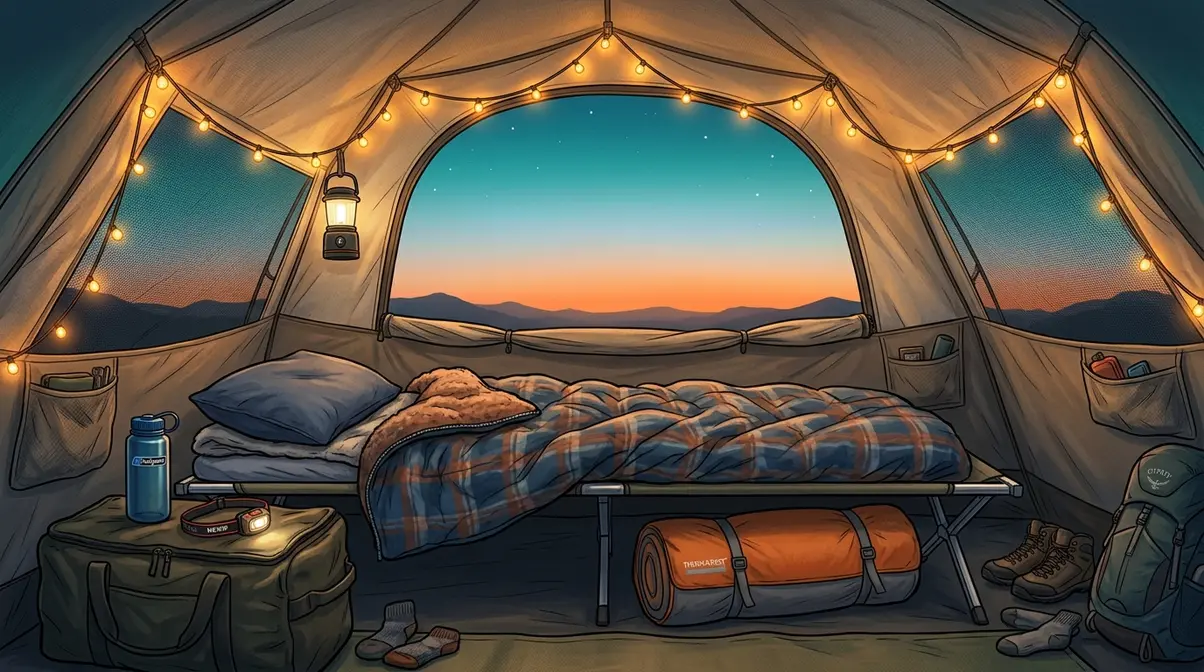
Getting a good night’s sleep is the single most important camping comfort hack — everything else becomes easier once you’re well-rested.
NIH research on camping sleep found that camping can naturally shift your circadian rhythm by up to two hours, improving sleep quality by aligning your body clock with natural light (PubMed). But that alignment only works when your environment is right — and that starts with what’s under you.
This is where The Comfort Blueprint begins. Think of it as a system: fix your sleep environment first, and every other part of the trip gets easier. Experienced campers who’ve evaluated these setups across multiple trips consistently report that sleep quality is the single variable that determines whether someone enjoys camping or gives it up entirely.
“My partner hates camping because it’s uncomfortable — he can’t sleep well, and everyday things are more challenging.”
— A common experience reported across camping communities
That frustration is valid. And it’s fixable. Here’s how.
Get Off the Ground: Cots & Pads
One of the best camping tricks and hacks you can apply costs almost nothing in effort: simply stop sleeping directly on the ground. Cold earth conducts heat away from your body far faster than cold air does — meaning you can lose significant warmth even on a mild night just from ground contact.
You have three main sleeping system options:
- Sleeping pad — Lightweight and packable, ideal for backpackers. Look for an R-value (a measure of insulation — higher numbers mean warmer sleep, with R-4 or above recommended for cold nights) of at least R-2 for summer camping and R-4+ for shoulder-season trips.
- Air mattress — The closest thing to a home bed. The Intex Dura-Beam, a double-height queen air mattress with a built-in pump, is a popular choice for car campers who want genuine home-like comfort without back pain.
- Camp cot — Elevates you completely off the ground, allowing airflow underneath and making it easier to get up in the night. The Coleman ComfortSmart Cot, a folding steel camp bed designed for taller or heavier campers, is a reliable option that experienced campers frequently recommend for those who struggle with low-to-ground sleeping.
The ISO sleeping bag temperature ratings standard (ISO 23537-1) ensures a sleeping bag’s “comfort rating” accurately reflects the temperature at which a standard adult can sleep comfortably — always match your bag’s rating to the expected overnight low, then add your pad’s R-value for a complete picture.
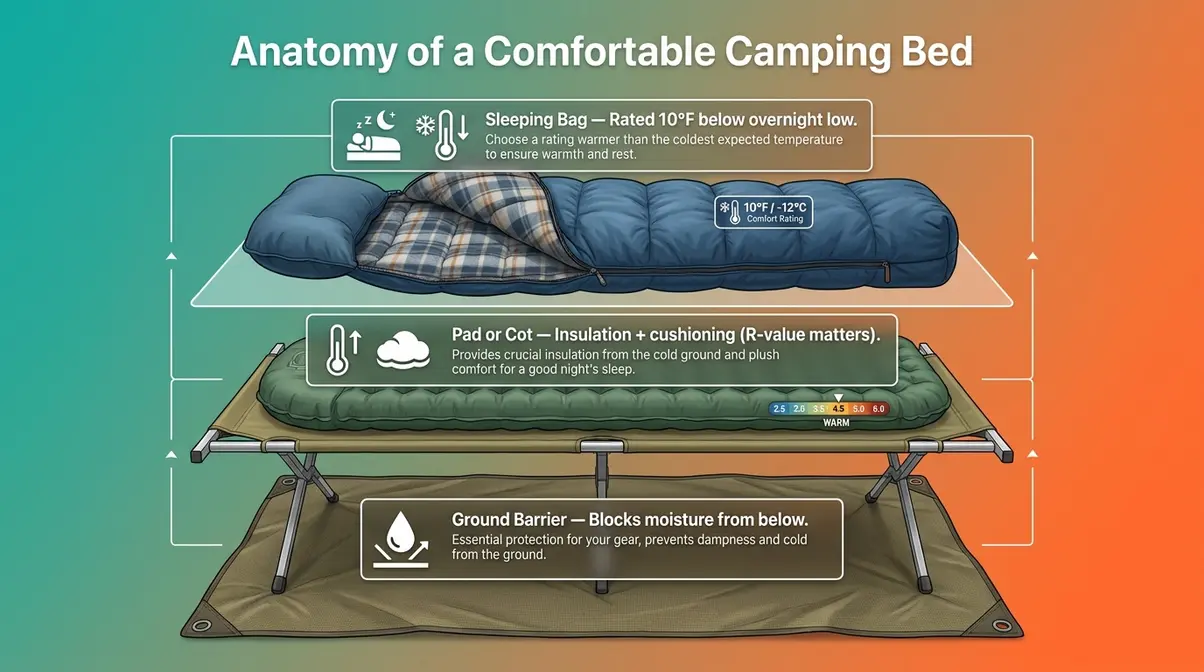
How to Build Your Camping Sleep System in 3 Layers:
- Ground barrier — A lightweight tarp or footprint under your tent blocks moisture from below
- Pad or cot — Your primary insulation and cushioning layer (choose based on trip type above)
- Sleeping bag — Rated to at least 10°F below the expected overnight temperature for a comfortable margin
For a deeper dive on choosing between these options, check out our guide to the best camping mattress for a good night’s sleep.
Once you’ve sorted what you’re sleeping ON, the next upgrade is what you’re sleeping ON TOP OF — and this is where most campers miss a surprisingly cheap fix.
Tent Floor: The Foam Tile Hack
These camping hacks and tips don’t have to be expensive. One of the most impactful comfort upgrades costs under $20 and takes five minutes to set up: interlocking foam puzzle tiles.
You’ve seen these in kids’ playrooms and garage floors. They work just as well inside a tent. Laid flat before you place any sleeping gear, they add both insulation from the cold ground AND soft cushioning underfoot — the difference between stepping onto a cold, hard tent floor at 3 AM and stepping onto something that actually feels comfortable.
For a pre-made alternative, the Drymate Tent Carpet Mat, a waterproof foam-backed rug made in the USA, is trimmable to fit any tent shape and wipes clean easily. It’s a strong option if you’d rather skip the DIY assembly.
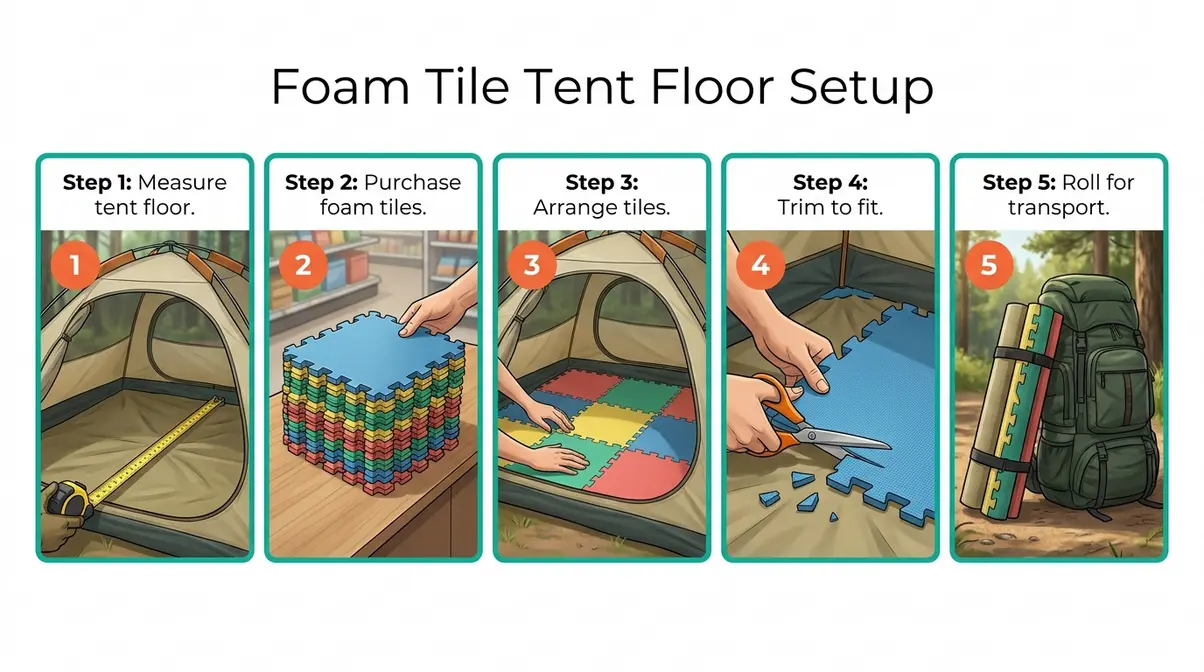
How to Set Up Foam Tile Tent Flooring:
- Measure your tent’s interior floor dimensions before your trip (length × width in feet)
- Purchase interlocking foam tiles — for a standard 6×8 foot tent, you need roughly 12–15 standard 2-foot square tiles
- Arrange the tiles inside your tent before placing any sleeping gear or bags on top
- Trim edge tiles with scissors to fit around tent poles or curved corners
- Roll or fold the tiles flat for transport — they add less than 3 lbs total to your gear load
The result is a noticeably warmer, softer tent floor that also reduces the noise of gear shifting at night. Community consensus across outdoor forums consistently rates this as one of the highest-impact, lowest-cost comfort upgrades available.
To explore more ways to improve your tent comfort, our full guide covers flooring, lighting, and ventilation upgrades in detail.
The floor is sorted. Now let’s tackle the small tent annoyances that add up — the stuck zippers, the dim lighting, and the general “bare” feeling that makes a tent feel like a shelter instead of a home.
Small Upgrades, Big Comfort
A few small changes transform how a tent feels — and most cost less than a cup of coffee. Here are the camping comfort tips and hacks that experienced campers consistently rely on for tent ambiance:
- Warm-toned LED string lights — Hang battery-powered fairy lights from the tent’s internal loops. Warm white or amber tones create a cozy atmosphere that harsh headlamp light never achieves. Cost: under $10.
- Zipper maintenance — Rub a candle stub, beeswax, or a zipper lubricant along tent zipper teeth before your trip. Stuck zippers wake people up at night. This 30-second fix is one that competitors ignore entirely, yet it prevents one of the most common campsite frustrations.
- Bring your real pillow — r/camping community tips consistently identify bringing a real pillow from home as the single most underrated comfort upgrade. If you’re backpacking or need to travel light, the Crisonky Inflatable Camping Pillow offers a compact, packable alternative that packs down to the size of a fist.
- The duffel bag bedside table — Stuff a soft duffel bag with extra clothes and place it beside your sleeping pad. It keeps your phone, headlamp, and water bottle within reach without cluttering the tent floor. Free, and genuinely useful.
- Ventilate even in cold weather — Leave a small vent cracked open at night. This prevents condensation buildup on tent walls and keeps air fresh, which improves sleep quality noticeably.
For a visual walkthrough of these tent upgrades, watch our step-by-step tutorial: How to Sleep Comfortably in a Tent.
With your sleep setup dialed in, the next biggest source of camping frustration is disorganization — spending 20 minutes looking for your headlamp when you just want to go to bed.
Campsite Organization: Stop Wasting Time
The fastest way to reduce campsite frustration is to treat your site like a home — with specific areas for sleeping, cooking, and relaxing. When everything has a place, you stop wasting time and start enjoying the trip. This section covers the exact system experienced campers use to stay organized, and it’s the second pillar of The Comfort Blueprint.
Think of your campsite like a studio apartment. A studio has a sleeping area, a kitchen corner, and a living space — all within the same footprint. Your campsite works the same way.
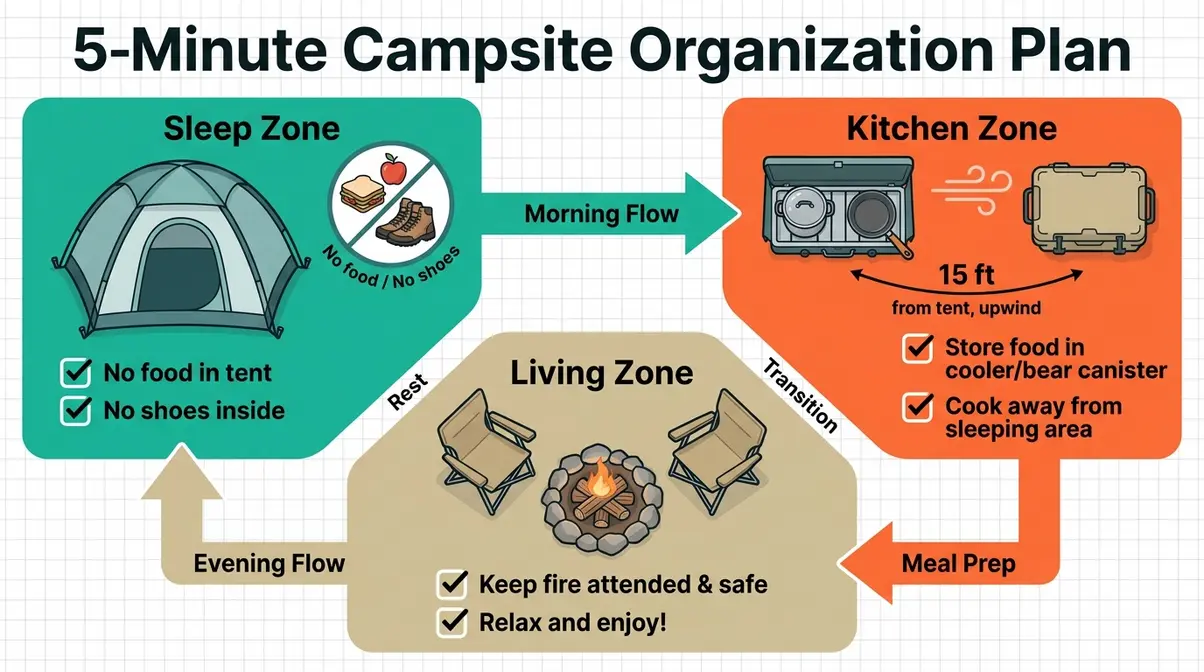
Zones: Sleep, Kitchen & Living
A campsite divided into three distinct zones makes every item’s location predictable — so you’re never rummaging through bags in the dark. Here’s the system:
- Sleep Zone — Your tent and all sleeping gear. Keep this area clean and gear-free. No food, no muddy boots, no cooking equipment inside or immediately adjacent.
- Kitchen Zone — Your stove, cooler, and food prep surface. Set this up 10–15 feet away from your tent. The CDC camping safety guidelines recommend keeping food storage and cooking areas away from sleeping areas to reduce wildlife attraction and maintain campsite safety.
- Living Zone — Chairs, a folding table, and the fire pit area. This is the social heart of the campsite, and it sits naturally between the Sleep Zone and Kitchen Zone.
A tent vestibule — the covered porch-like area at your tent entrance that acts as a gear storage buffer zone — works perfectly as the transition point between the Living Zone and Sleep Zone. Store muddy boots, wet jackets, and day packs here instead of dragging them inside.
Set Up Your Campsite in 3 Steps:
- Pitch your tent and designate the Sleep Zone — clear any rocks or debris from under the footprint
- Set up your kitchen 15 feet away and upwind of the tent (upwind keeps cooking smells away from your sleeping area)
- Place chairs and your camp table between the two zones to create the Living Zone
For more on using your tent’s vestibule for campsite organization with a tent vestibule, our dedicated guide walks through the best layouts for different tent styles.
Zones give you the system. Now you need the right storage tools to make it stick.
How Do I Keep My Campsite Organized?
Good camping storage ideas don’t require expensive gear. These are the tools and habits that experienced campers rely on to keep everything findable:
- Clear plastic bins with lids — Stack them in your car and transfer to the Kitchen Zone on arrival. Clear bins mean you can see contents without opening every lid. Label each bin with masking tape and a marker before you leave home.
- Over-door hanging organizers — The fabric kind with pockets, hung from your tent’s internal loops or a nearby tree branch. These are underrated camp furniture hacks for small items: headlamps, sunscreen, bug spray, phone chargers, and keys all have a dedicated pocket. A $5 version from a dollar store holds more than most dedicated camp organizers costing ten times as much.
- The “one bag per person” rule — Each camper has one personal bag that lives in the Sleep Zone. Everything else goes in shared bins. This prevents the “where’s my stuff?” problem, especially with kids or groups.
- Mesh stuff sacks — Use different colors for different categories: red for first aid, blue for hygiene, green for snacks. Color-coding cuts gear-finding time dramatically.
- A dedicated “wet bag” — A waterproof dry bag or large zip-lock for wet clothes and towels. Keeps moisture isolated from dry gear throughout the trip.
Good storage keeps your gear organized. But the real test is keeping the tent itself clean — and that requires one surprisingly simple trick.
Keep Dirt Out of Your Tent
A dirty tent is an uncomfortable tent. These three habits make a noticeable difference:
- Place a welcome mat outside the tent door — A folded towel or a cheap doormat works perfectly. Experienced campers report this single step cuts tent cleaning time significantly by catching most of the dirt and debris before it enters.
- Enforce a “no shoes inside” rule — Keep a designated shoe spot just outside the door. Use the vestibule as the shoe storage area if your tent has one. This is the most effective cleanliness habit in camping communities, and it costs nothing.
- Keep a small hand broom and dustpan in the tent pocket — A 60-second morning sweep prevents grit buildup that scratches tent floors and sleeping pads over time.
A clean, organized campsite is a comfortable campsite. But organization only takes you so far — when the temperature drops at night or spikes at noon, you need a different set of tools.
All-Weather Comfort: Stay Warm, Stay Cool
Maintaining a comfortable body temperature is the third pillar of The Comfort Blueprint — and it’s where beginners most often struggle. The good news: most hot and cold weather problems are solvable with free or near-free hacks before you spend anything on gear.
Stay Warm at Night (No Power)
Staying warm while camping without electricity is easier than most beginners expect — the key is layering and retaining the heat your body already generates. The CDC camping weather safety guidelines warn that hypothermia can occur even at temperatures above 40°F if your clothing becomes wet from sweat, making moisture management as important as insulation.
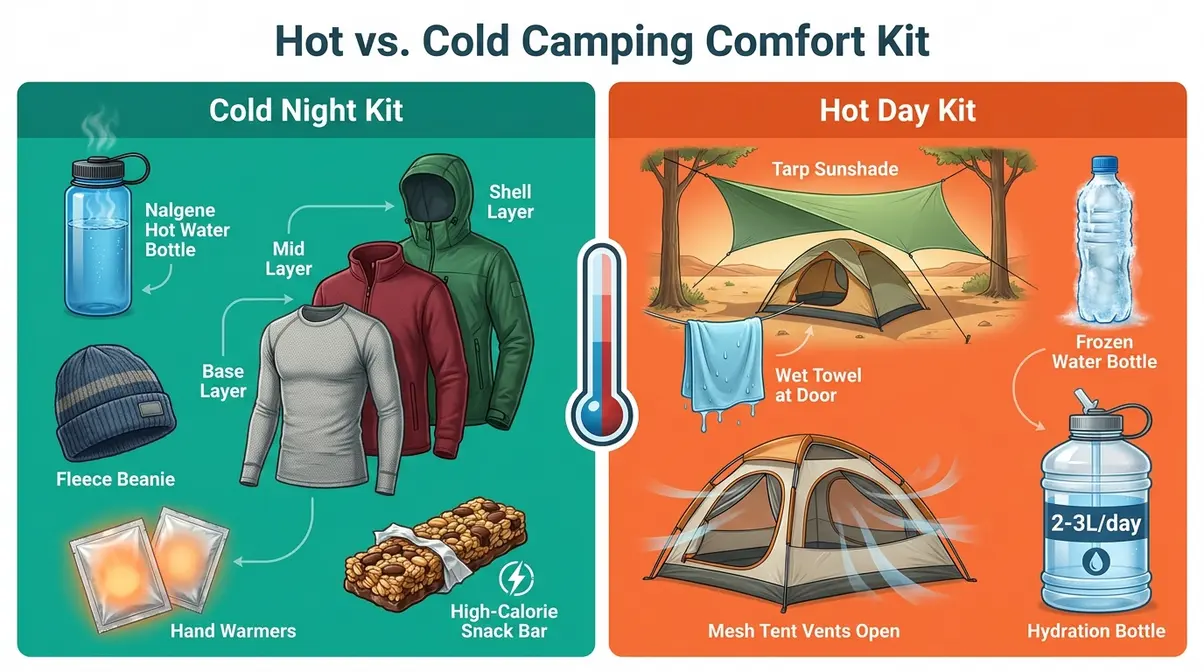
Here are five specific hacks that work:
- The hot water bottle hack — Fill a Nalgene-style water bottle (or any heat-safe bottle) with hot water just before bed. Place it at the foot of your sleeping bag. It acts as a personal heater for 3–4 hours. Cost: $0 if you already have a camp stove and a bottle.
- The three-layer system — (1) A moisture-wicking base layer (fabric that moves sweat away from your skin so you don’t get chilled), (2) an insulating mid-layer like fleece or down that traps warmth, (3) a windproof outer shell. This system works because each layer has a specific job.
- Sleep with a hat on — Up to 40% of body heat can be lost through the head. A simple beanie worn to sleep is one of the most effective and most overlooked warmth hacks.
- Hand warmers in sleeping bag pockets — Small, inexpensive, and they last 8–10 hours. Place near your feet or core, never directly against bare skin.
- Eat a high-calorie snack before bed — Your body generates heat while digesting food. A handful of nuts or a small chocolate bar before lights-out keeps you warmer through the night.
The 5-Minute Pre-Bed Warm-Up Routine:
- Boil water, fill your heat-safe bottle, and place it in the foot of your sleeping bag
- Change into your dry base layer and put on a beanie
- Eat a small high-calorie snack
- Activate hand warmers if the forecast is below 45°F
- Zip your sleeping bag fully and leave one tent vent cracked to reduce condensation
If you want to go beyond these DIY methods, our guide to stay warm with electric tent heaters covers safe, portable heating options for car campers.
Cold nights are one challenge. Hot afternoons in a baking tent are another — and they’re just as uncomfortable. Here’s how to stay cool.
Staying Cool in a Hot Tent
Think of your tent like a greenhouse — it traps heat, which is useful at night but brutal at noon. The following hacks address that problem directly:
- Choose your campsite location carefully — Pitch your tent in the shade of trees or a natural windbreak. Shade alone can reduce tent interior temperature dramatically. Avoid low-lying areas that trap heat and moisture.
- Maximize tent ventilation — Open all mesh panels and vents. Angle the rain fly to allow airflow underneath rather than sitting flush against the tent body. This creates a convection effect that moves hot air out continuously.
- The wet towel hack — Soak a small towel in cool water and hang it across the tent door opening. As air moves through, it cools via evaporation. It’s simple, free, and genuinely effective on dry, hot days.
- Set up a tarp sunshade — Rig a $15 tarp over your tent before the midday sun hits. Community reports and field experience suggest this can drop tent interior temperature by 15–20°F on a clear summer day.
- Stay hydrated — The USDA Forest Service heat safety guidelines recommend drinking at least one quart of water per hour during strenuous outdoor activity in the heat. For casual campers, aim for 2–3 liters per day minimum in hot weather. Freeze water bottles the night before — they double as ice packs in your cooler AND provide cold drinking water as they melt.
For campers dealing with extreme summer heat, our guide to keep cool with a tent air conditioner covers portable cooling options that work with a power station.
Heat and cold are manageable. But wet clothes and condensation are sneakier comfort killers — and most beginners don’t know how to deal with them.
Managing Wet Clothes and Condensation
This is a gap that no major competitor addresses — and it’s one of the most common sources of the “everything feels damp and gross” camping experience.
- Understand tent condensation — When warm air from your breath meets the cold tent walls overnight, it turns to water droplets. This is normal — it’s not a leak. The fix is simple: always leave at least one small vent open, even in cold weather. Airflow prevents moisture from accumulating on surfaces.
- Build a drying line — String a length of paracord or a bungee cord between two trees as a clothesline. Wet clothes left inside the tent make the condensation problem significantly worse and keep your sleep environment damp.
- Pack a microfiber towel — Microfiber dries in approximately 30 minutes and weighs almost nothing. Use it to wipe condensation off tent walls in the morning, dry wet gear, and handle personal hygiene tasks throughout the day.
With shelter, organization, and temperature handled, the next comfort pillar is food. Nothing ruins a camping trip faster than a spoiled cooler or a terrible cup of coffee.
Culinary Convenience: Make Camp Meals Easy
Food is the fourth pillar of The Comfort Blueprint — and it’s where some of the most practical camping hacks live. The goal isn’t gourmet cooking. It’s reliable, safe, easy meals that take less time to prepare than they do to enjoy.
Our team evaluated these setups across multiple camping trips and found that food frustration almost always comes from poor cooler management, not cooking skill. By mastering a few simple food storage and preparation techniques, you can eat incredibly well in the woods without spending your entire afternoon scrubbing pots.
How to Keep Food Cold in a Cooler
Applying these camping cooler hacks can keep food safe for three or more days without a premium cooler. According to FDA outdoor food safety guidelines, cold food must be stored at 40°F or below using ice or frozen gel packs to prevent bacterial growth — ice alone in an unprepared, room-temperature cooler rarely maintains this past day two (FDA).
How to Pack a Cooler for a 3-Day Trip:
- Pre-chill overnight — The night before your trip, fill the cooler with ice or frozen gel packs and let it sit. A cold cooler retains temperature 24–48 hours longer than one filled from room temperature.
- Frozen items on the bottom — Frozen meat, pre-frozen meals, and frozen water bottles go in first. They act as additional ice mass.
- Block ice or frozen bottles in the middle — Block ice melts slower than cubed ice. Frozen water bottles are especially useful because they double as cold drinking water as they melt throughout the trip.
- Refrigerated items on top — Dairy, produce, and drinks go here, where they’re easiest to access without disturbing the cold layer below.
- Fill all air gaps — Empty space in a cooler speeds up temperature loss. Pack extra ice around gaps to minimize fluctuation.
For a deeper dive, our guide to easy camping meal prep and cooler hacks covers pre-trip meal planning strategies that pair with this system.
Simple Meal Prep and Cooking Shortcuts
These easy camping cooking tips save time and reduce the “this is too much work” feeling that discourages beginners:
- Pre-chop and pre-measure at home — Dice vegetables, marinate proteins, and measure spices into small containers before you leave. Meal assembly at camp becomes a 10-minute task instead of a 45-minute one.
- One-pot meals only — Fewer dishes mean less cleanup and less water used. Pasta with pre-made sauce, chili, and stir-fry all work well on a single camp stove burner. Our guide to simple one-pot campfire recipes has 10 tested options organized by difficulty.
- Embrace foil packet meals — Also known as “hobo meals,” wrapping seasoned meat and vegetables in heavy-duty aluminum foil allows you to cook directly in the campfire coals. The best part? You eat straight from the foil, resulting in zero dishes to wash afterward.
- Bring hiking snacks in a dedicated bag — A separate snack bag keeps energy-dense foods accessible throughout the day without opening the cooler. Trail mix, energy bars, and dried fruit require zero preparation and zero refrigeration.
- Pre-make breakfast the night before — Overnight oats in a jar, pre-cracked eggs in a sealed container, or pre-mixed pancake batter all eliminate morning cooking friction when you’re tired and cold.
- Use a cast iron pan for versatility — One cast iron skillet handles breakfast, lunch, and dinner. It distributes heat evenly over uneven campfire flames and cleans with just hot water and a stiff brush — no soap required.
If you’re using natural water sources for cooking, the CDC backcountry water guidelines state that bringing water to a rolling boil for at least one minute is the most reliable way to eliminate disease-causing organisms.
Make Great Coffee at Camp
Good coffee is a genuine morale booster — and it’s completely achievable without a fancy setup. An AeroPress, a portable coffee brewer the size of a water bottle that makes barista-quality coffee with just hot water, is the most popular choice among experienced campers. It weighs under 8 ounces, produces a rich, full-bodied cup in about two minutes, and is nearly impossible to break.
To elevate your morning routine further, pack a double-walled vacuum-insulated camp mug. Standard enamel mugs look rustic, but they lose heat rapidly in cool morning air. An insulated mug ensures your coffee stays piping hot while you cook breakfast, preventing the disappointment of a lukewarm brew.
If you don’t want to carry brewing equipment, instant coffee has improved dramatically in recent years. Brands like Starbucks VIA and Mount Hagen produce cups that most campers find genuinely satisfying. Pair with a pre-measured packet of powdered creamer and sugar stored in a small zip-lock, and your morning routine takes under five minutes.
Personal Hygiene: Feel Fresh Without a Shower
Hygiene is the fifth and final pillar of The Comfort Blueprint — and it’s one that beginners consistently underestimate. Feeling clean has an outsized effect on morale. Managing personal hygiene in a minimalist way is entirely doable with the right kit and the right mindset.
Your Camping Hygiene Kit
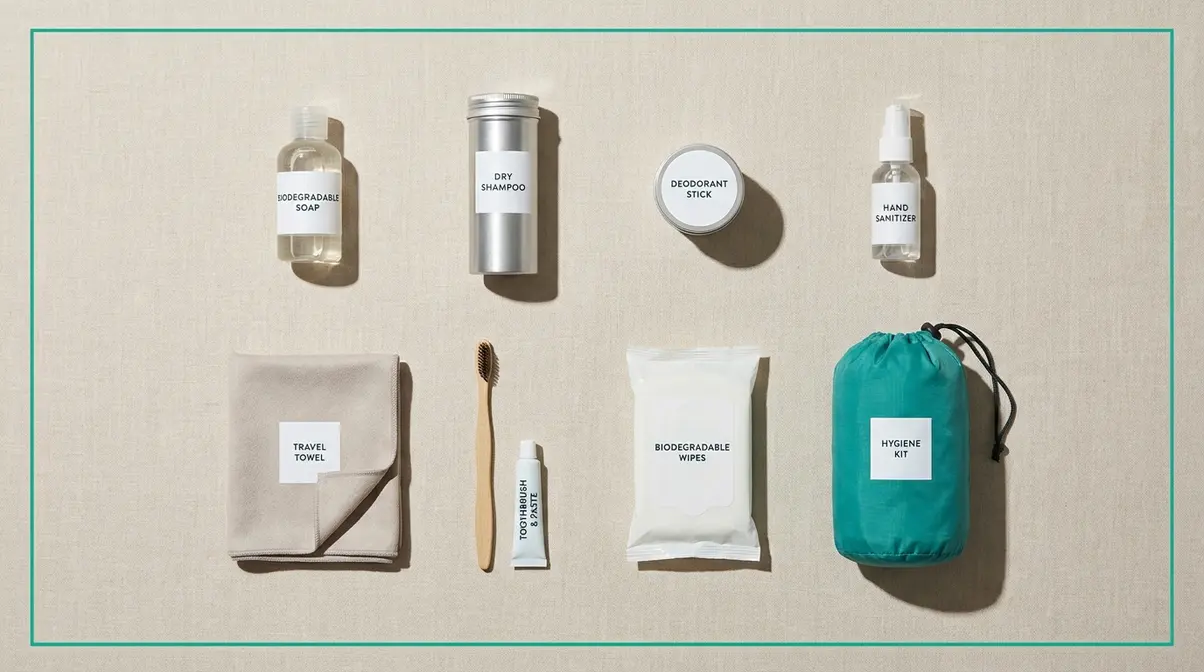
Skip the full-size toiletry bag. Build a compact, purpose-built kit instead:
- Pack This:
- Biodegradable soap (works for body, hair, and dishes — multi-purpose)
- Dry shampoo (refreshes hair between washes without water)
- Deodorant wipes or a small stick deodorant
- Hand sanitizer (for before meals and after bathroom trips)
- Microfiber travel towel (dries fast, packs small)
- Toothbrush and a small tube of toothpaste
- Feminine hygiene products or equivalent personal care items
- Leave This Behind:
- Full-size shampoo and conditioner bottles
- Loofahs (they harbor bacteria in damp conditions)
- Cotton towels (they stay wet for hours and attract mildew)
Keep your hygiene kit in a dedicated colored stuff sack in your Sleep Zone’s personal bag. When it has its own place, you never skip the routine because you can’t find your toothbrush.
Waterless Washing: Body, Hands & Teeth
You don’t need running water to feel genuinely clean. These waterless washing techniques are widely used by backpackers and car campers alike:
- Wet wipes for body washing — Unscented baby wipes or biodegradable camping wipes cover a full body wipe-down in under two minutes. This is the most common hygiene hack across camping forums for multi-day trips without shower access.
- Hand sanitizer before every meal — This is non-negotiable, especially when cooking for a group. Carry a small bottle in your hip pocket, not buried in a bag.
- Waterless toothbrushing — Brush with a pea-sized amount of toothpaste and spit. No rinsing required in a pinch. Some campers use dry toothbrush tablets that dissolve on the brush — they eliminate the need to carry a tube entirely.
- Dry shampoo for hair — A quick spray at the roots, a brief massage, and a brush-out removes excess oil and restores a feeling of cleanliness in under 90 seconds.
- Spot-clean clothing — A damp cloth with a small amount of biodegradable soap removes food stains and sweat marks from clothing between laundry opportunities. Hang to dry on your paracord clothesline.
Safety & Limitations: What to Watch Out For
Every camping comfort hack has a context where it works well — and a context where it doesn’t. Honest guidance means covering both.
Common Pitfalls That Ruin Comfort
These are the specific mistakes that undo even the best preparation:
- Ignoring weather forecasts — Checking the forecast the morning of your trip isn’t enough. Overnight low temperatures and precipitation probability can change 48 hours out. Check the forecast three days before departure and again the night before. Being caught with a summer sleeping bag in an unexpected cold snap is a comfort failure that no hack can fix retroactively.
- Overpacking “just in case” gear — A disorganized, overstuffed camp is harder to manage than a lean one. Experienced campers evaluate these setups across multiple trips and consistently report that less gear, well-organized, outperforms more gear poorly stored.
- Using open flames inside or too close to a tent — This includes candles, camp stoves, and propane heaters not rated for enclosed spaces. Always follow manufacturer safety guidelines for any heating device. The hot water bottle hack in this guide is specifically recommended as a safe, flameless alternative.
- Neglecting fire regulations — Always check local fire regulations before your trip. Many campgrounds have seasonal burn bans. KOA’s camping hacks resource and the USDA Forest Service website publish current restrictions by region.
- Skipping the campsite walkthrough — Before unpacking, walk the site and identify: tent placement (avoid low spots, roots, and ant hills), kitchen placement (10–15 feet from tent, downwind), and the nearest bathroom or toilet facility.
When These Hacks Aren’t Enough
The Comfort Blueprint covers the most common sources of camping discomfort — but some situations genuinely call for a different approach or professional guidance:
- Extreme weather conditions — If temperatures are expected below 20°F or severe storms are forecast, the hacks in this guide are not substitutes for proper cold-weather gear and training. Consider postponing or choosing a site with cabin accommodation.
- Medical conditions affected by outdoor environments — If you or a fellow camper has a condition that is sensitive to temperature, allergens, or physical exertion, consult a healthcare provider before planning a multi-day camping trip.
- First-time solo camping — Solo camping introduces safety considerations beyond comfort. The REI beginner camping guide is an excellent starting point for understanding what skills and gear are genuinely required before going alone.
- Backcountry and wilderness camping — The tips in this guide are written primarily for established campgrounds. Backcountry travel requires Leave No Trace principles, navigation skills, and additional safety preparation that goes beyond comfort optimization.
Frequently Asked Questions
How can I sleep well while camping?
Getting a good night’s sleep while camping starts with getting off the ground. Use a sleeping pad with an R-value of R-2 or higher, an air mattress, or a camp cot to eliminate cold ground contact. NIH research on camping sleep found that a week of outdoor camping can shift your circadian rhythm by up to two hours, naturally improving sleep quality. Pair this with a sleeping bag rated to the overnight low temperature, a real pillow, and warm-toned lighting in your tent for a complete sleep setup.
How do I prevent tent condensation?
The most effective way to prevent tent condensation is to maximize airflow by leaving at least one vent open overnight. Condensation occurs when warm moisture from your breath hits the cold interior walls of the tent. By cracking a window or roof vent — even in cold weather — you allow that moist air to escape before it settles. Additionally, avoid drying wet clothes inside the tent, as this adds significant moisture to the enclosed environment.
How do I stay warm while camping at night?
Staying warm at night without electricity is achievable with five free or low-cost hacks. The most effective is the hot water bottle trick — fill a heat-safe bottle just before bed and place it at the foot of your sleeping bag for 3–4 hours of warmth. Add a moisture-wicking base layer, a beanie, a high-calorie bedtime snack, and hand warmers for cold nights below 40°F. The CDC notes that hypothermia risk exists even above 40°F when clothing becomes wet, so keeping your base layer dry is as important as adding insulation.
What are some camping hygiene hacks?
The most practical camping hygiene hack is building a compact, purpose-built kit rather than packing a full toiletry bag. Unscented biodegradable wipes cover a full body wipe-down in two minutes. Dry shampoo refreshes hair in under 90 seconds. Hand sanitizer before every meal is non-negotiable. Keep your hygiene kit in a dedicated colored stuff sack in your personal bag so the routine is never skipped because items are lost. Feeling clean has a direct, measurable impact on how much you enjoy a camping trip.
What should I pack for a 3-day camping trip?
Packing for a 3-day camping trip requires focusing on the five pillars of comfort: sleep, organization, temperature, food, and hygiene. You will need a reliable sleep system (pad and rated bag), weather-appropriate layered clothing, and a pre-chilled cooler packed with simple, one-pot meals. Don’t forget a compact hygiene kit with biodegradable wipes and a dedicated bin for campsite organization. By packing systematically rather than throwing in “just in case” items, you keep your campsite manageable and stress-free.
Make Your Next Trip Your Best One
Camping discomfort is a solvable problem — not a feature of the outdoors. The Comfort Blueprint proves this: address sleep, organization, temperature, food, and hygiene as a connected system, and every part of the trip gets easier. NIH research on camping sleep confirms that your body is actually designed to sleep better outdoors when the environment is right. These 25 camping comfort tips and hacks give you the environment that makes that possible.
The most important insight from The Comfort Blueprint is this: you don’t need expensive gear to be comfortable outdoors. Foam tiles, a hot water bottle, a welcome mat, and a pre-chilled cooler outperform most $200 upgrades because they address the actual root causes of discomfort — cold ground, disorganization, temperature swings, and poor food management.
Pick one section from this guide and apply it to your next trip. Start with sleep if your partner is reluctant or if you’ve struggled with rest before. Once you nail the sleep setup, add the zone system. Then temperature. Build the system one layer at a time — and give camping a fair chance with the right foundation under you. Ready to upgrade your next outdoor adventure? Start by implementing the sleep system on your next weekend trip, and share this guide with your camping partner to plan your comfort strategy together.

David King
Field gear tester at Tent Explorer.