How to Choose a Tent for Camping: 4-Step Beginner Guide
 David King
Updated June 15, 2026
23 min read
David King
Updated June 15, 2026
23 min read
“Choosing a tent is overwhelming! Any Advice?”
— First-time camper, r/CampingandHiking
If that sounds familiar, you’re not alone. Walk into any outdoor retailer and you’ll find dozens of tents with specs that seem designed to confuse rather than help — “3000mm HH,” “non-freestanding,” “3-4 season.” Buy the wrong tent and you could end up cramped, soaked, or carrying 10 extra pounds up a mountain trail you deeply regret.
Here’s the good news: learning how to choose a tent for camping doesn’t require a gear science degree. It requires four honest questions about you — your camping style, your group, your weather, and your must-have features. Answer those in order, and the right tent narrows itself down fast.
This guide walks you through exactly that process using The Tent Fit Formula — a four-step decision framework built specifically for beginners. We’ll cover camping style, size and capacity, seasonality, and essential features, plus the most common mistakes first-time buyers make.
The Tent Fit Formula — match camping style, group size, weather, and features before you browse a single product page — is how to choose a tent for camping without wasting money or ending up miserable.
- Step 1 — Camping Style: Car campers prioritize space and comfort; backpackers prioritize weight under 2 lbs per person.
- Step 2 — Size Up: Manufacturer capacity ratings are tight. Use the N+1 rule — a “2-person” tent comfortably sleeps one adult with gear.
- Step 3 — Seasonality: Most campers need a 3-season tent. 4-season tents are for mountaineering, not rainy weekends.
- Step 4 — Features: Prioritize rainfly coverage, vestibule size, and pole material before anything else.
Before You Start: Beginner Essentials
Estimated Time: 10-15 minutes to evaluate your needs.
What You’ll Need: Your typical camping itinerary, an accurate group size count, expected weather conditions, and a realistic budget.
Before diving into the four steps, take 60 seconds to orient yourself. This section sets the foundation so the technical details in later steps actually make sense.
Tents are sold in a bewildering range of styles, sizes, and price points — from a $40 big-box shelter to a $900 ultralight backpacking tent. The good news: for most beginner campers heading to a designated campground, the right tent costs between $100 and $350 and follows a straightforward set of criteria.
Here’s what to keep in mind as you read:
- You don’t need the most expensive option. Entry-level tents from REI, MEC, and MSR cover the needs of 90% of beginner campers.
- Specs can be misleading. A “4-person” tent often sleeps two adults comfortably. A “3-season” tent doesn’t mean spring, summer, and fall equally — it has a specific meaning you’ll learn in Step 3.
- Your camping style drives every other decision. Before you compare fabrics or poles, you need to know whether you’re car camping or hiking in. Everything else flows from that.
A note on how the tents and specifications in this guide were evaluated: our team reviewed product data, ISO standards, and user consensus across outdoor communities including Reddit’s r/CampingandHiking, CleverHiker, and REI’s gear forums. Where possible, recommendations are cross-referenced with hands-on testing reports and established outdoor retailer guidance.
2026 Tent Tech Note: Lightweight materials like Dyneema composite fabric and hybrid silnylon floors have come down in price significantly. If you’re reading this in 2026, expect better waterproofing and lighter weights at the $200–$300 price point than were available just two years ago.
Step 1 — Decide Your Camping Style
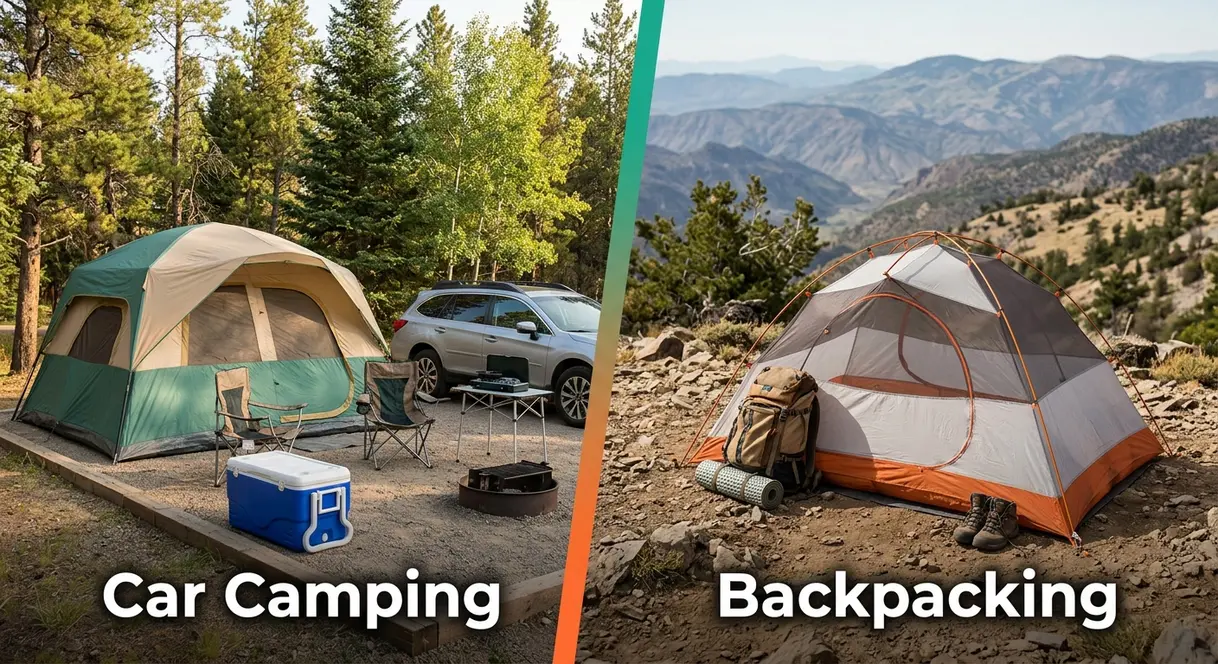
The single most important decision you’ll make when learning how to choose a tent is this: will you drive to your campsite, or hike to it? Understanding the difference between a backpacking tent vs camping tent is your first priority. Everything downstream — weight, size, price, design — depends on the answer.
Our team evaluated tent categories across car camping and backpacking use cases to identify the clearest differentiators for first-time buyers. The distinction isn’t just about weight. It’s about an entirely different philosophy of shelter design.
What Is a Car Camping Tent?
A car camping tent (also called a base camp tent) is designed to be transported in a vehicle and set up at a drive-in campsite. Because weight doesn’t matter — your car carries it — these tents are built for comfort, livable space, and ease of setup rather than packability.
Car camping tents typically feature:
- Larger floor plans — often 40–80+ square feet for family models
- Cabin-style walls that stand nearly vertical, maximizing headroom space
- Heavier poles (often fiberglass) that are cheaper to manufacture
- Multiple rooms or dividers for privacy
- Gear lofts, lantern hooks, and pockets for organization
Weight ranges from 8 to 20+ lbs, which would be impractical on a trail but is completely irrelevant when you’re pulling into a campsite. If your camping involves a cooler, folding chairs, and a parking spot within 50 feet of your tent, a car camping tent is almost certainly your category.
What Is a Backpacking Tent?
A backpacking tent is engineered around one constraint above all others: it must be light enough to carry on your back for miles. Every design decision — pole material, fabric weight, vestibule size — is a trade-off between weight reduction and livable comfort.
Backpacking tents typically feature:
- Aluminum or carbon fiber poles that are lighter and more resilient than fiberglass
- Silnylon or silpoly fabrics (lightweight ripstop nylon or polyester with silicone coating)
- Compact packed size — many fit inside a 6–8 liter stuff sack
- Minimal interior amenities — fewer pockets, no room dividers
- Higher cost per ounce — ultralight tents can cost $400–$900+
Ultralight tents, often marketed as “bikepacking” or “thru-hiker” shelters, push this further, sometimes sacrificing a full rainfly for a tarp-style design. A Bivvy Bag (a waterproof sleeve you sleep inside) is the most minimal option of all — suitable for solo ultralight adventurers but not recommended for beginners.
How to Decide Which Type You Need
Use this decision tree before you look at a single product listing:
- Will you carry the tent more than 1 mile on your back?
- Yes → Go backpacking tent
- No → Go car camping tent
- Are you planning multi-day canoe trips, tree planting work camps, or any activity where the tent travels by non-vehicle means?
- Yes → Weight and packed size matter; lean toward backpacking or hybrid tent
- No → Car camping tent is your best value
- Is your budget under $150?
- Yes → Car camping tents offer far more space and durability at this price point
- No → Both categories are available; let use case decide
For most beginners planning their first campground trip, a car camping tent in the 2-to-4 person range is the right starting point. According to REI’s expert buying guide, the majority of first-time buyers overestimate how often they’ll backpack and end up with a tent that’s too heavy to use comfortably on trails and too small to enjoy at the campground.
Weight and Packed Size: Why It Matters
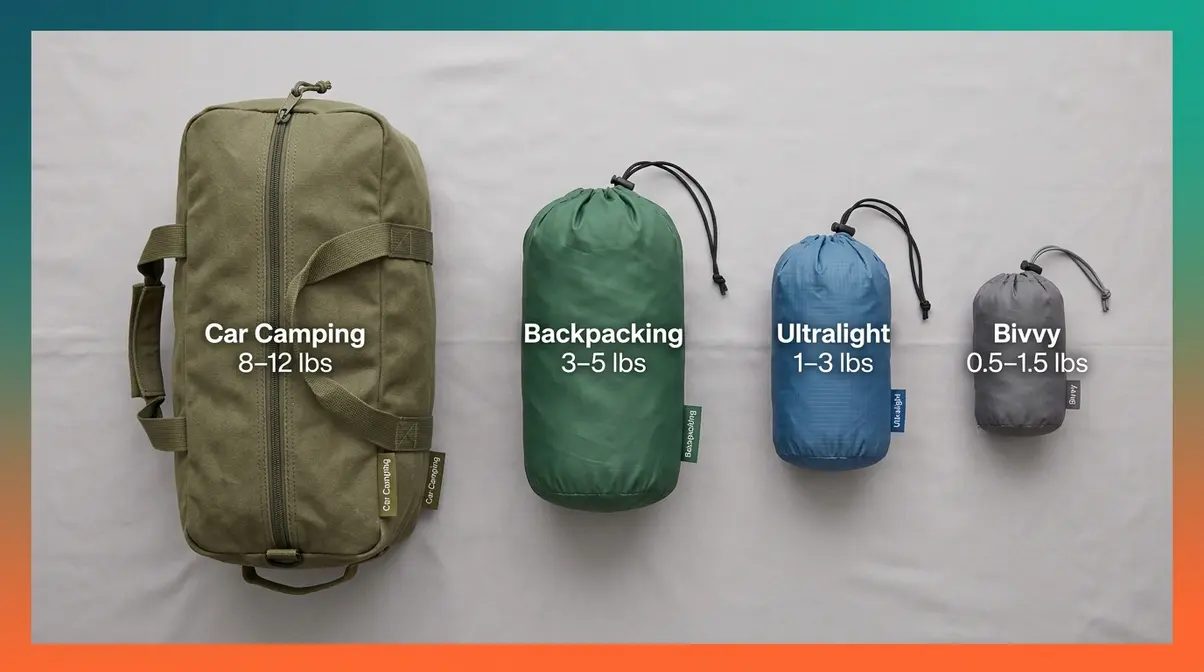
If you decide backpacking is in your future — even occasionally — understanding tent weight becomes a critical variable. A useful benchmark: your tent should weigh no more than 2 lbs per person for comfortable backpacking, according to Princeton University Outdoor Action guidelines.
| Tent Category | Typical Weight | Packed Size | Best For |
|---|---|---|---|
| Car Camping (2P) | 8–12 lbs | Large duffel | Drive-in campgrounds |
| Backpacking (2P) | 3–5 lbs | 6–8 L stuff sack | Hiking, thru-trails |
| Ultralight (1–2P) | 1–3 lbs | 3–5 L stuff sack | Long-distance hiking |
| Bivvy Bag (1P) | 0.5–1.5 lbs | Pocket-sized | Solo minimalist camping |
A tent that’s too heavy punishes every step of a hike. A tent that’s too light for car camping often means cramped quarters and flimsy poles. Match the category to the use case, and weight takes care of itself.
Step 2 — Choose the Right Tent Size for Your Group
Once you know your camping style, the next step is figuring out how much space you actually need. This is where most first-time buyers get burned — and where The Tent Fit Formula saves you from a very uncomfortable night.
How Tent Capacity Ratings Work
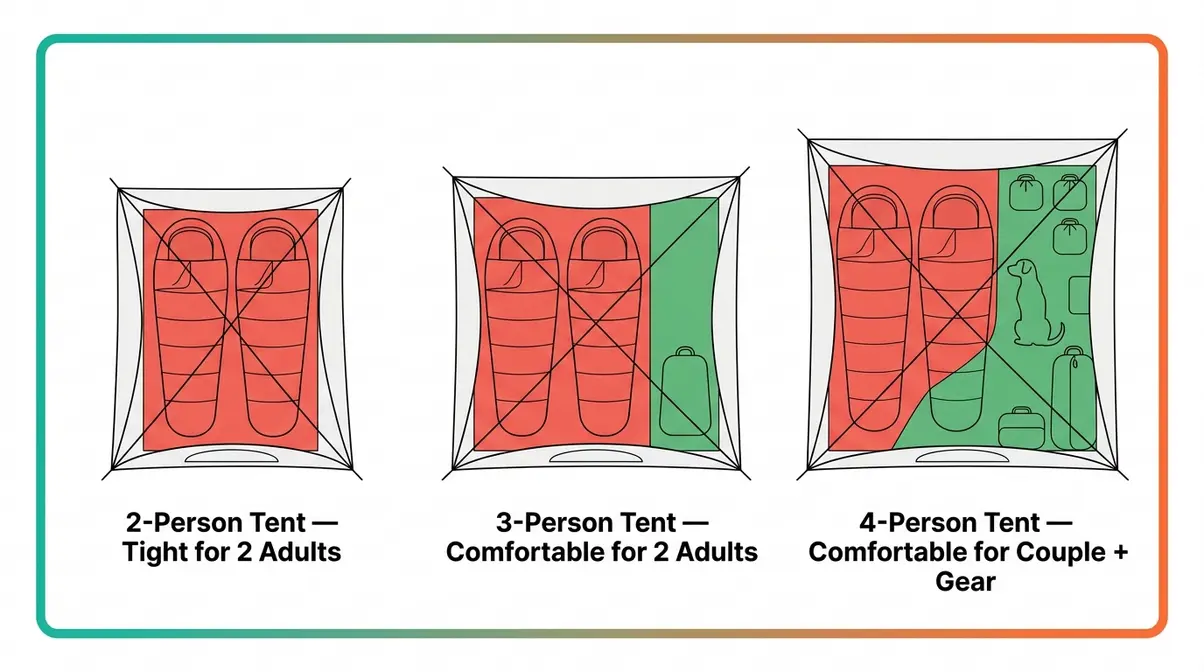
Tent capacity ratings are the manufacturer’s estimate of how many sleeping bags can fit side-by-side on the tent floor — with zero extra space. With tent capacity ratings explained, you’ll realize there is no room for gear, no buffer for movement, no consideration of shoulder width or pillow placement.
Consumer Reports testing has consistently found that manufacturer capacity ratings assume approximately 20 square feet per person — roughly the size of a sleeping bag with no margin. For context, a typical adult sleeping bag is about 19–20 square feet when laid flat. The math is tight by design, not by comfort.
This means:
- A “2-person” tent realistically sleeps 1 adult with gear, or 2 adults in close quarters
- A “3-person” tent is a comfortable 2-person tent
- A “4-person” tent is a comfortable 2-adult + 2-children or 3-adult tent
When our team tested a 2-person tent with two adults and their gear, there was less than 6 inches of clearance on each side. Getting dressed required strategic timing. That’s not a comfortable night — it’s a camping survival exercise.
The N+1 Rule: Why You Should Size Up
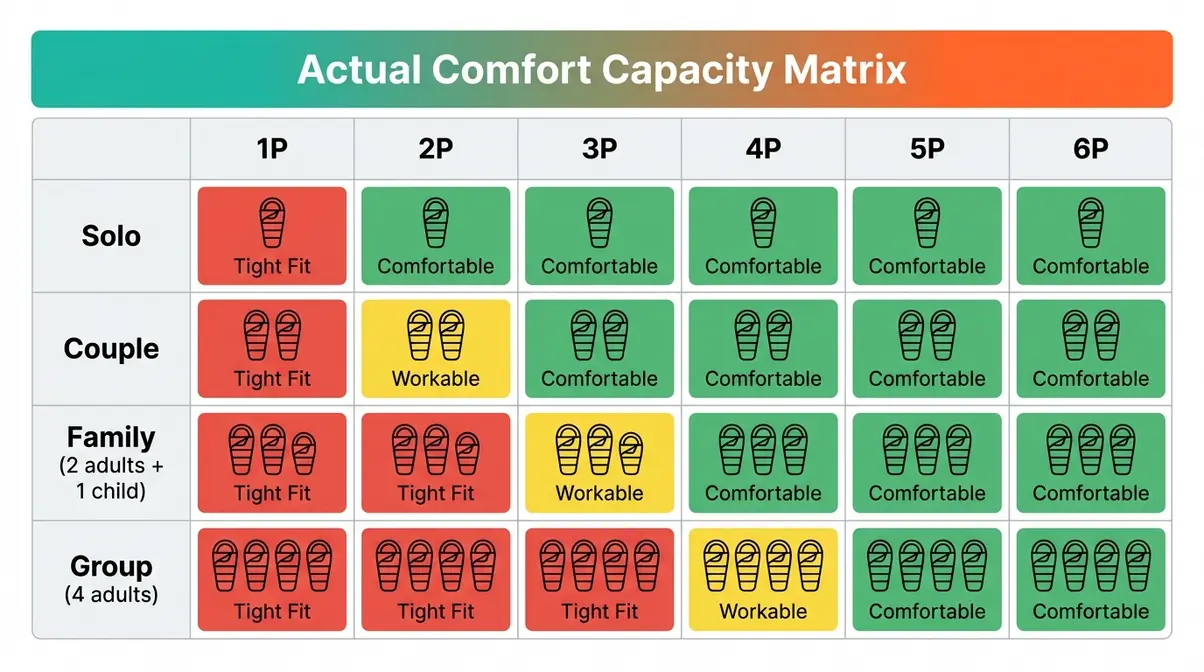
The N+1 Rule is simple: always buy one size larger than the number of people sleeping in the tent. If two adults are camping, buy a 3-person tent. If a family of four is camping, buy a 5- or 6-person tent.
Why does this matter beyond comfort? Three reasons:
- Gear storage. Boots, bags, and daypacks take up real floor space. Without a vestibule (covered porch area), your gear lives inside the tent.
- Pet accommodation. A medium-sized dog takes up roughly the same floor space as a child. Plan for it.
- Weather days. If it rains all morning and you’re stuck inside, you’ll want room to sit up, read, and not feel like you’re in a coffin.
CleverHiker’s buying guide notes that the N+1 rule is the single most common piece of advice across experienced camping communities — and the most commonly ignored advice by first-time buyers who balk at paying slightly more for the larger size.
How to Know What Size Tent to Buy
Use this chart to find your starting point. These are comfort-based recommendations, not manufacturer minimums. If you have a very large group, you might even consider the best family tent for 8 person setups.
| Group Composition | Recommended Tent Size | Floor Space Target |
|---|---|---|
| Solo camper | 2-person tent | 28–32 sq ft |
| Couple (no gear issues) | 3-person tent | 40–50 sq ft |
| Couple + gear or 1 dog | 4-person tent | 55–65 sq ft |
| Family of 3 (2 adults + 1 child) | 4-person tent | 55–65 sq ft |
| Family of 4 | 6-person tent | 75–90 sq ft |
| Group of 4 adults | 6-person tent or two 3-person tents | 75+ sq ft |
Actual Comfort Capacity Matrix:
Floor Space vs. Peak Height
Two dimensions matter in a tent: floor space (how much you can lie down) and peak height (how tall the tent is at its highest point).
Floor space is non-negotiable for sleeping. But peak height determines whether you can sit up, change clothes, or stand — and it varies dramatically by tent design.
- Backpacking tents: Peak height of 36–42 inches (sit up, can’t stand)
- Dome car camping tents: Peak height of 48–60 inches (sit comfortably, crouch to move)
- Cabin-style car camping tents: Peak height of 60–78 inches (stand upright — the gold standard for family camping)
If you’re tall, have mobility considerations, or plan to spend time inside during bad weather, prioritize peak height alongside floor space. A tent with 75 sq ft of floor but only 42 inches of peak height will feel like a cave by day two.
Step 3 — Match Your Tent to the Season and Weather
Tent seasonality is one of the most misunderstood specs in the outdoor gear world. The number on the label — “3-season” or “4-season” — doesn’t describe which calendar months you can use it. It describes a structural and material design philosophy. Getting this wrong can mean a miserable, dangerous night in a storm.
What Does a 3-Season Tent Mean?
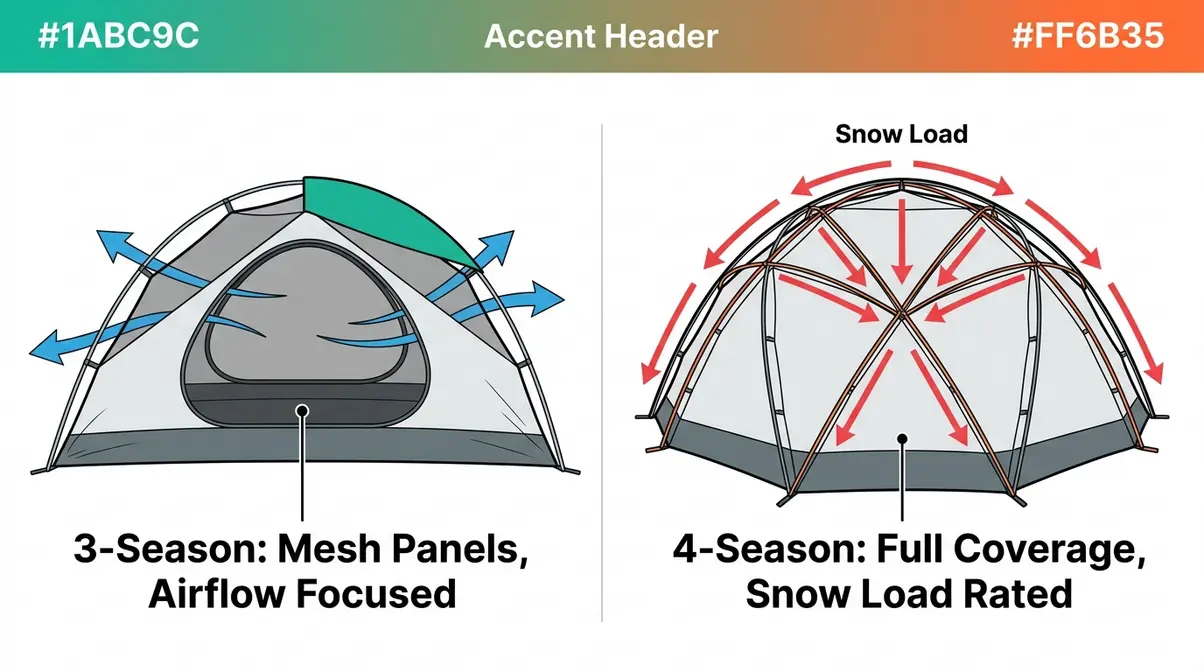
A 3-season tent is designed for spring, summer, and fall camping in moderate conditions — meaning rain, wind, and temperatures above freezing. It is the most common tent category and the right choice for the vast majority of beginner campers.
Key characteristics of a 3-season tent:
- Large mesh panels for airflow and condensation management
- Single or double rainfly that covers most (but not all) of the mesh
- Lighter pole structure optimized for moderate wind loads
- Waterproofing rated at 1,500–3,000mm HH (hydrostatic head — more on this in Step 4)
According to MEC’s tent buying guide, 3-season tents handle the conditions experienced by approximately 90% of recreational campers in North America. If you’re camping at a national park, state park, or designated campground from April through October, a 3-season tent is almost certainly sufficient.
Do You Really Need a 4-Season Tent?
A 4-season tent (also called a mountaineering tent or winter tent) is engineered for extreme conditions: heavy snow loads, sustained high winds, and sub-zero temperatures. It uses a geodesic or semi-geodesic pole structure with minimal mesh and maximum fabric coverage to retain heat and resist snow accumulation. If you plan on winter expeditions, learning why choose a four season tent is essential for safer camping.
4-season tents are heavier, more expensive ($400–$1,500+), and significantly less ventilated than 3-season models. They are designed for:
- Alpine mountaineering
- Winter camping in snow
- Expeditions above treeline in sustained wind
Most beginner campers do not need a 4-season tent. If you’re camping in a designated campground — even in shoulder season — a high-quality 3-season tent handles the job. Buying a 4-season tent for weekend car camping is like buying a snowplow for a mild winter: technically capable, practically overkill.
3-Season vs. 4-Season Misconception
Here’s the misconception that catches first-time buyers off guard: “3-season” does NOT mean the tent fails in cold weather or heavy rain. A quality 3-season model is often the best tent for wind and rain during typical summer storms. A quality 3-season tent with a full-coverage rainfly and 2,000mm+ HH rating handles driving rain, gusty winds, and temperatures well below freezing — as long as there’s no heavy snow load.
The real difference is structural load capacity, not temperature rating:
- 3-season tents flex in wind but can collapse under sustained snow weight
- 4-season tents use more poles in a geodesic pattern to distribute snow loads across the structure
The practical upshot: if you’re not camping in snow, you almost certainly need a 3-season tent, not a 4-season one. Save the extra $200–$600 for gear that will actually improve your experience.
Extended-Season (3-4 Season) Tents
Between the standard 3-season and full mountaineering 4-season lies a useful middle category: the extended-season tent (sometimes labeled “3–4 season” or “all-season”).
These tents bridge the gap by offering:
- Heavier pole structure than a 3-season tent for moderate snow loads
- Less mesh than a 3-season tent for better warmth retention
- Lower weight than a full 4-season tent for packability
- Waterproofing of 2,500–4,000mm HH — above standard 3-season specs
Extended-season tents are the right choice for alpine camping in shoulder seasons (late October, early April), shoulder-season thru-hiking, or anyone who regularly camps in conditions where overnight snow is possible but not sustained. They cost $300–$700 and represent a genuine middle ground rather than a marketing compromise.
| Tent Type | Best Conditions | Typical Weight | HH Rating | Price Range |
|---|---|---|---|---|
| 3-Season | Spring–Fall, rain/wind | 3–7 lbs | 1,500–3,000mm | $100–$400 |
| Extended-Season (3–4) | Shoulder season, light snow | 4–8 lbs | 2,500–4,000mm | $300–$700 |
| 4-Season | Winter, heavy snow, alpine | 6–12 lbs | 3,000–5,000mm | $400–$1,500+ |
Step 4 — Learn the Essential Tent Features
Now that you’ve locked in your camping style, group size, and seasonality, it’s time to compare features. This is where beginners get most overwhelmed — but with your first three decisions made, most features either clearly matter or clearly don’t.
Tent Shape: Dome vs. Cabin
The two most common tent shapes are dome and cabin, and they represent a trade-off between structural stability and usable headroom space.
Dome tents use crossing poles that arch over the tent body, creating a rounded profile. They shed wind and rain efficiently, set up quickly, and work on uneven ground. Most backpacking tents and many car camping tents use dome geometry.
Cabin tents use near-vertical walls that maximize interior volume. The result is a tent that feels like a small room — you can stand upright, move around, and even fit a cot. The trade-off: cabin walls catch wind more easily, and the tent requires flat, level ground.
For families and car campers who prioritize livable space, cabin tents are often worth the stability trade-off. For backpackers or anyone camping in exposed, windy locations, dome geometry is safer and more reliable.
Rainfly Coverage: Full vs. Partial
A rainfly (a separate waterproof outer layer that drapes over the tent body) is your primary defense against rain. The question isn’t whether to have one — it’s how much coverage it provides.
- Full-coverage rainfly: Extends to the ground or near-ground on all sides. Maximum weather protection. Reduces ventilation.
- Partial rainfly: Covers the roof and part of the walls, leaving lower mesh panels exposed. Better airflow in warm weather. Less protection in driving rain or wind-driven precipitation.
For beginners who can’t predict conditions precisely, a full-coverage rainfly is the safer default. You can always roll it back on warm, clear nights. You can’t add coverage you don’t have when a storm rolls in at 2 a.m.
Vestibules: Your Gear’s Best Friend
A vestibule is a covered porch area outside the tent door, created by the rainfly extending beyond the tent body. Think of it as a mudroom for your campsite.
Vestibules solve a problem that many first-time buyers don’t anticipate: where does your gear go when it rains? Without a vestibule, muddy boots, wet rain jackets, and daypacks end up inside your tent — reducing your sleeping space and making everything damp.
A good vestibule provides:
- Gear storage out of the rain but outside the sleeping area
- A dry zone for removing wet clothing before entering the tent
- Wind buffer at the door for cold-weather camping
- Additional cooking shelter in a pinch (never cook inside a tent — carbon monoxide risk)
According to the MEC tent buying guide, vestibule size is one of the top three features experienced campers wish they’d prioritized on their first tent purchase. Aim for at least 8–12 square feet of vestibule space per tent door.
Freestanding vs. Non-Freestanding Tents
Freestanding tents hold their shape using poles alone — no stakes required to stand up. You can pitch them, pick them up, and move them before staking. This makes setup dramatically easier on rocky or root-covered ground. Choosing between a freestanding vs semi-freestanding tent dictates how easily you can set up camp. The Boy Scouts of America often advises freestanding tents for beginners to minimize site impact and simplify pitching.
Non-freestanding tents require stakes and/or guylines to maintain their shape. They’re typically lighter (fewer poles, simpler structure) but demand more skill and suitable ground conditions to pitch correctly.
For beginners, freestanding tents are strongly recommended for ease of setup. The ability to reposition a freestanding tent after pitching — to avoid a root you didn’t notice, or to orient the door away from the wind — is a practical advantage that experienced campers often take for granted.
Most car camping tents are freestanding. Many ultralight backpacking tents are non-freestanding or semi-freestanding (requiring at least two stakes to complete the structure). If ease of setup is a priority — and for beginners, it should be — filter your search to freestanding designs first.
Pole Materials: Aluminum vs. Fiberglass
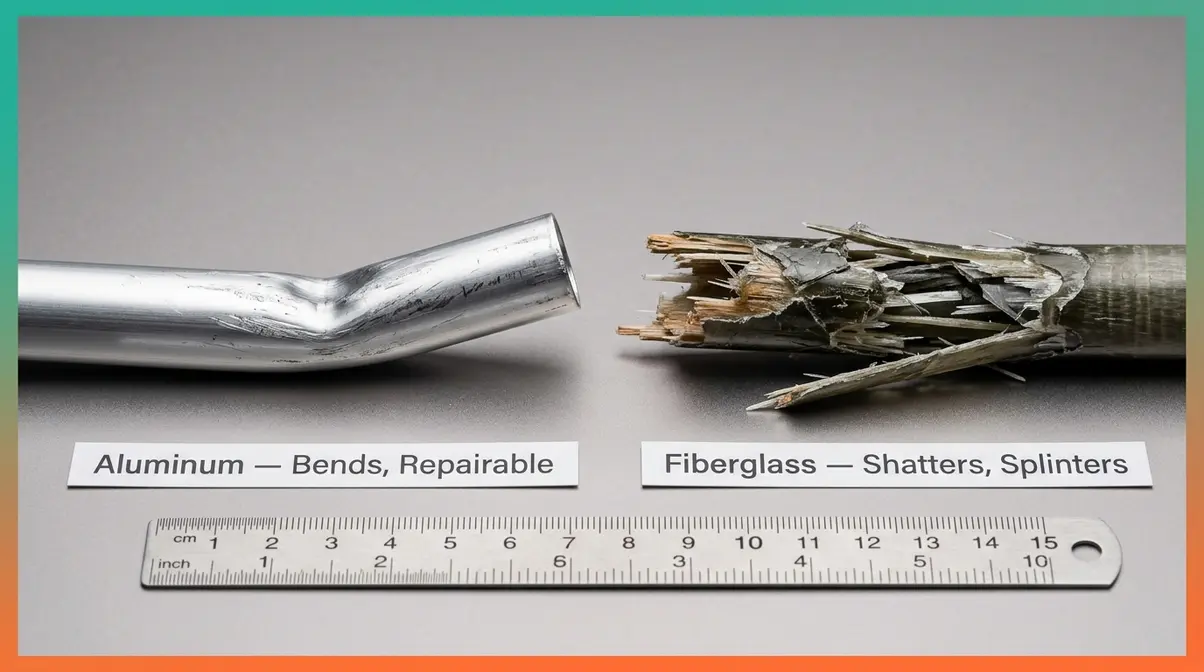
Exploring tent materials helps you understand that tent poles are the skeleton of your shelter. The material determines weight, durability, and what happens when a pole breaks in the field.
Aluminum poles:
- Lighter than fiberglass by 20–30%
- Bend rather than shatter under stress — a bent pole can often be straightened
- Standard on all backpacking tents and mid-range to high-end car camping tents
- More expensive to manufacture
Fiberglass poles:
- Heavier but cheaper to produce
- Shatter under high stress — a broken fiberglass pole splinters and can puncture the tent fabric
- Common on budget car camping tents ($50–$150)
- Adequate for calm-weather car camping; not recommended for exposed or windy sites
| Pole Type | Weight | Failure Mode | Best For | Relative Cost |
|---|---|---|---|---|
| Aluminum (7000-series) | Light | Bends, repairable | Backpacking, all camping | Higher |
| Aluminum (6000-series) | Medium-light | Bends | Car camping, mid-range | Medium |
| Fiberglass | Heavy | Shatters, splinters | Budget car camping only | Lower |
| Carbon Fiber | Very light | Can snap under stress | Ultralight backpacking | Highest |
| DAC Featherlight (aluminum alloy) | Very light | Bends, very resilient | Premium backpacking | Premium |
User consensus across outdoor forums consistently reports that fiberglass pole failure is one of the top reasons campers upgrade their first tent sooner than expected. If your budget allows, choosing a tent with aluminum poles — even at the entry level — extends the useful life of your shelter significantly.
Hydrostatic Head (HH) Ratings
Hydrostatic head (HH) is the measurement of how much water pressure a fabric can withstand before it leaks, expressed in millimeters. A rating of 1,500mm means the fabric can hold a 1,500mm (about 5 feet) column of water before moisture passes through. Higher numbers mean better waterproofing.
The ISO 5912:2020 standard — the international benchmark for tent fabric waterproofness — establishes the following performance thresholds:
| HH Rating | Performance Level | Suitable Conditions |
|---|---|---|
| Under 1,000mm | Not waterproof | Fair weather only |
| 1,000–1,500mm | Minimal protection | Light drizzle |
| 1,500–2,000mm | Entry-level waterproof | Moderate rain |
| 2,000–3,000mm | Good waterproofing | Heavy rain, sustained precipitation |
| 3,000mm+ | Excellent waterproofing | Driving rain, high wind, storm conditions |
According to Popular Mechanics’ gear testing data, a minimum of 2,000mm HH is the practical threshold for camping in conditions where real rain is possible. Entry-level tents rated at 1,200–1,500mm may perform adequately in light drizzle but will fail in a genuine downpour.
Hydrostatic Head Weather Simulation Chart:
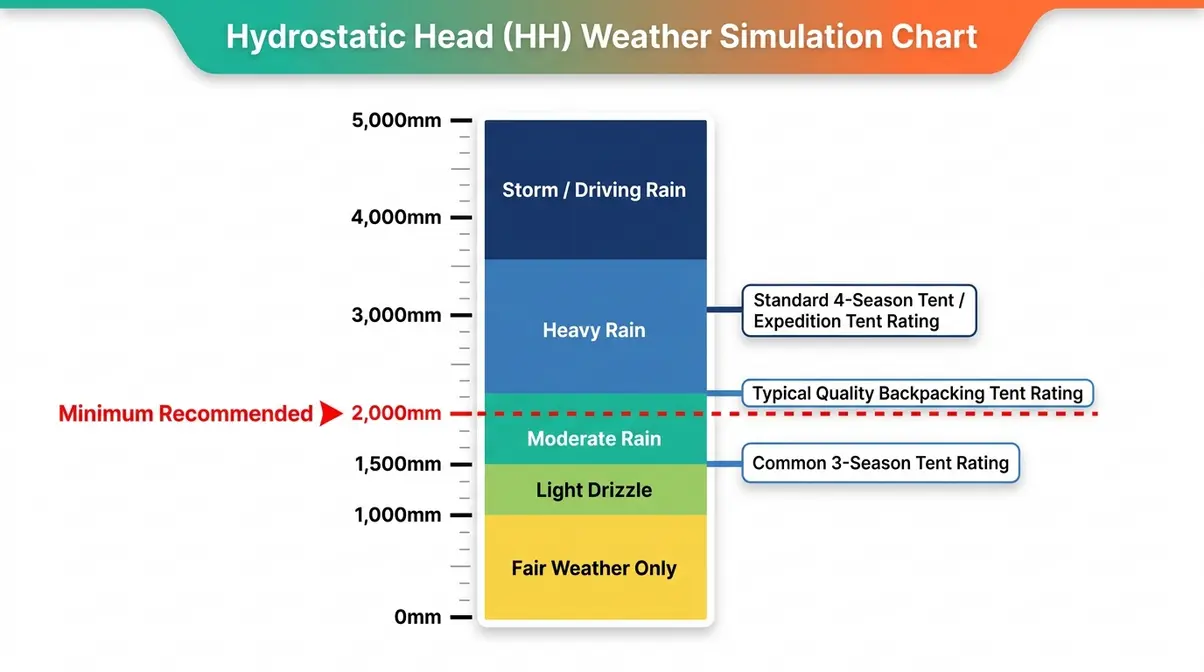
One more note: the tent floor needs a higher HH rating than the walls, because it bears the weight of sleeping bodies pressing against wet ground. Look for floor ratings of 3,000mm or higher, even on tents with 1,500–2,000mm wall ratings.
Ventilation and Condensation Management
Condensation is the hidden enemy of tent comfort — and it’s a problem that surprises nearly every first-time camper. Even on a dry night, your body releases approximately 1 liter of moisture through breathing and perspiration during 8 hours of sleep. In a sealed tent, that moisture has nowhere to go. It condenses on the inner walls, drips onto your sleeping bag, and makes everything feel damp.
The solution is ventilation geometry: the strategic placement of mesh panels, vents, and rainfly gap positioning to create airflow without exposing the interior to rain.
Key ventilation features to look for:
- Double-wall construction: A mesh inner tent plus a separate rainfly with an air gap between them. This is the gold standard — moisture migrates through the mesh and escapes between the layers. Single-wall tents (common in ultralight designs) are lighter but condense more readily.
- Low and high vents: Hot, moist air rises. Tents with vents near the peak allow rising moisture to escape. Bonus points for adjustable vents you can open from inside.
- Vestibule gap: Leaving the vestibule door slightly open (even in rain) allows cross-airflow through the tent body without exposing the interior.
User consensus across camping communities consistently identifies condensation as the top complaint about otherwise well-reviewed tents — almost always traceable to inadequate ventilation rather than a defective rainfly. When comparing two tents of similar price and waterproofing, choose the one with more mesh and more vent options.
Common Tent-Buying Mistakes to Avoid
Even with a solid framework, first-time buyers fall into predictable traps. Here are the ones our team sees most often — and how to sidestep them.
5 Mistakes First-Time Tent Buyers Make
Mistake 1: Buying to the rated capacity. You already know the N+1 Rule. Skipping it is the single most common regret among first-time buyers. A “2-person” tent that sleeps one adult and their gear is not a failure — it’s working as designed.
Mistake 2: Ignoring the floor HH rating. Shoppers focus on the headline waterproofing number (usually the rainfly or canopy) and miss the floor spec. A tent with a 3,000mm canopy and an 800mm floor will still let moisture through from the ground. Always check the floor rating separately.
Mistake 3: Choosing weight over livability for car camping. Beginners who’ve read about ultralight backpacking sometimes buy a 3 lb tent for a car camping trip. The result: a cramped, low-headroom shelter that makes the trip less enjoyable without saving a single ounce of effort.
Mistake 4: Skipping the setup test at home. Your first tent setup should not happen in the dark at a campsite. Set it up in your backyard or living room before your trip. You’ll find missing parts, confusing pole clips, or a broken zipper while you still have time to fix it.
Mistake 5: Buying a tent without checking the packed size. A tent that fits in a bag you can carry is usable. A tent that requires a separate cart to transport because the stuff sack is the size of a duffel bag is a practical problem. Check packed dimensions — not just weight — before buying. Additionally, consider National Park Service guidelines on campsite impact when choosing your tent footprint.
Are Expensive Tents Actually Worth the Money?
A $90 big-box tent and a $350 mid-range tent from REI or MEC look similar in photos, but for regular campers, a mid-range tent ($250–$400) is almost always worth it over a budget model. Here’s where the difference actually shows up:
- Pole quality: A $90 tent almost always uses fiberglass poles that shatter. A $350 tent uses aluminum poles that bend and survive.
- Seam sealing: Budget tents often have taped seams rather than factory-sealed seams. In sustained rain, taped seams can peel. Factory-sealed seams (look for “factory seam-sealed” in the spec sheet) don’t.
- Zipper quality: Cheap zippers jam, snag, and fail at the worst moments. YKK or Dyneema zippers on mid-range tents last years of regular use.
- Longevity: User consensus across outdoor communities indicates that a quality $300 tent used regularly lasts 8–12 years. A $90 budget tent typically lasts 2–3 seasons before poles, zippers, or coatings fail.
The math: if you camp even 3–4 nights per year, a $300 tent costs roughly $25–$37 per year over its lifespan. A $90 tent replaced every 2–3 years costs more in the long run — and provides a worse experience throughout.
Frequently Asked Questions
What’s the difference between a car camping tent and a backpacking tent?
Car camping tents prioritize space and comfort over weight, while backpacking tents prioritize light weight and compact packed size over interior volume. A car camping tent typically weighs 8–15 lbs with a large floor plan (40–80 sq ft) and is transported in a vehicle. A backpacking tent weighs 2–5 lbs, packs into a 6–8 liter stuff sack, and uses lightweight aluminum poles and silnylon fabric. The key decision point: if you’re hiking more than 1 mile to your campsite, choose a backpacking tent. For drive-in campgrounds, a car camping tent gives you far more space and comfort per dollar spent.
Do I need a footprint for my tent?
A tent footprint protects your shelter’s floor from abrasion and punctures. While not strictly mandatory, using a footprint extends the life of your tent significantly, especially on rocky or root-heavy terrain. It also provides an extra layer of waterproofing against saturated ground. Make sure the footprint is slightly smaller than the tent base to prevent water from pooling between the layers. For beginners, investing in a footprint is a smart way to protect a mid-range tent investment.
How do I prevent tent condensation?
The most effective way to prevent condensation is maximizing ventilation. Even on a dry night, your body releases approximately 1 liter of moisture through breathing and perspiration. To combat this, always open the peak vents and leave the vestibule door slightly unzipped if weather permits. Choosing a double-wall tent rather than a single-wall design also creates a crucial air gap that lets moisture escape. Proper site selection—avoiding low valleys where cold, damp air settles—further reduces condensation buildup.
How long should a good camping tent last?
A quality mid-range tent should last 8–12 years with regular use. The difference between a budget model and a premium one shows up in pole material, seam sealing, and zipper quality. User consensus across camping communities indicates a quality $300 tent lasts 8–12 years of regular use, while a $90 budget tent typically fails within 2–3 seasons. If you camp 3–4 nights per year, the per-night cost of a mid-range tent is lower than a budget replacement cycle. Proper cleaning and storing the tent completely dry will maximize its lifespan.
What is a hydrostatic head (HH) rating and what number should I look for?
Hydrostatic head (HH) measures how much water pressure a tent fabric can resist before leaking, expressed in millimeters. Under the ISO 5912:2020 standard, a 2,000mm HH rating is the practical minimum for camping where real rain is expected. For most beginner campers, look for a tent with a canopy/rainfly rated at 2,000mm or higher and a floor rated at 3,000mm or higher (floors bear body weight against wet ground, requiring stronger waterproofing). Budget tents rated at 1,200–1,500mm may handle light drizzle but will leak in a genuine storm.
Putting It All Together: Your Tent Fit Formula
The four steps in this guide form a complete decision sequence — The Tent Fit Formula — that takes you from overwhelmed beginner to confident shopper without needing to understand every spec on a product page.
Work through the steps in order: first lock in your camping style (car camping or backpacking), then apply the N+1 Rule to find your size, then match seasonality to your actual camping conditions (almost certainly a 3-season tent), then filter by the features that matter for your use case — full rainfly, vestibule size, freestanding design, and a minimum 2,000mm HH rating.
The Tent Fit Formula works because it starts with you, not the product. By the time you reach a product page, you already know your category, your size, your season rating, and your non-negotiable features. You’re no longer browsing. You’re confirming.
Your next step: take five minutes to answer the four questions — camping style, group size, weather conditions, and must-have features — before you open a single browser tab of tent listings. Check out our complete tent reviews and recommendations to apply your Formula to specific models, or browse our guide to first camping trips if you’re still in the planning stage. The right tent is closer than it feels.

David King
Field gear tester at Tent Explorer.